分类 技术 下的文章

Twitter 允许用户将博客帖子和文章分享给全世界。使用 Python 和 Tweepy 库使得创建一个 Twitter 机器人来接管你的所有的推特变得非常简单。这篇文章告诉你如何去构建这样一个机器人。希望你能将这些概念也同样应用到其他的在线服务的项目中去。

开始

tweepy 库可以让创建一个 Twitter 机器人的过程更加容易上手。它包含了 Twitter 的 API 调用和一个很简单的接口。

下面这些命令使用 pipenv 在一个虚拟环境中安装 tweepy。如果你没有安装 pipenv,可以看一看我们之前的文章如何在 Fedora 上安装 Pipenv。

$ mkdir twitterbot
$ cd twitterbot
$ pipenv --three
$ pipenv install tweepy
$ pipenv shell

Tweepy —— 开始

要使用 Twitter API ,机器人需要通过 Twitter 的授权。为了解决这个问题, tweepy 使用了 OAuth 授权标准。你可以通过在 https://apps.twitter.com/ 创建一个新的应用来获取到凭证。

创建一个新的 Twitter 应用

当你填完了表格并点击了“ 创建你自己的 Twitter 应用 Create your Twitter application ”的按钮后,你可以获取到该应用的凭证。 Tweepy 需要 用户密钥 API Key 和 用户密码 API Secret ,这些都可以在 “ 密钥和访问令牌 Keys and Access Tokens ” 中找到。

向下滚动页面,使用“ 创建我的访问令牌 Create my access token ”按钮生成一个“ 访问令牌 Access Token ” 和一个“ 访问令牌密钥 Access Token Secret ”。

使用 Tweppy —— 输出你的时间线

现在你已经有了所需的凭证了,打开一个文件,并写下如下的 Python 代码。

import tweepy
auth = tweepy.OAuthHandler("your_consumer_key", "your_consumer_key_secret")
auth.set_access_token("your_access_token", "your_access_token_secret")
api = tweepy.API(auth)
public_tweets = api.home_timeline()
for tweet in public_tweets:
    print(tweet.text)

在确保你正在使用你的 Pipenv 虚拟环境后,执行你的程序。

$ python tweet.py

上述程序调用了 home_timeline 方法来获取到你时间线中的 20 条最近的推特。现在这个机器人能够使用 tweepy 来获取到 Twitter 的数据,接下来尝试修改代码来发送 tweet。

使用 Tweepy —— 发送一条推特

要发送一条推特 ,有一个容易上手的 API 方法 update_status 。它的用法很简单:

api.update_status("The awesome text you would like to tweet")

Tweepy 拓展为制作 Twitter 机器人准备了非常多不同有用的方法。要获取 API 的详细信息,请查看文档。

一个杂志机器人

接下来我们来创建一个搜索 Fedora Magazine 的推特并转推这些的机器人。

为了避免多次转推相同的内容,这个机器人存放了最近一条转推的推特的 ID 。 两个助手函数 store_last_id 和 get_last_id 将会帮助存储和保存这个 ID。

然后,机器人使用 tweepy 搜索 API 来查找 Fedora Magazine 的最近的推特并存储这个 ID。

import tweepy

def store_last_id(tweet_id):
    """ Stores a tweet id in text file """
    with open('lastid', 'w') as fp:
        fp.write(str(tweet_id))


def get_last_id():
    """ Retrieve the list of tweets that were
    already retweeted """

    with open('lastid') as fp:
        return fp.read()

if __name__ == '__main__':

    auth = tweepy.OAuthHandler("your_consumer_key", "your_consumer_key_secret")
    auth.set_access_token("your_access_token", "your_access_token_secret")

    api = tweepy.API(auth)

    try:
        last_id = get_last_id()
    except FileNotFoundError:
        print("No retweet yet")
        last_id = None

    for tweet in tweepy.Cursor(api.search, q="fedoramagazine.org", since_id=last_id).items():
        if tweet.user.name  == 'Fedora Project':
            store_last_id(tweet.id)
            #tweet.retweet()
            print(f'"{tweet.text}" was retweeted')

为了只转推 Fedora Magazine 的推特 ,机器人搜索内容包含 fedoramagazine.org 和由 「Fedora Project」 Twitter 账户发布的推特。

结论

在这篇文章中你看到了如何使用 tweepy 的 Python 库来创建一个自动阅读、发送和搜索推特的 Twitter 应用。现在,你能使用你自己的创造力来创造一个你自己的 Twitter 机器人。

这篇文章的演示源码可以在 Github 找到。


via: https://fedoramagazine.org/learn-build-twitter-bot-python/

作者:Clément Verna 选题:lujun9972 译者:Bestony 校对:校对者ID

本文由 LCTT 原创编译,Linux中国 荣誉推出

Fedora 28 Workstation 添加了一个功能允许你使用键盘快速搜索、选择和输入 emoji。emoji,这种可爱的表意文字是 Unicode 的一部分,在消息传递中使用得相当广泛,特别是在移动设备上。你可能听过这样的成语:“一图胜千言”。这正是 emoji 所提供的:简单的图像供你在交流中使用。Unicode 的每个版本都增加了更多 emoji,在最近的 Unicode 版本中添加了 200 多个 emoji。本文向你展示如何使它们在你的 Fedora 系统中易于使用。

很高兴看到 emoji 的数量在增长。但与此同时,它带来了如何在计算设备中输入它们的挑战。许多人已经将这些符号用于移动设备或社交网站中的输入。

[编者注:本文是对此主题以前发表过的文章的更新]。

在 Fedora 28 Workstation 上启用 emoji 输入

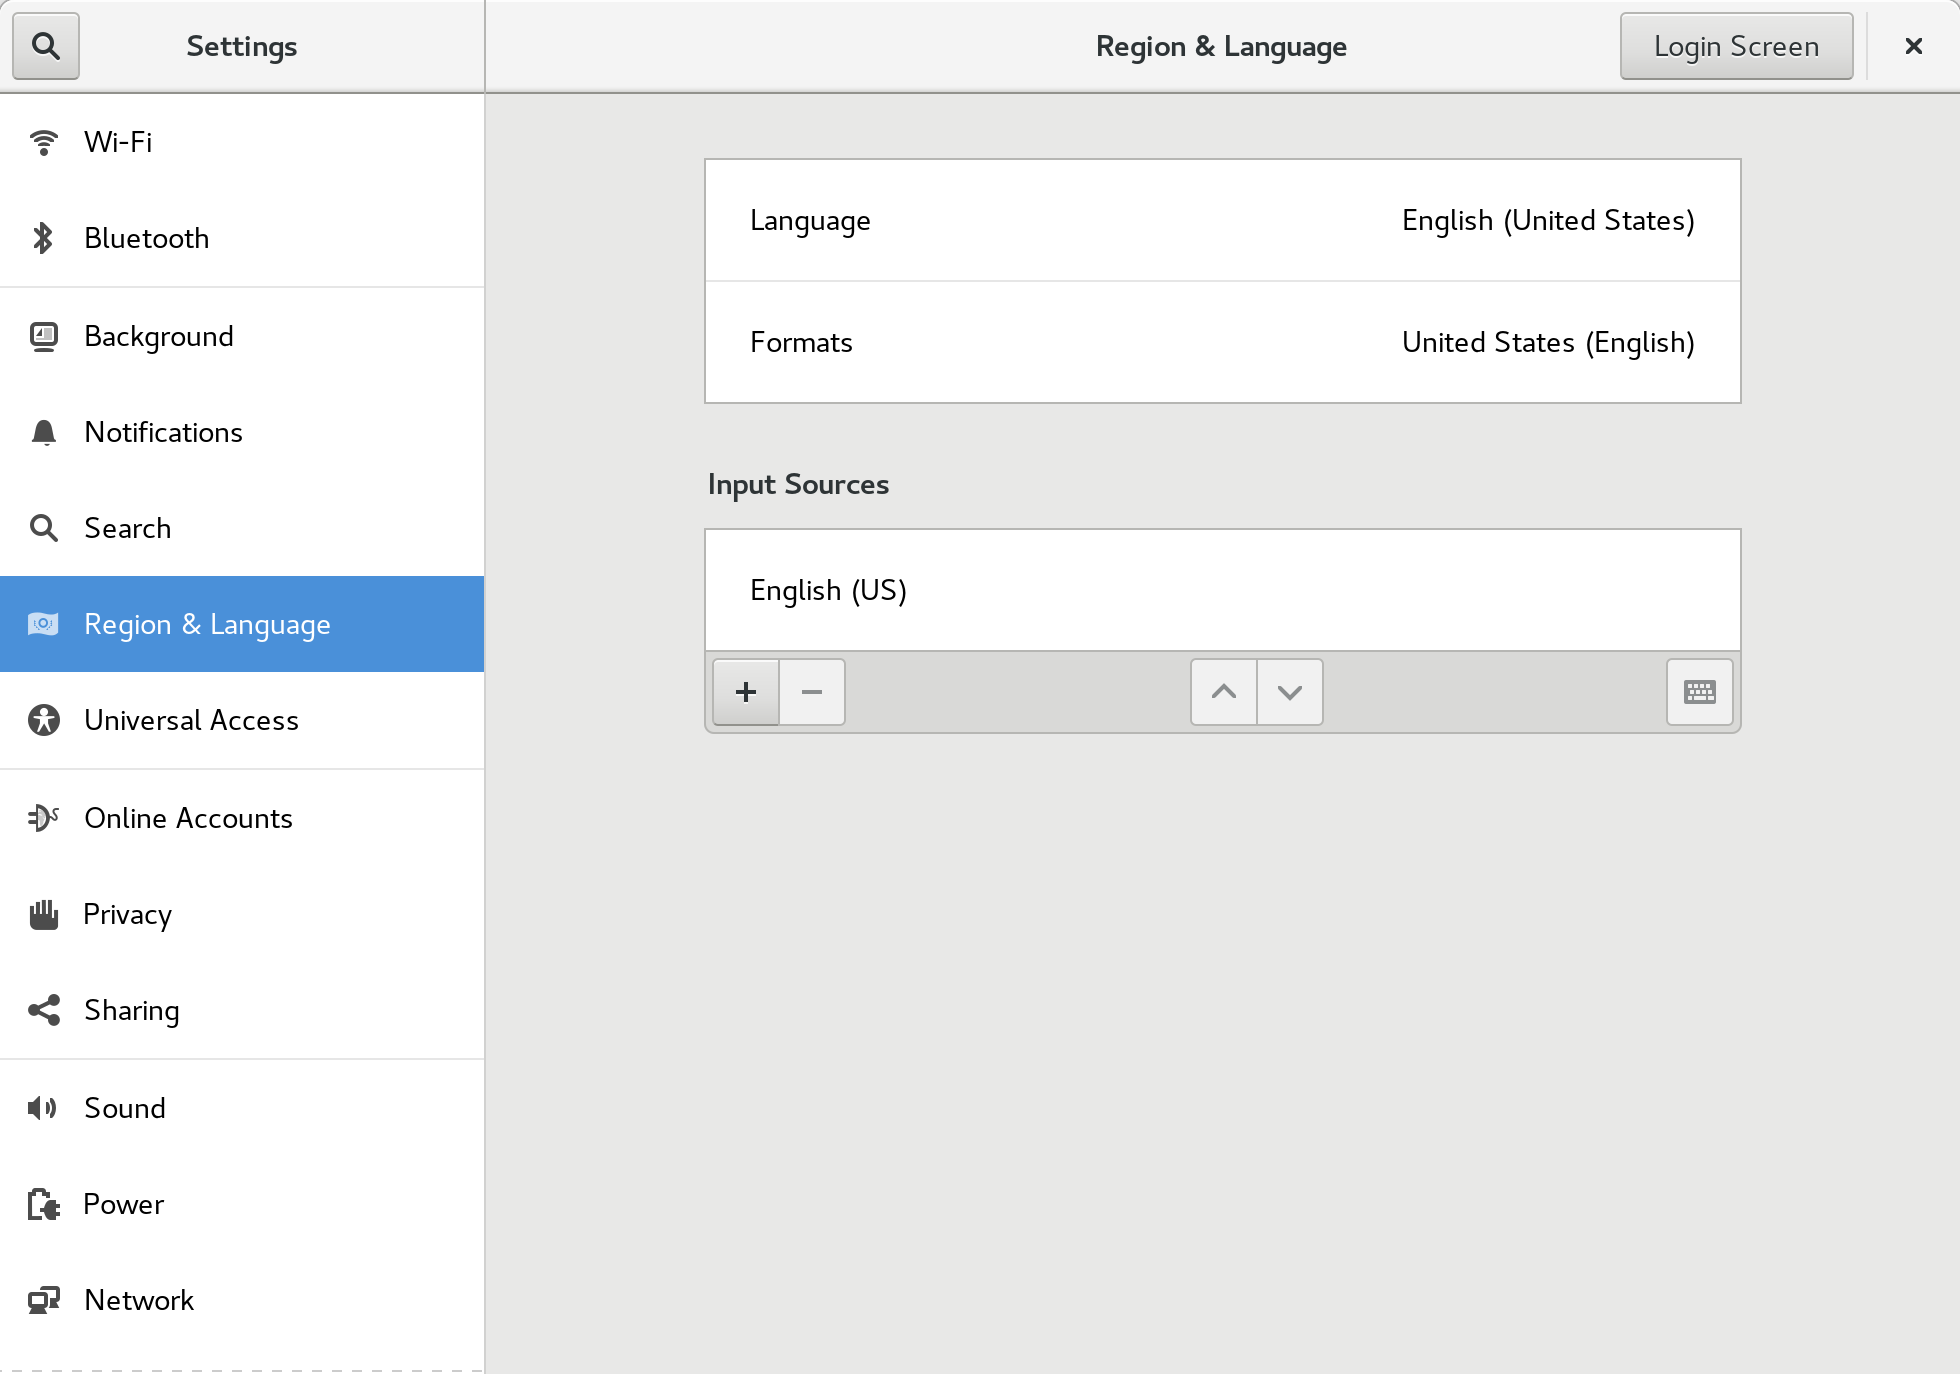
新的 emoji 输入法默认出现在 Fedora 28 Workstation 中。要使用它,必须使用“区域和语言设置”对话框启用它。从 Fedora Workstation 设置打开“区域和语言”对话框,或在“概要”中搜索它。

Region & Language settings tool

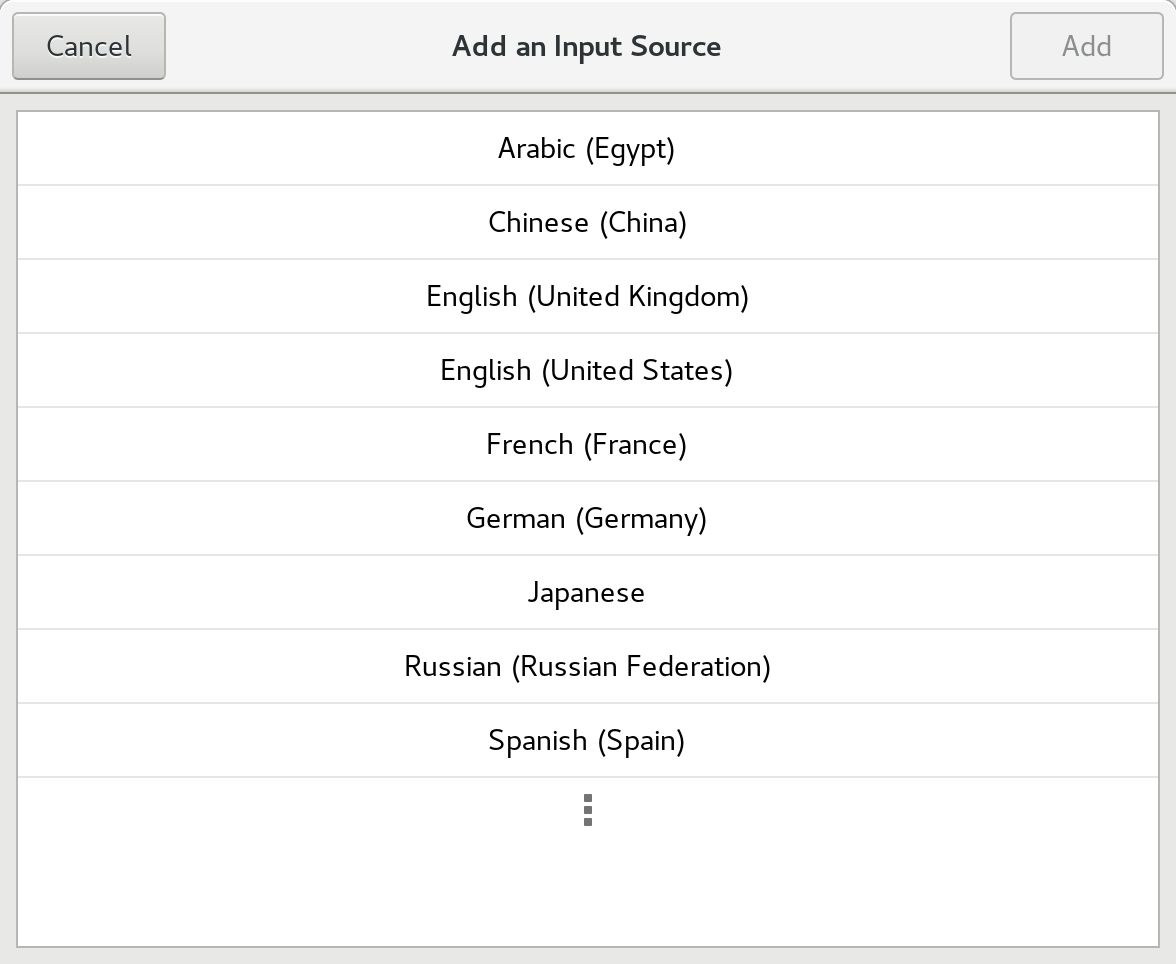
选择 + 控件添加输入源。出现以下对话框:

Adding an input source

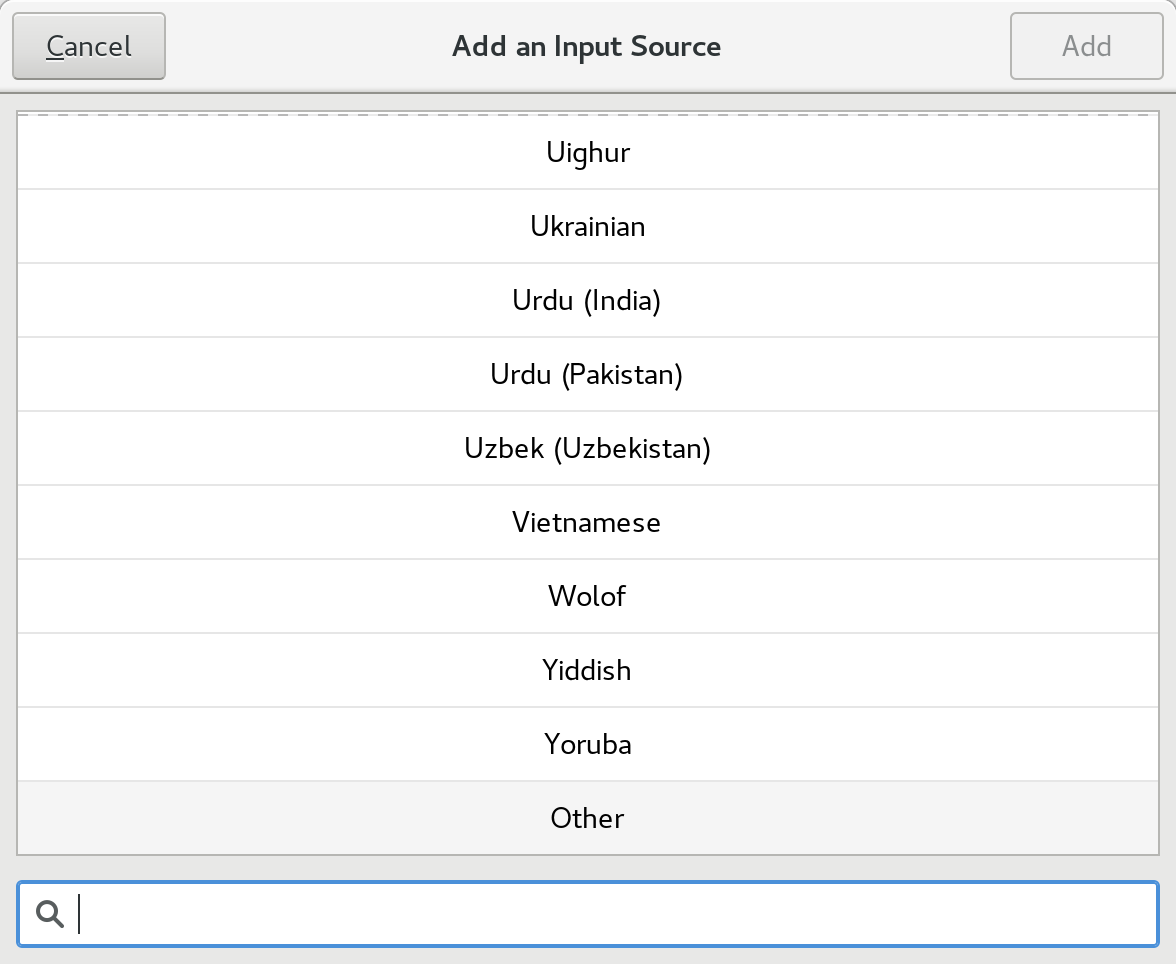
选择最后选项(三个点)来完全展开选择。然后,在列表底部找到“Other”并选择它:

Selecting other input sources

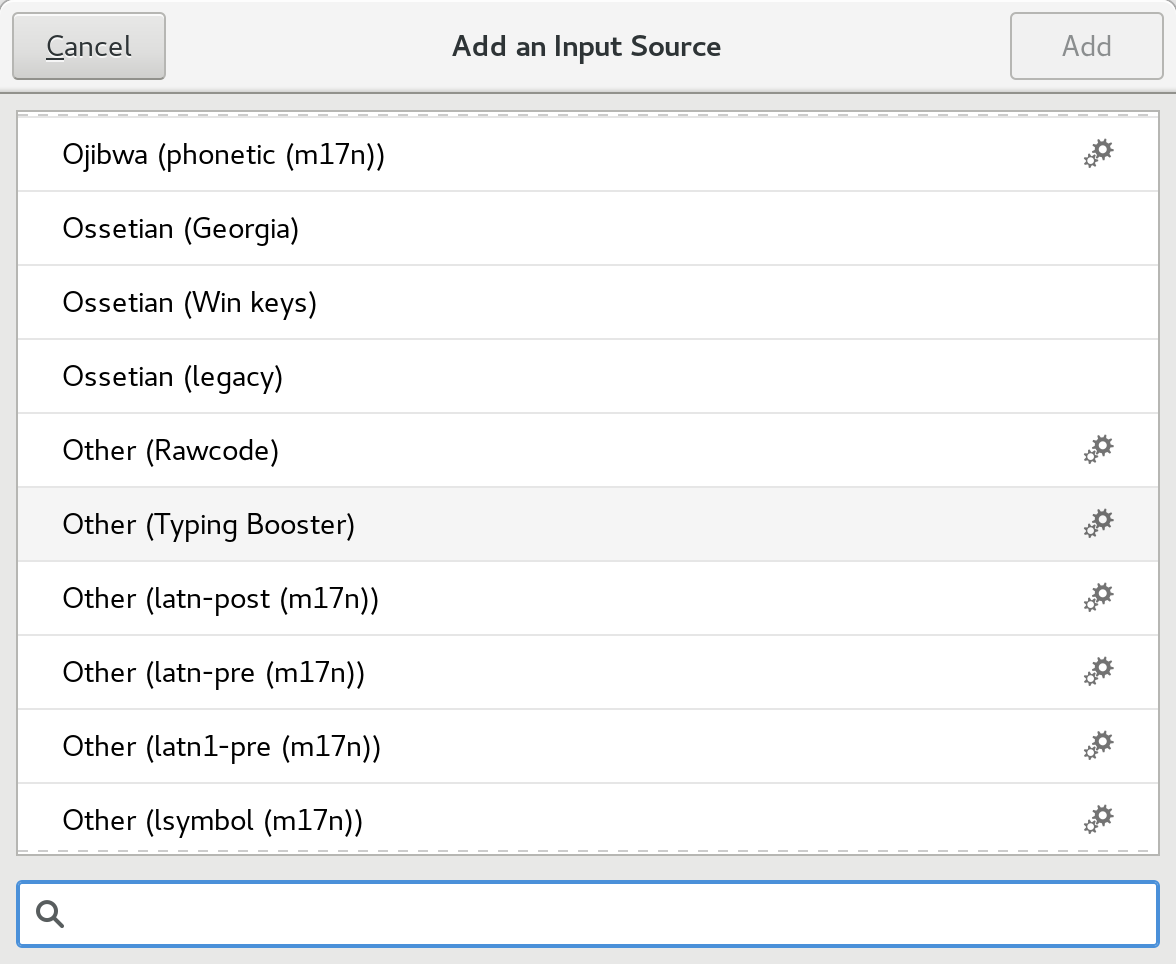
在下面的对话框中,找到 “Typing Booster” 选项并选择它:

这个高级输入法由 iBus 在背后支持。该高级输入法可通过列表右侧的齿轮图标在列表中识别。

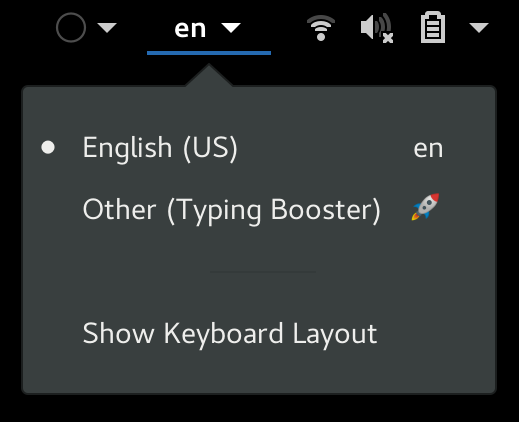
输入法下拉菜单自动出现在 GNOME Shell 顶部栏中。确认你的默认输入法 —— 在此示例中为英语(美国) - 被选为当前输入法,你就可以输入了。

Input method dropdown in Shell top bar

使用新的表情符号输入法

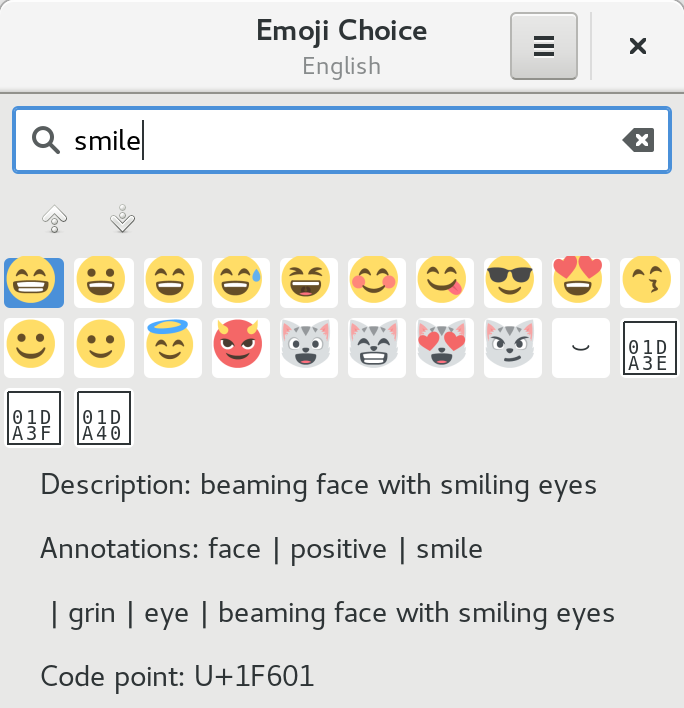
现在 emoji 输入法启用了,按键盘快捷键 Ctrl+Shift+E 搜索 emoji。将出现一个弹出对话框,你可以在其中输入搜索词,例如 “smile” 来查找匹配的符号。

Searching for smile emoji

使用箭头键翻页列表。然后按回车进行选择,字形将替换输入内容。


via: https://fedoramagazine.org/boost-typing-emoji-fedora-28-workstation/

作者:Paul W. Frields 选题:lujun9972 译者:geekpi 校对:wxy

本文由 LCTT 原创编译,Linux中国 荣誉推出

当你使用默认密码创建用户时,你必须强制用户在下一次登录时更改密码。

当你在一个组织中工作时,此选项是强制性的。因为老员工可能知道默认密码,他们可能会也可能不会尝试不当行为。

这是安全投诉之一,所以,确保你必须以正确的方式处理此事而无任何失误。即使是你的团队成员也要一样做。

大多数用户都很懒,除非你强迫他们更改密码,否则他们不会这样做。所以要做这个实践。

出于安全原因,你需要经常更改密码,或者至少每个月更换一次。

确保你使用的是难以猜测的密码(大小写字母,数字和特殊字符的组合)。它至少应该为 10-15 个字符。

我们运行了一个 shell 脚本来在 Linux 服务器中创建一个用户账户,它会自动为用户附加一个密码,密码是实际用户名和少量数字的组合。

我们可以通过使用以下两种方法来实现这一点:

  • passwd 命令
  • chage 命令

建议阅读:

方法 1:使用 passwd 命令

passwd 的意思是“密码”。它用于更新用户的身份验证令牌。passwd 命令/实用程序用于设置、修改或更改用户的密码。

普通的用户只能更改自己的账户,但超级用户可以更改任何账户的密码。

此外,我们还可以使用其他选项,允许用户执行其他活动,例如删除用户密码、锁定或解锁用户账户、设置用户账户的密码过期时间等。

在 Linux 中这可以通过调用 Linux-PAM 和 Libuser API 执行。

在 Linux 中创建用户时,用户详细信息将存储在 /etc/passwd 文件中。passwd 文件将每个用户的详细信息保存为带有七个字段的单行。

此外,在 Linux 系统中创建新用户时,将更新以下四个文件。

  • /etc/passwd: 用户详细信息将在此文件中更新。
  • /etc/shadow: 用户密码信息将在此文件中更新。
  • /etc/group: 新用户的组详细信息将在此文件中更新。
  • /etc/gshadow: 新用户的组密码信息将在此文件中更新。

如何使用 passwd 命令执行此操作

我们可以使用 passwd 命令并添加 -e 选项来执行此操作。

为了测试这一点,让我们创建一个新用户账户,看看它是如何工作的。

# useradd -c "2g Admin - Magesh M" magesh && passwd magesh
Changing password for user magesh.
New password:
Retype new password:
passwd: all authentication tokens updated successfully.

使用户账户的密码失效,那么在下次登录尝试期间,用户将被迫更改密码。

# passwd -e magesh
Expiring password for user magesh.
passwd: Success

当我第一次尝试使用此用户登录系统时,它要求我设置一个新密码。

login as: magesh
[email protected]'s password:
You are required to change your password immediately (root enforced)
WARNING: Your password has expired.
You must change your password now and login again!
Changing password for user magesh.
Changing password for magesh.
(current) UNIX password:
New password:
Retype new password:
passwd: all authentication tokens updated successfully.
Connection to localhost closed.

方法 2:使用 chage 命令

chage 意即“改变时间”。它会更改用户密码过期信息。

chage 命令会改变上次密码更改日期之后需要修改密码的天数。系统使用此信息来确定用户何时必须更改他/她的密码。

它允许用户执行其他活动,例如设置帐户到期日期,到期后设置密码失效,显示帐户过期信息,设置密码更改前的最小和最大天数以及设置到期警告天数。

如何使用 chage 命令执行此操作

让我们在 chage 命令的帮助下,通过添加 -d 选项执行此操作。

为了测试这一点,让我们创建一个新用户帐户,看看它是如何工作的。我们将创建一个名为 thanu 的用户帐户。

# useradd -c "2g Editor - Thanisha M" thanu && passwd thanu
Changing password for user thanu.
New password:
Retype new password:
passwd: all authentication tokens updated successfully.

要实现这一点,请使用 chage 命令将用户的上次密码更改日期设置为 0。

# chage -d 0 thanu

# chage -l thanu
Last password change : Jul 18, 2018
Password expires : never
Password inactive : never
Account expires : never
Minimum number of days between password change : 0
Maximum number of days between password change : 99999
Number of days of warning before password expires : 7

当我第一次尝试使用此用户登录系统时,它要求我设置一个新密码。

login as: thanu
[email protected]'s password:
You are required to change your password immediately (root enforced)
WARNING: Your password has expired.
You must change your password now and login again!
Changing password for user thanu.
Changing password for thanu.
(current) UNIX password:
New password:
Retype new password:
passwd: all authentication tokens updated successfully.
Connection to localhost closed.

via: https://www.2daygeek.com/how-to-force-user-to-change-password-on-next-login-in-linux/

作者:Prakash Subramanian 选题:lujun9972 译者:MjSeven 校对:wxy

本文由 LCTT 原创编译,Linux中国 荣誉推出

众所周知,让我们的 Linux 系统保持最新状态会用到多种包管理器。比如说,在 Ubuntu 中,你无法使用 sudo apt update 和 sudo apt upgrade 命令升级所有软件。此命令仅升级使用 APT 包管理器安装的应用程序。你有可能使用 cargo、pip、npm、snap 、flatpak 或 Linuxbrew 包管理器安装了其他软件。你需要使用相应的包管理器才能使它们全部更新。

再也不用这样了!跟 topgrade 打个招呼,这是一个可以一次性升级系统中所有软件的工具。

你无需运行每个包管理器来更新包。这个 topgrade 工具通过检测已安装的软件包、工具、插件并运行相应的软件包管理器来更新 Linux 中的所有软件,用一条命令解决了这个问题。它是自由而开源的,使用 rust 语言编写。它支持 GNU/Linux 和 Mac OS X.

在 Linux 中使用一个命令升级所有软件

topgrade 存在于 AUR 中。因此,你可以在任何基于 Arch 的系统中使用 Yay 助手程序安装它。

$ yay -S topgrade

在其他 Linux 发行版上,你可以使用 cargo 包管理器安装 topgrade。要安装 cargo 包管理器,请参阅以下链接:

然后,运行以下命令来安装 topgrade。

$ cargo install topgrade

安装完成后,运行 topgrade 以升级 Linux 系统中的所有软件。

$ topgrade

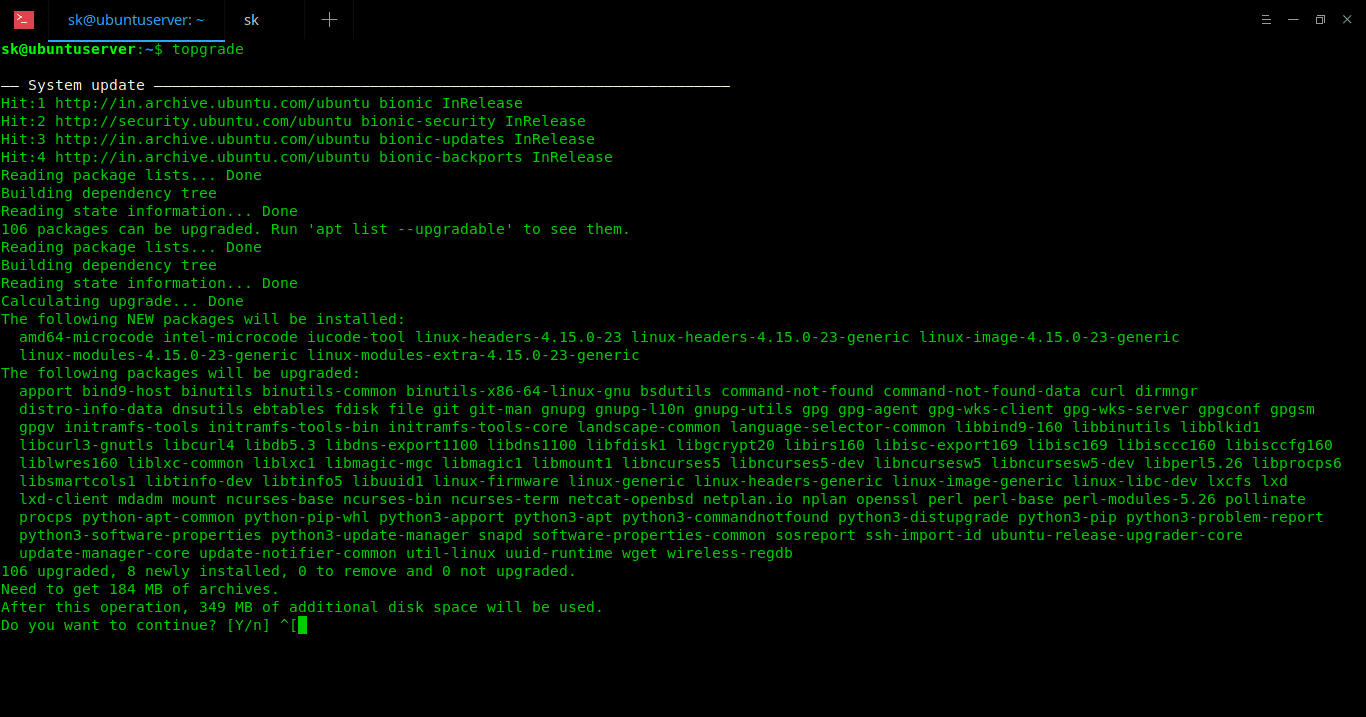
一旦调用了 topgrade,它将逐个执行以下任务。如有必要,系统会要求输入 root/sudo 用户密码。

1、 运行系统的包管理器:

  • Arch:运行 yay 或者回退到 pacman
  • CentOS/RHEL:运行 yum upgrade
  • Fedora :运行 dnf upgrade
  • Debian/Ubuntu:运行 apt update 和 apt dist-upgrade
  • Linux/macOS:运行 brew update 和 brew upgrade

2、 检查 Git 是否跟踪了以下路径。如果有,则拉取它们:

  • ~/.emacs.d (无论你使用 Spacemacs 还是自定义配置都应该可用)
  • ~/.zshrc
  • ~/.oh-my-zsh
  • ~/.tmux
  • ~/.config/fish/config.fish
  • 自定义路径

3、 Unix:运行 zplug 更新

4、 Unix:使用 TPM 升级 tmux 插件

5、 运行 cargo install-update

6、 升级 Emacs 包

7、 升级 Vim 包。对以下插件框架均可用:

8、 升级 npm 全局安装的包

9、 升级 Atom 包

10、 升级 Flatpak 包

11、 升级 snap 包

12、 Linux:运行 fwupdmgr 显示固件升级。 (仅查看​​。实际不会执行升级)

13、 运行自定义命令。

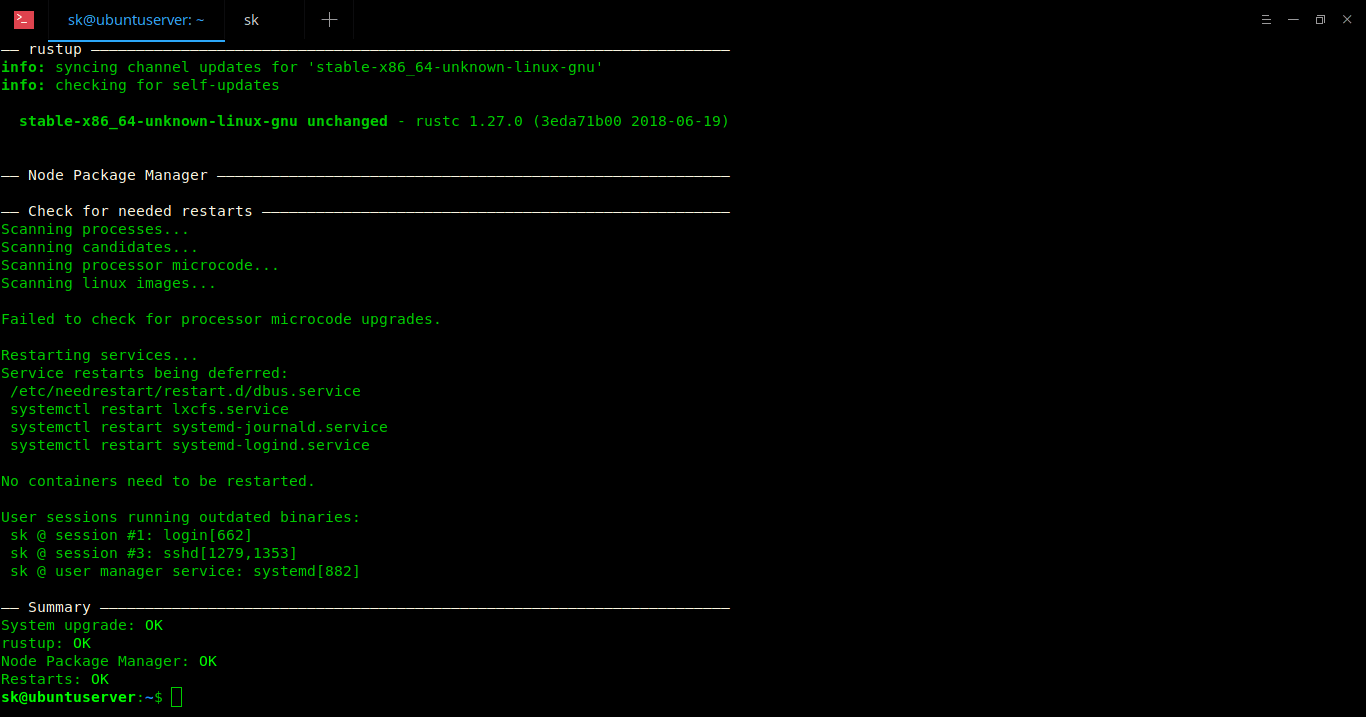
最后,topgrade 将运行 needrestart 以重新启动所有服务。在 Mac OS X 中,它会升级 App Store 程序。

我的 Ubuntu 18.04 LTS 测试环境的示例输出:

好处是如果一个任务失败,它将自动运行下一个任务并完成所有其他后续任务。最后,它将显示摘要,其中包含运行的任务数量,成功的数量和失败的数量等详细信息。

建议阅读:

就个人而言,我喜欢创建一个像 topgrade 程序的想法,并使用一个命令升级使用各种包管理器安装的所有软件。我希望你也觉得它有用。还有更多的好东西。敬请关注!

干杯!


via: https://www.ostechnix.com/how-to-upgrade-everything-using-a-single-command-in-linux/

作者:SK 选题:lujun9972 译者:geekpi 校对:wxy

本文由 LCTT 原创编译,Linux中国 荣誉推出

大多数教育机构仍在使用 Microsoft 字体, 我不清楚其他国家是什么情况。但在泰米尔纳德邦(印度的一个州), Times New Roman 和 Arial 字体主要被用于大学和学校的几乎所有文档工作、项目和作业。不仅是教育机构,而且一些小型组织、办公室和商店仍在使用 MS Windows 字体。以防万一,如果你需要在 Ubuntu 桌面版上使用 Microsoft 字体,请按照以下步骤安装。

免责声明: Microsoft 已免费发布其核心字体。 但请注意 Microsoft 字体是禁止使用在其他操作系统中。在任何 Linux 操作系统中安装 MS 字体之前请仔细阅读 EULA 。我们不负责这种任何种类的盗版行为。

(LCTT 译注:本文只做技术探讨,并不代表作者、译者和本站鼓励任何行为。)

在 Ubuntu 18.04 LTS 桌面版上安装 MS 字体

如下所示安装 MS TrueType 字体:

$ sudo apt update
$ sudo apt install ttf-mscorefonts-installer

然后将会出现 Microsoft 的最终用户协议向导,点击 OK 以继续。
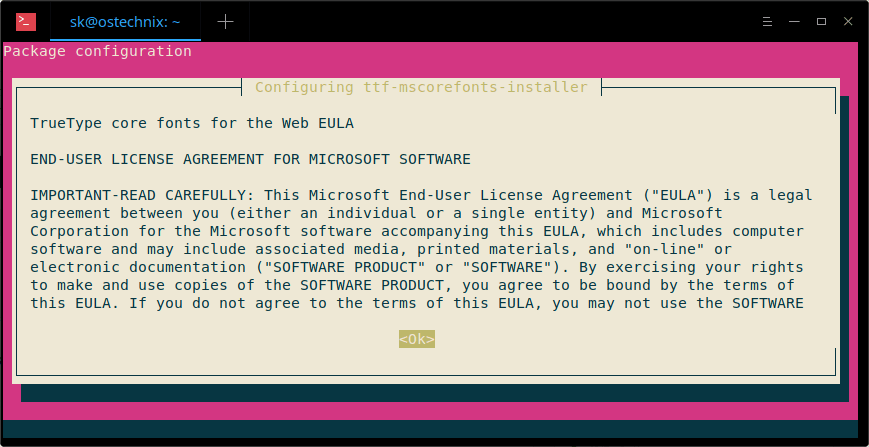
点击 Yes 已接受 Microsoft 的协议:
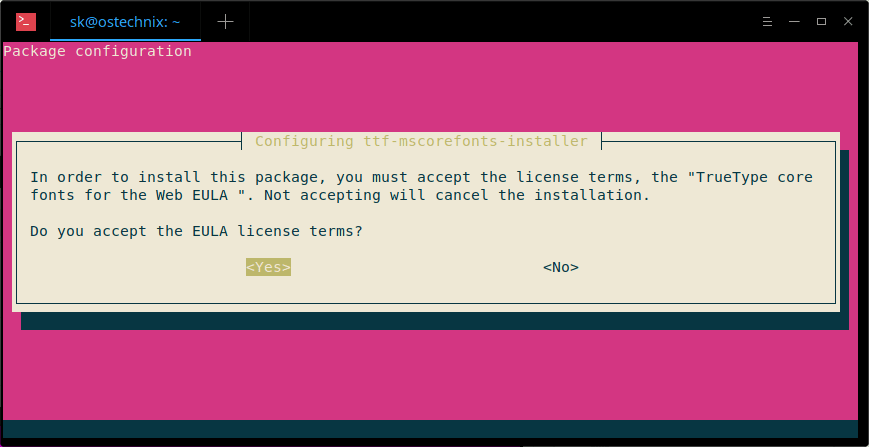
安装字体之后, 我们需要使用命令行来更新字体缓存:

$ sudo fc-cache -f -v

示例输出:

/usr/share/fonts: caching, new cache contents: 0 fonts, 6 dirs
/usr/share/fonts/X11: caching, new cache contents: 0 fonts, 4 dirs
/usr/share/fonts/X11/Type1: caching, new cache contents: 8 fonts, 0 dirs
/usr/share/fonts/X11/encodings: caching, new cache contents: 0 fonts, 1 dirs
/usr/share/fonts/X11/encodings/large: caching, new cache contents: 0 fonts, 0 dirs
/usr/share/fonts/X11/misc: caching, new cache contents: 89 fonts, 0 dirs
/usr/share/fonts/X11/util: caching, new cache contents: 0 fonts, 0 dirs
/usr/share/fonts/cMap: caching, new cache contents: 0 fonts, 0 dirs
/usr/share/fonts/cmap: caching, new cache contents: 0 fonts, 5 dirs
/usr/share/fonts/cmap/adobe-cns1: caching, new cache contents: 0 fonts, 0 dirs
/usr/share/fonts/cmap/adobe-gb1: caching, new cache contents: 0 fonts, 0 dirs
/usr/share/fonts/cmap/adobe-japan1: caching, new cache contents: 0 fonts, 0 dirs
/usr/share/fonts/cmap/adobe-japan2: caching, new cache contents: 0 fonts, 0 dirs
/usr/share/fonts/cmap/adobe-korea1: caching, new cache contents: 0 fonts, 0 dirs
/usr/share/fonts/opentype: caching, new cache contents: 0 fonts, 2 dirs
/usr/share/fonts/opentype/malayalam: caching, new cache contents: 3 fonts, 0 dirs
/usr/share/fonts/opentype/noto: caching, new cache contents: 24 fonts, 0 dirs
/usr/share/fonts/truetype: caching, new cache contents: 0 fonts, 46 dirs
/usr/share/fonts/truetype/Gargi: caching, new cache contents: 1 fonts, 0 dirs
/usr/share/fonts/truetype/Gubbi: caching, new cache contents: 1 fonts, 0 dirs
/usr/share/fonts/truetype/Nakula: caching, new cache contents: 1 fonts, 0 dirs
/usr/share/fonts/truetype/Navilu: caching, new cache contents: 1 fonts, 0 dirs
/usr/share/fonts/truetype/Sahadeva: caching, new cache contents: 1 fonts, 0 dirs
/usr/share/fonts/truetype/Sarai: caching, new cache contents: 1 fonts, 0 dirs
/usr/share/fonts/truetype/abyssinica: caching, new cache contents: 1 fonts, 0 dirs
/usr/share/fonts/truetype/dejavu: caching, new cache contents: 6 fonts, 0 dirs
/usr/share/fonts/truetype/droid: caching, new cache contents: 1 fonts, 0 dirs
/usr/share/fonts/truetype/fonts-beng-extra: caching, new cache contents: 6 fonts, 0 dirs
/usr/share/fonts/truetype/fonts-deva-extra: caching, new cache contents: 3 fonts, 0 dirs
/usr/share/fonts/truetype/fonts-gujr-extra: caching, new cache contents: 5 fonts, 0 dirs
/usr/share/fonts/truetype/fonts-guru-extra: caching, new cache contents: 1 fonts, 0 dirs
/usr/share/fonts/truetype/fonts-kalapi: caching, new cache contents: 1 fonts, 0 dirs
/usr/share/fonts/truetype/fonts-orya-extra: caching, new cache contents: 1 fonts, 0 dirs
/usr/share/fonts/truetype/fonts-telu-extra: caching, new cache contents: 2 fonts, 0 dirs
/usr/share/fonts/truetype/freefont: caching, new cache contents: 12 fonts, 0 dirs
/usr/share/fonts/truetype/kacst: caching, new cache contents: 15 fonts, 0 dirs
/usr/share/fonts/truetype/kacst-one: caching, new cache contents: 2 fonts, 0 dirs
/usr/share/fonts/truetype/lao: caching, new cache contents: 1 fonts, 0 dirs
/usr/share/fonts/truetype/liberation: caching, new cache contents: 16 fonts, 0 dirs
/usr/share/fonts/truetype/liberation2: caching, new cache contents: 12 fonts, 0 dirs
/usr/share/fonts/truetype/lohit-assamese: caching, new cache contents: 1 fonts, 0 dirs
/usr/share/fonts/truetype/lohit-bengali: caching, new cache contents: 1 fonts, 0 dirs
/usr/share/fonts/truetype/lohit-devanagari: caching, new cache contents: 1 fonts, 0 dirs
/usr/share/fonts/truetype/lohit-gujarati: caching, new cache contents: 1 fonts, 0 dirs
/usr/share/fonts/truetype/lohit-kannada: caching, new cache contents: 1 fonts, 0 dirs
/usr/share/fonts/truetype/lohit-malayalam: caching, new cache contents: 1 fonts, 0 dirs
/usr/share/fonts/truetype/lohit-oriya: caching, new cache contents: 1 fonts, 0 dirs
/usr/share/fonts/truetype/lohit-punjabi: caching, new cache contents: 1 fonts, 0 dirs
/usr/share/fonts/truetype/lohit-tamil: caching, new cache contents: 1 fonts, 0 dirs
/usr/share/fonts/truetype/lohit-tamil-classical: caching, new cache contents: 1 fonts, 0 dirs
/usr/share/fonts/truetype/lohit-telugu: caching, new cache contents: 1 fonts, 0 dirs
/usr/share/fonts/truetype/malayalam: caching, new cache contents: 11 fonts, 0 dirs
/usr/share/fonts/truetype/msttcorefonts: caching, new cache contents: 60 fonts, 0 dirs
/usr/share/fonts/truetype/noto: caching, new cache contents: 2 fonts, 0 dirs
/usr/share/fonts/truetype/openoffice: caching, new cache contents: 1 fonts, 0 dirs
/usr/share/fonts/truetype/padauk: caching, new cache contents: 4 fonts, 0 dirs
/usr/share/fonts/truetype/pagul: caching, new cache contents: 1 fonts, 0 dirs
/usr/share/fonts/truetype/samyak: caching, new cache contents: 1 fonts, 0 dirs
/usr/share/fonts/truetype/samyak-fonts: caching, new cache contents: 3 fonts, 0 dirs
/usr/share/fonts/truetype/sinhala: caching, new cache contents: 1 fonts, 0 dirs
/usr/share/fonts/truetype/tibetan-machine: caching, new cache contents: 1 fonts, 0 dirs
/usr/share/fonts/truetype/tlwg: caching, new cache contents: 58 fonts, 0 dirs
/usr/share/fonts/truetype/ttf-khmeros-core: caching, new cache contents: 2 fonts, 0 dirs
/usr/share/fonts/truetype/ubuntu: caching, new cache contents: 13 fonts, 0 dirs
/usr/share/fonts/type1: caching, new cache contents: 0 fonts, 1 dirs
/usr/share/fonts/type1/gsfonts: caching, new cache contents: 35 fonts, 0 dirs
/usr/local/share/fonts: caching, new cache contents: 0 fonts, 0 dirs
/home/sk/.local/share/fonts: skipping, no such directory
/home/sk/.fonts: skipping, no such directory
/var/cache/fontconfig: cleaning cache directory
/home/sk/.cache/fontconfig: cleaning cache directory
/home/sk/.fontconfig: not cleaning non-existent cache directory
fc-cache: succeeded

在 Linux 和 Windows 双启动的机器上安装 MS 字体

如果你有 Linux 和 Windows 的双启动系统,你可以轻松地从 Windows C 驱动器上安装 MS 字体。 你所要做的就是挂载 Windows 分区(C:/windows)。

我假设你已经在 Linux 中将 C:\Windows 分区挂载在了 /Windowsdrive 目录下。

现在,将字体位置链接到你的 Linux 系统的字体文件夹,如下所示:

ln -s /Windowsdrive/Windows/Fonts /usr/share/fonts/WindowsFonts

链接字体文件之后,使用命令行重新生成 fontconfig 缓存:

fc-cache

或者,将所有的 Windows 字体复制到 /usr/share/fonts 目录下并使用一下命令安装字体:

mkdir /usr/share/fonts/WindowsFonts
cp /Windowsdrive/Windows/Fonts/* /usr/share/fonts/WindowsFonts
chmod 755 /usr/share/fonts/WindowsFonts/*

最后,使用命令行重新生成 fontconfig 缓存:

fc-cache

测试 Windows 字体

安装 MS 字体后打开 LibreOffice 或 GIMP。 现在,你将会看到 Microsoft coretype 字体。
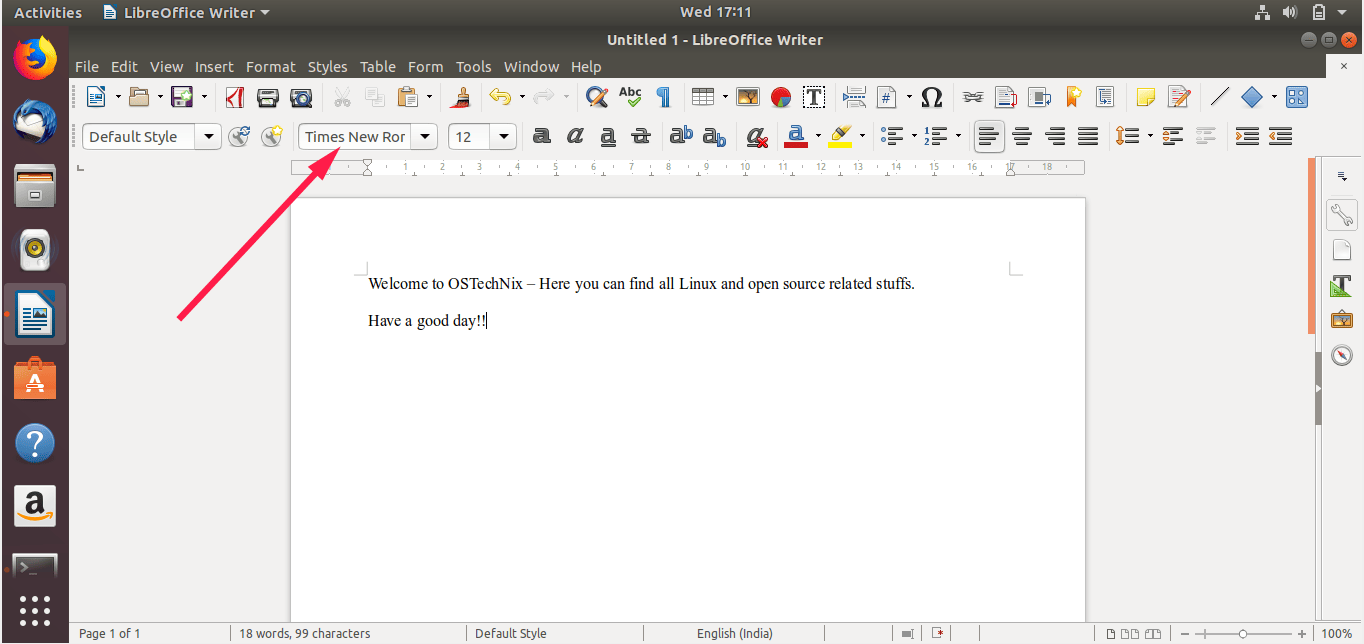
就是这样, 希望这本指南有用。我再次警告你,在其他操作系统中使用 MS 字体是被禁止的。在安装 MS 字体之前请先阅读 Microsoft 许可协议。

如果你觉得我们的指南有用,请在你的社区、专业网络上分享并支持我们。还有更多好东西在等着我们。持续访问!

庆祝吧!!


via: https://www.ostechnix.com/install-microsoft-windows-fonts-ubuntu-16-04/

作者:SK 选题:lujun9972 译者:Auk7F7 校对:wxy

本文由 LCTT 原创编译,Linux中国 荣誉推出

用这里列出的方便的工具来跟踪你的磁盘利用率。

跟踪磁盘利用率信息是系统管理员(和其他人)的日常待办事项列表之一。Linux 有一些内置的使用程序来帮助提供这些信息。

df

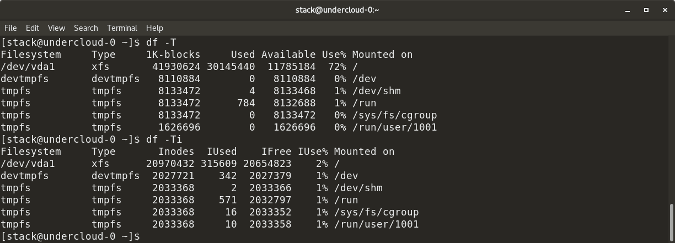
df 命令意思是 “disk-free”,显示 Linux 系统上可用和已使用的磁盘空间。

df -h 以人类可读的格式显示磁盘空间。

df -a 显示文件系统的完整磁盘使用情况,即使 Available(可用) 字段为 0。

df -T 显示磁盘使用情况以及每个块的文件系统类型(例如,xfs、ext2、ext3、btrfs 等)。

df -i 显示已使用和未使用的 inode。

du

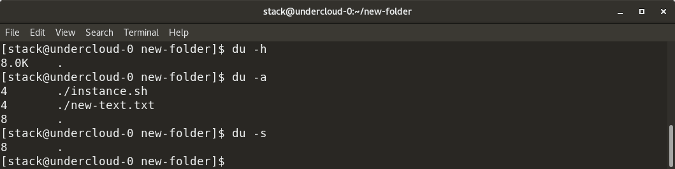
du 显示文件,目录等的磁盘使用情况,默认情况下以 kb 为单位显示。

du -h 以人类可读的方式显示所有目录和子目录的磁盘使用情况。

du -a 显示所有文件的磁盘使用情况。

du -s 提供特定文件或目录使用的总磁盘空间。

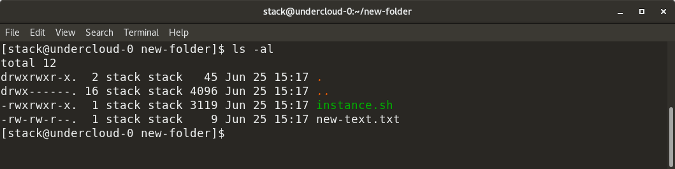
ls -al

ls -al 列出了特定目录的全部内容及大小。

stat

stat <文件/目录>显示文件/目录或文件系统的大小和其他统计信息。

fdisk -l

fdisk -l 显示磁盘大小以及磁盘分区信息。

这些是用于检查 Linux 文件空间的大多数内置实用程序。有许多类似的工具,如 Disks(GUI 工具),Ncdu 等,它们也显示磁盘空间的利用率。你有你最喜欢的工具而它不在这个列表上吗?请在评论中分享。


via: https://opensource.com/article/18/7/how-check-free-disk-space-linux

作者:Archit Modi 选题:lujun9972 译者:MjSeven 校对:wxy

本文由 LCTT 原创编译,Linux中国 荣誉推出