2015年3月

india-open-source-software-foss

印度政府做了一项重大政策改变,它宣布其政府的所有软件服务和应用都将强制采用开源软件。印度政府说,这是他们的数字印度计划的一部分,所有的电子政务项目都将采用自由和开源软件(FOSS)。

据一份来自印度电子和信息技术部(DeitY)的申明说:“印度政府应当努力在各个政府部门所实施的电子政务系统中采用自由和开源软件,(对开源软件的采用)要优先于闭源软件。”

印度政府说,这一举措将确保透明度、可靠性和效率。而在去年11月,印度电子和信息技术部部长说,“只要有可能”就优先采用开源软件,仅在开源软件不能满足功能需求时才选择闭源软件。

该申明补充道:

“政府部门应确保遵循这一要求,并通过在软件能力、战略控制、可伸缩性、软件生命周期成本和支持需求等方面对开源软件和闭源软件做比较而决定。”

美国、几个欧洲国家和英国等一些国家都把开源软件作为优先选择。此外, 印度的喀拉拉邦政府据闻已经使用开源软件很长一段时间了。已经上线的印度政府总门户网站 MyGov.in 完全是通过开源软件所开发的。

这件事被认为是开源运动的一大胜利,其根本原因在于开源技术能够极大地降低成本。印度是世界上增长最快的国家之一,其在信息时代前沿的发展上具有巨大潜力。随着这个政策的改变,开源软件可能成为印度技术革命的驱动力。

大多数情况下你可以从BIOS、产品目录或者干脆手动找出你的系统所持的最大内存。这里,我们介绍一种简单有用的技巧——使用dmidecode来找出系统支持的最大内存,这样你就无需打开机箱或者参照BIOS和产品目录了。

什么是 dmidecode?

就像你可能知道的一样, dmidecode是一个将计算机DMI(又名SMBIOS)表的内容转换为可读格式的工具。这个表包含了系统硬件组件的介绍以及其他一些如序列号和IOS版本等有用的信息。使用dmidecode你能够获取此项信息,而无需去探测真实的硬件。

找出你的系统所支持的最大内存

请确定你已经在系统中安装了dmidecode,我觉得你的操作系统应该已经自动安装过了,不过并不非常确定。

在基于Deb的系统中安装

sudo apt-get install dmidecode

在基于RPM的系统中安装

sudo yum install dmidecode

在SUSE/openSUSE中安装

sudo zypper in dmidecode

好了,我们已经安装了dmidecode,接下来让我们找出支持的最大内存。输入以下命令:

sudo dmidecode -t 16

输出样本

# dmidecode 2.12
SMBIOS 2.6 present.

Handle 0x0014, DMI type 16, 15 bytes
Physical Memory Array
    Location: System Board Or Motherboard
    Use: System Memory
    Error Correction Type: None
    Maximum Capacity: 16 GB
    Error Information Handle: Not Provided
    Number Of Devices: 2

就像你看到的,我的系统支持最大内存到16G,并且有两个内存插槽,简单吧?

接下来,让我们找出现在已经安装的内存的详细信息。

sudo dmidecode -t 17

输出样本

# dmidecode 2.12
SMBIOS 2.6 present.

Handle 0x0017, DMI type 17, 28 bytes
Memory Device
    Array Handle: 0x0014
    Error Information Handle: 0x0000
    Total Width: Unknown
    Data Width: Unknown
    Size: No Module Installed
    Form Factor: DIMM
    Set: None
    Locator: DIMM_B
    Bank Locator: BANK 2
    Type: Unknown
    Type Detail: None
    Speed: Unknown
    Manufacturer: Not Specified
    Serial Number: Not Specified
    Asset Tag: Not Specified
    Part Number: Not Specified
    Rank: Unknown

Handle 0x0015, DMI type 17, 28 bytes
Memory Device
    Array Handle: 0x0014
    Error Information Handle: 0x0000
    Total Width: 64 bits
    Data Width: 64 bits
    Size: 4096 MB
    Form Factor: SODIMM
    Set: None
    Locator: DIMM_A
    Bank Locator: BANK 0
    Type: DDR3
    Type Detail: Synchronous
    Speed: 1067 MHz
    Manufacturer: 014F
    Serial Number: 00092AF2
    Asset Tag: 54114000     
    Part Number: JM1066KSN-4G      
    Rank: Unknown

就像上边输出的一样,我在插槽1里边安装了一个内存条。内存大小为4G,类型为DDR3,速度为1067 MHz

同样的,我们可以通过下边命令得到完整的内存信息。

sudo dmidecode -t memory
sudo dmidecode -t memory | less
sudo dmidecode -t memory | more

输出样本

# dmidecode 2.12
SMBIOS 2.6 present.

Handle 0x0014, DMI type 16, 15 bytes
Physical Memory Array
    Location: System Board Or Motherboard
    Use: System Memory
    Error Correction Type: None
    Maximum Capacity: 16 GB
    Error Information Handle: Not Provided
    Number Of Devices: 2

Handle 0x0017, DMI type 17, 28 bytes
Memory Device
    Array Handle: 0x0014
    Error Information Handle: 0x0000
    Total Width: Unknown
    Data Width: Unknown
    Size: No Module Installed
    Form Factor: DIMM
    Set: None
    Locator: DIMM_B
    Bank Locator: BANK 2
    Type: Unknown
    Type Detail: None
    Speed: Unknown
    Manufacturer: Not Specified
    Serial Number: Not Specified
    Asset Tag: Not Specified
    Part Number: Not Specified
    Rank: Unknown

Handle 0x0015, DMI type 17, 28 bytes
Memory Device
    Array Handle: 0x0014
    Error Information Handle: 0x0000
    Total Width: 64 bits
    Data Width: 64 bits
    Size: 4096 MB
    Form Factor: SODIMM
    Set: None
    Locator: DIMM_A
    Bank Locator: BANK 0
    Type: DDR3
    Type Detail: Synchronous
    Speed: 1067 MHz
    Manufacturer: 014F
    Serial Number: 00092AF2
    Asset Tag: 54114000     
    Part Number: JM1066KSN-4G      
    Rank: Unknown

如果你好奇想要知道整个系统的详细信息,例如主板、内存、BIOS等,那么可以输入以下命令来获取。

sudo dmidecode

输出样本

# dmidecode 2.12
SMBIOS 2.6 present.
48 structures occupying 2173 bytes.
Table at 0x000EB840.

Handle 0xDA00, DMI type 218, 251 bytes
OEM-specific Type
    Header and Data:
        DA FB 00 DA B2 00 0D 5F 0F 37 40 7D 00 00 00 00
        00 7E 00 01 00 00 00 DC 01 00 80 02 00 DD 01 00
        80 03 00 75 01 01 80 01 00 76 01 02 80 01 00 2D
        01 03 80 01 00 2E 01 03 80 00 00 81 01 07 80 00
        00 82 01 07 80 01 00 83 01 08 80 00 00 84 01 08
        80 01 00 85 01 06 80 00 00 86 01 06 80 01 00 58
        02 05 80 00 00 57 02 05 80 01 00 9C 00 02 00 01
        00 9B 00 02 00 00 00 8A 01 03 00 01 00 89 01 03
        00 00 00 7F 01 04 00 00 00 80 01 04 00 01 00 53
        01 05 00 00 00 52 01 05 00 01 00 7B 01 06 00 00
        00 7C 01 06 00 01 00 94 01 07 00 00 00 93 01 07
        00 01 00 7D 00 08 00 00 00 2D 00 09 00 01 00 2E
        00 09 00 00 00 6E 00 0A 00 00 00 95 00 0B 00 01
        00 96 00 0B 00 00 00 2F 02 0C 00 01 00 30 02 0C
        00 00 00 50 02 0D 00 00 00 51 02 0D 00 01 00 52
        02 0D 00 02 00 FF FF 00 00 00 00

Handle 0xDA01, DMI type 218, 59 bytes
OEM-specific Type
    Header and Data:
        DA 3B 01 DA B2 00 0D 5F 0F 37 40 53 02 0D 00 03
        00 54 02 0D 00 04 00 56 02 0D 00 05 00 4B 01 0E
        00 01 00 4A 01 0E 00 00 00 EA 00 0F 00 01 00 EB
        00 0F 00 00 00 FF FF 00 00 00 00

Handle 0x0004, DMI type 4, 42 bytes
Processor Information
    Socket Designation: CPU 1
    Type: Central Processor
    Family: Core i3
    Manufacturer: Intel            
    ID: A7 06 03 01 FF FB AB BE
    Signature: Type 0, Family 6, Model 42, Stepping 7
    Flags:
        FPU (Floating-point unit on-chip)
        VME (Virtual mode extension)
        DE (Debugging extension)
        PSE (Page size extension)
        TSC (Time stamp counter)
        MSR (Model specific registers)
        PAE (Physical address extension)
        MCE (Machine check exception)
        CX8 (CMPXCHG8 instruction supported)
        APIC (On-chip APIC hardware supported)
        SEP (Fast system call)
        MTRR (Memory type range registers)
        PGE (Page global enable)
        MCA (Machine check architecture)
        CMOV (Conditional move instruction supported)
        PAT (Page attribute table)
        PSE-36 (36-bit page size extension)
        CLFSH (CLFLUSH instruction supported)
        DS (Debug store)
        ACPI (ACPI supported)
        MMX (MMX technology supported)
        FXSR (FXSAVE and FXSTOR instructions supported)
        SSE (Streaming SIMD extensions)
        SSE2 (Streaming SIMD extensions 2)
        SS (Self-snoop)
        HTT (Multi-threading)
        TM (Thermal monitor supported)
        PBE (Pending break enabled)
    Version: Intel(R) Core(TM) i3-2350M CPU @ 2.30GHz       
    Voltage: 1.1 V
    External Clock: 100 MHz
    Max Speed: 2300 MHz
    Current Speed: 2300 MHz
    Status: Populated, Enabled
    Upgrade: Other
    L1 Cache Handle: 0x0005
    L2 Cache Handle: 0x0006
    L3 Cache Handle: 0x0007
    Serial Number: To Be Filled By O.E.M.
    Asset Tag: To Be Filled By O.E.M.
    Part Number: To Be Filled By O.E.M.
    Core Count: 2
    Core Enabled: 1
    Thread Count: 2
    Characteristics:
        64-bit capable

Handle 0x0005, DMI type 7, 19 bytes
Cache Information
    Socket Designation: L1-Cache
    Configuration: Enabled, Not Socketed, Level 1
    Operational Mode: Write Back
    Location: Internal
    Installed Size: 64 kB
    Maximum Size: 64 kB
    Supported SRAM Types:
        Other
    Installed SRAM Type: Other
    Speed: Unknown
    Error Correction Type: None
    System Type: Unified
    Associativity: 8-way Set-associative

Handle 0x0006, DMI type 7, 19 bytes
Cache Information
    Socket Designation: L2-Cache
    Configuration: Enabled, Not Socketed, Level 2
    Operational Mode: Varies With Memory Address
    Location: Internal
    Installed Size: 512 kB
    Maximum Size: 512 kB
    Supported SRAM Types:
        Other
    Installed SRAM Type: Other
    Speed: Unknown
    Error Correction Type: None
    System Type: Unified
    Associativity: 8-way Set-associative

Handle 0x0007, DMI type 7, 19 bytes
Cache Information
    Socket Designation: L3-Cache
    Configuration: Enabled, Not Socketed, Level 3
    Operational Mode: Varies With Memory Address
    Location: Internal
    Installed Size: 3072 kB
    Maximum Size: 3072 kB
    Supported SRAM Types:
        Other
    Installed SRAM Type: Other
    Speed: Unknown
    Error Correction Type: None
    System Type: Unified
    Associativity: Other

Handle 0x0008, DMI type 8, 9 bytes
Port Connector Information
    Internal Reference Designator: J1A1
    Internal Connector Type: None
    External Reference Designator: PS2Mouse
    External Connector Type: PS/2
    Port Type: Mouse Port

Handle 0x0009, DMI type 8, 9 bytes
Port Connector Information
    Internal Reference Designator: J1A1
    Internal Connector Type: None
    External Reference Designator: Keyboard
    External Connector Type: PS/2
    Port Type: Keyboard Port

Handle 0x000A, DMI type 8, 9 bytes
Port Connector Information
    Internal Reference Designator: J2A2B
    Internal Connector Type: None
    External Reference Designator: Video
    External Connector Type: DB-15 female
    Port Type: Video Port

Handle 0x000B, DMI type 8, 9 bytes
Port Connector Information
    Internal Reference Designator: J3A1
    Internal Connector Type: None
    External Reference Designator: USB1
    External Connector Type: Access Bus (USB)
    Port Type: USB

Handle 0x000C, DMI type 8, 9 bytes
Port Connector Information
    Internal Reference Designator: J3A1
    Internal Connector Type: None
    External Reference Designator: USB2
    External Connector Type: Access Bus (USB)
    Port Type: USB

Handle 0x000D, DMI type 8, 9 bytes
Port Connector Information
    Internal Reference Designator: J3A1
    Internal Connector Type: None
    External Reference Designator: USB3
    External Connector Type: Access Bus (USB)
    Port Type: USB

Handle 0x000E, DMI type 8, 9 bytes
Port Connector Information
    Internal Reference Designator: J5A1
    Internal Connector Type: None
    External Reference Designator: LAN
    External Connector Type: RJ-45
    Port Type: Network Port

Handle 0x000F, DMI type 9, 17 bytes
System Slot Information
    Designation: J6B2
    Type: x16 PCI Express
    Current Usage: In Use
    Length: Long
    ID: 0
    Characteristics:
        3.3 V is provided
        Opening is shared
        PME signal is supported
    Bus Address: 0000:00:01.0

Handle 0x0010, DMI type 9, 17 bytes
System Slot Information
    Designation: J6B1
    Type: x1 PCI Express
    Current Usage: In Use
    Length: Short
    ID: 1
    Characteristics:
        3.3 V is provided
        Opening is shared
        PME signal is supported
    Bus Address: 0000:00:1c.3

Handle 0x0012, DMI type 11, 5 bytes
OEM Strings
    String 1: Dell System
    String 2: 5[0003]
    String 3: 13[P18F]

Handle 0x0013, DMI type 12, 5 bytes
System Configuration Options
    Option 1: To Be Filled By O.E.M.

Handle 0x001C, DMI type 21, 7 bytes
Built-in Pointing Device
    Type: Touch Pad
    Interface: Bus Mouse
    Buttons: 2

Handle 0x001D, DMI type 22, 26 bytes
Portable Battery
    Location: Sys. Battery Bay
    Manufacturer: Sanyo              
    Serial Number: 5390     
    Name: DELL 4YRJH22
    Chemistry: Lithium Ion
    Design Capacity: 45000 mWh
    Design Voltage: 10800 mV
    SBDS Version: 1.0                
    Maximum Error: 2%
    SBDS Manufacture Date: 2012-02-28
    OEM-specific Information: 0x00000001

Handle 0x001E, DMI type 32, 20 bytes
System Boot Information
    Status: No errors detected

Handle 0x0020, DMI type 27, 12 bytes
Cooling Device
    Type: Fan
    Status: OK
    OEM-specific Information: 0x00000000

Handle 0x0021, DMI type 28, 20 bytes
Temperature Probe
    Description: CPU Internal Temperature
    Location: Processor
    Status: OK
    Maximum Value: 127.0 deg C
    Minimum Value: 0.0 deg C
    Resolution: 1.000 deg C
    Tolerance: 0.5 deg C
    Accuracy: Unknown
    OEM-specific Information: 0x00000000

Handle 0xB000, DMI type 176, 5 bytes
OEM-specific Type
    Header and Data:
        B0 05 00 B0 00

Handle 0xB100, DMI type 177, 12 bytes
OEM-specific Type
    Header and Data:
        B1 0C 00 B1 1A 0E 00 00 00 00 00 00

Handle 0x0025, DMI type 209, 12 bytes
OEM-specific Type
    Header and Data:
        D1 0C 25 00 00 00 00 03 05 01 00 03

Handle 0x0026, DMI type 210, 12 bytes
OEM-specific Type
    Header and Data:
        D2 0C 26 00 00 00 00 03 05 20 01 03

Handle 0x0027, DMI type 211, 13 bytes
OEM-specific Type
    Header and Data:
        D3 0D 27 00 01 00 00 00 00 02 03 04 04
    Strings:
        Front               

Handle 0x0028, DMI type 212, 57 bytes
OEM-specific Type
    Header and Data:
        D4 39 28 00 70 00 71 00 01 49 50 48 9C 00 49 FC
        01 9B 00 49 FC 00 7F 01 4A FB 04 80 01 4A FB 00
        53 01 4A F7 08 52 01 4A F7 08 7B 01 4A EF 10 7C
        01 4A EF 10 FF FF 00 00 00

Handle 0x002A, DMI type 217, 8 bytes
OEM-specific Type
    Header and Data:
        D9 08 2A 00 01 02 00 00
    Strings:                                       

Handle 0x002B, DMI type 219, 11 bytes
OEM-specific Type
    Header and Data:
        DB 0B 2B 00 00 01 02 03 00 04 05
    Strings:                                                                                                    

Handle 0x002C, DMI type 220, 22 bytes
OEM-specific Type
    Header and Data:
        DC 16 2C 00 01 F0 00 00 02 F0 00 00 00 00 03 F0
        04 F0 00 00 00 00

Handle 0x002D, DMI type 221, 19 bytes
OEM-specific Type
    Header and Data:
        DD 13 2D 00 00 00 00 00 00 03 00 00 00 00 00 00
        00 00 00

Handle 0x002E, DMI type 222, 16 bytes
OEM-specific Type
    Header and Data:
        DE 10 2E 00 01 08 FF FF 00 00 00 00 00 00 00 00

Handle 0x0014, DMI type 16, 15 bytes
Physical Memory Array
    Location: System Board Or Motherboard
    Use: System Memory
    Error Correction Type: None
    Maximum Capacity: 16 GB
    Error Information Handle: Not Provided
    Number Of Devices: 2

Handle 0x0016, DMI type 20, 19 bytes
Memory Device Mapped Address
    Starting Address: 0x00000000000
    Ending Address: 0x000FFFFFFFF
    Range Size: 4 GB
    Physical Device Handle: 0x0015
    Memory Array Mapped Address Handle: 0x0018
    Partition Row Position: 1
    Interleave Position: 1
    Interleaved Data Depth: 1

Handle 0x0017, DMI type 17, 28 bytes
Memory Device
    Array Handle: 0x0014
    Error Information Handle: 0x0000
    Total Width: Unknown
    Data Width: Unknown
    Size: No Module Installed
    Form Factor: DIMM
    Set: None
    Locator: DIMM_B
    Bank Locator: BANK 2
    Type: Unknown
    Type Detail: None
    Speed: Unknown
    Manufacturer: Not Specified
    Serial Number: Not Specified
    Asset Tag: Not Specified
    Part Number: Not Specified
    Rank: Unknown

Handle 0x0018, DMI type 19, 15 bytes
Memory Array Mapped Address
    Starting Address: 0x00000000000
    Ending Address: 0x000FFFFFFFF
    Range Size: 4 GB
    Physical Array Handle: 0x0014
    Partition Width: 2

Handle 0x002F, DMI type 13, 22 bytes
BIOS Language Information
    Language Description Format: Abbreviated
    Installable Languages: 1
        eng
        Currently Installed Language: eng

Handle 0x0030, DMI type 131, 64 bytes
OEM-specific Type
    Header and Data:
        83 40 30 00 31 00 00 00 00 00 00 00 00 00 00 00
        F8 00 4B 1C FF FF FF FF 01 00 00 00 00 00 07 00
        AD 04 04 00 00 00 00 00 C8 00 FF FF 00 00 00 00
        00 00 00 00 32 00 00 00 76 50 72 6F 00 00 00 00

Handle 0x0029, DMI type 216, 9 bytes
OEM-specific Type
    Header and Data:
        D8 09 29 00 01 02 01 00 00
    Strings:
        INTEL
        0000

Handle 0x0000, DMI type 0, 24 bytes
BIOS Information
    Vendor: Dell Inc.
    Version: A05
    Release Date: 08/03/2012
    Address: 0xF0000
    Runtime Size: 64 kB
    ROM Size: 2048 kB
    Characteristics:
        MCA is supported
        PCI is supported
        BIOS is upgradeable
        BIOS shadowing is allowed
        ESCD support is available
        Boot from CD is supported
        Selectable boot is supported
        BIOS ROM is socketed
        EDD is supported
        5.25"/1.2 MB floppy services are supported (int 13h)
        3.5"/720 kB floppy services are supported (int 13h)
        3.5"/2.88 MB floppy services are supported (int 13h)
        Print screen service is supported (int 5h)
        8042 keyboard services are supported (int 9h)
        Serial services are supported (int 14h)
        Printer services are supported (int 17h)
        CGA/mono video services are supported (int 10h)
        ACPI is supported
        USB legacy is supported
        ATAPI Zip drive boot is supported
        BIOS boot specification is supported
        Targeted content distribution is supported
    BIOS Revision: 0.5
    Firmware Revision: 0.5

Handle 0x0002, DMI type 2, 15 bytes
Base Board Information
    Manufacturer: Dell Inc.
    Product Name: 01HXXJ
    Version: A05
    Serial Number: .JSQ7PA1.CN7117623M00J2.
    Asset Tag: Not Specified
    Features:
        Board is a hosting board
        Board is replaceable
    Location In Chassis: To Be Filled By O.E.M.
    Chassis Handle: 0x0003
    Type: Motherboard
    Contained Object Handles: 0

Handle 0x0003, DMI type 3, 21 bytes
Chassis Information
    Manufacturer: Dell Inc.
    Type: Portable
    Lock: Not Present
    Version: Not Specified
    Serial Number: JSR1
    Asset Tag: Not Specified
    Boot-up State: Safe
    Power Supply State: Safe
    Thermal State: Safe
    Security Status: None
    OEM Information: 0x00000000
    Height: Unspecified
    Number Of Power Cords: 1
    Contained Elements: 0

Handle 0x0001, DMI type 1, 27 bytes
System Information
    Manufacturer: Dell Inc.
    Product Name: Inspiron N5050
    Version: Not Specified
    Serial Number: JSR1
    UUID: 4C4C4544-0053-5110-8029-CAC05241
    Wake-up Type: Power Switch
    SKU Number: To be filled by O.E.M.
    Family:                       

Handle 0x0024, DMI type 208, 12 bytes
OEM-specific Type
    Header and Data:
        D0 0C 24 00 02 05 FE 00 04 05 01 02
    Strings:
        20120323
        20120323

Handle 0x0011, DMI type 10, 6 bytes
On Board Device Information
    Type: Video
    Status: Enabled
    Description: Mobile Intel SandyBridge HD Graphics

Handle 0x0015, DMI type 17, 28 bytes
Memory Device
    Array Handle: 0x0014
    Error Information Handle: 0x0000
    Total Width: 64 bits
    Data Width: 64 bits
    Size: 4096 MB
    Form Factor: SODIMM
    Set: None
    Locator: DIMM_A
    Bank Locator: BANK 0
    Type: DDR3
    Type Detail: Synchronous
    Speed: 1067 MHz
    Manufacturer: 014F
    Serial Number: 0009F2
    Asset Tag: 54114000     
    Part Number: JM1066-4G      
    Rank: Unknown

Handle 0x0031, DMI type 127, 4 bytes
End Of Table

好了,就是这样。


via: http://www.unixmen.com/linux-basics-how-to-find-maximum-supported-ram-by-your-system/

作者:SK 译者:mr-ping 校对:wxy

本文由 LCTT 原创翻译,Linux中国 荣誉推出

大家好,今天我们会在CentOS 7.0 上为 subversion(SVN)安装Web 界面 WebSVN。(subverion 是 apache 的顶级项目,也称为 Apache SVN 或 SVN)

WebSVN 将 Svbverion 的操作你的仓库的各种功能通过 Web 界面提供出来。通过它,我们可以看到任何给定版本的任何文件或者目录的日志,并且可看到所有文件改动、添加、删除的列表。我们同样可以查看两个版本间的差异来知道特定版本改动了什么。

特性

WebSVN提供了下面这些特性:

  • 易于使用的用户界面
  • 可定制的模板系统
  • 色彩化的文件列表
  • 追溯视图
  • 日志信息查询
  • RSS支持
  • 更多

由于其使用PHP写成,WebSVN同样易于移植和安装。

现在我们将为Subverison安装WebSVN。请确保你的服务器上已经安装了 SVN。如果你还没有安装,你可以按本教程安装。

安装完SVN后,你需要以下几步。

1. 下载 WebSVN

你可以从官方网站 http://www.websvn.info/download/ 中下载 WebSVN。我们首先进入 /var/www/html/ 并在这里下载安装包。

$ sudo -s

请在shell或者终端中执行上面的命令,因为我们需要切换到root权限来对系统限制区域有访问权。

# cd /var/www/html
# wget http://websvn.tigris.org/files/documents/1380/49057/websvn-2.3.3.zip

downloading websvn package

这里,我下载的是最新的2.3.3版本的 websvn。你可以从上面这个网站找到下载链接,用适合你的包的链接来替换上面的链接。

2. 解压下载的zip

# unzip websvn-2.3.3.zip

# mv websvn-2.3.3 websvn

extracting websvn

3. 安装php

# yum install php

yum install php

4. 编辑WebSVN配置

现在,我们需要拷贝位于 /var/www/html/websvn/include 的 distconfig.php 为 config.php,并且接着编辑该配置文件。

# cd /var/www/html/websvn/include
# cp distconfig.php config.php
# nano config.php

现在我们需要按如下改变文件。完成之后,请保存并退出。

// Configure these lines if your commands aren't on your path.
//
 $config->setSVNCommandPath('/usr/bin'); // e.g. c:\\program files\\subversion\\bin
 $config->setDiffPath('/usr/bin');

// For syntax colouring, if option enabled...
 $config->setEnscriptPath('/usr/bin');
 $config->setSedPath('/bin');

// For delivered tarballs, if option enabled...
 $config->setTarPath('/bin');

// For delivered GZIP'd files and tarballs, if option enabled...
 $config->setGZipPath('/bin');

//
 $config->parentPath('/svn/');

$extEnscript[".pl"] = "perl";
$extEnscript[".py"] = "python";
$extEnscript[".sql"] = "sql";
$extEnscript[".java"] = "java";
$extEnscript[".html"] = "html";
$extEnscript[".xml"] = "html";
$extEnscript[".thtml"] = "html";
$extEnscript[".tpl"] = "html";
$extEnscript[".sh"] = "bash";

websvn config file

5. 启动 WebSVN

现在,我们将近完成了。现在需要重启Apache服务。你可以用下面的命令。

# systemctl restart httpd.service

接着我们在浏览器中打开WebSVN,输入 http:// IP地址/websvn ,或者你在本地的话,你可以输入 http://localhost/websvn

websvn successfully installed

注意: 如果你遇到一个像"Unable to find "enscript" tool at location "/usr/bin/enscript"这样的问题,那么你需要使用“yum install enscript”安装enscript来修复这个问题。

总结

好了,我们已经在CentOS 7上完成WebSVN的安装了。这个教程同样适用于RHEL 7。

如果你有任何问题、评论、反馈请在下面的评论栏中留下,来让我们知道该添加什么和改进。谢谢! 用用看吧。:-)


via: http://linoxide.com/linux-how-to/install-websvn-subversion-centos-7/

作者:Arun Pyasi 译者:geekpi 校对:wxy

本文由 LCTT 原创翻译,Linux中国 荣誉推出

通常在你在虚拟机中添加一块新硬盘时,你可能会看到新硬盘没有自动加载。这是因为连接到硬盘的SCSI总线需要重新扫描来使得新硬盘可见。这里有一个简单的命令来重新扫描SCSI总线和SCSI设备。下面这几步在CentOS 7 和RHEL 7 中测试过。

  1. 在ESXi或者vCenter中添加一块新的20G硬盘:

  1. 显示当前磁盘分区:
[root@centos7 ~]# fdisk -l

Disk /dev/sda: 32.2 GB, 32212254720 bytes, 62914560 sectors
Units = sectors of 1 * 512 = 512 bytes
Sector size (logical/physical): 512 bytes / 512 bytes
I/O size (minimum/optimal): 512 bytes / 512 bytes
Disk label type: dos
Disk identifier: 0x0006b96a

   Device Boot      Start         End      Blocks   Id  System
/dev/sda1   *        2048     1026047      512000   83  Linux
/dev/sda2         1026048    62914559    30944256   8e  Linux LVM

Disk /dev/mapper/centos-swap: 2147 MB, 2147483648 bytes, 4194304 sectors
Units = sectors of 1 * 512 = 512 bytes
Sector size (logical/physical): 512 bytes / 512 bytes
I/O size (minimum/optimal): 512 bytes / 512 bytes

Disk /dev/mapper/centos-root: 29.5 GB, 29536288768 bytes, 57688064 sectors
Units = sectors of 1 * 512 = 512 bytes
Sector size (logical/physical): 512 bytes / 512 bytes
I/O size (minimum/optimal): 512 bytes / 512 bytes
  1. 确定主机总线号
[root@centos7 ~]# ls /sys/class/scsi_host/
host0  host1  host2
  1. 重新扫描SCSI总线来添加设备
[root@centos7 ~]# echo "- - -" > /sys/class/scsi_host/host0/scan
[root@centos7 ~]# echo "- - -" > /sys/class/scsi_host/host1/scan
[root@centos7 ~]# echo "- - -" > /sys/class/scsi_host/host2/scan
  1. 验证磁盘和分区并确保20GB硬盘已经添加了。在本例中,出现了下面这行 “Disk /dev/sdb: 21.5 GB, 21474836480 bytes, 41943040 sectors” 并且可以确认没有重启服务器就添加了新盘:
[root@centos7 ~]# fdisk -l

Disk /dev/sda: 32.2 GB, 32212254720 bytes, 62914560 sectors
Units = sectors of 1 * 512 = 512 bytes
Sector size (logical/physical): 512 bytes / 512 bytes
I/O size (minimum/optimal): 512 bytes / 512 bytes
Disk label type: dos
Disk identifier: 0x0006b96a

   Device Boot      Start         End      Blocks   Id  System
/dev/sda1   *        2048     1026047      512000   83  Linux
/dev/sda2         1026048    62914559    30944256   8e  Linux LVM

Disk /dev/mapper/centos-swap: 2147 MB, 2147483648 bytes, 4194304 sectors
Units = sectors of 1 * 512 = 512 bytes
Sector size (logical/physical): 512 bytes / 512 bytes
I/O size (minimum/optimal): 512 bytes / 512 bytes

Disk /dev/mapper/centos-root: 29.5 GB, 29536288768 bytes, 57688064 sectors
Units = sectors of 1 * 512 = 512 bytes
Sector size (logical/physical): 512 bytes / 512 bytes
I/O size (minimum/optimal): 512 bytes / 512 bytes

Disk /dev/sdb: 21.5 GB, 21474836480 bytes, 41943040 sectors
Units = sectors of 1 * 512 = 512 bytes
Sector size (logical/physical): 512 bytes / 512 bytes
I/O size (minimum/optimal): 512 bytes / 512 bytes

via: http://www.ehowstuff.com/how-to-add-a-new-hard-disk-without-rebooting-on-centos-7-rhel-7/

作者:skytech 译者:geekpi 校对:wxy

本文由 LCTT 原创翻译,Linux中国 荣誉推出

如果你正在管理Debian或者Ubuntu服务器,你也许会经常使用dpkg 或者 apt-get命令。这两个命令用来安装、卸载和更新包。

在本篇中,让我们看下如何在基于DEB的系统下检查是否安装了一个包。

要检查特定的包,比如firefox是否安装了,使用这个命令:

dpkg -s firefox

示例输出:

 Package: firefox
 Status: install ok installed
 Priority: optional
 Section: web
 Installed-Size: 93339
 Maintainer: Ubuntu Mozilla Team <[email protected]>
 Architecture: amd64
 Version: 35.0+build3-0ubuntu0.14.04.2
 Replaces: kubuntu-firefox-installer
 Provides: gnome-www-browser, iceweasel, www-browser
 Depends: lsb-release, libasound2 (>= 1.0.16), libatk1.0-0 (>= 1.12.4), libc6 (>= 2.17), libcairo2 (>= 1.2.4), libdbus-1-3 (>= 1.0.2), libdbus-glib-1-2 (>= 0.78), libfontconfig1 (>= 2.9.0), libfreetype6 (>= 2.2.1), libgcc1 (>= 1:4.1.1), libgdk-pixbuf2.0-0 (>= 2.22.0), libglib2.0-0 (>= 2.37.3), libgtk2.0-0 (>= 2.24.0), libpango-1.0-0 (>= 1.22.0), libpangocairo-1.0-0 (>= 1.14.0), libstartup-notification0 (>= 0.8), libstdc++6 (>= 4.6), libx11-6, libxcomposite1 (>= 1:0.3-1), libxdamage1 (>= 1:1.1), libxext6, libxfixes3, libxrender1, libxt6
 Recommends: xul-ext-ubufox, libcanberra0, libdbusmenu-glib4, libdbusmenu-gtk4
 Suggests: ttf-lyx
 Conffiles:
 /etc/firefox/syspref.js 09e457e65435a1a043521f2bd19cd2a1
 /etc/apport/blacklist.d/firefox ee63264f847e671832d42255912ce144
 /etc/apport/native-origins.d/firefox 7c26b75c7c2b715c89cc6d85338252a4
 /etc/apparmor.d/usr.bin.firefox f54f7a43361c7ecfa3874abca2f292cf
 Description: Safe and easy web browser from Mozilla
 Firefox delivers safe, easy web browsing. A familiar user interface,
 enhanced security features including protection from online identity theft,
 and integrated search let you get the most out of the web.
 Xul-Appid: {ec8030f7-c20a-464f-9b0e-13a3a9e97384}

如上所见,firefox已经安装了。

同样,你可以使用dpkg-query 命令。这个命令会有一个更好的输出,当然,你可以用通配符。

dpkg-query -l firefox

示例输出:

Desired=Unknown/Install/Remove/Purge/Hold
| Status=Not/Inst/Conf-files/Unpacked/halF-conf/Half-inst/trig-aWait/Trig-pend
|/ Err?=(none)/Reinst-required (Status,Err: uppercase=bad)
||/ Name                                 Version                 Architecture            Description
+++-====================================-=======================-=======================-=============================================================================
ii  firefox                              35.0+build3-0ubuntu0.14 amd64                   Safe and easy web browser from Mozilla

要列出你系统中安装的所有包,输入下面的命令:

dpkg --get-selections

示例输出:

abiword                        install
abiword-common                    install
accountsservice                    install
acl                        install
adduser                        install
alsa-base                    install
alsa-utils                    install
anacron                        install
app-install-data                install
apparmor                    install
.
.
.
zeitgeist                    install
zeitgeist-core                    install
zeitgeist-datahub                install
zenity                        install
zenity-common                    install
zip                        install
zlib1g:amd64                    install
zlib1g:i386                    install

上面的输出可能会非常长,这依赖于你的系统已安装的包。

你同样可以通过grep来过滤割到更精确的包。比如,我想要使用dpkg命令查看系统中安装的gcc包:

dpkg --get-selections | grep gcc

示例输出:

gcc                        install
gcc-4.8                        install
gcc-4.8-base:amd64                install
gcc-4.8-base:i386                install
gcc-4.9-base:amd64                install
gcc-4.9-base:i386                install
libgcc-4.8-dev:amd64                install
libgcc1:amd64                    install
libgcc1:i386                    install

此外,你可以使用“-L”参数来找出包中文件的位置。

dpkg -L gcc-4.8

示例输出:

/.
/usr
/usr/share
/usr/share/doc
/usr/share/doc/gcc-4.8-base
/usr/share/doc/gcc-4.8-base/README.Bugs
/usr/share/doc/gcc-4.8-base/NEWS.html
/usr/share/doc/gcc-4.8-base/quadmath
/usr/share/doc/gcc-4.8-base/quadmath/changelog.gz
/usr/share/doc/gcc-4.8-base/gcc
.
.
.
/usr/bin/x86_64-linux-gnu-gcc-4.8
/usr/bin/x86_64-linux-gnu-gcc-ar-4.8
/usr/bin/x86_64-linux-gnu-gcov-4.8

就是这样了。希望这篇对你有用。

美好的一天!


via: http://www.unixmen.com/linux-basics-check-package-installed-not-ubuntu/

作者:SK 译者:geekpi 校对:wxy

本文由 LCTT 原创翻译,Linux中国 荣誉推出

在Linux或类Unix系统中,每个用户和进程都运行在一个特定环境中。这个环境包含了变量、设置、别名、函数以及更多的东西。下面是对Shell环境下一些常用命令的简单介绍,包括每个命令如何使用的例子,以及在命令行下设定你自己的环境来提高效率。

找出你当前的shell

在终端应用中输入下面命令中的任意一个:

ps $$
ps -p $$

或者

echo "$0"

输出范例:

图1: Finding out your shell name

图1:找出当前的shell

找出所有已安装的shell

找到已安装shell的完整路径:

type -a zsh
type -a ksh
type -a sh
type -a bash

输出范例:

Fig.02: Finding out your shell path

图2:找出shell的路径

文件/etc/shells里包含了系统所支持的shell列表。每一行代表一个shell,是相对根目录的完整路径。用这个cat命令来查看这些数据:

cat /etc/shells

输出范例:

# List of acceptable shells for chpass(1).
# Ftpd will not allow users to connect who are not using
# one of these shells.

/bin/bash
/bin/csh
/bin/ksh
/bin/sh
/bin/tcsh
/bin/zsh
/usr/local/bin/fish

临时改变当前shell

只需要输入shell的名字。在下面的例子里,我从bash切换到了zsh:

zsh

这只是临时改变了系统shell。也叫做子shell。要从子/临时shell退出,输入下面的命令或者按下CTRL-D:

exit

找出子shell的层级或临时shell的嵌套层级

每个bash实例启动后,变量$SHLVL的值都会加一。输入下面的命令:

echo "$SHLVL"

示例输出:

Fig. 03: Bash shell nesting level (subshell numbers)

图3:Bash shell嵌套层级(子shell数目)

通过chsh命令永久变更系统shell

想要把当前系统shell从bash永久换成zsh?试试这个:

chsh -s /bin/zsh

想把其他用户的shell从bash永久换成ksh?试试这个:

sudo chsh -s /bin/ksh userNameHere

查看当前的环境变量

你需要用到:

env
env | more
env | less
env | grep 'NAME'

示例输出:

TERM_PROGRAM=Apple_Terminal
SHELL=/bin/bash
TERM=xterm-256color
TMPDIR=/var/folders/6x/45252d6j1lqbtyy_xt62h40c0000gn/T/
Apple_PubSub_Socket_Render=/tmp/launch-djaOJg/Render
TERM_PROGRAM_VERSION=326
TERM_SESSION_ID=16F470E3-501C-498E-B315-D70E538DA825
USER=vivek
SSH_AUTH_SOCK=/tmp/launch-uQGJ2h/Listeners
__CF_USER_TEXT_ENCODING=0x1F5:0:0
PATH=/usr/bin:/bin:/usr/sbin:/sbin:/usr/local/bin:/opt/X11/bin:/usr/local/go/bin:/usr/local/sbin/modemZapp:/Users/vivek/google-cloud-sdk/bin
__CHECKFIX1436934=1
PWD=/Users/vivek
SHLVL=2
HOME=/Users/vivek
LOGNAME=vivek
LC_CTYPE=UTF-8
DISPLAY=/tmp/launch-6hNAhh/org.macosforge.xquartz:0
_=/usr/bin/env
OLDPWD=/Users/vivek

下面是bash shell里一些常见变量的列表:

Fig.04: Common bash environment variables

图4:常见bash环境变量

注意:下面这些环境变量没事不要乱改。很可能会造成不稳定的shell会话:

SHELL

UID

RANDOM

PWD

PPID

SSHAUTHSOCK

USER

HOME

LINENO

显示环境变量的值

使用下面任意一条命令显示环境变量HOME的值:

## 使用printenv ##
printenv HOME

## 或者用echo ##
echo "$HOME"

# 考虑到可移植性,也可以用printf ##
printf "%s\n" "$HOME"

示例输出:

/home/vivek

增加或设定一个新环境变量

下面是bash,zsh,sh和ksh的语法:

## 语法 ##
VAR=value
FOO=bar

## 设定vim为默认文本编辑器 ##
EDITOR=vim
export $EDITOR

## 考虑安全性,设定默认shell连接超时时间 ##
TMOUT=300
export TMOUT

## 你可以直接使用export命令设定命令的搜素路径 ##
export PATH=$PATH:$HOME/bin:/usr/local/bin:/path/to/mycoolapps

然后,使用printenv或者echo或printf命令查看环境变量PATH,EDITOR,和TMOUT的值:

printenv PATH
echo "$EDITOR"
printf "%s\n" $TMOUT

怎么修改一个现有的环境变量?

下面是语法:

export VAR=value
## 或者 ##
VAR=value
export $VAR

## 把默认文本编辑器从vim改为emacs ##
echo "$EDITOR" ## <--- 屏幕输出vim
EDITOR=emacs   ## <--- 修改
export $EDITOR ## <--- 让修改在其他会话生效
echo "$EDITOR" ## <--- 屏幕输出emacs 

tcsh shell下增加和修改变量的语法是下面这样的:

## 语法
setenv var value
printenv var

## 设置变量foo的值为bar ##
setenv foo bar
echo "$foo"
printenv foo

## 设置变量PATH ##
setenv PATH $PATH\:$HOME/bin
echo "$PATH"

## 设置变量PAGER ##
setenv PAGER most
printf "%s\n" $PAGER

找出bash shell的配置文件

用下面的命令列出bash shell的文件:

ls -l ~/.bash* ~/.profile /etc/bash* /etc/profile

示例输出:

Fig.05: List all bash environment configuration files

图5:列出bash的所有配置文件

要查看所有的bash配置文件,输入:

less ~/.bash* ~/.profile /etc/bash* /etc/profile

可以使用文字编辑器比如vim或emacs来一个一个编辑bash配置文件:

vim ~/.bashrc

编辑/etc/目录下的文件,输入:

## 首先是备份,以防万一
sudo cp -v /etc/bashrc /etc/bashrc.bak.22_jan_15

########################################################################
## 然后,随心所欲随便改吧,好好玩玩shell环境或者提高一下效率:)                 ##
########################################################################
sudo vim /etc/bashrc

被Bash shell初始化过程中应用的文件搞糊涂了吗?

下面的"bash初始化文件"流程图应该有些帮助:

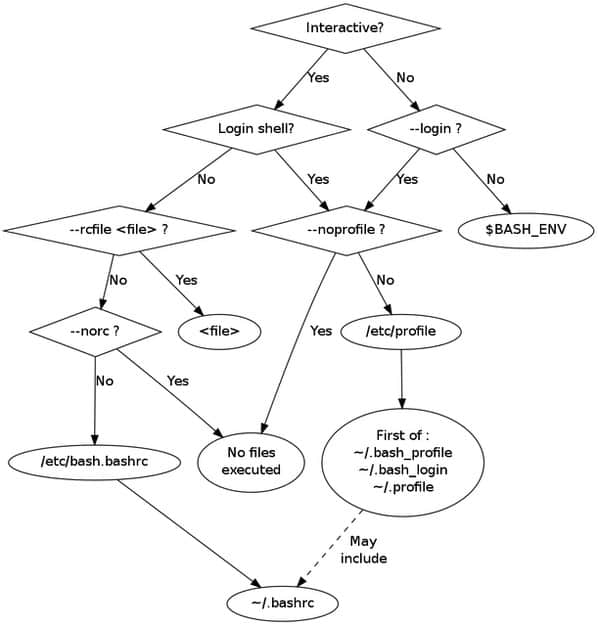
根据账户设定的默认shell,你的用户配置或系统配置可能是下面其中一种:

找出zsh shell配置文件

zsh的wiki中建议用下面的命令:

strings =zsh | grep zshrc

示例输出:

/etc/zshrc
.zshrc

输入下面的命令列出你的zsh shell文件:

ls -l /etc/zsh/* /etc/profile ~/.z*

查看所有zsh配置文件:

less /etc/zsh/* /etc/profile ~/.z*

找出ksh shell配置文件

  1. 查看~/.profile或者/etc/profile文件。

找出tcsh shell配置文件

  1. C shell查看~/.login,~/.cshrc文件。
  2. TC shell查看~/.tcshrc和~/.cshrc文件。

我可以写个类似这样每次登录时都自动执行的脚本吗?

是的,把你的命令或别名或其他设定添加到~/.bashrc(bash shell)或者~/.profile(sh/ksh/bash)或者~/.login(csh/tcsh)文件中。

我可以写个类似这样每次登出都自动执行的脚本吗?

是的,把你的命令或别名或其他设定添加到~/.bash\_logout(bash)或者~/.logout(csh/tcsh)文件。

history:获取关于shell会话的更多信息

输入history命令来查看本次会话的历史:

history

示例输出:

    9  ls
   10  vi advanced-cache.php
   11  cd ..
   12  ls
   13  w
   14  cd ..
   15  ls
   16  pwd
   17  ls
   ....
   ..
   ...
   91  hddtemp /dev/sda
   92  yum install hddtemp
   93  hddtemp /dev/sda
   94  hddtemp /dev/sg0
   95  hddtemp /dev/sg1
   96  smartctl -d ata -A /dev/sda | grep -i temperature
   97  smartctl -d ata -A /dev/sg1 | grep -i temperature
   98  smartctl  -A /dev/sg1 | grep -i temperature
   99  sensors

输入history 20来查看命令历史的后20条:

history 20

示例输出:

Fig.06: View session history in the bash shell using history command

图6:在bash shell中使用history命令查看会话历史

你可以重复使用之前的命令。简单地按下[上]或[下]方向键就可以查看之前的命令。在shell提示符下按下[CTRL-R]可以向后搜索历史缓存或文件来查找命令。重复最后一次命令,只需要在shell提示符下输入!!就好了:

ls -l /foo/bar
!!

在以上的历史记录中找到命令#93 (hddtemp /dev/sda),输入:

!93

使用sudo或su改变用户

下面是语法:

su userName

## 登录为tom用户 ##
su tom

## 为用户tom打开一个新的shell会话 ##
su tom

## 登录为root用户 ##
su -

## sudo命令语法(必须在系统中配置有这个命令) ##
sudo -s
sudo tom

看看帖子"Linux下使用其他用户身份运行命令"更多地了解sudo,su和runuser命令。

shell别名

别名仅仅是命令的一个快捷方式。

列出所有的别名

输入下面的命令:

alias

示例输出:

alias ..='cd ..'
alias ...='cd ../../../'
alias ....='cd ../../../../'
alias .....='cd ../../../../'
alias .4='cd ../../../../'
alias .5='cd ../../../../..'
alias bc='bc -l'
alias cd..='cd ..'
alias chgrp='chgrp --preserve-root'
alias chmod='chmod --preserve-root'
alias chown='chown --preserve-root'
alias cp='cp -i'
alias dnstop='dnstop -l 5 eth1'
alias egrep='egrep --color=auto'
alias ethtool='ethtool eth1'

设定一个别名

bash/zsh语法:

alias c='clear'
alias down='sudo /sbin/shutdown -h now'

对于命令clear可以输入c别名,这样我们就可以输入c代替clear命令来清空屏幕:

c

或者输入down来关闭基于Linux的服务器:

down

你可以设定任意多的别名。看下"Linux/Unix/Mac OS X系统中的30个方便的bash shell别名"了解在类Unix系统中别名的实际应用。

shell函数

Bash/ksh/zsh函数允许你更进一步地配置shell环境。在这个例子中,我写了一个简单的名叫memcpu()的bash函数,用来显示前10个最占用CPU和内存的进程:

memcpu() { echo "*** Top 10 cpu eating process ***"; ps auxf | sort -nr -k 3 | head -10;
echo  "*** Top 10 memory eating process ***"; ps auxf | sort -nr -k 4 | head -10;  }

输入memcpu就可以在屏幕上看到下面的信息:

memcpu

*** Top 10 cpu eating process ***
nginx    39559 13.0  0.2 264020 35168 ?        S    04:26   0:00      \_ /usr/bin/php-cgi
nginx    39545  6.6  0.1 216484 13088 ?        S    04:25   0:04      \_ /usr/bin/php-cgi
nginx    39471  6.2  0.6 273352 81704 ?        S    04:22   0:17      \_ /usr/bin/php-cgi
nginx    39544  5.7  0.1 216484 13084 ?        S    04:25   0:03      \_ /usr/bin/php-cgi
nginx    39540  5.5  0.1 221260 19296 ?        S    04:25   0:04      \_ /usr/bin/php-cgi
nginx    39542  5.4  0.1 216484 13152 ?        S    04:25   0:04      \_ /usr/bin/php-cgi
nixcraft 39543  5.3  0.1 216484 14096 ?        S    04:25   0:04      \_ /usr/bin/php-cgi
nixcraft 39538  5.2  0.1 221248 18608 ?        S    04:25   0:04      \_ /usr/bin/php-cgi
nixcraft 39539  5.0  0.1 216484 16272 ?        S    04:25   0:04      \_ /usr/bin/php-cgi
nixcraft 39541  4.8  0.1 216484 14860 ?        S    04:25   0:04      \_ /usr/bin/php-cgi

*** Top 10 memory eating process ***
498      63859  0.5  4.0 2429652 488084 ?      Ssl   2014 177:41 memcached -d -p 11211 -u memcached -m 2048 -c 18288 -P /var/run/memcached/memcached.pid -l 10.10.29.68 -L
mysql    64221  4.2  3.4 4653600 419868 ?      Sl    2014 1360:40  \_ /usr/libexec/mysqld --basedir=/usr --datadir=/var/lib/mysql --user=mysql --log-error=/var/log/mysqld.log --open-files-limit=65535 --pid-file=/var/run/mysqld/mysqld.pid --socket=/var/lib/mysql/mysql.sock
nixcraft 39418  0.4  1.1 295312 138624 ?       S    04:17   0:02  |   \_ /usr/bin/php-cgi
nixcraft 39419  0.5  0.9 290284 113036 ?       S    04:18   0:02  |   \_ /usr/bin/php-cgi
nixcraft 39464  0.7  0.8 294356 99200 ?        S    04:20   0:02  |   \_ /usr/bin/php-cgi
nixcraft 39469  0.3  0.7 288400 91256 ?        S    04:20   0:01  |   \_ /usr/bin/php-cgi
nixcraft 39471  6.2  0.6 273352 81704 ?        S    04:22   0:17      \_ /usr/bin/php-cgi
vivek    39261  2.2  0.6 253172 82812 ?        S    04:05   0:28      \_ /usr/bin/php-cgi
squid     9995  0.0  0.5 175152 72396 ?        S     2014  27:00  \_ (squid) -f /etc/squid/squid.conf
cybercit  3922  0.0  0.4 303380 56304 ?        S    Jan10   0:13  |   \_ /usr/bin/php-cgi

看下"如何编写和应用shell函数"了解更多信息。

综合一下:定制你自己的Linux或Unix bash shell工作环境

现在,你将使用bash shell配置自己的环境。我只介绍bash。但是理论上zsh,ksh和其他常用shell都差不多。让我们看看如何调整shell来适合我作为系统管理员的需求。编辑你的~/.bashrc文件来附加设定。下面是一些常用的配置选项。

1: 设定bash路径和环境变量

# 设定路径 ##
export PATH=$PATH:/usr/local/bin:/home/vivek/bin:/opt/firefox/bin:/opt/oraapp/bin

# 为cd命令设定路径
export CDPATH=.:$HOME:/var/www

使用less或more命令作为翻页器:

export PAGER=less

设定vim作为默认文本编辑器:

export EDITOR=vim
export VISUAL=vim
export SVN_EDITOR="$VISUAL"

设定Oracle数据库特别要求的参数:

export ORACLE_HOME=/usr/lib/oracle/xe/app/oracle/product/10.2.0/server
export ORACLE_SID=XE
export NLS_LANG=$($ORACLE_HOME/bin/nls_lang.sh)

设定JAVA\_HOME和其他java路径,比如java版本:

export JAVA_HOME=/usr/lib/jvm/java-6-sun/jre

# 把ORACLE和JAVA加入到PATH里
export PATH=$PATH:$ORACLE_HOME/bin:$JAVA_HOME/bin

使用密钥实现免密码登录让ssh远程登录更安全:

# 再也不用输密码了
/usr/bin/keychain $HOME/.ssh/id_rsa
source $HOME/.keychain/$HOSTNAME-sh

最后,打开bash命令补齐

source /etc/bash_completion

2: 设定bash命令提示符

设定定制的bash提示符(PS1):

PS1='{\u@\h:\w }\$ '

3: 设定默认文件权限

## 设定默认权限为644 ##
umask 022

4: 调整shell命令历史设定

# 不往命令历史里写入相同的行
HISTCONTROL=ignoreboth

# 忽略这些命令
HISTIGNORE="reboot:shutdown *:ls:pwd:exit:mount:man *:history"

# 通过HISTSIZE和HISTFILESIZE设定命令历史的长度
export HISTSIZE=10000
export HISTFILESIZE=10000

# 为命令历史文件增加时间戳
export HISTTIMEFORMAT="%F %T "

# 附加到命令历史文件,而不是覆盖
shopt -s histappend

5: 设定shell会话的时区

## 为我自己的shell会话设定IST(印度标准时间) ##
TZ=Asia/Kolkata

6: 设定shell行编辑接口

## 使用vi风格的行编辑接口,替代bash默认的emacs模式 ##
set -o vi

7: 设定自己喜好的别名

## 增加一些保护 ##
alias rm='rm -i'
alias cp='cp -i'
alias mv='mv -i'

## Memcached ##
alias mcdstats='/usr/bin/memcached-tool 10.10.29.68:11211 stats'
alias mcdshow='/usr/bin/memcached-tool 10.10.29.68:11211 display'
alias mcdflush='echo "flush_all" | nc 10.10.29.68 11211'

## 默认命令参数 ##
alias vi='vim'
alias grep='grep --color=auto'
alias egrep='egrep --color=auto'
alias fgrep='fgrep --color=auto'
alias bc='bc -l'
alias wget='wget -c'
alias chown='chown --preserve-root'
alias chmod='chmod --preserve-root'
alias chgrp='chgrp --preserve-root'
alias rm='rm -I --preserve-root'
alias ln='ln -i'

下面是一些额外的OS X Unix bash shell别名:

# 从bash打开桌面应用
alias preview="open -a '$PREVIEW'"
alias safari="open -a safari"
alias firefox="open -a firefox"
alias chrome="open -a google\ chrome"
alias f='open -a Finder '

# 清理那些.DS_Store文件
alias dsclean='find . -type f -name .DS_Store -delete'

8: 寡人好色

# 彩色的grep输出 
alias grep='grep --color=auto'
export GREP_COLOR='1;33'

# 彩色的ls
export LSCOLORS='Gxfxcxdxdxegedabagacad'
# Gnu/linux的ls
ls='ls --color=auto'

# BSD/os x的ls命令
# alias ls='ls -G'

9: 设定自己喜好的bash函数

# 在屏幕上显示10个最近的历史命令
function ht {
  history | awk '{a[$2]++}END{for(i in a){print a[i] " " i}}' | sort -rn | head
}

# host和ping命令的替代
# 接受http:// 或 https:// 或 ftps:// 名称用作域或主机名
_getdomainnameonly(){
    local h="$1"
    local f="${h,,}"
    # remove protocol part of hostname
        f="${f#http://}"
        f="${f#https://}"
    f="${f#ftp://}"
    f="${f#scp://}"
    f="${f#scp://}"
    f="${f#sftp://}"
    # remove username and/or username:password part of hostname
    f="${f#*:*@}"
    f="${f#*@}"
    # remove all /foo/xyz.html*  
    f=${f%%/*}
    # show domain name only
    echo "$f"
}


ping(){
    local array=( $@ )          # get all args in an array
    local len=${#array[@]}          # find the length of an array
    local host=${array[$len-1]}     # get the last arg
    local args=${array[@]:0:$len-1} # get all args before the last arg in $@ in an array 
    local _ping="/bin/ping"
    local c=$(_getdomainnameonly "$host")
    [ "$t" != "$c" ] && echo "Sending ICMP ECHO_REQUEST to \"$c\"..."
    # pass args and host
    $_ping $args $c
}

host(){
    local array=( $@ )
    local len=${#array[@]}
    local host=${array[$len-1]}
    local args=${array[@]:0:$len-1}
    local _host="/usr/bin/host"
    local c=$(_getdomainnameonly "$host")
    [ "$t" != "$c" ] && echo "Performing DNS lookups for \"$c\"..."
    $_host $args $c
}

10: 通过shell shopt命令设定bash shell行为

最后,你可以使用set和shopt命令调整bash shell环境

# 目录拼写纠正
shopt -q -s cdspell

# 保证每次终端窗口改变大小后会更新显示
shopt -q -s checkwinsize

# 打开高级模式匹配功能
shopt -q -s extglob

# 退出时附加命令历史而不是覆盖
shopt -s histappend

# 在命令历史使用多行
shopt -q -s cmdhist

# 在后台任务结束时立刻通知
set -o notify

# 禁用[CTRL-D]来结束shell
set -o ignoreeof

总结

这个帖子不难理解。它简短地将如何定制用户环境从头介绍了一下。要深入了解bash/ksh/zsh/csh/tcsh/的能力,我建议你用下面的命令阅读man文档:

man bash
man zsh
man tcsh
man ksh
这篇文章由Aadrika T. J.贡献;由admin编辑并增加了额外内容。你也可以为nixCraft做出贡献

via: http://www.cyberciti.biz/howto/shell-primer-configuring-your-linux-unix-osx-environment/

作者:nixCraft 译者:zpl1025 校对:wxy

本文由 LCTT 原创翻译,Linux中国 荣誉推出