标签 apt-get 下的文章

apt-get和apt-cache是Ubuntu Linux中的命令行下的包管理工具。 apt-get的GUI版本是Synaptic包管理器。本篇中我们会展示apt-get和apt-cache命令的15个不同例子。

示例:1 列出所有可用包

linuxtechi@localhost:~$ apt-cache pkgnames
account-plugin-yahoojp
ceph-fuse
dvd+rw-tools
e3
gnome-commander-data
grub-gfxpayload-lists
gweled
.......................................

示例:2 用关键字搜索包

这个命令在你不确定包名时很有用,只要在apt-cache(LCTT 译注:这里原文是apt-get,应为笔误)后面输入与包相关的关键字即可。

linuxtechi@localhost:~$ apt-cache search "web server"
apache2 - Apache HTTP Server
apache2-bin - Apache HTTP Server (binary files and modules)
apache2-data - Apache HTTP Server (common files)
apache2-dbg - Apache debugging symbols
apache2-dev - Apache HTTP Server (development headers)
apache2-doc - Apache HTTP Server (on-site documentation)
apache2-utils - Apache HTTP Server (utility programs for web servers)
......................................................................

注意: 如果你安装了“apt-file”包,我们就可以像下面那样用配置文件搜索包。

linuxtechi@localhost:~$ apt-file search nagios.cfg
ganglia-nagios-bridge: /usr/share/doc/ganglia-nagios-bridge/nagios.cfg
nagios3-common: /etc/nagios3/nagios.cfg
nagios3-common: /usr/share/doc/nagios3-common/examples/nagios.cfg.gz
pnp4nagios-bin: /etc/pnp4nagios/nagios.cfg
pnp4nagios-bin: /usr/share/doc/pnp4nagios/examples/nagios.cfg

示例:3 显示特定包的基本信息

linuxtechi@localhost:~$ apt-cache show postfix
Package: postfix
Priority: optional
Section: mail
Installed-Size: 3524
Maintainer: LaMont Jones <[email protected]>
Architecture: amd64
Version: 2.11.1-1
Replaces: mail-transport-agent
Provides: default-mta, mail-transport-agent
.....................................................

示例:4 列出包的依赖

linuxtechi@localhost:~$ apt-cache depends postfix
postfix
 Depends: libc6
 Depends: libdb5.3
 Depends: libsasl2-2
 Depends: libsqlite3-0
 Depends: libssl1.0.0
 |Depends: debconf
 Depends: <debconf-2.0>
 cdebconf
 debconf
 Depends: netbase
 Depends: adduser
 Depends: dpkg
............................................

示例:5 使用apt-cache显示缓存统计

linuxtechi@localhost:~$ apt-cache stats 
Total package names: 60877 (1,218 k)
Total package structures: 102824 (5,758 k)
 Normal packages: 71285
 Pure virtual packages: 1102
 Single virtual packages: 9151
 Mixed virtual packages: 1827
 Missing: 19459
Total distinct versions: 74913 (5,394 k)
Total distinct descriptions: 93792 (2,251 k)
Total dependencies: 573443 (16.1 M)
Total ver/file relations: 78007 (1,872 k)
Total Desc/File relations: 93792 (2,251 k)
Total Provides mappings: 16583 (332 k)
Total globbed strings: 171 (2,263 )
Total dependency version space: 2,665 k
Total slack space: 37.3 k
Total space accounted for: 29.5 M

示例:6 使用 “apt-get update” 更新仓库

使用命令“apt-get update”, 我们可以重新从源仓库中同步文件索引。包的索引从“/etc/apt/sources.list”中检索。

linuxtechi@localhost:~$ sudo apt-get update
 Ign http://extras.ubuntu.com utopic InRelease
 Hit http://extras.ubuntu.com utopic Release.gpg
 Hit http://extras.ubuntu.com utopic Release
 Hit http://extras.ubuntu.com utopic/main Sources
 Hit http://extras.ubuntu.com utopic/main amd64 Packages
 Hit http://extras.ubuntu.com utopic/main i386 Packages
 Ign http://in.archive.ubuntu.com utopic InRelease
 Ign http://in.archive.ubuntu.com utopic-updates InRelease
 Ign http://in.archive.ubuntu.com utopic-backports InRelease
 ................................................................

示例:7 使用apt-get安装包

linuxtechi@localhost:~$ sudo apt-get install icinga

上面的命令会安装叫“icinga”的包。

示例:8 升级所有已安装的包

linuxtechi@localhost:~$ sudo apt-get upgrade

示例:9 更新特定的包

在apt-get命令中的“install”选项后面接上“-only-upgrade”用来更新一个特定的包,如下所示:

linuxtechi@localhost:~$ sudo apt-get install filezilla --only-upgrade

示例:10 使用apt-get卸载包

linuxtechi@localhost:~$ sudo apt-get remove skype

上面的命令只会删除skype包,如果你想要删除它的配置文件,在apt-get命令中使用“purge”选项。如下所示:

linuxtechi@localhost:~$ sudo apt-get purge skype

我们可以结合使用上面的两个命令:

linuxtechi@localhost:~$ sudo apt-get remove --purge skype

示例:11 在当前的目录中下载包

linuxtechi@localhost:~$ sudo apt-get download icinga
Get:1 http://in.archive.ubuntu.com/ubuntu/ utopic/universe icinga amd64 1.11.6-1build1 [1,474 B]
Fetched 1,474 B in 1s (1,363 B/s)

上面的目录会把icinga包下载到你的当前工作目录。

示例:12 清理本地包占用的磁盘空间

linuxtechi@localhost:~$ sudo apt-get clean

上面的命令会清空apt-get所下载的包占用的磁盘空间。

我们也可以使用“autoclean”选项来代替“clean”,两者之间主要的区别是autoclean清理不再使用且没用的下载。

linuxtechi@localhost:~$ sudo apt-get autoclean
Reading package lists... Done
Building dependency tree
Reading state information... Done

示例:13 使用“autoremove”删除包

当在apt-get命令中使用“autoremove”时,它会删除为了满足依赖而安装且现在没用的包。

linuxtechi@localhost:~$ sudo apt-get autoremove icinga

示例:14 显示包的更新日志

linuxtechi@localhost:~$ sudo apt-get changelog apache2
Get:1 Changelog for apache2 (http://changelogs.ubuntu.com/changelogs/pool/main/a/apache2/apache2_2.4.10-1ubuntu1/changelog) [195 kB]
Fetched 195 kB in 3s (60.9 kB/s)

上面的命令会下载apache2的更新日志,并在你屏幕上分页显示。

示例:15 使用 “check” 选项显示损坏的依赖关系

linuxtechi@localhost:~$ sudo apt-get check
Reading package lists... Done
Building dependency tree
Reading state information... Done

via: http://www.linuxtechi.com/ubuntu-apt-get-apt-cache-commands-examples/

作者:Pradeep Kumar 译者:geekpi 校对:wxy

本文由 LCTT 原创翻译,Linux中国 荣誉推出

如果你在Debian或Ubuntu系统上经常感觉到apt-getaptitude包安装速度过慢,那么这里就有几种改善这一情况的方法。你有没有考虑过改变正被使用的默认镜像站点?你有没有排除因特网连接的上游带宽成为瓶颈的可能?

如果不是这些原因,你可以尝试第三个选择:使用apt-fast工具。apt-fast实际上是一个围绕apt-get和aptitude所写的shell脚本容器,它能加速包的下载速度。apt-fast本质上采用aria2下载工具,这款工具能够以“块”的方式从多个镜像并行下载一个文件(就像BitTorrent下载)。

在Debian或Ubuntu上安装apt-fast

下面是在基于Debian的Linux上安装apt-fast的步骤

Debian

$ sudo apt-get install aria2
$ wget https://github.com/ilikenwf/apt-fast/archive/master.zip
$ unzip master.zip
$ cd apt-fast-master
$ sudo cp apt-fast /usr/bin
$ sudo cp apt-fast.conf /etc
$ sudo cp ./man/apt-fast.8 /usr/share/man/man8
$ sudo gzip /usr/share/man/man8/apt-fast.8
$ sudo cp ./man/apt-fast.conf.5 /usr/share/man/man5
$ sudo gzip /usr/share/man/man5/apt-fast.conf.5

Ubuntu 14.04 以及更高版本

$ sudo add-apt-repository ppa:saiarcot895/myppa
$ sudo apt-get update
$ sudo apt-get install apt-fast

Ubuntu 11.04 到 Ubuntu 13.10

$ sudo add-apt-repository ppa:apt-fast/stable
$ sudo apt-get update
$ sudo apt-get install apt-fast

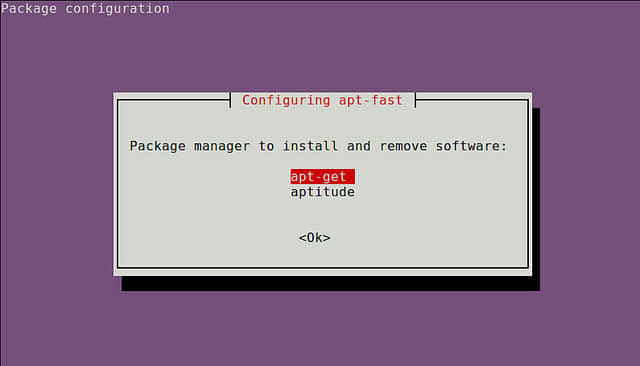
在安装期间,你需要选择一个默认的软件包管理器 (e.g., apt-get. aptitude ),还需要设置其余选项。但是你可以随时通过编辑配置文件 /etc/apt-fast/conf 来更改设置。

配置 apt-get

安装完成后,你需要在/etc/apt-fast.conf里配置apt-fast使用的一系列镜像。

你可以在下面的URL中找到一系列Debian/Ubuntu镜像。

选择完那些地理上靠近你的镜像后,你需按照下面的格式将选择的镜像加入到/etc/apt-fast.conf。

$ sudo vi /etc/apt-fast.conf

Debian:

MIRRORS=('http://ftp.us.debian.org/debian/,http://carroll.aset.psu.edu/pub/linux/distributions/debian/,http://debian.gtisc.gatech.edu/debian/,http://debian.lcs.mit.edu/debian/,http://mirror.cc.columbia.edu/debian/')

Ubuntu/Mint:

MIRRORS=('http://us.archive.ubuntu.com/ubuntu,http://mirror.cc.columbia.edu/pub/linux/ubuntu/archive/,http://mirror.cc.vt.edu/pub2/ubuntu/,http://mirror.umd.edu/ubuntu/,http://mirrors.mit.edu/ubuntu/')

如上面所示,对于一个特定档案的个别镜像,需要用逗号分割开来。你需要在/etc/apt/sources.list的MIRRORS字符串中包含默认的镜像指定站点。

使用apt-fast安装一个包

现在你就可以测试apt-fast的强大了。下面是使用apt-fast的示例:

apt-fast [apt-get options and arguments]
apt-fast [aptitude options and arguments]
apt-fast { { install | upgrade | dist-upgrade | build-dep | download  | source  } [ -y | --yes | --assume-yes | --assume-no ]   ... | clean }

使用apt-fast安装包:

 $ sudo apt-fast install texlive-full

在当前目录下载软件包,但不安装:

 $ sudo apt-fast download texlive-full

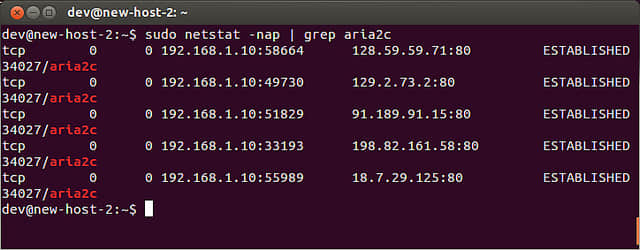
如前面所示,apt-fast的并行下载是通过aria2完成的。你可以看到如下图般从多个镜像并行下载。

$ sudo netstat -nap | grep aria2c

请注意,apt-fast并没有加速"apt-get update"。并行下载只在"install", "upgrade", "dist-upgrage"和"build-dep"操作中触发。其余的操作,apt-fast就会简单地回到默认的包管理器apt-get或aptitude。

apt-fast有多快?

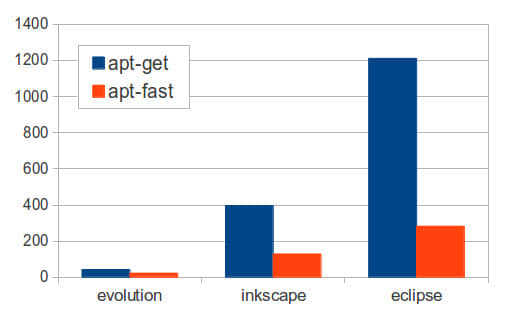
为了比较apt-fast和apt-get,我尝试在两个相同的Ubuntu实例上使用两种方法安装几个软件包。下面的图表展示了所有软件包安装的时间(单位为秒)。

正如你所见到的,apt-fast确实比apt-get快(e.g. 快3--4秒),特别是安装庞大软件包的时候。

当然,安装性能的提高程度还依赖你上游因特网连通性。以我为例,我有富足的带宽来支持我的上游连接。这也是为什么我看到并行下载带来了成功的提高。


via: http://xmodulo.com/speed-slow-apt-get-install-debian-ubuntu.html

作者:Dan Nanni 译者:su-kaiyao 校对:wxy

本文由 LCTT 原创翻译,Linux中国 荣誉推出

为何要启用测试版/不稳定版?

测试版/不稳定版的Debian给开发者提供了一个比当前稳定版更新的环境以及软件。你们注意到了么?其实这些稳定版啊不稳定版啊神马的都是别名,比方说稳定版其实就是Debian的稳定发行版,而测试版将会是下一个Debian的稳定发行版(当然那是测试后的事了)。截至发稿为止,当前Debian的稳定发行版是Wheezy 7.x,将会成为下一个稳定版的测试版则是Jessie。

当你需要一款应用的最新版本的时候,启用测试版/不稳定版将会是不二的选择。当初我因为工作需要,要安装个Apache的 2.4.x到我的Debian Wheezy。测试版需要的是2.4.x的,可是我的软件库里面只有2.2.x的。所以最好的解决方案当时是将测试版下下来啦。

通常来说当我们想尝试最新版本的应用时,都应该只在测试版软件库中搜索。

(题图来源)

在这篇文章里我将教大家如何在不弄坏你系统的前提下设置好测试、不稳定版的Debain系统并在上面安装软件。

Stable < Testing < Unstable (稳定 < 测试版 < 不稳定版)
Wheezy < Jessie < Sid

1. 设置测试版/不稳定版的apt源

第一步是把测试版/不稳定版的源加到你的sources.list文件里。在Debian Wheezy系统上,/etc/apt/sources.list理应长得像这样:

$ cat /etc/apt/sources.list

...
deb http://security.debian.org/ wheezy/updates main
deb http://http.us.debian.org/debian/ wheezy main
deb-src http://security.debian.org/ wheezy/updates main
...

把你repo服务器的链接记下来,比如:http://http.us.debian.org/debian/

这个repo服务器将会是离你最近的一个服务器; 在不同的地理位置会有不同的url,这个将会用于下一步。

如果想加测试/不稳定源,则需要在sources.list文件加上这些东西:

# Testing repository - main, contrib and non-free branches
deb http://http.us.debian.org/debian testing main non-free contrib
deb-src http://http.us.debian.org/debian testing main non-free contrib


# Testing security updates repository
deb http://security.debian.org/ testing/updates main contrib non-free
deb-src http://security.debian.org/ testing/updates main contrib non-free


# Unstable repo main, contrib and non-free branches, no security updates here
deb http://http.us.debian.org/debian unstable main non-free contrib
deb-src http://http.us.debian.org/debian unstable main non-free contrib

格式将会是

deb <respository server/mirror> <repository name> <sub branches of the repo>
(deb <上一步弄的服务器或镜像url> <repo的名字> <repo底下的分支>)

当然啦,除了用testing或者unstable这么烂的词,也能使用他们的发行版代号,比如Jessie或者Sid

deb http://http.us.debian.org/debian jessie main non-free contrib
deb http://security.debian.org/ jessie/updates main contrib non-free
deb http://http.us.debian.org/debian sid main non-free contrib

2. 钉住 apt!这非常重要

在加了测试/不稳定的repo之后,当你更新系统的时候所有安装过并且可用的软件就会立马更新,而后你的系统就被你玩火自焚了。

所以需要设置一些规则,以便选定的软件包在正常的更新时不会被更新到一个不稳定的测试版本。

我们需要使用“钉住APT”的方式来告诉apt系统,除了我们希望使用测试版或不稳定版的特定软件包之外,其它的总是使用稳定版的软件包来更新。

可以通过如下两个文件之一来设置如何设置APT的优先级来“钉住”。

/etc/apt/preferences
或
/etc/apt/preferences.d/my_preferences

打开这两个文件之一(如果没有的话就创建一个),然后输入如下内容:

Package: *
Pin: release a=stable
Pin-Priority: 700

Package: *
Pin: release a=testing
Pin-Priority: 650

Package: *
Pin: release a=unstable
Pin-Priority: 600

前面我们提到过,稳定版指的是你当前的debian版本,测试版是下一个,而不稳定版则是更远的将来发行版。上面的设置中最主要的是优先级(Pin-Priority)。当前的稳定版应该有最高的优先级,这就是说,正常的apt-get操作只会从当前的稳定版的软件库(现在是wheezy)里面安装软件。

更新包缓存

在增加了新的软件库和指定了优先规则后,需要更新一下包缓存。

$ sudo apt-get update

确认APT规则

我们必须确认“钉住”的设置正确,优先级也没问题。使用 apt-cache 的 policy 参数来检查:

$ apt-cache policy apache2
apache2:
  Installed: (none)
  Candidate: 2.2.22-13
  Version table:
     2.4.7-1 0
        600 http://http.us.debian.org/debian/ unstable/main amd64 Packages
     2.4.6-3 0
        650 http://http.us.debian.org/debian/ testing/main amd64 Packages
     2.2.22-13 0
        700 http://http.us.debian.org/debian/ wheezy/main amd64 Packages

如上的输出,确认在wheezy 稳定版中, 2.2.22 版本的Apache是选定的版本,它有最高的优先级。

3. 从测试版/不稳定版软件库中安装软件

现在可以从测试版或不稳定版中选择一个特定的软件来安装它了。假如说我们要从测试版软件源中安装 apache2。

有两个不同的方法,并且其结果也有所不同。

方式一

# apt-get install apache2/testing

上述命令会从测试版软件库中安装 apache2,并从稳定版软件库中安装其依赖包(稳定版通过apt规则确定)。这个命令在某些情况下会失败,比如安装的软件包(apache2)所需的依赖包在稳定版软件库中没有更新到可以支持该软件时。

方式二

# apt-get -t testing install apache2

上述命令会从测试版软件库中安装apache2,并从测试版软件库中安装其依赖包。这要比上面的命令工作的更好。

所以,要安装较新的软件包,直接从测试版/不稳定版的软件库中安装就行了。注意,优先级号码不只是一个数字而已,还有其特定意义。可以查看 apt\_preferences的man页面了解更多:

$ man 5 apt_preferences

总结

使用“钉住”方式的测试版/不稳定版的软件库是一个获取较新版本软件包的一个好办法,不过其实并不推荐使用它们。如果弄错了,可能会从也许不兼容的分支上下载软件包,这会把你的系统搞乱。

一个更好的方式是,使用向后移植的软件库来安装更新的包。它从测试版和不稳定版的软件库中获取较新版本的软件包,但是为当前的稳定版软件库而编译。所以,对于 debian wheezy来说,你可以使用wheezy-backports 软件库。访问http://backports.debian.org/ 了解更多。

资源


via: http://www.binarytides.com/enable-testing-repo-debian/

译者:213edu wxy 校对:wxy

本文由 LCTT 原创翻译,Linux中国 荣誉推出

对 Ubuntu 默认的 Ambiance 主题不太满意?何不试试其它的主题,用换主题的方式来改变你的桌面外观?如果你不知道哪些主题对你有用的话,我已经列出了 Ubuntu 13.10 最好的主题。在我们看这些主题前,用简单的句子说明下该怎么样使用这些主题。

在 Ubuntu 13.10 中安装主题

在 Ubuntu 中要使用主题有两种方式,既可以添加 PPA 来下载也可以直接下载主题文件。如果你是直接下载的文件,要把它解压到 ~/.themes 或者 /user/share/themes 目录中。如果你是通过添加 PPA 来下载的,并不需要做什么特殊的操作。

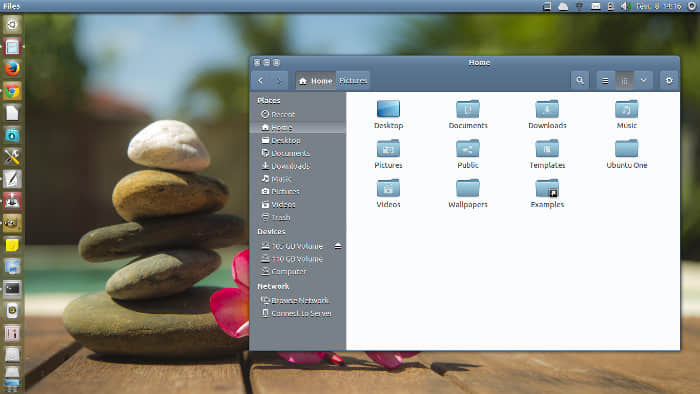
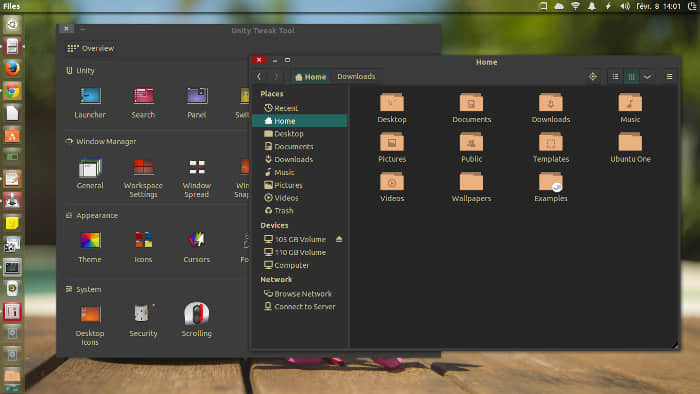
下一步就是正式使用已经安装的主题。你可以使用 Unity Tweak 工具软件来切换到已经安装的主题。请参考这篇文章如何在 Ubuntu 13.10 上安装主题上的截图教程.

Ubuntu 13.10 最好的 Unity 主题:

大多数主题都是由主题本身和图标集组成的。我的建议是主题本身及图标集都要从同一个主题集中安装,以使它们更漂亮。事不宜迟,让我们看些 Ubuntu13.10 中最好的主题:

Numix

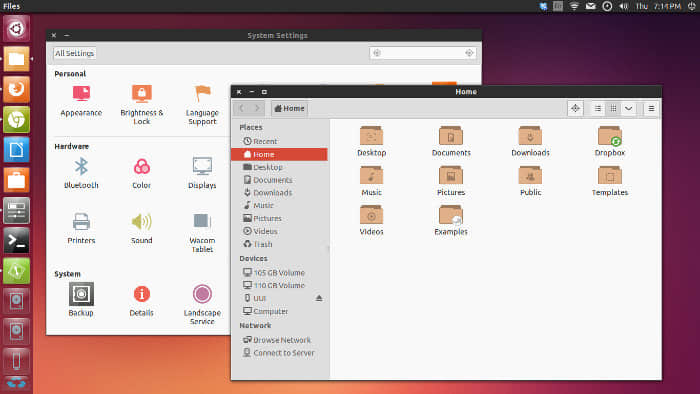
Numix 确实是一款漂亮的主题。它有着扁平和弧形图标,并且完美的集成进 Unity 桌面环境中。在终端下可以使用下面的命令来安装 Numix 主题和图表集:

sudo add-apt-repository ppa:numix/ppa
sudo apt-get update
sudo apt-get install numix-gtk-theme numix-icon-theme numix-icon-theme-circle numix-wallpaper-saucy

Moka

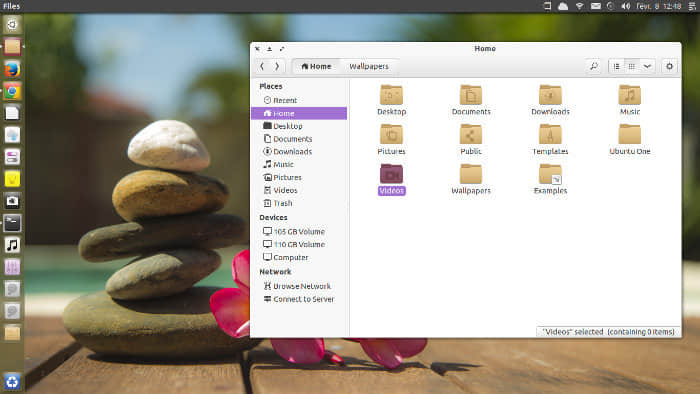
漂亮,不是吗?使用如下命令来安装 Moka GTK 主题和图标集:

sudo add-apt-repository ppa:snwh/moka-gtk-theme-daily
sudo add-apt-repository ppa:snwh/moka-icon-theme-daily
sudo apt-get update
sudo apt-get install moka-gtk-theme moka-icon-theme moka-icon-theme-symbolic moka-icon-theme-extras

zonColor

zonColor 是从亮到暗及颜色相异的几个主题组成的一个包。它也由自己的图标集。使用如下的命令来安装 zonColor 主题和图标集。

sudo add-apt-repository ppa:noobslab/themes
sudo add-apt-repository ppa:noobslab/icons
sudo apt-get update
sudo apt-get install zoncolor-themes zoncolor-icons

Nokto

Nokto 没有自己的图标集,但它是一个很漂亮的黑色主题。要安装 Natko, 可以使用如下的命令:

sudo add-apt-repository ppa:noobslab/themes
sudo apt-get update
sudo apt-get install nokto-theme

Flattastic

很像 Nokto, Flattastic 也没有自己的图标集,但你可以使用任何的平面图标,它们会与主题融合的很好。虽然它不能以 PPA 的方式来安装,但是你可以从这儿下载到文件然后来安装。一旦下载完成,把 zip 压缩文件解压到 /usr/share/themes 目录下,然后你就可以使用 Unity Tweak 工具来选择使用这个主题。

这就是 Ubuntu 13.10 下5个最棒主题。你也许会想看看类似的文章,这列出了 Ubuntu 下5个最棒的图标集.您觉得这些主题怎么样?除了这些提到的,您有一个您最钟爱的吗?请跟我们分享。


via: http://itsfoss.com/best-themes-ubuntu-1310/

译者:runningwater 校对:wxy

本文由 LCTT 原创翻译,Linux中国 荣誉推出

apt-fast是一个为 apt-getaptitude 做的“ shell脚本封装 ”,通过对每个包进行并发下载的方式可以大大减少APT的下载时间。apt-fast使用aria2c或axel下载管理器来减少APT下载时间。就像传统的apt-get包管理器一样,apt-fast支持几乎所有的apt-get功能,如, install , remove , update , upgrade , dist-upgrade 等等,并且更重要的是它也支持proxy。

在Ubuntu上安装apt-fast

使用以下PPA去安装apt-fast。apt-fast开发者说:“ 一些发行版,如PCLinux已经在他们默认的仓库中包括了apt-fast 。” 我希望它将来也包含在Ubuntu/Debian的默认仓库中。

添加apt-fast的PPA,在终端中输入以下命令。

sudo add-apt-repository ppa:apt-fast/stable

用命令更新源:

sudo apt-get update

使用命令安装apt-fast:

sudo apt-get install apt-fast

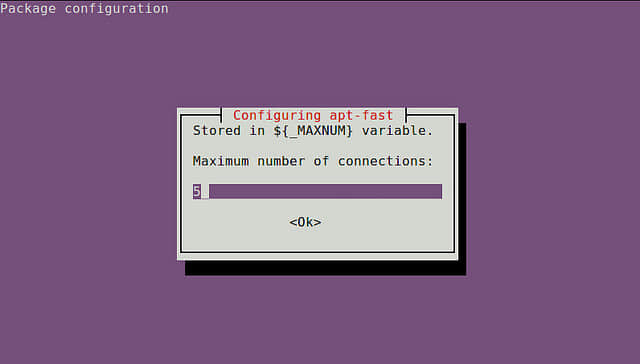
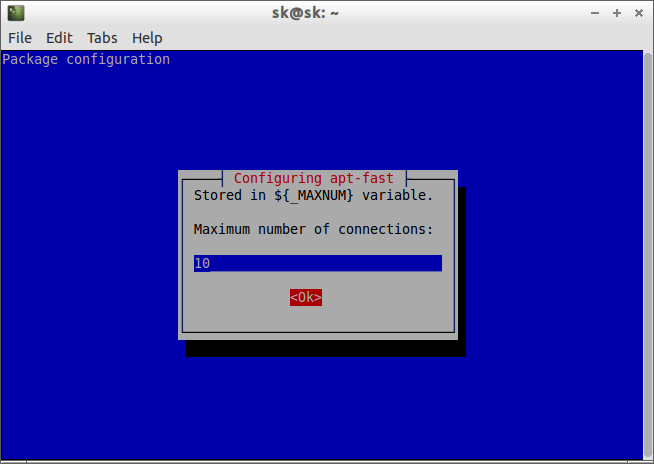
在安装期间,它将要求你输入下载包的最大并发链接数。

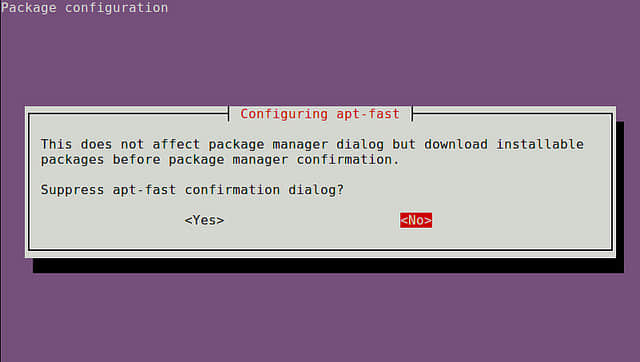
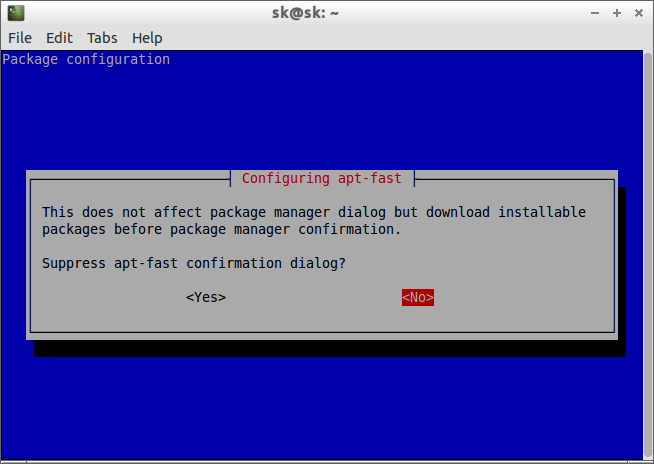
在下一个对话框里面,会问你是否要禁止apt-fast的确认对话框。选择No并继续安装。如果你选择Yes,apt-fast在安装软件包时不会问你确认与否。

我发现 aria2 下载管理器已经随着apt-fast的安装而自动安装。所以,你不必单独安装aria2。

如果你想重新配置apt-fast选项,你可以使用命令:

sudo dpkg-reconfigure apt-fast

用法

与apt-get功能相似,我们可以使用:

apt-fast install package
apt-fast remove package
apt-fast update
apt-fast upgrade
apt-fast dist-upgrade

及更多命令。

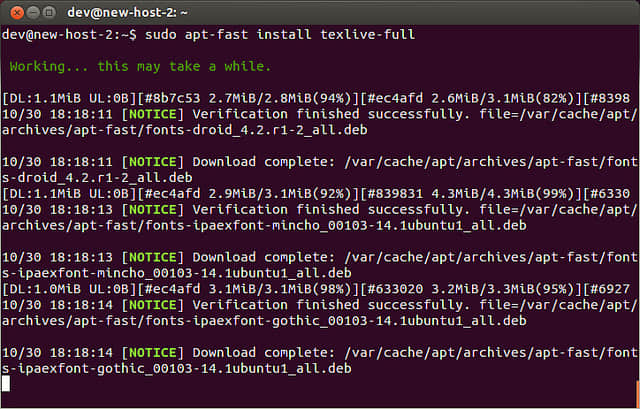
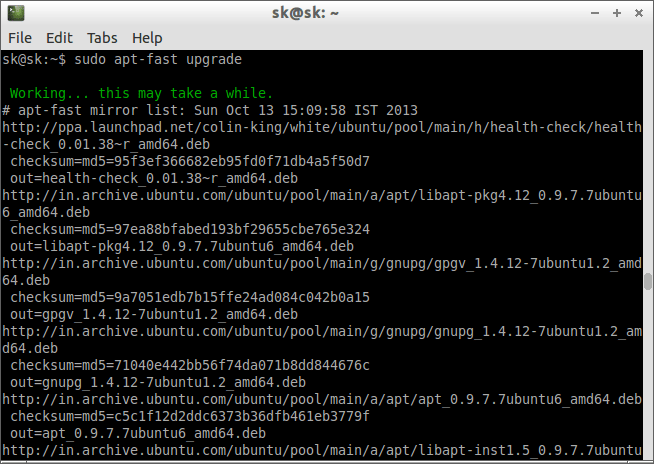
这是一个正在工作中的apt-fast包管理器:

创建别名(可选)

编辑 ~/.bashrc 文件在末尾添加下面这行。

alias apt-get='apt-fast'

或者简单运行以下命令在你的 ~/.bashrc 中添加它。

sudo echo "alias apt-get='apt-fast'" >> ~/.bashrc

从现在每当你运行apt-get命令去移除,更新和升级包时,它将在后台自动使用apt-fast。听起来很酷吧?

在测试期间,当下载包时我发现它与apt-get相比非常快。试一试,你一定会赞同我的看法。感谢阅读!!

via: http://www.unixmen.com/improve-apt-get-download-speed-apt-fast/

译者:Vito 校对:Caroline

本文由 LCTT 原创翻译,Linux中国 荣誉推出

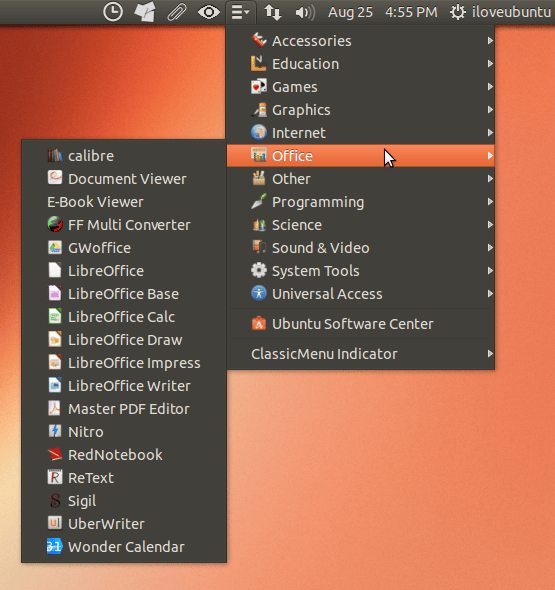
ClassicMenu Indicator 是一个很方便使用的程序菜单列表工具。简单的说就是一个开始菜单程序。可以设置在 Unity panel 上。使用的时候,只需要一个点击,就可以找到你需要使用的各个程序。

ClassicMenu Indicator 已经更新到 0.08 版,对前面的版本进行了优化,同时支持更多的 Ubuntu 不同版本。

我们可以通过 PPA 很简单的来安装它,支持 Ubuntu 12.04, Ubuntu 12.10, Ubuntu 13.04, Ubuntu 13.10 。命令如下:

sudo add-apt-repository ppa:diesch/testing
sudo apt-get update
sudo apt-get install classicmenu-indicator

安装完毕后可以通过 Dash 中搜索 ClassicMenu 来运行它。

已同步至 linux的微博