标签 脚本 下的文章

在 Linux 中有两种运行 shell 脚本的方法。你可以使用:

bash script.sh

或者,你可以像这样执行 shell 脚本:

./script.sh

这可能很简单,但没太多解释。不要担心,我将使用示例来进行必要的解释,以便你能理解为什么在运行一个 shell 脚本时要使用给定的特定语法格式。

我将使用这一行 shell 脚本来使需要解释的事情变地尽可能简单:

abhishek@itsfoss:~/Scripts$ cat hello.sh

echo "Hello World!"

方法 1:通过将文件作为参数传递给 shell 以运行 shell 脚本

第一种方法涉及将脚本文件的名称作为参数传递给 shell 。

考虑到 bash 是默认 shell,你可以像这样运行一个脚本:

bash hello.sh

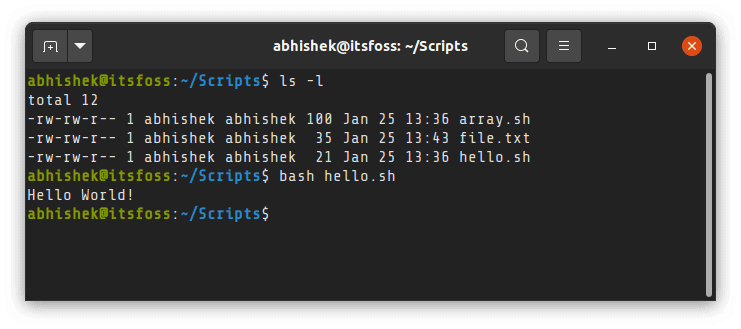
你知道这种方法的优点吗?你的脚本不需要执行权限。对于简单的任务非常方便快速。

在 Linux 中运行一个 Shell 脚本

如果你还不熟悉,我建议你 阅读我的 Linux 文件权限详细指南

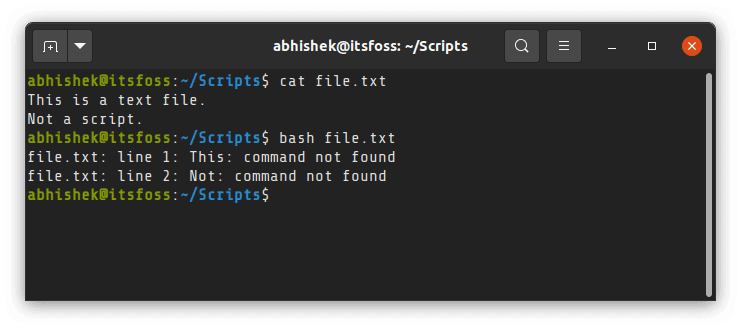
记住,将其作为参数传递的需要是一个 shell 脚本。一个 shell 脚本是由命令组成的。如果你使用一个普通的文本文件,它将会抱怨错误的命令。

运行一个文本文件为脚本

在这种方法中,你要明确地具体指定你想使用 bash 作为脚本的解释器

shell 只是一个程序,并且 bash 只是 Shell 的一种实现。还有其它的 shell 程序,像 ksh 、zsh 等等。如果你安装有其它的 shell ,你也可以使用它们来代替 bash 。

例如,我已安装了 zsh ,并使用它来运行相同的脚本:

使用 Zsh 来执行 Shell 脚本

方法 2:通过具体指定 shell 脚本的路径来执行脚本

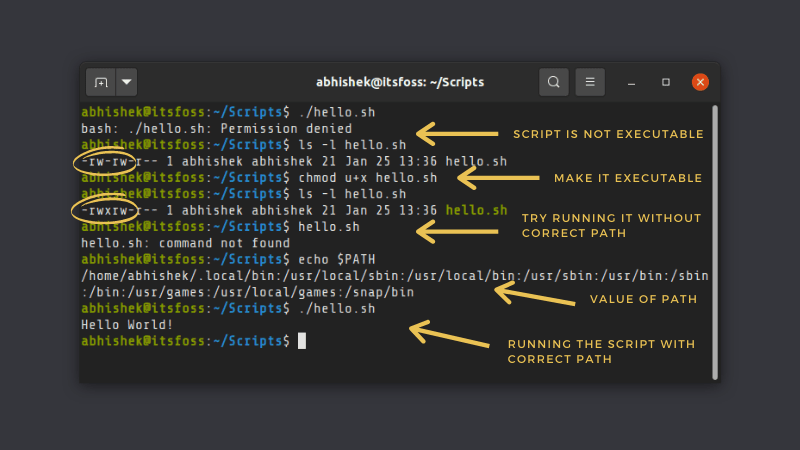
另外一种运行一个 shell 脚本的方法是通过提供它的路径。但是要这样做之前,你的文件必须是可执行的。否则,当你尝试执行脚本时,你将会得到 “权限被拒绝” 的错误。

因此,你首先需要确保你的脚本有可执行权限。你可以 使用 chmod 命令 来给予你自己脚本的这种权限,像这样:

chmod u+x script.sh

使你的脚本是可执行之后,你只需输入文件的名称及其绝对路径或相对路径。大多数情况下,你都在同一个目录中,因此你可以像这样使用它:

./script.sh

如果你与你的脚本不在同一个目录中,你可以具体指定脚本的绝对路径或相对路径:

在其它的目录中运行 Shell 脚本

在脚本前的这个 ./ 是非常重要的(当你与脚本在同一个目录中)。

为什么当你在同一个目录下,却不能使用脚本名称?这是因为你的 Linux 系统会在 PATH 环境变量中指定的几个目录中查找可执行的文件来运行。

这里是我的系统的 PATH 环境变量的值:

abhishek@itsfoss:~$ echo $PATH
/home/abhishek/.local/bin:/usr/local/sbin:/usr/local/bin:/usr/sbin:/usr/bin:/sbin:/bin:/usr/games:/usr/local/games:/snap/bin

这意味着在下面目录中具有可执行权限的任意文件都可以在系统的任何位置运行:

  • /home/abhishek/.local/bin
  • /usr/local/sbin
  • /usr/local/bin
  • /usr/sbin
  • /usr/bin
  • /sbin
  • /bin
  • /usr/games
  • /usr/local/games
  • /snap/bin

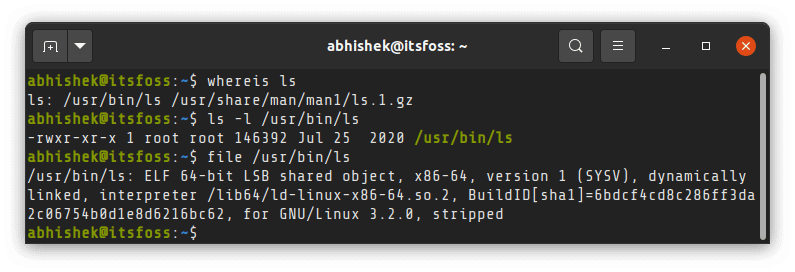
Linux 命令(像 lscat 等)的二进制文件或可执行文件都位于这些目录中的其中一个。这就是为什么你可以在你系统的任何位置通过使用命令的名称来运作这些命令的原因。看看,ls 命令就是位于 /usr/bin 目录中。

当你使用脚本而不具体指定其绝对路径或相对路径时,系统将不能在 PATH 环境变量中找到提及的脚本。

为什么大多数 shell 脚本在其头部包含 #! /bin/bash ?

记得我提过 shell 只是一个程序,并且有 shell 程序的不同实现。

当你使用 #! /bin/bash 时,你是具体指定 bash 作为解释器来运行脚本。如果你不这样做,并且以 ./script.sh 的方式运行一个脚本,它通常会在你正在运行的 shell 中运行。

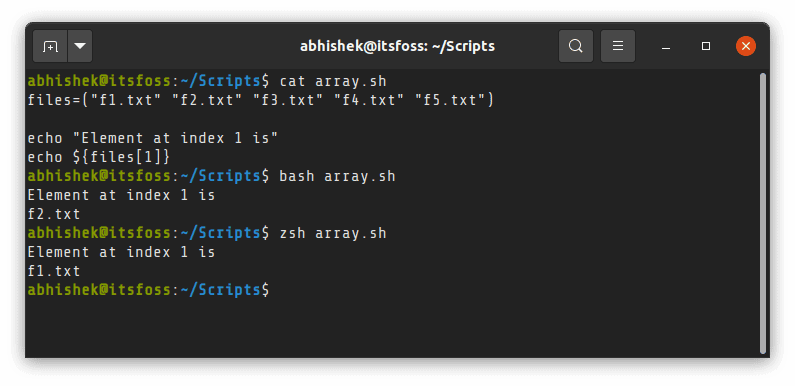
有问题吗?可能会有。看看,大多数的 shell 语法是大多数种类的 shell 中通用的,但是有一些语法可能会有所不同。

例如,在 bash 和 zsh 中数组的行为是不同的。在 zsh 中,数组索引是从 1 开始的,而不是从 0 开始。

Bash Vs Zsh

使用 #! /bin/bash 来标识该脚本是 bash 脚本,并且应该使用 bash 作为脚本的解释器来运行,而不受在系统上正在使用的 shell 的影响。如果你使用 zsh 的特殊语法,你可以通过在脚本的第一行添加 #! /bin/zsh 的方式来标识其是 zsh 脚本。

#!/bin/bash 之间的空格是没有影响的。你也可以使用 #!/bin/bash

它有帮助吗?

我希望这篇文章能够增加你的 Linux 知识。如果你还有问题或建议,请留下评论。

专家用户可能依然会挑出我遗漏的东西。但这种初级题材的问题是,要找到信息的平衡点,避免细节过多或过少,并不容易。

如果你对学习 bash 脚本感兴趣,在我们专注于系统管理的网站 Linux Handbook 上,我们有一个 完整的 Bash 初学者系列 。如果你想要,你也可以 购买带有附加练习的电子书 ,以支持 Linux Handbook。


via: https://itsfoss.com/run-shell-script-linux/

作者:Abhishek Prakash 选题:lujun9972 译者:robsean 校对:wxy

本文由 LCTT 原创编译,Linux中国 荣誉推出

如果某些事情不得不重复做三遍,尝试使其自动化。

 title=

之前写过关于社区管理员的工作,如果你问 10 位社区管理员,你会得到 12 个不同的答案。不过,大多数情况下,你做的是社区需要你在任何特定时刻做的事情。而且很多事情可能是重复的。

当我还是系统管理员时,我遵循一个规则:如果某些事必须做三遍,我会尝试使其自动化。当然,如今,使用诸如 Ansible 这样的强大工具,就有了一整套科学的方法。

我每天或每周要做的一些事情涉及在一些地方查找内容,然后生成信息的摘要或报告,然后发布到别处。这样的任务是自动化的理想选择。这些并不是什么 难事,当我与同事共享其中一些脚本时,总是至少有一个能证明这是有用的。

在 GitHub 上,我有几个每周都要使用的脚本。它们都不是很复杂,但每次都为我节省几分钟。其中一些是用 Perl 写的,因为我快 50 岁了(这些是我早些年写的)。有些是用 Python 写的,因为几年前,我决定要学习 Python。

以下是概述:

tshirts.py

这个简单的 tshirts.py 脚本会根据你要定制的活动 T 恤的数量,然后告诉你尺寸分布是什么。它将这些尺寸分布在一条正态曲线(也称为 “钟形曲线”)上,以我的经验,这和一个正常的会议观众的实际需求非常吻合。如果在美国使用,则可能需要将脚本中的值调整的稍大一些;如果在欧洲使用,则可能需要将脚本中的值稍稍缩小一些。你的情况也许不同。

用法:

[rbowen@sasha:community-tools/scripts]$ ./tshirts.py                                                                                                                                                          
How many shirts? 300
For a total of 300 shirts, order:

30.0 small
72.0 medium
96.0 large
72.0 xl
30.0 2xl

followers.py

followers.py 脚本为我提供了我关心的 Twitter 账号的关注者数量。

该脚本只有 14 行,没什么复杂的,但是它可能节省我十分钟的加载网页和查找数字的时间。

你需要编辑 feed 数组以添加你关心的帐户:

feeds = [
        'centosproject',
        'centos'
        ];

注意:如果你在英语国家以外的地方运行它,则可能无法正常工作,因为它只是一个简单的屏幕抓取脚本,它读取 HTML 并查找其中包含的特定信息。因此,当输出使用其他语言时,正则表达式可能不匹配。

用法:

[rbowen@sasha:community-tools/scripts]$ ./followers.py                                                                                                                                                                          
centosproject: 11,479 Followers
centos: 18,155 Followers

get\_meetups

get\_meetups 脚本S 另一种类别的脚本 —— API脚本。这个特定的脚本使用 meetup.com 网站的 API 来寻找在特定区域和时间范围内特定主题的聚会,以便我可以将它报告给我的社区。你所依赖的许多服务都提供了 API,因此你的脚本可以查找信息,而无需手动查找网页。学习如何使用这些 API 既令人沮丧又耗时,但是最终将获得可以节省大量时间的技能。

免责声明:meetup.com 已于 2019 年 8 月更改了他们的 API,我还没有将这个脚本更新到新的API,所以它现在实际上并没有工作。在接下来的几周内请关注此版本的修复版本。

centos-announcements.pl

centos-announcements.pl 脚本要复杂得多,而且对我的用例来说非常特殊,但你可能有类似的情况。在本例中该脚本查看邮件列表存档(centos-announce 邮件列表),并查找具有特定格式的邮件,然后生成这些邮件的报告。报告有两种不同的格式:一种用于我的每月新闻通讯,另一种用于安排 Twitter 信息(借助于 Hootsuite)。

我使用 Hootsuite 为 Twitter 安排内容,它们具有便捷的 CSV(逗号分隔值)格式,你可以一次批量安排整整一周的推文。从各种数据源(比如:邮件列表、博客、其他网页)自动生成 CSV 格式可以节省大量时间。但是请注意,这可能只应该用于初稿,然后你可以对其进行检查和编辑,以便最终不会自动发布你不想要内容的推文。

reporting.pl

reporting.pl 脚本也是相当特定的,以满足我的特殊需求,但是这个概念本身是通用的。我每月向 CentOS SIG(特殊兴趣小组)发送邮件,这些邮件计划在给定的月份报告。该脚本只是告诉我本月有哪些 SIG,并记录需要发送给他们的电子邮件。

但是,因以下两个原因,实际上并未发送该电子邮件。第一,我希望在消息发送之前对其进行编辑。第二,虽然发送电子邮件的脚本在过去很有效,但如今,很可能被当做垃圾邮件而被过滤。

总结

在这个存储库中还有一些其他脚本,这些脚本或多或少是针对我的特定需求的,但是我希望其中至少有一个脚本对你有用,并且希望这些脚本的多样性能激励你去自动化一些你自己的东西。我也希望看到你的自动化脚本存储库;在评论中链接他们!


via: https://opensource.com/article/20/3/automating-community-management-python

作者:Rich Bowen 选题:lujun9972 译者:stevenzdg988 校对:wxy

本文由 LCTT 原创编译,Linux中国 荣誉推出

无论你的脚本是否成功运行, 信号捕获 trap 都能让它平稳结束。

Shell 脚本的启动并不难被检测到,但 Shell 脚本的终止检测却并不容易,因为我们无法确定脚本会按照预期地正常结束,还是由于意外的错误导致失败。当脚本执行失败时,将正在处理的内容记录下来是非常有用的做法,但有时候这样做起来并不方便。而 Bashtrap 命令的存在正是为了解决这个问题,它可以捕获到脚本的终止信号,并以某种预设的方式作出应对。

响应失败

如果出现了一个错误,可能导致发生一连串错误。下面示例脚本中,首先在 /tmp 中创建一个临时目录,这样可以在临时目录中执行解包、文件处理等操作,然后再以另一种压缩格式进行打包:

#!/usr/bin/env bash
CWD=`pwd`
TMP=${TMP:-/tmp/tmpdir}

## create tmp dir
mkdir "${TMP}"

## extract files to tmp
tar xf "${1}" --directory "${TMP}"

## move to tmpdir and run commands
pushd "${TMP}"
for IMG in *.jpg; do
  mogrify -verbose -flip -flop "${IMG}"
done
tar --create --file "${1%.*}".tar *.jpg

## move back to origin
popd

## bundle with bzip2
bzip2 --compress "${TMP}"/"${1%.*}".tar \
      --stdout > "${1%.*}".tbz

## clean up
/usr/bin/rm -r /tmp/tmpdir

一般情况下,这个脚本都可以按照预期执行。但如果归档文件中的文件是 PNG 文件而不是期望的 JPEG 文件,脚本就会在中途失败,这时候另一个问题就出现了:最后一步删除临时目录的操作没有被正常执行。如果你手动把临时目录删掉,倒是不会造成什么影响,但是如果没有手动把临时目录删掉,在下一次执行这个脚本的时候,它必须处理一个现有的临时目录,里面充满了不可预知的剩余文件。

其中一个解决方案是在脚本开头增加一个预防性删除逻辑用来处理这种情况。但这种做法显得有些暴力,而我们更应该从结构上解决这个问题。使用 trap 是一个优雅的方法。

使用 trap 捕获信号

我们可以通过 trap 捕捉程序运行时的信号。如果你使用过 kill 或者 killall 命令,那你就已经使用过名为 SIGTERM 的信号了。除此以外,还可以执行 trap -ltrap --list 命令列出其它更多的信号:

$ trap --list
 1) SIGHUP       2) SIGINT       3) SIGQUIT      4) SIGILL       5) SIGTRAP
 6) SIGABRT      7) SIGBUS       8) SIGFPE       9) SIGKILL     10) SIGUSR1
11) SIGSEGV     12) SIGUSR2     13) SIGPIPE     14) SIGALRM     15) SIGTERM
16) SIGSTKFLT   17) SIGCHLD     18) SIGCONT     19) SIGSTOP     20) SIGTSTP
21) SIGTTIN     22) SIGTTOU     23) SIGURG      24) SIGXCPU     25) SIGXFSZ
26) SIGVTALRM   27) SIGPROF     28) SIGWINCH    29) SIGIO       30) SIGPWR
31) SIGSYS      34) SIGRTMIN    35) SIGRTMIN+1  36) SIGRTMIN+2  37) SIGRTMIN+3
38) SIGRTMIN+4  39) SIGRTMIN+5  40) SIGRTMIN+6  41) SIGRTMIN+7  42) SIGRTMIN+8
43) SIGRTMIN+9  44) SIGRTMIN+10 45) SIGRTMIN+11 46) SIGRTMIN+12 47) SIGRTMIN+13
48) SIGRTMIN+14 49) SIGRTMIN+15 50) SIGRTMAX-14 51) SIGRTMAX-13 52) SIGRTMAX-12
53) SIGRTMAX-11 54) SIGRTMAX-10 55) SIGRTMAX-9  56) SIGRTMAX-8  57) SIGRTMAX-7
58) SIGRTMAX-6  59) SIGRTMAX-5  60) SIGRTMAX-4  61) SIGRTMAX-3  62) SIGRTMAX-2
63) SIGRTMAX-1  64) SIGRTMAX

可以被 trap 识别的信号除了以上这些,还包括:

  • EXIT:进程退出时发出的信号
  • ERR:进程以非 0 状态码退出时发出的信号
  • DEBUG:表示调试模式的布尔值

如果要在 Bash 中实现信号捕获,只需要在 trap 后加上需要执行的命令,再加上需要捕获的信号列表就可以了。

例如,下面的这行语句可以捕获到在进程运行时用户按下 Ctrl + C 组合键发出的 SIGINT 信号:

trap "{ echo 'Terminated with Ctrl+C'; }" SIGINT

因此,上文中脚本的缺陷可以通过使用 trap 捕获 SIGINTSIGTERM、进程错误退出、进程正常退出等信号,并正确处理临时目录的方式来修复:

#!/usr/bin/env bash
CWD=`pwd`
TMP=${TMP:-/tmp/tmpdir}

trap \
 "{ /usr/bin/rm -r "${TMP}" ; exit 255; }" \
 SIGINT SIGTERM ERR EXIT

## create tmp dir
mkdir "${TMP}"
tar xf "${1}" --directory "${TMP}"

## move to tmp and run commands
pushd "${TMP}"
for IMG in *.jpg; do
  mogrify -verbose -flip -flop "${IMG}"
done
tar --create --file "${1%.*}".tar *.jpg

## move back to origin
popd

## zip tar
bzip2 --compress $TMP/"${1%.*}".tar \
      --stdout > "${1%.*}".tbz

对于更复杂的功能,还可以用 Bash 函数来简化 trap 语句。

Bash 中的信号捕获

信号捕获可以让脚本在无论是否成功执行所有任务的情况下都能够正确完成清理工作,能让你的脚本更加可靠,这是一个很好的习惯。尽管尝试把信号捕获加入到你的脚本里看看能够起到什么作用吧。


via: https://opensource.com/article/20/6/bash-trap

作者:Seth Kenlon 选题:lujun9972 译者:HankChow 校对:wxy

本文由 LCTT 原创编译,Linux中国 荣誉推出

一个可以列出文件、目录、可执行文件和链接的简单脚本。

 title=

你是否曾经想列出目录中的所有文件,但仅列出文件,而不列出其它的。仅列出目录呢?如果有这种需求的话,那么下面的脚本可能正是你一直在寻找的,它在 GPLv3 下开源。

当然,你可以使用 find 命令:

find . -maxdepth 1 -type f -print

但这键入起来很麻烦,输出也不友好,并且缺少 ls 命令拥有的一些改进。你还可以结合使用 lsgrep 来达到相同的结果:

ls -F . | grep -v /

但是,这又有点笨拙。下面这个脚本提供了一种简单的替代方法。

用法

该脚本提供了四个主要功能,具体取决于你调用它的名称:lsf 列出文件,lsd 列出目录,lsx 列出可执行文件以及 lsl 列出链接。

通过符号链接无需安装该脚本的多个副本。这样可以节省空间并使脚本更新更容易。

该脚本通过使用 find 命令进行搜索,然后在找到的每个项目上运行 ls。这样做的好处是,任何给脚本的参数都将传递给 ls 命令。因此,例如,这可以列出所有文件,甚至包括以点开头的文件:

lsf -a

要以长格式列出目录,请使用 lsd 命令:

lsd -l

你可以提供多个参数,以及文件和目录路径。

下面提供了当前目录的父目录和 /usr/bin 目录中所有文件的长分类列表:

lsf -F -l .. /usr/bin

目前该脚本不处理递归,仅列出当前目录中的文件。

lsf -R

该脚本不会深入子目录,这个不足有一天可能会进行修复。

内部

该脚本采用自上而下的方式编写,其初始化功能位于脚本的开头,而工作主体则接近结尾。脚本中只有两个真正重要的功能。函数 parse_args() 会仔细分析命令行,将选项与路径名分开,并处理脚本中的 ls 命令行选项中的特定选项。

list_things_in_dir() 函数以目录名作为参数并在其上运行 find 命令。找到的每个项目都传递给 ls 命令进行显示。

总结

这是一个可以完成简单功能的简单脚本。它节省了时间,并且在使用大型文件系统时可能会非常有用。

脚本

#!/bin/bash

# Script to list:
#      directories (if called "lsd")
#      files       (if called "lsf")
#      links       (if called "lsl")
#  or  executables (if called "lsx")
# but not any other type of filesystem object.
# FIXME: add lsp   (list pipes)
#
# Usage:
#   <command_name> [switches valid for ls command] [dirname...]
#
# Works with names that includes spaces and that start with a hyphen.
#
# Created by Nick Clifton.
# Version 1.4
# Copyright (c) 2006, 2007 Red Hat.
#
# This is free software; you can redistribute it and/or modify it
# under the terms of the GNU General Public License as published
# by the Free Software Foundation; either version 3, or (at your
# option) any later version.

# It is distributed in the hope that it will be useful, but
# WITHOUT ANY WARRANTY; without even the implied warranty of
# MERCHANTABILITY or FITNESS FOR A PARTICULAR PURPOSE.  See the
# GNU General Public License for more details.

# ToDo:
#  Handle recursion, eg:  lsl -R
#  Handle switches that take arguments, eg --block-size
#  Handle --almost-all, --ignore-backups, --format and --ignore

main ()
{
  init
 
  parse_args ${1+"$@"}

  list_objects

  exit 0
}

report ()
{
  echo $prog": " ${1+"$@"}
}

fail ()
{
  report " Internal error: " ${1+"$@"}
  exit 1
}

# Initialise global variables.
init ()
{
  # Default to listing things in the current directory.
  dirs[0]=".";
 
  # num_dirs is the number of directories to be listed minus one.
  # This is because we are indexing the dirs[] array from zero.
  num_dirs=0;
 
  # Default to ignoring things that start with a period.
  no_dots=1
 
  # Note - the global variables 'type' and 'opts' are initialised in
  # parse_args function.
}

# Parse our command line
parse_args ()
{
  local no_more_args

  no_more_args=0 ;

  prog=`basename $0` ;

  # Decide if we are listing files or directories.
  case $prog in
    lsf | lsf.sh)
      type=f
      opts="";
      ;;
    lsd | lsd.sh)
      type=d
      # The -d switch to "ls" is presumed when listing directories.
      opts="-d";
      ;;
    lsl | lsl.sh)
      type=l
      # Use -d to prevent the listed links from being followed.
      opts="-d";
      ;;
    lsx | lsx.sh)
      type=f
      find_extras="-perm /111"
      ;;    
    *)
      fail "Unrecognised program name: '$prog', expected either 'lsd', 'lsf', 'lsl' or 'lsx'"
      ;;
  esac

  # Locate any additional command line switches for ls and accumulate them.
  # Likewise accumulate non-switches to the directories list.
  while [ $# -gt 0 ]
  do
    case "$1" in
      # FIXME: Handle switches that take arguments, eg --block-size
      # FIXME: Properly handle --almost-all, --ignore-backups, --format
      # FIXME:   and --ignore
      # FIXME: Properly handle --recursive
      -a | -A | --all | --almost-all)
        no_dots=0;
        ;;
      --version)
        report "version 1.2"
        exit 0
        ;;
      --help)
        case $type in
          d) report "a version of 'ls' that lists only directories" ;;
          l) report "a version of 'ls' that lists only links" ;;
          f) if [ "x$find_extras" = "x" ] ; then
               report "a version of 'ls' that lists only files" ;
             else
              report "a version of 'ls' that lists only executables";
             fi ;;
        esac
        exit 0
        ;;
      --)
        # A switch to say that all further items on the command line are
        # arguments and not switches.
        no_more_args=1 ;
        ;;
      -*)
        if [ "x$no_more_args" = "x1" ] ;
        then
          dirs[$num_dirs]="$1";
          let "num_dirs++"
        else
          # Check for a switch that just uses a single dash, not a double
          # dash.  This could actually be multiple switches combined into
          # one word, eg "lsd -alF".  In this case, scan for the -a switch.
          # XXX: FIXME: The use of =~ requires bash v3.0+.
          if [[ "x${1:1:1}" != "x-" && "x$1" =~ "x-.*a.*" ]] ;
          then
            no_dots=0;
          fi
          opts="$opts $1";
        fi
        ;;
      *)
        dirs[$num_dirs]="$1";
        let "num_dirs++"
        ;;
    esac
    shift
  done

  # Remember that we are counting from zero not one.
  if [ $num_dirs -gt 0 ] ;
  then
    let "num_dirs--"
  fi
}

list_things_in_dir ()
{
  local dir

  # Paranoia checks - the user should never encounter these.
  if test "x$1" = "x" ;
  then
    fail "list_things_in_dir called without an argument"
  fi

  if test "x$2" != "x" ;
  then
    fail "list_things_in_dir called with too many arguments"
  fi

  # Use quotes when accessing $dir in order to preserve
  # any spaces that might be in the directory name.
  dir="${dirs[$1]}";

  # Catch directory names that start with a dash - they
  # confuse pushd.
  if test "x${dir:0:1}" = "x-" ;
  then
    dir="./$dir"
  fi
 
  if [ -d "$dir" ]
  then
    if [ $num_dirs -gt 0 ]
    then
      echo "  $dir:"
    fi

    # Use pushd rather passing the directory name to find so that the
    # names that find passes on to xargs do not have any paths prepended.
    pushd "$dir" > /dev/null
    if [ $no_dots -ne 0 ] ; then
      find . -maxdepth 1 -type $type $find_extras -not -name ".*" -printf "%f\000" \
        | xargs --null --no-run-if-empty ls $opts -- ;
    else
      find . -maxdepth 1 -type $type $find_extras -printf "%f\000" \
        | xargs --null --no-run-if-empty ls $opts -- ;
    fi
    popd > /dev/null
  else
    report "directory '$dir' could not be found"
  fi
}

list_objects ()
{
  local i

  i=0;
  while [ $i -le $num_dirs ]
  do
    list_things_in_dir i
    let "i++"
  done
}

# Invoke main
main ${1+"$@"}

via: https://opensource.com/article/20/2/script-large-files

作者:Nick Clifton 选题:lujun9972 译者:wxy 校对:wxy

本文由 LCTT 原创编译,Linux中国 荣誉推出

学习逻辑操作符和 shell 扩展,本文是三篇 Bash 编程系列的第二篇。

Bash 是一种强大的编程语言,完美契合命令行和 shell 脚本。本系列(三篇文章,基于我的 三集 Linux 自学课程)讲解如何在 CLI 使用 Bash 编程。

第一篇文章 讲解了 Bash 的一些简单命令行操作,包括如何使用变量和控制操作符。第二篇文章探讨文件、字符串、数字等类型和各种各样在执行流中提供控制逻辑的的逻辑运算符,还有 Bash 中的各类 shell 扩展。本系列第三篇也是最后一篇文章,将会探索能重复执行操作的 forwhileuntil 循环。

逻辑操作符是程序中进行判断的根本要素,也是执行不同的语句组合的依据。有时这也被称为流控制。

逻辑操作符

Bash 中有大量的用于不同条件表达式的逻辑操作符。最基本的是 if 控制结构,它判断一个条件,如果条件为真,就执行一些程序语句。操作符共有三类:文件、数字和非数字操作符。如果条件为真,所有的操作符返回真值(0),如果条件为假,返回假值(1)。

这些比较操作符的函数语法是,一个操作符加一个或两个参数放在中括号内,后面跟一系列程序语句,如果条件为真,程序语句执行,可能会有另一个程序语句列表,该列表在条件为假时执行:

if [ arg1 operator arg2 ] ; then list
或
if [ arg1 operator arg2 ] ; then list ; else list ; fi

像例子中那样,在比较表达式中,空格不能省略。中括号的每部分,[],是跟 test 命令一样的传统的 Bash 符号:

if test arg1 operator arg2 ; then list

还有一个更新的语法能提供一点点便利,一些系统管理员比较喜欢用。这种格式对于不同版本的 Bash 和一些 shell 如 ksh(Korn shell)兼容性稍差。格式如下:

if [[ arg1 operator arg2 ]] ; then list

文件操作符

文件操作符是 Bash 中一系列强大的逻辑操作符。图表 1 列出了 20 多种不同的 Bash 处理文件的操作符。在我的脚本中使用频率很高。

操作符描述
-a filename如果文件存在,返回真值;文件可以为空也可以有内容,但是只要它存在,就返回真值
-b filename如果文件存在且是一个块设备,如 /dev/sda/dev/sda1,则返回真值
-c filename如果文件存在且是一个字符设备,如 /dev/TTY1,则返回真值
-d filename如果文件存在且是一个目录,返回真值
-e filename如果文件存在,返回真值;与上面的 -a 相同
-f filename如果文件存在且是一个一般文件,不是目录、设备文件或链接等的其他的文件,则返回 真值
-g filename如果文件存在且 SETGID 标记被设置在其上,返回真值
-h filename如果文件存在且是一个符号链接,则返回真值
-k filename如果文件存在且粘滞位已设置,则返回真值
-p filename如果文件存在且是一个命名的管道(FIFO),返回真值
-r filename如果文件存在且有可读权限(它的可读位被设置),返回真值
-s filename如果文件存在且大小大于 0,返回真值;如果一个文件存在但大小为 0,则返回假值
-t fd如果文件描述符 fd 被打开且被关联到一个终端设备上,返回真值
-u filename如果文件存在且它的 SETUID 位被设置,返回真值
-w filename如果文件存在且有可写权限,返回真值
-x filename如果文件存在且有可执行权限,返回真值
-G filename如果文件存在且文件的组 ID 与当前用户相同,返回真值
-L filename如果文件存在且是一个符号链接,返回真值(同 -h
-N filename如果文件存在且从文件上一次被读取后文件被修改过,返回真值
-O filename如果文件存在且你是文件的拥有者,返回真值
-S filename如果文件存在且文件是套接字,返回真值
file1 -ef file2如果文件 file1 和文件 file2 指向同一设备的同一 INODE 号,返回真值(即硬链接)
file1 -nt file2如果文件 file1file2 新(根据修改日期),或 file1 存在而 file2 不存在,返回真值
file1 -ot file2如果文件 file1file2 旧(根据修改日期),或 file1 不存在而 file2 存在

图表 1:Bash 文件操作符

以测试一个文件存在与否来举例:

[student@studentvm1 testdir]$ File="TestFile1" ; if [ -e $File ] ; then echo "The file $File exists." ; else echo "The file $File does not exist." ; fi
The file TestFile1 does not exist.
[student@studentvm1 testdir]$

创建一个用来测试的文件,命名为 TestFile1。目前它不需要包含任何数据:

[student@studentvm1 testdir]$ touch TestFile1

在这个简短的 CLI 程序中,修改 $File 变量的值相比于在多个地方修改表示文件名的字符串的值要容易:

[student@studentvm1 testdir]$ File="TestFile1" ; if [ -e $File ] ; then echo "The file $File exists." ; else echo "The file $File does not exist." ; fi
The file TestFile1 exists.
[student@studentvm1 testdir]$

现在,运行一个测试来判断一个文件是否存在且长度不为 0(表示它包含数据)。假设你想判断三种情况:

  1. 文件不存在;
  2. 文件存在且为空;
  3. 文件存在且包含数据。

因此,你需要一组更复杂的测试代码 — 为了测试所有的情况,使用 if-elif-else 结构中的 elif 语句:

[student@studentvm1 testdir]$ File="TestFile1" ; if [ -s $File ] ; then echo "$File exists and contains data." ; fi
[student@studentvm1 testdir]$

在这个情况中,文件存在但不包含任何数据。向文件添加一些数据再运行一次:

[student@studentvm1 testdir]$ File="TestFile1" ; echo "This is file $File" > $File ; if [ -s $File ] ; then echo "$File exists and contains data." ; fi
TestFile1 exists and contains data.
[student@studentvm1 testdir]$

这组语句能返回正常的结果,但是仅仅是在我们已知三种可能的情况下测试某种确切的条件。添加一段 else 语句,这样你就可以更精确地测试。把文件删掉,你就可以完整地测试这段新代码:

[student@studentvm1 testdir]$ File="TestFile1" ; rm $File ; if [ -s $File ] ; then echo "$File exists and contains data." ; else echo "$File does not exist or is empty." ; fi
TestFile1 does not exist or is empty.

现在创建一个空文件用来测试:

[student@studentvm1 testdir]$ File="TestFile1" ; touch $File ; if [ -s $File ] ; then echo "$File exists and contains data." ; else echo "$File does not exist or is empty." ; fi
TestFile1 does not exist or is empty.

向文件添加一些内容,然后再测试一次:

[student@studentvm1 testdir]$ File="TestFile1" ; echo "This is file $File" > $File ; if [ -s $File ] ; then echo "$File exists and contains data." ; else echo "$File does not exist or is empty." ; fi
TestFile1 exists and contains data.

现在加入 elif 语句来辨别是文件不存在还是文件为空:

[student@studentvm1 testdir]$ File="TestFile1" ; touch $File ; if [ -s $File ] ; then echo "$File exists and contains data." ; elif [ -e $File ] ; then echo "$File exists and is empty." ; else echo "$File does not exist." ; fi
TestFile1 exists and is empty.
[student@studentvm1 testdir]$ File="TestFile1" ; echo "This is $File" > $File ; if [ -s $File ] ; then echo "$File exists and contains data." ; elif [ -e $File ] ; then echo "$File exists and is empty." ; else echo "$File does not exist." ; fi
TestFile1 exists and contains data.
[student@studentvm1 testdir]$

现在你有一个可以测试这三种情况的 Bash CLI 程序,但是可能的情况是无限的。

如果你能像保存在文件中的脚本那样组织程序语句,那么即使对于更复杂的命令组合也会很容易看出它们的逻辑结构。图表 2 就是一个示例。 if-elif-else 结构中每一部分的程序语句的缩进让逻辑更变得清晰。

File="TestFile1"
echo "This is $File" > $File
if [ -s $File ]
   then
   echo "$File exists and contains data."
elif [ -e $File ]
   then
   echo "$File exists and is empty."
else
   echo "$File does not exist."
fi

图表 2: 像在脚本里一样重写书写命令行程序

对于大多数 CLI 程序来说,让这些复杂的命令变得有逻辑需要写很长的代码。虽然 CLI 可能是用 Linux 或 Bash 内置的命令,但是当 CLI 程序很长或很复杂时,创建一个保存在文件中的脚本将更有效,保存到文件中后,可以随时运行。

字符串比较操作符

字符串比较操作符使我们可以对字符串中的字符按字母顺序进行比较。图表 3 列出了仅有的几个字符串比较操作符。

操作符描述
-z string如果字符串的长度为 0 ,返回真值
-n string如果字符串的长度不为 0 ,返回真值
string1 == string2string1 = string2如果两个字符串相等,返回真值。处于遵从 POSIX 一致性,在测试命令中应使用一个等号 =。与命令 [[ 一起使用时,会进行如上描述的模式匹配(混合命令)。
string1 != string2两个字符串不相等,返回真值
string1 < string2如果对 string1string2 按字母顺序进行排序,string1 排在 string2 前面(即基于地区设定的对所有字母和特殊字符的排列顺序)
string1 > string2如果对 string1string2 按字母顺序进行排序,string1 排在 string2 后面

图表 3: Bash 字符串逻辑操作符

首先,检查字符串长度。比较表达式中 $MyVar 两边的双引号不能省略(你仍应该在目录 ~/testdir 下 )。

[student@studentvm1 testdir]$ MyVar="" ; if [ -z "" ] ; then echo "MyVar is zero length." ; else echo "MyVar contains data" ; fi
MyVar is zero length.
[student@studentvm1 testdir]$ MyVar="Random text" ; if [ -z "" ] ; then echo "MyVar is zero length." ; else echo "MyVar contains data" ; fi
MyVar is zero length.

你也可以这样做:

[student@studentvm1 testdir]$ MyVar="Random text" ; if [ -n "$MyVar" ] ; then echo "MyVar contains data." ; else echo "MyVar is zero length" ; fi
MyVar contains data.
[student@studentvm1 testdir]$ MyVar="" ; if [ -n "$MyVar" ] ; then echo "MyVar contains data." ; else echo "MyVar is zero length" ; fi
MyVar is zero length

有时候你需要知道一个字符串确切的长度。这虽然不是比较,但是也与比较相关。不幸的是,计算字符串的长度没有简单的方法。有很多种方法可以计算,但是我认为使用 expr(求值表达式)命令是相对最简单的一种。阅读 expr 的手册页可以了解更多相关知识。注意表达式中你检测的字符串或变量两边的引号不要省略。

[student@studentvm1 testdir]$ MyVar="" ; expr length "$MyVar"
0
[student@studentvm1 testdir]$ MyVar="How long is this?" ; expr length "$MyVar"
17
[student@studentvm1 testdir]$ expr length "We can also find the length of a literal string as well as a variable."
70

关于比较操作符,在我们的脚本中使用了大量的检测两个字符串是否相等(例如,两个字符串是否实际上是同一个字符串)的操作。我使用的是非 POSIX 版本的比较表达式:

[student@studentvm1 testdir]$ Var1="Hello World" ; Var2="Hello World" ; if [ "$Var1" == "$Var2" ] ; then echo "Var1 matches Var2" ; else echo "Var1 and Var2 do not match." ; fi
Var1 matches Var2
[student@studentvm1 testdir]$ Var1="Hello World" ; Var2="Hello world" ; if [ "$Var1" == "$Var2" ] ; then echo "Var1 matches Var2" ; else echo "Var1 and Var2 do not match." ; fi
Var1 and Var2 do not match.

在你自己的脚本中去试一下这些操作符。

数字比较操作符

数字操作符用于两个数字参数之间的比较。像其他类操作符一样,大部分都很容易理解。

操作符描述
arg1 -eq arg2如果 arg1 等于 arg2,返回真值
arg1 -ne arg2如果 arg1 不等于 arg2,返回真值
arg1 -lt arg2如果 arg1 小于 arg2,返回真值
arg1 -le arg2如果 arg1 小于或等于 arg2,返回真值
arg1 -gt arg2如果 arg1 大于 arg2,返回真值
arg1 -ge arg2如果 arg1 大于或等于 arg2,返回真值

图表 4: Bash 数字比较逻辑操作符

来看几个简单的例子。第一个示例设置变量 $X 的值为 1,然后检测 $X 是否等于 1。第二个示例中,$X 被设置为 0,所以比较表达式返回结果不为真值。

[student@studentvm1 testdir]$ X=1 ; if [ $X -eq 1 ] ; then echo "X equals 1" ; else echo "X does not equal 1" ; fi
X equals 1
[student@studentvm1 testdir]$ X=0 ; if [ $X -eq 1 ] ; then echo "X equals 1" ; else echo "X does not equal 1" ; fi
X does not equal 1
[student@studentvm1 testdir]$

自己来多尝试一下其他的。

杂项操作符

这些杂项操作符展示一个 shell 选项是否被设置,或一个 shell 变量是否有值,但是它不显示变量的值,只显示它是否有值。

操作符描述
-o optname如果一个 shell 选项 optname 是启用的(查看内建在 Bash 手册页中的 set -o 选项描述下面的选项列表),则返回真值
-v varname如果 shell 变量 varname 被设置了值(被赋予了值),则返回真值
-R varname如果一个 shell 变量 varname 被设置了值且是一个名字引用,则返回真值

图表 5: 杂项 Bash 逻辑操作符

自己来使用这些操作符实践下。

扩展

Bash 支持非常有用的几种类型的扩展和命令替换。根据 Bash 手册页,Bash 有七种扩展格式。本文只介绍其中五种:~ 扩展、算术扩展、路径名称扩展、大括号扩展和命令替换。

大括号扩展

大括号扩展是生成任意字符串的一种方法。(下面的例子是用特定模式的字符创建大量的文件。)大括号扩展可以用于产生任意字符串的列表,并把它们插入一个用静态字符串包围的特定位置或静态字符串的两端。这可能不太好想象,所以还是来实践一下。

首先,看一下大括号扩展的作用:

[student@studentvm1 testdir]$ echo {string1,string2,string3}
string1 string2 string3

看起来不是很有用,对吧?但是用其他方式使用它,再来看看:

[student@studentvm1 testdir]$ echo "Hello "{David,Jen,Rikki,Jason}.
Hello David. Hello Jen. Hello Rikki. Hello Jason.

这看起来貌似有点用了 — 我们可以少打很多字。现在试一下这个:

[student@studentvm1 testdir]$ echo b{ed,olt,ar}s
beds bolts bars

我可以继续举例,但是你应该已经理解了它的用处。

~ 扩展

资料显示,使用最多的扩展是波浪字符(~)扩展。当你在命令中使用它(如 cd ~/Documents)时,Bash shell 把这个快捷方式展开成用户的完整的家目录。

使用这个 Bash 程序观察 ~ 扩展的作用:

[student@studentvm1 testdir]$ echo ~
/home/student
[student@studentvm1 testdir]$ echo ~/Documents
/home/student/Documents
[student@studentvm1 testdir]$ Var1=~/Documents ; echo $Var1 ; cd $Var1
/home/student/Documents
[student@studentvm1 Documents]$

路径名称扩展

路径名称扩展是展开文件通配模式为匹配该模式的完整路径名称的另一种说法,匹配字符使用 ?*。文件通配指的是在大量操作中匹配文件名、路径和其他字符串时用特定的模式字符产生极大的灵活性。这些特定的模式字符允许匹配字符串中的一个、多个或特定字符。

  • ? — 匹配字符串中特定位置的一个任意字符
  • * — 匹配字符串中特定位置的 0 个或多个任意字符

这个扩展用于匹配路径名称。为了弄清它的用法,请确保 testdir 是当前工作目录(PWD),先执行基本的列出清单命令 ls(我家目录下的内容跟你的不一样)。

[student@studentvm1 testdir]$ ls
chapter6  cpuHog.dos    dmesg1.txt  Documents  Music       softlink1  testdir6    Videos
chapter7  cpuHog.Linux  dmesg2.txt  Downloads  Pictures    Templates  testdir
testdir  cpuHog.mac    dmesg3.txt  file005    Public      testdir    tmp
cpuHog     Desktop       dmesg.txt   link3      random.txt  testdir1   umask.test
[student@studentvm1 testdir]$

现在列出以 Dotestdir/Documentstestdir/Downloads 开头的目录:

Documents:
Directory01  file07  file15        test02  test10  test20      testfile13  TextFiles
Directory02  file08  file16        test03  test11  testfile01  testfile14
file01       file09  file17        test04  test12  testfile04  testfile15
file02       file10  file18        test05  test13  testfile05  testfile16
file03       file11  file19        test06  test14  testfile09  testfile17
file04       file12  file20        test07  test15  testfile10  testfile18
file05       file13  Student1.txt  test08  test16  testfile11  testfile19
file06       file14  test01        test09  test18  testfile12  testfile20

Downloads:
[student@studentvm1 testdir]$

然而,并没有得到你期望的结果。它列出了以 Do 开头的目录下的内容。使用 -d 选项,仅列出目录而不列出它们的内容。

[student@studentvm1 testdir]$ ls -d Do*
Documents  Downloads
[student@studentvm1 testdir]$

在两个例子中,Bash shell 都把 Do* 模式展开成了匹配该模式的目录名称。但是如果有文件也匹配这个模式,会发生什么?

[student@studentvm1 testdir]$ touch Downtown ; ls -d Do*
Documents  Downloads  Downtown
[student@studentvm1 testdir]$

因此所有匹配这个模式的文件也被展开成了完整名字。

命令替换

命令替换是让一个命令的标准输出数据流被当做参数传给另一个命令的扩展形式,例如,在一个循环中作为一系列被处理的项目。Bash 手册页显示:“命令替换可以让你用一个命令的输出替换为命令的名字。”这可能不太好理解。

命令替换有两种格式:command$(command)。在更早的格式中使用反引号(`),在命令中使用反斜杠(\)来保持它转义之前的文本含义。然而,当用在新版本的括号格式中时,反斜杠被当做一个特殊字符处理。也请注意带括号的格式打开个关闭命令语句都是用一个括号。

我经常在命令行程序和脚本中使用这种能力,一个命令的结果能被用作另一个命令的参数。

来看一个非常简单的示例,这个示例使用了这个扩展的两种格式(再一次提醒,确保 testdir 是当前工作目录):

[student@studentvm1 testdir]$ echo "Todays date is `date`"
Todays date is Sun Apr  7 14:42:46 EDT 2019
[student@studentvm1 testdir]$ echo "Todays date is $(date)"
Todays date is Sun Apr  7 14:42:59 EDT 2019
[student@studentvm1 testdir]$

-seq 工具用于一个数字序列:

[student@studentvm1 testdir]$ seq 5
1
2
3
4
5
[student@studentvm1 testdir]$ echo `seq 5`
1 2 3 4 5
[student@studentvm1 testdir]$

现在你可以做一些更有用处的操作,比如创建大量用于测试的空文件。

[student@studentvm1 testdir]$ for I in $(seq -w 5000) ; do touch file-$I ; done

seq 工具加上 -w 选项后,在生成的数字前面会用 0 补全,这样所有的结果都等宽,例如,忽略数字的值,它们的位数一样。这样在对它们按数字顺序进行排列时很容易。

seq -w 5000 语句生成了 1 到 5000 的数字序列。通过把命令替换用于 for 语句,for 语句就可以使用该数字序列来生成文件名的数字部分。

算术扩展

Bash 可以进行整型的数学计算,但是比较繁琐(你一会儿将看到)。数字扩展的语法是 $((arithmetic-expression)) ,分别用两个括号来打开和关闭表达式。算术扩展在 shell 程序或脚本中类似命令替换;表达式结算后的结果替换了表达式,用于 shell 后续的计算。

我们再用一个简单的用法来开始:

[student@studentvm1 testdir]$ echo $((1+1))
2
[student@studentvm1 testdir]$ Var1=5 ; Var2=7 ; Var3=$((Var1*Var2)) ; echo "Var 3 = $Var3"
Var 3 = 35

下面的除法结果是 0,因为表达式的结果是一个小于 1 的整型数字:

[student@studentvm1 testdir]$ Var1=5 ; Var2=7 ; Var3=$((Var1/Var2)) ; echo "Var 3 = $Var3"
Var 3 = 0

这是一个我经常在脚本或 CLI 程序中使用的一个简单的计算,用来查看在 Linux 主机中使用了多少虚拟内存。 free 不提供我需要的数据:

[student@studentvm1 testdir]$ RAM=`free | grep ^Mem | awk '{print $2}'` ; Swap=`free | grep ^Swap | awk '{print $2}'` ; echo "RAM = $RAM and Swap = $Swap" ; echo "Total Virtual memory is $((RAM+Swap))" ;
RAM = 4037080 and Swap = 6291452
Total Virtual memory is 10328532

我使用 ` 字符来划定用作命令替换的界限。

我用 Bash 算术扩展的场景主要是用脚本检查系统资源用量后基于返回的结果选择一个程序运行的路径。

总结

本文是 Bash 编程语言系列的第二篇,探讨了 Bash 中文件、字符串、数字和各种提供流程控制逻辑的逻辑操作符还有不同种类的 shell 扩展。


via: https://opensource.com/article/19/10/programming-bash-logical-operators-shell-expansions

作者:David Both 选题:lujun9972 译者:lxbwolf 校对:wxy

本文由 LCTT 原创编译,Linux中国 荣誉推出

目前市场上有许多开源监控工具可用于监控 Linux 系统的性能。当系统达到指定的阈值限制时,它可以发送电子邮件警报。它可以监视 CPU 利用率、内存利用率、交换利用率、磁盘空间利用率等所有内容。

如果你只有很少的系统并且想要监视它们,那么编写一个小的 shell 脚本可以使你的任务变得非常简单。

在本教程中,我们添加了两个 shell 脚本来监视 Linux 系统上的内存利用率。当系统达到给定阈值时,它将给特定电子邮件地址发邮件。

方法-1:用 Linux Bash 脚本监视内存利用率并发送电子邮件

如果只想在系统达到给定阈值时通过邮件获取当前内存利用率百分比,请使用以下脚本。

这是个非常简单直接的单行脚本。在大多数情况下,我更喜欢使用这种方法。

当你的系统达到内存利用率的 80% 时,它将触发一封电子邮件。

*/5 * * * * /usr/bin/free | awk '/Mem/{printf("RAM Usage: %.2f%\n"), $3/$2*100}' |  awk '{print $3}' | awk '{ if($1 > 80) print $0;}' | mail -s "High Memory Alert" [email protected]

注意:你需要更改电子邮件地址而不是使用我们的电子邮件地址。此外,你可以根据你的要求更改内存利用率阈值。

输出:你将收到类似下面的电子邮件提醒。

High Memory Alert: 80.40%

我们过去添加了许多有用的 shell 脚本。如果要查看这些内容,请导航至以下链接。

* 如何使用 shell 脚本自动执行日常活动?

方法-2:用 Linux Bash 脚本监视内存利用率并发送电子邮件

如果要在邮件警报中获取有关内存利用率的更多信息。使用以下脚本,其中包括基于 top 命令和 ps 命令的最高内存利用率和进程详细信息。

这将立即让你了解系统的运行情况。

当你的系统达到内存利用率的 “80%” 时,它将触发一封电子邮件。

注意:你需要更改电子邮件地址而不是使用我们的电子邮件地址。此外,你可以根据你的要求更改内存利用率阈值。

# vi /opt/scripts/memory-alert.sh

#!/bin/sh
ramusage=$(free | awk '/Mem/{printf("RAM Usage: %.2f\n"), $3/$2*100}'| awk '{print $3}')

if [ "$ramusage" > 20 ]; then

  SUBJECT="ATTENTION: Memory Utilization is High on $(hostname) at $(date)"
  MESSAGE="/tmp/Mail.out"
  TO="[email protected]"
  echo "Memory Current Usage is: $ramusage%" >> $MESSAGE
  echo "" >> $MESSAGE
  echo "------------------------------------------------------------------" >> $MESSAGE
  echo "Top Memory Consuming Process Using top command" >> $MESSAGE
  echo "------------------------------------------------------------------" >> $MESSAGE
  echo "$(top -b -o +%MEM | head -n 20)" >> $MESSAGE
  echo "" >> $MESSAGE
  echo "------------------------------------------------------------------" >> $MESSAGE
  echo "Top Memory Consuming Process Using ps command" >> $MESSAGE
  echo "------------------------------------------------------------------" >> $MESSAGE
  echo "$(ps -eo pid,ppid,%mem,%Memory,cmd --sort=-%mem | head)" >> $MESSAGE
  mail -s "$SUBJECT" "$TO" < $MESSAGE
  rm /tmp/Mail.out
fi

最后添加一个 cron 任务 来自动执行此操作。它将每 5 分钟运行一次。

# crontab -e
*/5 * * * * /bin/bash /opt/scripts/memory-alert.sh

注意:由于脚本计划每 5 分钟运行一次,因此你将在最多 5 分钟后收到电子邮件提醒(但不是 5 分钟,取决于具体时间)。

比如说,如果你的系统达到 8.25 的给定限制,那么你将在 5 分钟内收到电子邮件警报。希望现在说清楚了。

输出:你将收到类似下面的电子邮件提醒。

Memory Current Usage is: 80.71%

+------------------------------------------------------------------+
Top Memory Consuming Process Using top command
+------------------------------------------------------------------+
top - 12:00:58 up 5 days,  9:03,  1 user,  load average: 1.82, 2.60, 2.83
Tasks: 314 total,   1 running, 313 sleeping,   0 stopped,   0 zombie
%Cpu0  :  8.3 us, 12.5 sy,  0.0 ni, 75.0 id,  0.0 wa,  0.0 hi,  4.2 si,  0.0 st
%Cpu1  : 13.6 us,  4.5 sy,  0.0 ni, 81.8 id,  0.0 wa,  0.0 hi,  0.0 si,  0.0 st
%Cpu2  : 21.7 us, 21.7 sy,  0.0 ni, 56.5 id,  0.0 wa,  0.0 hi,  0.0 si,  0.0 st
%Cpu3  : 13.6 us,  9.1 sy,  0.0 ni, 77.3 id,  0.0 wa,  0.0 hi,  0.0 si,  0.0 st
%Cpu4  : 17.4 us,  8.7 sy,  0.0 ni, 73.9 id,  0.0 wa,  0.0 hi,  0.0 si,  0.0 st
%Cpu5  : 20.8 us,  4.2 sy,  0.0 ni, 70.8 id,  0.0 wa,  0.0 hi,  4.2 si,  0.0 st
%Cpu6  :  9.1 us,  0.0 sy,  0.0 ni, 90.9 id,  0.0 wa,  0.0 hi,  0.0 si,  0.0 st
%Cpu7  : 17.4 us,  4.3 sy,  0.0 ni, 78.3 id,  0.0 wa,  0.0 hi,  0.0 si,  0.0 st
KiB Mem : 16248588 total,  5015964 free,  6453404 used,  4779220 buff/cache
KiB Swap: 17873388 total, 16928620 free,   944768 used.  6423008 avail Mem 

  PID USER      PR  NI    VIRT    RES    SHR S  %CPU  %MEM     TIME+ COMMAND
17163 daygeek   20     2033204 487736 282888 S  10.0   3.0   8:26.07 /usr/lib/firefox/firefox -contentproc -childID 15 -isForBrowser -prefsLen 9408 -prefMapSize 184979 -parentBuildID 20190521202118 -greomni /u+
 1121 daygeek   20     4191388 419180 100552 S   5.0   2.6 126:02.84 /usr/bin/gnome-shell
 1902 daygeek   20     1701644 327216  82536 S  20.0   2.0 153:27.92 /opt/google/chrome/chrome
 2969 daygeek   20     1051116 324656  92388 S  15.0   2.0 149:38.09 /opt/google/chrome/chrome --type=renderer --field-trial-handle=10346122902703263820,11905758137655502112,131072 --service-pipe-token=1339861+
 1068 daygeek   20     1104856 309552 278072 S   5.0   1.9 143:47.42 /usr/lib/Xorg vt2 -displayfd 3 -auth /run/user/1000/gdm/Xauthority -nolisten tcp -background none -noreset -keeptty -verbose 3
27246 daygeek   20      907344 265600 108276 S  30.0   1.6  10:42.80 /opt/google/chrome/chrome --type=renderer --field-trial-handle=10346122902703263820,11905758137655502112,131072 --service-pipe-token=8587368+

+------------------------------------------------------------------+
Top Memory Consuming Process Using ps command
+------------------------------------------------------------------+
  PID  PPID %MEM %CPU CMD
 8223     1  6.4  6.8 /usr/lib/firefox/firefox --new-window
13948  1121  6.3  1.2 /usr/bin/../lib/notepadqq/notepadqq-bin
 8671  8223  4.4  7.5 /usr/lib/firefox/firefox -contentproc -childID 5 -isForBrowser -prefsLen 6999 -prefMapSize 184979 -parentBuildID 20190521202118 -greomni /usr/lib/firefox/omni.ja -appomni /usr/lib/firefox/browser/omni.ja -appdir /usr/lib/firefox/browser 8223 true tab
17163  8223  3.0  0.6 /usr/lib/firefox/firefox -contentproc -childID 15 -isForBrowser -prefsLen 9408 -prefMapSize 184979 -parentBuildID 20190521202118 -greomni /usr/lib/firefox/omni.ja -appomni /usr/lib/firefox/browser/omni.ja -appdir /usr/lib/firefox/browser 8223 true tab
 1121  1078  2.5  1.6 /usr/bin/gnome-shell
17937  8223  2.5  0.8 /usr/lib/firefox/firefox -contentproc -childID 16 -isForBrowser -prefsLen 9410 -prefMapSize 184979 -parentBuildID 20190521202118 -greomni /usr/lib/firefox/omni.ja -appomni /usr/lib/firefox/browser/omni.ja -appdir /usr/lib/firefox/browser 8223 true tab
 8499  8223  2.2  0.6 /usr/lib/firefox/firefox -contentproc -childID 4 -isForBrowser -prefsLen 6635 -prefMapSize 184979 -parentBuildID 20190521202118 -greomni /usr/lib/firefox/omni.ja -appomni /usr/lib/firefox/browser/omni.ja -appdir /usr/lib/firefox/browser 8223 true tab
 8306  8223  2.2  0.8 /usr/lib/firefox/firefox -contentproc -childID 1 -isForBrowser -prefsLen 1 -prefMapSize 184979 -parentBuildID 20190521202118 -greomni /usr/lib/firefox/omni.ja -appomni /usr/lib/firefox/browser/omni.ja -appdir /usr/lib/firefox/browser 8223 true tab
 9198  8223  2.1  0.6 /usr/lib/firefox/firefox -contentproc -childID 7 -isForBrowser -prefsLen 8604 -prefMapSize 184979 -parentBuildID 20190521202118 -greomni /usr/lib/firefox/omni.ja -appomni /usr/lib/firefox/browser/omni.ja -appdir /usr/lib/firefox/browser 8223 true tab

via: https://www.2daygeek.com/linux-bash-script-to-monitor-memory-utilization-usage-and-send-email/

作者:Magesh Maruthamuthu 选题:lujun9972 译者:wxy 校对:wxy

本文由 LCTT 原创编译,Linux中国 荣誉推出