标签 升级 下的文章

这篇教程将向你展示如何更新服务器版本或者桌面版本的 Ubuntu。它还解释了更新和升级之间的区别以及你应该了解的有关于 Ubuntu Linux 中的更新的一些其他内容。

如果你是一个新手并已经体验 Ubuntu 数天或几周,你可能想知道如何更新你的 Ubuntu 系统以获取安全补丁,错误修复和应用升级。

更新 Ubuntu 非常简单。我并不是瞎说。它简单得只要运行两个命令。让我来告诉你这两个命令的更多细节。

请注意,本教程适用于 Ubuntu 18.04、16.04 或任何其他版本。命令行方式也适用于基于 Ubuntu 的发行版如 Linux Mint、Linux Lite、elementary OS 等。

通过命令行更新 Ubuntu

如何更新 Ubuntu

在桌面上,打开终端。你可以在菜单里找到它或者使用 Ctrl+Alt+T 快捷键。如果你是登录到一台 Ubuntu 服务器,那你已经在访问一个终端了。

在终端里,你只需要使用以下命令:

sudo apt update && sudo apt upgrade -y

它将询问你密码,而你可以使用你的账号密码。输入时,你将不会看到任何内容在屏幕上,所以请继续输入你的密码并按回车键。

现在,我来解释下上面的命令。

事实上,这不是一条命令。它由两条命令组成。符号 && 是合并两条命令的一个方法,第二条命令仅在前一条命令执行成功时执行。

当命令 apt upgrade 要求你在安装更新前确认时,末尾的参数 -y 会自动输入 yes

请注意,你也可以逐条使用这两条命令:

sudo apt update
sudo apt upgrade

这将花费更长的时间,因为你必须等待第一条命令执行完成后才能输入第二条命令。

说明:sudo apt update

这条命令更新了可用软件包的本地数据库。如果你没运行这条命令,本地数据库将不会被更新,而你的系统将不会知道是否有可用的新版本。

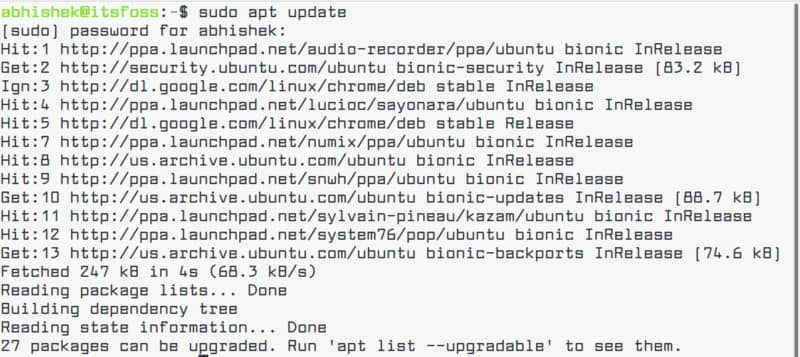
这就是为什么当你运行 sudo apt update,你会在输出中看到大量的 URL。这条命令会从对应的储存库(你在输出中看到的 URL)中获取软件包信息。

更新 Ubuntu Linux

在命令的末尾,它告诉你有多少个软件包可以被更新。你可以使用下列命令查看这些软件包:

apt list --upgradable

补充阅读: 阅读这篇文章了解命令 apt update 的输出中的 Ign、Hit 和 Get 是什么

说明:sudo apt upgrade

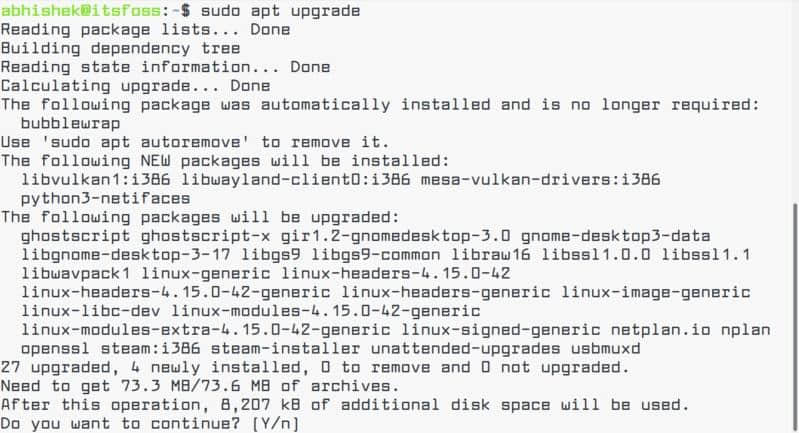
这条命令将已安装的软件包版本与本地数据库进行匹配。它收集全部信息,然后列出所有具有更新版本的软件包。此时,它会询问您是否要升级(已安装的软件包更新到新版本)。

通过命令行更新 Ubuntu Linux

你可以键入 yesy 或者只敲回车键去确认安装这些更新。

所以总的来说,sudo apt update 会检查可用的新版本,而 sudo apt upgrade 实际上会执行更新。

命令 update 可能会令人困惑,因为你可能期望通过命令 apt update 安装更新来更新系统,但这并不会发生。

通过 GUI 更新 Ubuntu(适用于桌面用户)

如果你使用桌面版 Ubuntu,你并不需要为了更新系统而打开终端。你可以仍可以使用命令行更新,但这只是一个选择。

在菜单里,找到 “软件更新” 并运行它。

在 Ubuntu 中运行 Software Updater

它将检查你的系统是否有可用的更新。

检查 Ubuntu 是否有可用更新

如果有可用的更新,它将给你提供安装更新的选择。

在 Ubuntu 中通过更新管理器安装更新

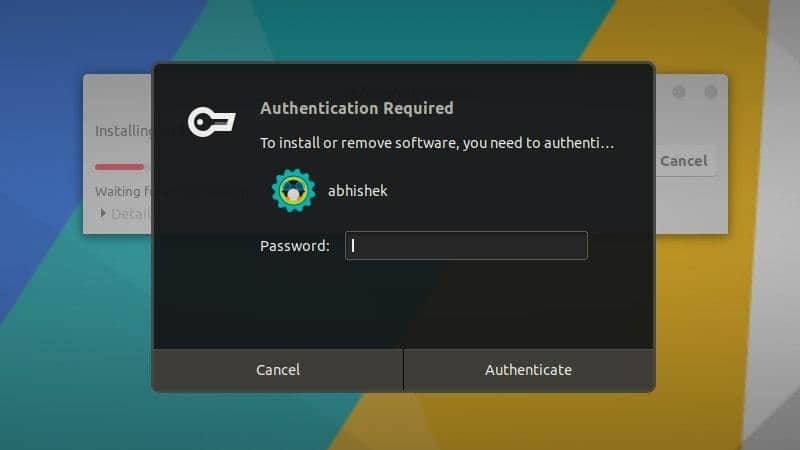
现在,点击 “安装”,它可能会向你询问密码。

通过 GUI 在 Ubuntu Linux 中安装更新

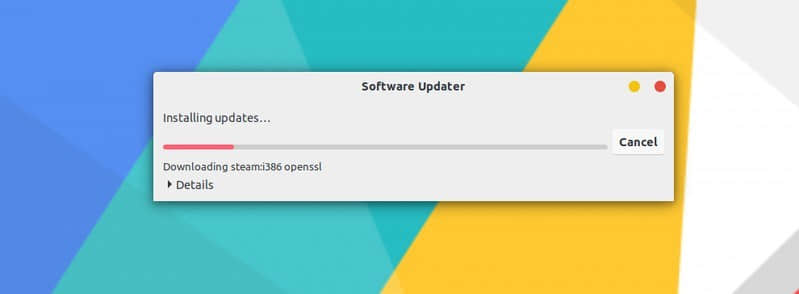
一旦你输入你的密码,它将开始安装更新。

通过 GUI 更新 Ubuntu

在某些情况下,你可能需要重启系统才能使已安装的更新正常工作。如果需要重启系统,你将在更新结束时收到通知。

通过 GUI 更新 Ubuntu

如果你不希望马上重启你的系统,可以选择稍后重启。

通过 GUI 在 Ubuntu 中安装更新

提示:如果“软件更新”返回一个错误,你需要在终端是使用命令 sudo apt update。输出的最后几行将包含真正的错误信息。你可以在因特网上搜索该错误并解决问题。

更新 Ubuntu 时要记住几件事

你刚学习了如何更新你的 Ubuntu 系统。如果你感兴趣,你还需要了解一些关于 Ubuntu 更新的内容。

更新后清理

你的系统将会有一些更新后不再需要的软件包。你可用使用这条命令删除这些软件包并释放空间

sudo apt autoremove

在 Ubuntu Server 中内核热修复以避免重启

如果是 Linux 内核更新,你将需要在系统更新后重启。当你不希望服务器停机时,这将会是一个问题。

热修复功能允许 Linux 内核在持续运行时打补丁。换句话说就是你不需要重启你的系统。

如果你在管理服务器,你可能需要在 Ubuntu 中启用热修复

版本升级是不同的

本文讨论的更新是使你安装的 Ubuntu 保持最新。但它不包括版本升级(例如从 Ubuntu 16.04 升级到 18.04)。

Ubuntu 版本 升级完全是另一回事。它更新整个操作系统核心。你需要在这个漫长的过程开始前做好备份。

总结

我希望你喜欢这个关于 Ubuntu 系统更新的教程并学到一些新东西。

如果你有其他问题,请随时提出。如果你是一位经验丰富的 Linux 用户并且有些更好的技巧,请同我们分享。


via: https://itsfoss.com/update-ubuntu/

作者:Abhishek Prakash 选题:lujun9972 译者:LazyWolfLin 校对:wxy

本文由 LCTT 原创编译,Linux中国 荣誉推出

众所周知,让我们的 Linux 系统保持最新状态会用到多种包管理器。比如说,在 Ubuntu 中,你无法使用 sudo apt updatesudo apt upgrade 命令升级所有软件。此命令仅升级使用 APT 包管理器安装的应用程序。你有可能使用 cargopipnpmsnapflatpakLinuxbrew 包管理器安装了其他软件。你需要使用相应的包管理器才能使它们全部更新。

再也不用这样了!跟 topgrade 打个招呼,这是一个可以一次性升级系统中所有软件的工具。

你无需运行每个包管理器来更新包。这个 topgrade 工具通过检测已安装的软件包、工具、插件并运行相应的软件包管理器来更新 Linux 中的所有软件,用一条命令解决了这个问题。它是自由而开源的,使用 rust 语言编写。它支持 GNU/Linux 和 Mac OS X.

在 Linux 中使用一个命令升级所有软件

topgrade 存在于 AUR 中。因此,你可以在任何基于 Arch 的系统中使用 Yay 助手程序安装它。

$ yay -S topgrade

在其他 Linux 发行版上,你可以使用 cargo 包管理器安装 topgrade。要安装 cargo 包管理器,请参阅以下链接:

然后,运行以下命令来安装 topgrade

$ cargo install topgrade

安装完成后,运行 topgrade 以升级 Linux 系统中的所有软件。

$ topgrade

一旦调用了 topgrade,它将逐个执行以下任务。如有必要,系统会要求输入 root/sudo 用户密码。

1、 运行系统的包管理器:

  • Arch:运行 yay 或者回退到 pacman
  • CentOS/RHEL:运行 yum upgrade
  • Fedora :运行 dnf upgrade
  • Debian/Ubuntu:运行 apt updateapt dist-upgrade
  • Linux/macOS:运行 brew updatebrew upgrade

2、 检查 Git 是否跟踪了以下路径。如果有,则拉取它们:

  • ~/.emacs.d (无论你使用 Spacemacs 还是自定义配置都应该可用)
  • ~/.zshrc
  • ~/.oh-my-zsh
  • ~/.tmux
  • ~/.config/fish/config.fish
  • 自定义路径

3、 Unix:运行 zplug 更新

4、 Unix:使用 TPM 升级 tmux 插件

5、 运行 cargo install-update

6、 升级 Emacs 包

7、 升级 Vim 包。对以下插件框架均可用:

8、 升级 npm 全局安装的包

9、 升级 Atom 包

10、 升级 Flatpak

11、 升级 snap

12、 Linux:运行 fwupdmgr 显示固件升级。 (仅查看​​。实际不会执行升级)

13、 运行自定义命令。

最后,topgrade 将运行 needrestart 以重新启动所有服务。在 Mac OS X 中,它会升级 App Store 程序。

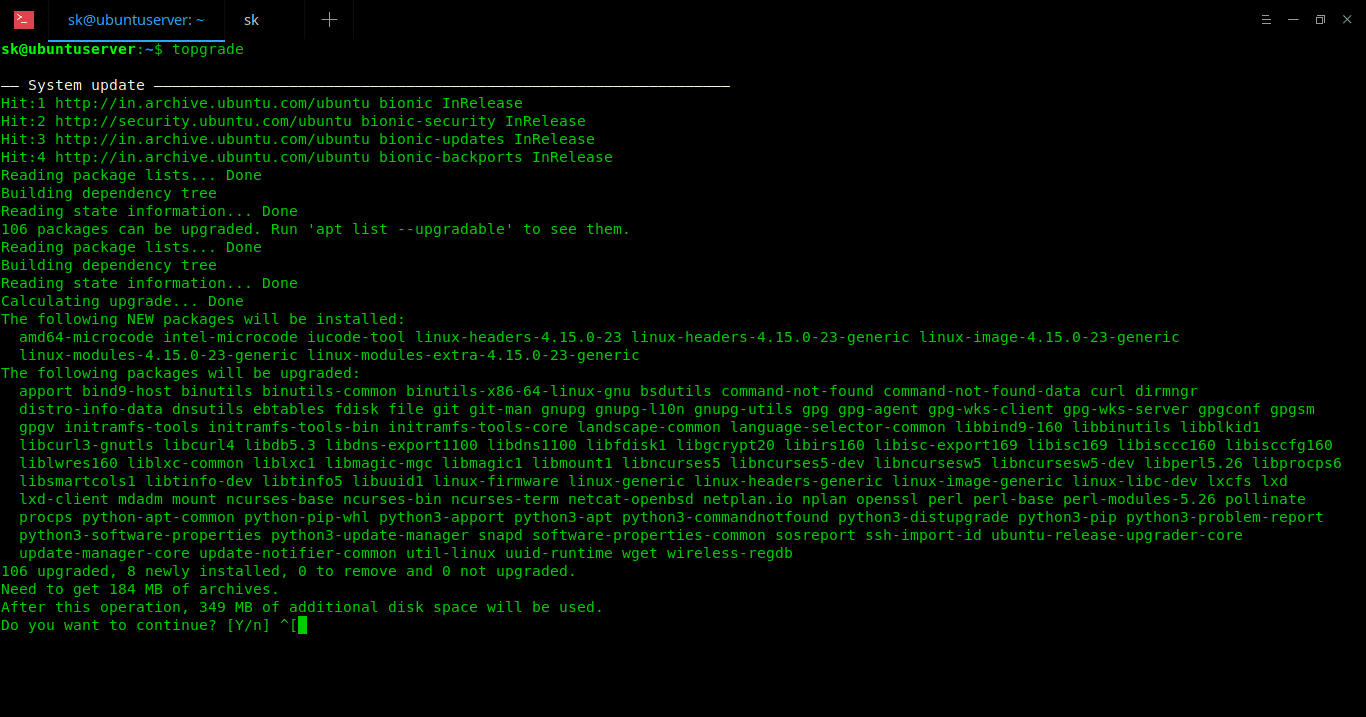
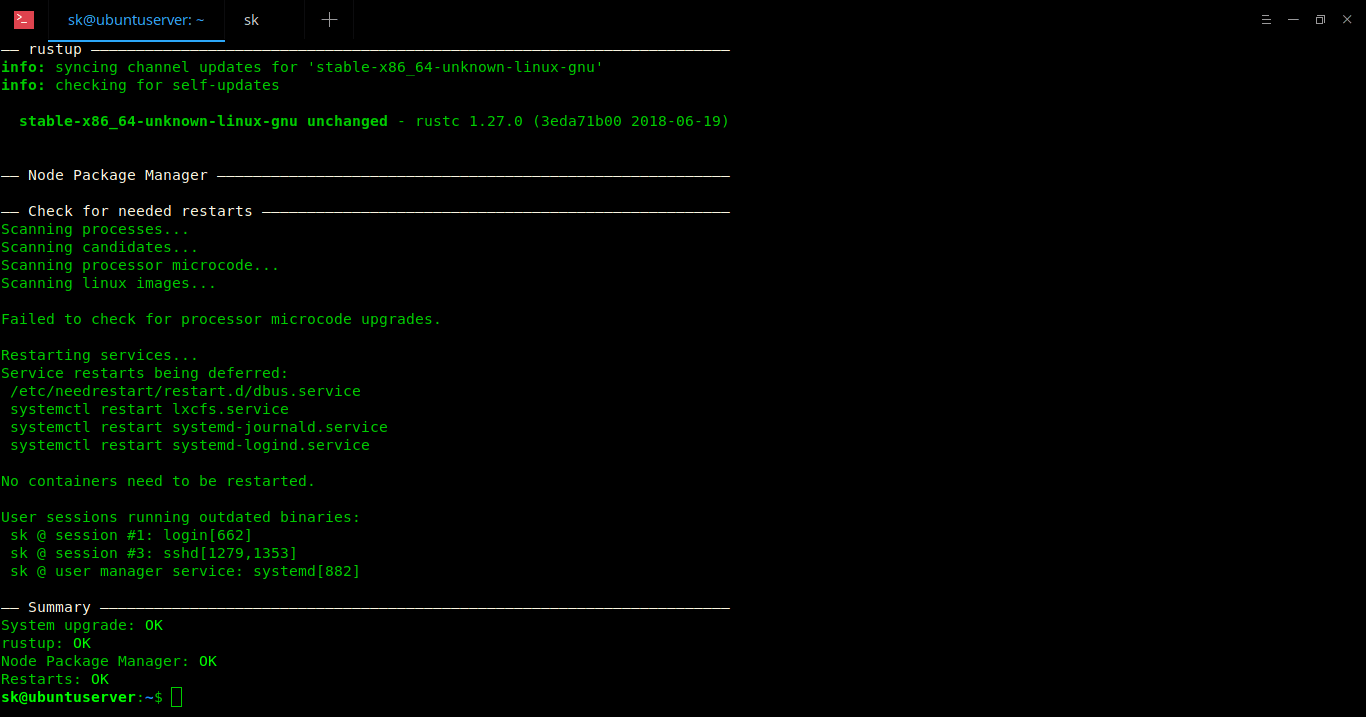
我的 Ubuntu 18.04 LTS 测试环境的示例输出:

好处是如果一个任务失败,它将自动运行下一个任务并完成所有其他后续任务。最后,它将显示摘要,其中包含运行的任务数量,成功的数量和失败的数量等详细信息。

建议阅读:

就个人而言,我喜欢创建一个像 topgrade 程序的想法,并使用一个命令升级使用各种包管理器安装的所有软件。我希望你也觉得它有用。还有更多的好东西。敬请关注!

干杯!


via: https://www.ostechnix.com/how-to-upgrade-everything-using-a-single-command-in-linux/

作者:SK 选题:lujun9972 译者:geekpi 校对:wxy

本文由 LCTT 原创编译,Linux中国 荣誉推出

为服务器打补丁是 Linux 系统管理员的一项重要任务,为的是让系统更加稳定,性能更加优化。厂商经常会发布一些安全/高危的补丁包,相关软件需要升级以防范潜在的安全风险。

Yum (Yellowdog Update Modified) 是 CentOS 和 RedHat 系统上用的 RPM 包管理工具,yum history 命令允许系统管理员将系统回滚到上一个状态,但由于某些限制,回滚不是在所有情况下都能成功,有时 yum 命令可能什么都不做,有时可能会删掉一些其他的包。

我建议你在升级之前还是要做一个完整的系统备份,而 yum history 并不能用来替代系统备份的。系统备份能让你将系统还原到任意时候的节点状态。

推荐阅读:

某些情况下,安装的应用程序在升级了补丁之后不能正常工作或者出现一些错误(可能是由于库不兼容或者软件包升级导致的),那该怎么办呢?

与应用开发团队沟通,并找出导致库和软件包的问题所在,然后使用 yum history 命令进行回滚。

注意:

  • 它不支持回滚 selinux,selinux-policy-*,kernel,glibc (以及依赖 glibc 的包,比如 gcc)。
  • 不建议将系统降级到更低的版本(比如 CentOS 6.9 降到 CentOS 6.8),这会导致系统处于不稳定的状态

让我们先来看看系统上有哪些包可以升级,然后挑选出一些包来做实验。

# yum update
Loaded plugins: fastestmirror, security
Setting up Update Process
Loading mirror speeds from cached hostfile
epel/metalink | 12 kB 00:00
 * epel: mirror.csclub.uwaterloo.ca
base | 3.7 kB 00:00
dockerrepo | 2.9 kB 00:00
draios | 2.9 kB 00:00
draios/primary_db | 13 kB 00:00
epel | 4.3 kB 00:00
epel/primary_db | 5.9 MB 00:00
extras | 3.4 kB 00:00
updates | 3.4 kB 00:00
updates/primary_db | 2.5 MB 00:00
Resolving Dependencies
--> Running transaction check
---> Package git.x86_64 0:1.7.1-8.el6 will be updated
---> Package git.x86_64 0:1.7.1-9.el6_9 will be an update
---> Package httpd.x86_64 0:2.2.15-60.el6.centos.4 will be updated
---> Package httpd.x86_64 0:2.2.15-60.el6.centos.5 will be an update
---> Package httpd-tools.x86_64 0:2.2.15-60.el6.centos.4 will be updated
---> Package httpd-tools.x86_64 0:2.2.15-60.el6.centos.5 will be an update
---> Package perl-Git.noarch 0:1.7.1-8.el6 will be updated
---> Package perl-Git.noarch 0:1.7.1-9.el6_9 will be an update
--> Finished Dependency Resolution

Dependencies Resolved

=================================================================================================
 Package Arch Version Repository Size
=================================================================================================
Updating:
 git x86_64 1.7.1-9.el6_9 updates 4.6 M
 httpd x86_64 2.2.15-60.el6.centos.5 updates 836 k
 httpd-tools x86_64 2.2.15-60.el6.centos.5 updates 80 k
 perl-Git noarch 1.7.1-9.el6_9 updates 29 k

Transaction Summary
=================================================================================================
Upgrade 4 Package(s)

Total download size: 5.5 M
Is this ok [y/N]: n

你会发现 git 包可以被升级,那我们就用它来实验吧。运行下面命令获得软件包的版本信息(当前安装的版本和可以升级的版本)。

# yum list git
Loaded plugins: fastestmirror, security
Setting up Update Process
Loading mirror speeds from cached hostfile
 * epel: mirror.csclub.uwaterloo.ca
Installed Packages
git.x86_64 1.7.1-8.el6 @base
Available Packages
git.x86_64 1.7.1-9.el6_9 updates

运行下面命令来将 git1.7.1-8 升级到 1.7.1-9

# yum update git
Loaded plugins: fastestmirror, presto
Setting up Update Process
Loading mirror speeds from cached hostfile
 * base: repos.lax.quadranet.com
 * epel: fedora.mirrors.pair.com
 * extras: mirrors.seas.harvard.edu
 * updates: mirror.sesp.northwestern.edu
Resolving Dependencies
--> Running transaction check
---> Package git.x86_64 0:1.7.1-8.el6 will be updated
--> Processing Dependency: git = 1.7.1-8.el6 for package: perl-Git-1.7.1-8.el6.noarch
---> Package git.x86_64 0:1.7.1-9.el6_9 will be an update
--> Running transaction check
---> Package perl-Git.noarch 0:1.7.1-8.el6 will be updated
---> Package perl-Git.noarch 0:1.7.1-9.el6_9 will be an update
--> Finished Dependency Resolution

Dependencies Resolved

=================================================================================================
 Package Arch Version Repository Size
=================================================================================================
Updating:
 git x86_64 1.7.1-9.el6_9 updates 4.6 M
Updating for dependencies:
 perl-Git noarch 1.7.1-9.el6_9 updates 29 k

Transaction Summary
=================================================================================================
Upgrade 2 Package(s)

Total download size: 4.6 M
Is this ok [y/N]: y
Downloading Packages:
Setting up and reading Presto delta metadata
Processing delta metadata
Package(s) data still to download: 4.6 M
(1/2): git-1.7.1-9.el6_9.x86_64.rpm | 4.6 MB 00:00
(2/2): perl-Git-1.7.1-9.el6_9.noarch.rpm | 29 kB 00:00
-------------------------------------------------------------------------------------------------
Total 5.8 MB/s | 4.6 MB 00:00
Running rpm_check_debug
Running Transaction Test
Transaction Test Succeeded
Running Transaction
 Updating : perl-Git-1.7.1-9.el6_9.noarch 1/4
 Updating : git-1.7.1-9.el6_9.x86_64 2/4
 Cleanup : perl-Git-1.7.1-8.el6.noarch 3/4
 Cleanup : git-1.7.1-8.el6.x86_64 4/4
 Verifying : git-1.7.1-9.el6_9.x86_64 1/4
 Verifying : perl-Git-1.7.1-9.el6_9.noarch 2/4
 Verifying : git-1.7.1-8.el6.x86_64 3/4
 Verifying : perl-Git-1.7.1-8.el6.noarch 4/4

Updated:
 git.x86_64 0:1.7.1-9.el6_9

Dependency Updated:
 perl-Git.noarch 0:1.7.1-9.el6_9

Complete!

验证升级后的 git 版本.

# yum list git
Installed Packages
git.x86_64 1.7.1-9.el6_9 @updates

或
# rpm -q git
git-1.7.1-9.el6_9.x86_64

现在我们成功升级这个软件包,可以对它进行回滚了。步骤如下。

使用 YUM history 命令回滚升级操作

首先,使用下面命令获取 yum 操作的 id。下面的输出很清晰地列出了所有需要的信息,例如操作 id、谁做的这个操作(用户名)、操作日期和时间、操作的动作(安装还是升级)、操作影响的包数量。

# yum history
或
# yum history list all
Loaded plugins: fastestmirror, presto
ID | Login user | Date and time | Action(s) | Altered
-------------------------------------------------------------------------------
 13 | root | 2017-08-18 13:30 | Update | 2
 12 | root | 2017-08-10 07:46 | Install | 1
 11 | root | 2017-07-28 17:10 | E, I, U | 28 EE
 10 | root | 2017-04-21 09:16 | E, I, U | 162 EE
 9 | root | 2017-02-09 17:09 | E, I, U | 20 EE
 8 | root | 2017-02-02 10:45 | Install | 1
 7 | root | 2016-12-15 06:48 | Update | 1
 6 | root | 2016-12-15 06:43 | Install | 1
 5 | root | 2016-12-02 10:28 | E, I, U | 23 EE
 4 | root | 2016-10-28 05:37 | E, I, U | 13 EE
 3 | root | 2016-10-18 12:53 | Install | 1
 2 | root | 2016-09-30 10:28 | E, I, U | 31 EE
 1 | root | 2016-07-26 11:40 | E, I, U | 160 EE

上面命令显示有两个包受到了影响,因为 git 还升级了它的依赖包 perl-Git。 运行下面命令来查看关于操作的详细信息。

# yum history info 13
Loaded plugins: fastestmirror, presto
Transaction ID : 13
Begin time : Fri Aug 18 13:30:52 2017
Begin rpmdb : 420:f5c5f9184f44cf317de64d3a35199e894ad71188
End time : 13:30:54 2017 (2 seconds)
End rpmdb : 420:d04a95c25d4526ef87598f0dcaec66d3f99b98d4
User : root
Return-Code : Success
Command Line : update git
Transaction performed with:
 Installed rpm-4.8.0-55.el6.x86_64 @base
 Installed yum-3.2.29-81.el6.centos.noarch @base
 Installed yum-plugin-fastestmirror-1.1.30-40.el6.noarch @base
 Installed yum-presto-0.6.2-1.el6.noarch @anaconda-CentOS-201207061011.x86_64/6.3
Packages Altered:
 Updated git-1.7.1-8.el6.x86_64 @base
 Update 1.7.1-9.el6_9.x86_64 @updates
 Updated perl-Git-1.7.1-8.el6.noarch @base
 Update 1.7.1-9.el6_9.noarch @updates
history info

运行下面命令来回滚 git 包到上一个版本。

# yum history undo 13
Loaded plugins: fastestmirror, presto
Undoing transaction 53, from Fri Aug 18 13:30:52 2017
 Updated git-1.7.1-8.el6.x86_64 @base
 Update 1.7.1-9.el6_9.x86_64 @updates
 Updated perl-Git-1.7.1-8.el6.noarch @base
 Update 1.7.1-9.el6_9.noarch @updates
Loading mirror speeds from cached hostfile
 * base: repos.lax.quadranet.com
 * epel: fedora.mirrors.pair.com
 * extras: repo1.dal.innoscale.net
 * updates: mirror.vtti.vt.edu
Resolving Dependencies
--> Running transaction check
---> Package git.x86_64 0:1.7.1-8.el6 will be a downgrade
---> Package git.x86_64 0:1.7.1-9.el6_9 will be erased
---> Package perl-Git.noarch 0:1.7.1-8.el6 will be a downgrade
---> Package perl-Git.noarch 0:1.7.1-9.el6_9 will be erased
--> Finished Dependency Resolution

Dependencies Resolved

=================================================================================================
 Package Arch Version Repository Size
=================================================================================================
Downgrading:
 git x86_64 1.7.1-8.el6 base 4.6 M
 perl-Git noarch 1.7.1-8.el6 base 29 k

Transaction Summary
=================================================================================================
Downgrade 2 Package(s)

Total download size: 4.6 M
Is this ok [y/N]: y
Downloading Packages:
Setting up and reading Presto delta metadata
Processing delta metadata
Package(s) data still to download: 4.6 M
(1/2): git-1.7.1-8.el6.x86_64.rpm | 4.6 MB 00:00
(2/2): perl-Git-1.7.1-8.el6.noarch.rpm | 29 kB 00:00
-------------------------------------------------------------------------------------------------
Total 3.4 MB/s | 4.6 MB 00:01
Running rpm_check_debug
Running Transaction Test
Transaction Test Succeeded
Running Transaction
 Installing : perl-Git-1.7.1-8.el6.noarch 1/4
 Installing : git-1.7.1-8.el6.x86_64 2/4
 Cleanup : perl-Git-1.7.1-9.el6_9.noarch 3/4
 Cleanup : git-1.7.1-9.el6_9.x86_64 4/4
 Verifying : git-1.7.1-8.el6.x86_64 1/4
 Verifying : perl-Git-1.7.1-8.el6.noarch 2/4
 Verifying : git-1.7.1-9.el6_9.x86_64 3/4
 Verifying : perl-Git-1.7.1-9.el6_9.noarch 4/4

Removed:
 git.x86_64 0:1.7.1-9.el6_9 perl-Git.noarch 0:1.7.1-9.el6_9

Installed:
 git.x86_64 0:1.7.1-8.el6 perl-Git.noarch 0:1.7.1-8.el6

Complete!

回滚后,使用下面命令来检查降级包的版本。

# yum list git
或
# rpm -q git
git-1.7.1-8.el6.x86_64

使用YUM downgrade 命令回滚升级

此外,我们也可以使用 YUM downgrade 命令回滚升级。

# yum downgrade git-1.7.1-8.el6 perl-Git-1.7.1-8.el6
Loaded plugins: search-disabled-repos, security, ulninfo
Setting up Downgrade Process
Resolving Dependencies
--> Running transaction check
---> Package git.x86_64 0:1.7.1-8.el6 will be a downgrade
---> Package git.x86_64 0:1.7.1-9.el6_9 will be erased
---> Package perl-Git.noarch 0:1.7.1-8.el6 will be a downgrade
---> Package perl-Git.noarch 0:1.7.1-9.el6_9 will be erased
--> Finished Dependency Resolution

Dependencies Resolved

=================================================================================================
 Package Arch Version Repository Size
=================================================================================================
Downgrading:
 git x86_64 1.7.1-8.el6 base 4.6 M
 perl-Git noarch 1.7.1-8.el6 base 29 k

Transaction Summary
=================================================================================================
Downgrade 2 Package(s)

Total download size: 4.6 M
Is this ok [y/N]: y
Downloading Packages:
(1/2): git-1.7.1-8.el6.x86_64.rpm | 4.6 MB 00:00
(2/2): perl-Git-1.7.1-8.el6.noarch.rpm | 28 kB 00:00
-------------------------------------------------------------------------------------------------
Total 3.7 MB/s | 4.6 MB 00:01
Running rpm_check_debug
Running Transaction Test
Transaction Test Succeeded
Running Transaction
 Installing : perl-Git-1.7.1-8.el6.noarch 1/4
 Installing : git-1.7.1-8.el6.x86_64 2/4
 Cleanup : perl-Git-1.7.1-9.el6_9.noarch 3/4
 Cleanup : git-1.7.1-9.el6_9.x86_64 4/4
 Verifying : git-1.7.1-8.el6.x86_64 1/4
 Verifying : perl-Git-1.7.1-8.el6.noarch 2/4
 Verifying : git-1.7.1-9.el6_9.x86_64 3/4
 Verifying : perl-Git-1.7.1-9.el6_9.noarch 4/4

Removed:
 git.x86_64 0:1.7.1-9.el6_9 perl-Git.noarch 0:1.7.1-9.el6_9

Installed:
 git.x86_64 0:1.7.1-8.el6 perl-Git.noarch 0:1.7.1-8.el6

Complete!

注意: 你也需要降级依赖包,否则它会删掉当前版本的依赖包而不是对依赖包做降级,因为 downgrade 命令无法处理依赖关系。

至于 Fedora 用户

命令是一样的,只需要将包管理器名称从 yum 改成 dnf 就行了。

# dnf list git
# dnf history
# dnf history info
# dnf history undo
# dnf list git
# dnf downgrade git-1.7.1-8.el6 perl-Git-1.7.1-8.el6

via: https://www.2daygeek.com/rollback-fallback-updates-downgrade-packages-centos-rhel-fedora/

作者:2daygeek 译者:lujun9972 校对:wxy

本文由 LCTT 原创编译,Linux中国 荣誉推出

Upgrade Ubuntu to a newer version with a single command

zzupdate 是一个开源的命令行程序,通过将几个更新命令组合到一个命令中,使得将 Ubuntu 桌面和服务器版本升级到更新版本的任务变得容易一些。

将 Ubuntu 系统升级到更新的版本并不是一项艰巨的任务。无论是使用 GUI 还是使用几个命令,都可以轻松地将系统升级到最新版本。

另一方面,Gianluigi 'Zane' Zanettini 写的 zzupdate 只需一个命令就可以在 Ubuntu 中清理、更新、自动删除、版本升级、该工具的自我更新。

它会清理本地缓存,更新可用的软件包信息,然后执行发行版升级。接着,它会更新该工具并删除未使用的软件包。

该脚本必须以 root 用户身份运行。

安装 zzupdate 将 Ubuntu 升级到更新的版本

要安装 zzupdate,请在终端中执行以下命令。

curl -s https://raw.githubusercontent.com/TurboLabIt/zzupdate/master/setup.sh | sudo sh

然后将提供的示例配置文件复制到 zzupdate.conf 并设置你的首选项。

sudo cp /usr/local/turbolab.it/zzupdate/zzupdate.default.conf /etc/turbolab.it/zzupdate.conf

完成后,只要使用下面的命令,它就会开始升级你的 Ubuntu 系统到一个更新的版本(如果有的话)。

sudo zzupdate

请注意,在普通版本(非 LTS 版本)下,zzupdate 会将系统升级到下一个可用的版本。但是,当你运行 Ubuntu 16.04 LTS 时,它将尝试仅搜索下一个长期支持版本,而不是可用的最新版本。

如果你想退出 LTS 版本并升级到最新版本,你将需要更改一些选项。

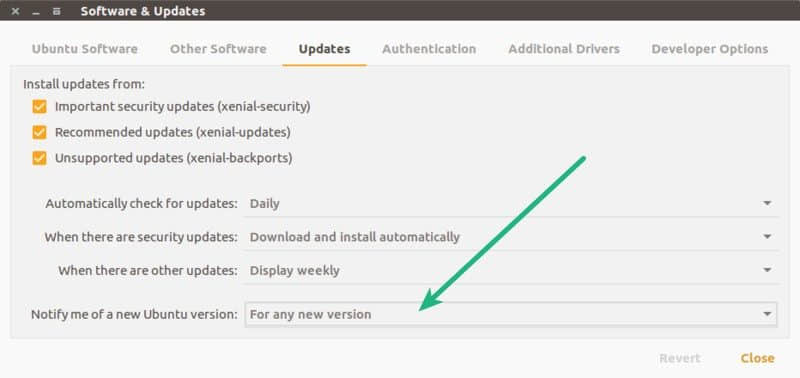
对于 Ubuntu 桌面,打开 软件和更新 和下面 更新 选项卡,并更改通知我新的 Ubuntu 版本选项为 “对于任何新版本”。

Software Updater in Ubuntu

对于 Ubuntu 服务版,编辑 release-upgrades 文件。

vi /etc/update-manager/release-upgrades

Prompt=normal

配置 zzupdate [可选]

zzupdate 要配置的选项:

REBOOT=1

如果值为 1,升级后系统将重启。

REBOOT_TIMEOUT=15

将重启超时设置为 900 秒,因为某些硬件比其他硬件重启需要更长的时间。

VERSION_UPGRADE=1

如果升级可用,则执行版本升级。

VERSION_UPGRADE_SILENT=0

自动显示版本进度。

COMPOSER_UPGRADE=1

值为 “1” 会自动升级该工具。

SWITCH_PROMPT_TO_NORMAL=0

此功能将 Ubuntu 版本更新为普通版本,即如果你运行着 LTS 发行版,zzupdate 将不会将其升级到 Ubuntu 17.10(如果其设置为 0)。它将仅搜索 LTS 版本。相比之下,无论你运行着 LTS 或者普通版,“1” 都将搜索最新版本。

完成后,你要做的就是在控制台中运行一个完整的 Ubuntu 系统更新。

sudo zzupdate

最后的话

尽管 Ubuntu 的升级过程本身就很简单,但是 zzupdate 将它简化为一个命令。不需要编码知识,这个过程完全是配置文件驱动。我个人发现这是一个很好的更新几个 Ubuntu 系统的工具,而无需单独关心不同的事情。

你愿意试试吗?


via: https://itsfoss.com/zzupdate-upgrade-ubuntu/

作者:Ambarish Kumar 译者:geekpi 校对:wxy

本文由 LCTT 原创编译,Linux中国 荣誉推出
就在之前几篇文章,我开始了“系统管理 101”系列文章,用来记录现今许多初级系统管理员、DevOps 工程师或者“全栈”开发者可能不曾接触过的一些系统管理方面的基本知识。按照我原本的设想,该系列文章已经是完结了的。然而后来 WannaCry 恶意软件出现,并在补丁管理不善的 Windows 主机网络间爆发。我能想象到那些仍然深陷 2000 年代 Linux 与 Windows 争论的读者听到这个消息可能已经面露优越的微笑。

我之所以这么快就决定再次继续“系统管理 101”文章系列,是因为我意识到在补丁管理方面一些 Linux 系统管理员和 Windows 系统管理员没有差别。实话说,在一些方面甚至做的更差(特别是以持续运行时间为自豪)。所以,这篇文章会涉及 Linux 下补丁管理的基础概念,包括良好的补丁管理该是怎样的,你可能会用到的一些相关工具,以及整个补丁安装过程是如何进行的。

什么是补丁管理?

我所说的补丁管理,是指你部署用于升级服务器上软件的系统,不仅仅是把软件更新到最新最好的前沿版本。即使是像 Debian 这样为了“稳定性”持续保持某一特定版本软件的保守派发行版,也会时常发布升级补丁用于修补错误和安全漏洞。

当然,如果你的组织决定自己维护特定软件的版本,要么是因为开发者有最新最好版本的需求,需要派生软件源码并做出修改,要么是因为你喜欢给自己额外的工作量,这时你就会遇到问题。理想情况下,你应该已经配置好你的系统,让它在自动构建和打包定制版本软件时使用其它软件所用的同一套持续集成系统。然而,许多系统管理员仍旧在自己的本地主机上按照维基上的文档(但愿是最新的文档)使用过时的方法打包软件。不论使用哪种方法,你都需要明确你所使用的版本有没有安全缺陷,如果有,那必须确保新补丁安装到你定制版本的软件上了。

良好的补丁管理是怎样的

补丁管理首先要做的是检查软件的升级。首先,对于核心软件,你应该订阅相应 Linux 发行版的安全邮件列表,这样才能第一时间得知软件的安全升级情况。如果你使用的软件有些不是来自发行版的仓库,那么你也必须设法跟踪它们的安全更新。一旦接收到新的安全通知,你必须查阅通知细节,以此明确安全漏洞的严重程度,确定你的系统是否受影响,以及安全补丁的紧急性。

一些组织仍在使用手动方式管理补丁。在这种方式下,当出现一个安全补丁,系统管理员就要凭借记忆,登录到各个服务器上进行检查。在确定了哪些服务器需要升级后,再使用服务器内建的包管理工具从发行版仓库升级这些软件。最后以相同的方式升级剩余的所有服务器。

手动管理补丁的方式存在很多问题。首先,这么做会使补丁安装成为一个苦力活,安装补丁越多就需要越多人力成本,系统管理员就越可能推迟甚至完全忽略它。其次,手动管理方式依赖系统管理员凭借记忆去跟踪他或她所负责的服务器的升级情况。这非常容易导致有些服务器被遗漏而未能及时升级。

补丁管理越快速简便,你就越可能把它做好。你应该构建一个系统,用来快速查询哪些服务器运行着特定的软件,以及这些软件的版本号,而且它最好还能够推送各种升级补丁。就个人而言,我倾向于使用 MCollective 这样的编排工具来完成这个任务,但是红帽提供的 Satellite 以及 Canonical 提供的 Landscape 也可以让你在统一的管理界面上查看服务器的软件版本信息,并且安装补丁。

补丁安装还应该具有容错能力。你应该具备在不下线的情况下为服务安装补丁的能力。这同样适用于需要重启系统的内核补丁。我采用的方法是把我的服务器划分为不同的高可用组,lb1、app1、rabbitmq1 和 db1 在一个组,而lb2、app2、rabbitmq2 和 db2 在另一个组。这样,我就能一次升级一个组,而无须下线服务。

所以,多快才能算快呢?对于少数没有附带服务的软件,你的系统最快应该能够在几分钟到一小时内安装好补丁(例如 bash 的 ShellShock 漏洞)。对于像 OpenSSL 这样需要重启服务的软件,以容错的方式安装补丁并重启服务的过程可能会花费稍多的时间,但这就是编排工具派上用场的时候。我在最近的关于 MCollective 的文章中(查看 2016 年 12 月和 2017 年 1 月的工单)给了几个使用 MCollective 实现补丁管理的例子。你最好能够部署一个系统,以具备容错性的自动化方式简化补丁安装和服务重启的过程。

如果补丁要求重启系统,像内核补丁,那它会花费更多的时间。再次强调,自动化和编排工具能够让这个过程比你想象的还要快。我能够在一到两个小时内在生产环境中以容错方式升级并重启服务器,如果重启之间无须等待集群同步备份,这个过程还能更快。

不幸的是,许多系统管理员仍坚信过时的观点,把持续运行时间(uptime)作为一种骄傲的象征——鉴于紧急内核补丁大约每年一次。对于我来说,这只能说明你没有认真对待系统的安全性!

很多组织仍然使用无法暂时下线的单点故障的服务器,也因为这个原因,它无法升级或者重启。如果你想让系统更加安全,你需要去除过时的包袱,搭建一个至少能在深夜维护时段重启的系统。

基本上,快速便捷的补丁管理也是一个成熟专业的系统管理团队所具备的标志。升级软件是所有系统管理员的必要工作之一,花费时间去让这个过程简洁快速,带来的好处远远不止是系统安全性。例如,它能帮助我们找到架构设计中的单点故障。另外,它还帮助鉴定出环境中过时的系统,给我们替换这些部分提供了动机。最后,当补丁管理做得足够好,它会节省系统管理员的时间,让他们把精力放在真正需要专业知识的地方。


Kyle Rankin 是高级安全与基础设施架构师,其著作包括: Linux Hardening in Hostile Networks,DevOps Troubleshooting 以及 The Official Ubuntu Server Book。同时,他还是 Linux Journal 的专栏作家。


via: https://www.linuxjournal.com/content/sysadmin-101-patch-management

作者:Kyle Rankin 译者:haoqixu 校对:wxy

本文由 LCTT 原创编译,Linux中国 荣誉推出
以手动方式安装和升级最新的 Linux 内核对于每个人来说都不是一件小事,甚至包括一些有经验的人也是如此。它需要对 Linux 内核有深入的了解。过去我们已经介绍了 UKUU(Ubuntu Kernel Upgrade Utility),它可以从 kernel.ubuntu.com 网站上自动检测最新的主线内核,并弹出一个不错的窗口界面进行安装。

Linux Kernel Utilities (LKU)提供一组 shell 脚本(三个 Shell 脚本),可以帮助用户从 kernel.org 获取并编译和安装最新的 Linux 内核,也可以从 kernel.ubuntu.com 获取安装最新的预编译的 Ubuntu 内核。甚至可以根据需要选择所需的内核(手动内核选择)。

该脚本还将根据 PGP 签名文件检查下载的归档文件,并且可以选择通用和低延迟版内核。

建议阅读:ukuu:一种在基于 Ubuntu 的系统上轻松安装升级 Linux 内核的方式

它可以删除或清除所有非活动的内核,并且不会为了安全目的留下备份的内核。强烈建议在执行此脚本之前重新启动一次。

  • compile_linux_kernel.sh :用户可以从 kernel.org 编译和安装所需的或最新的内核
  • update_ubuntu_kernel.sh :用户可以从 kernel.ubuntu.com 安装并更新所需或最新的预编译 Ubuntu 内核
  • remove_old_kernels.sh :这将删除或清除所有非活动内核,并且只保留当前加载的版本

kernel.org 有固定的发布周期(每三个月一次),发布的内核包括了新的功能,改进了硬件和系统性能。由于它具有标准的发布周期,除了滚动发布的版本(如 Arch Linux,openSUSE Tumbleweed 等),大多数发行版都不提供最新的内核。

如何安装 Linux Kernel Utilities (LKU)

正如我们在文章的开头所说的,它的 shell 脚本集只是克隆开发人员的 github 仓库并运行相应的 shell 文件来执行这个过程。

$ git clone https://github.com/mtompkins/linux-kernel-utilities.git && cd linux-kernel-utilities

安装指定版本内核

为了测试的目的,我们将安装 Linux v4.4.10-xenial 内核。在安装新内核之前,我们需要通过 uanme -a 命令检查当前安装的内核版本,以便我们可以检查新内核是否可以安装。

$ uname -a
Linux magi-VirtualBox 4.4.0-21-generic #37-Ubuntu SMP Mon Apr 18 18:33:37 UTC 2016 x86_64 x86_64 x86_64 GNU/Linux

根据上面的输出,我们的系统使用的是 4.4.0-21 通用内核。

只需运行 update_ubuntu_kernel.sh shell 脚本。第一次运行脚本时会检查是否满足所有的依赖关系,然后自动安装缺少的依赖项。它会检测系统使用的发行版,并检索 kernel.ubuntu.com 中可用的预编译内核。现在,从列表中选择你需要的内核并输入序号,然后按回车键,它将下载内核映像(linux-headers-4.4.10,linux-headers-4.4.10-xxx-generic 和 linux-image-4.4.10-xxx-generic)。

一旦内核镜像被下载,它将要求输入 sudo 密码来启动新内核的安装。

$ ./update_ubuntu_kernel.sh

[+] Checking Distro
 \_ Distro identified as LinuxMint.

[+] Checking Dependencies
    curl                    Found
    dkms                    Found
    git                     Found
    sudo                    Found
    wget                    Found
    whiptail                Found
    lynx                    Not Found

-- Installing Dependencies --

[!] The first time this script is run missing dependencies will be installed.
    For compiling a kernel this may take a bit of time. Feedback will be provided.

[+] Dependencies
 \_Elevating permissions as necessary . . .
[%] Elevated

[+] Testing for previous held packages and trying to correct any found.
 \_Passed

[+] Updating package cache . . .
 \_Complete

[+] Installing dependencies . . .
 \_Complete

    curl                    Found
    dkms                    Found
    git                     Found
    sudo                    Found
    wget                    Found
    whiptail                Found
    lynx                    Found

[+] Changing to temporary directory to work in . . .
 \_ Temporary directory access granted: /tmp/tmp.97eHDsmg2K

[+] Removing any conflicting remnants . . .
 \_ Done

[+] Retrieving available kernel choices . . .
 \_ Precompiled kernels available from kernel.ubuntu.com:

 1)  Linux v4.11                2)  Linux v4.11.3              3)  Linux v4.11.2              4)  Linux v4.11.1             
 5)  Linux v4.10                6)  Linux v4.10.17             7)  Linux v4.10.16             8)  Linux v4.10.15            
 9)  Linux v4.10.14             10) Linux v4.10.13             11) Linux v4.10.12
[ 节略 ……]                     
 249) Linux v4.0.3-wily          250) Linux v4.0.2-wily          251) Linux v4.0.1-wily          252) Linux v4.0-vivid          

Select your desired kernel: 158

Do you want the lowlatency kernel? (y/[n]):

[+] Processing selection
 \_ Determining CPU type: amd64
 \_ Locating source of v4.4.10-xenial generic kernel packages.
 \_ Done

[+] Checking AntiVirus flag and disabling if necessary
[+] Installing kernel . . .
[sudo] password for magi:
Selecting previously unselected package linux-headers-4.4.10-040410.
(Reading database ... 230647 files and directories currently installed.)
Preparing to unpack linux-headers-4.4.10-040410_4.4.10-040410.201605110631_all.deb ...
Unpacking linux-headers-4.4.10-040410 (4.4.10-040410.201605110631) ...
Selecting previously unselected package linux-headers-4.4.10-040410-generic.
Preparing to unpack linux-headers-4.4.10-040410-generic_4.4.10-040410.201605110631_amd64.deb ...
Unpacking linux-headers-4.4.10-040410-generic (4.4.10-040410.201605110631) ...
Selecting previously unselected package linux-image-4.4.10-040410-generic.
Preparing to unpack linux-image-4.4.10-040410-generic_4.4.10-040410.201605110631_amd64.deb ...
Done.
Unpacking linux-image-4.4.10-040410-generic (4.4.10-040410.201605110631) ...
Setting up linux-headers-4.4.10-040410 (4.4.10-040410.201605110631) ...
Setting up linux-headers-4.4.10-040410-generic (4.4.10-040410.201605110631) ...
Examining /etc/kernel/header_postinst.d.
run-parts: executing /etc/kernel/header_postinst.d/dkms 4.4.10-040410-generic /boot/vmlinuz-4.4.10-040410-generic
Setting up linux-image-4.4.10-040410-generic (4.4.10-040410.201605110631) ...
Running depmod.
update-initramfs: deferring update (hook will be called later)
Examining /etc/kernel/postinst.d.
run-parts: executing /etc/kernel/postinst.d/apt-auto-removal 4.4.10-040410-generic /boot/vmlinuz-4.4.10-040410-generic
run-parts: executing /etc/kernel/postinst.d/dkms 4.4.10-040410-generic /boot/vmlinuz-4.4.10-040410-generic
run-parts: executing /etc/kernel/postinst.d/initramfs-tools 4.4.10-040410-generic /boot/vmlinuz-4.4.10-040410-generic
update-initramfs: Generating /boot/initrd.img-4.4.10-040410-generic
Warning: No support for locale: en_IN
run-parts: executing /etc/kernel/postinst.d/pm-utils 4.4.10-040410-generic /boot/vmlinuz-4.4.10-040410-generic
run-parts: executing /etc/kernel/postinst.d/unattended-upgrades 4.4.10-040410-generic /boot/vmlinuz-4.4.10-040410-generic
run-parts: executing /etc/kernel/postinst.d/zz-update-grub 4.4.10-040410-generic /boot/vmlinuz-4.4.10-040410-generic
Generating grub configuration file ...
Warning: Setting GRUB_TIMEOUT to a non-zero value when GRUB_HIDDEN_TIMEOUT is set is no longer supported.
Found linux image: /boot/vmlinuz-4.4.10-040410-generic
Found initrd image: /boot/initrd.img-4.4.10-040410-generic
Found linux image: /boot/vmlinuz-4.4.9-040409-lowlatency
Found initrd image: /boot/initrd.img-4.4.9-040409-lowlatency
Found linux image: /boot/vmlinuz-4.4.0-21-generic
Found initrd image: /boot/initrd.img-4.4.0-21-generic
Found memtest86+ image: /boot/memtest86+.elf
Found memtest86+ image: /boot/memtest86+.bin
done
 \_ Done

安装后需要重新启动以使用新安装的内核。

$ sudo reboot now

现在,你正在使用的就是新安装的 4.4.10-040410-generic 版本内核。

$ uname -a
Linux magi-VirtualBox 4.4.10-040410-generic #201605110631 SMP Wed May 11 10:33:23 UTC 2016 x86_64 x86_64 x86_64 GNU/Linux

安装最新版本内核

过程与上述相同,它将自动安装最新版本的内核。

$ ./update_ubuntu_kernel.sh --latest

[+] Checking Distro
 \_ Distro identified as LinuxMint.

[+] Checking Dependencies
    curl                    Found
    dkms                    Found
    git                     Found
    sudo                    Found
    wget                    Found
    whiptail                Found
    lynx                    Found

[+] Changing to temporary directory to work in . . .
 \_ Temporary directory access granted: /tmp/tmp.pLPYmCze6S

[+] Removing any conflicting remnants . . .
 \_ Done

[+] Retrieving available kernel choices . . .
 \_ Precompiled kernels available from kernel.ubuntu.com:
.
.
.
.
Warning: Setting GRUB_TIMEOUT to a non-zero value when GRUB_HIDDEN_TIMEOUT is set is no longer supported.
Found linux image: /boot/vmlinuz-4.11.3-041103-generic
Found initrd image: /boot/initrd.img-4.11.3-041103-generic
Found linux image: /boot/vmlinuz-4.4.10-040410-generic
Found initrd image: /boot/initrd.img-4.4.10-040410-generic
Found linux image: /boot/vmlinuz-4.4.9-040409-lowlatency
Found initrd image: /boot/initrd.img-4.4.9-040409-lowlatency
Found linux image: /boot/vmlinuz-4.4.0-21-generic
Found initrd image: /boot/initrd.img-4.4.0-21-generic
Found memtest86+ image: /boot/memtest86+.elf
Found memtest86+ image: /boot/memtest86+.bin
done
 \_ Done

安装后需要重新启动以使用新安装的内核。

$ sudo reboot now

现在,你正在使用的就是最新版本 4.11.3-041103-generic 的内核。

$ uname -a
Linux magi-VirtualBox 4.11.3-041103-generic #201705251233 SMP Thu May 25 16:34:52 UTC 2017 x86_64 x86_64 x86_64 GNU/Linux

删除或清除旧内核

只需要运行 remove_old_kernels.sh shell 脚本即可删除或清除所有非活动状态的内核。

$ ./remove_old_kernels.sh

        ++++++++++++++++++++++++++++++++
        +++       W A R N I N G      +++
        ++++++++++++++++++++++++++++++++

A reboot is recommended before running this script to ensure the current kernel tagged
as the boot kernel is indeed registered and old kernels properly marked for removal.
If you have just installed or modified your existing kernel and do not reboot before
running this script it may render you system INOPERABLE and that would indeed suck.

You have been warned.
~the Mgmt

[?]Continue to automagically remove ALL old kernels? (y/N)y
\_ Removing ALL old kernels . . .
[sudo] password for magi:
Reading package lists... Done
Building dependency tree       
Reading state information... Done
The following packages will be REMOVED:
  linux-headers-4.4.0-21* linux-headers-4.4.0-21-generic* linux-headers-4.4.10-040410*
  linux-headers-4.4.10-040410-generic* linux-headers-4.4.9-040409* linux-headers-4.4.9-040409-lowlatency*
  linux-image-4.4.0-21-generic* linux-image-4.4.10-040410-generic* linux-image-4.4.9-040409-lowlatency*
  linux-image-extra-4.4.0-21-generic* linux-kernel-generic*
0 upgraded, 0 newly installed, 11 to remove and 547 not upgraded.
After this operation, 864 MB disk space will be freed.
(Reading database ... 296860 files and directories currently installed.)
Removing linux-kernel-generic (4.4.0-21) ...
Removing linux-headers-4.4.0-21-generic (4.4.0-21.37) ...
Removing linux-headers-4.4.0-21 (4.4.0-21.37) ...
Removing linux-headers-4.4.10-040410-generic (4.4.10-040410.201605110631) ...
Removing linux-headers-4.4.10-040410 (4.4.10-040410.201605110631) ...
Removing linux-headers-4.4.9-040409-lowlatency (4.4.9-040409.201605041832) ...
Removing linux-headers-4.4.9-040409 (4.4.9-040409.201605041832) ...
Removing linux-image-extra-4.4.0-21-generic (4.4.0-21.37) ...
.
.
.
done
Purging configuration files for linux-image-4.4.9-040409-lowlatency (4.4.9-040409.201605041832) ...
Examining /etc/kernel/postrm.d .
run-parts: executing /etc/kernel/postrm.d/initramfs-tools 4.4.9-040409-lowlatency /boot/vmlinuz-4.4.9-040409-lowlatency
run-parts: executing /etc/kernel/postrm.d/zz-update-grub 4.4.9-040409-lowlatency /boot/vmlinuz-4.4.9-040409-lowlatency

via: http://www.2daygeek.com/lku-linux-kernel-utilities-compile-install-update-latest-kernel-in-linux-mint-ubuntu/

作者:2DAYGEEK 译者:firmianay 校对:wxy

本文由 LCTT 原创编译,Linux中国 荣誉推出