分类 技术 下的文章

Nishita Agarwal是Tecmint的用户,她将分享关于她刚刚经历的一家公司(印度的一家私人公司Pune)的面试经验。在面试中她被问及许多不同的问题,但她是iptables方面的专家,因此她想分享这些关于iptables的问题和相应的答案给那些以后可能会进行相关面试的人。

Linux防火墙Iptables面试问题

所有的问题和相应的答案都基于Nishita Agarwal的记忆并经过了重写。

“嗨,朋友!我叫Nishita Agarwal。我已经取得了理学学士学位,我的专业集中在UNIX和它的变种(BSD,Linux)。它们一直深深的吸引着我。我在存储方面有1年多的经验。我正在寻求职业上的变化,并将供职于印度的Pune公司。”

下面是我在面试中被问到的问题的集合。我已经把我记忆中有关iptables的问题和它们的答案记录了下来。希望这会对您未来的面试有所帮助。

1. 你听说过Linux下面的iptables和Firewalld么?知不知道它们是什么,是用来干什么的?

答案 : iptables和Firewalld我都知道,并且我已经使用iptables好一段时间了。iptables主要由C语言写成,并且以GNU GPL许可证发布。它是从系统管理员的角度写的,最新的稳定版是iptables 1.4.21。iptables通常被用作类UNIX系统中的防火墙,更准确的说,可以称为iptables/netfilter。管理员通过终端/GUI工具与iptables打交道,来添加和定义防火墙规则到预定义的表中。Netfilter是内核中的一个模块,它执行包过滤的任务。

Firewalld是RHEL/CentOS 7(也许还有其他发行版,但我不太清楚)中最新的过滤规则的实现。它已经取代了iptables接口,并与netfilter相连接。

2. 你用过一些iptables的GUI或命令行工具么?

答案 : 虽然我既用过GUI工具,比如与Webmin结合的Shorewall;以及直接通过终端访问iptables,但我必须承认通过Linux终端直接访问iptables能给予用户更高级的灵活性、以及对其背后工作更好的理解的能力。GUI适合初级管理员,而终端适合有经验的管理员。

3. 那么iptables和firewalld的基本区别是什么呢?

答案 : iptables和firewalld都有着同样的目的(包过滤),但它们使用不同的方式。iptables与firewalld不同,在每次发生更改时都刷新整个规则集。通常iptables配置文件位于‘/etc/sysconfig/iptables‘,而firewalld的配置文件位于‘/etc/firewalld/‘。firewalld的配置文件是一组XML文件。以XML为基础进行配置的firewalld比iptables的配置更加容易,但是两者都可以完成同样的任务。例如,firewalld可以在自己的命令行界面以及基于XML的配置文件下使用iptables。

4. 如果有机会的话,你会在你所有的服务器上用firewalld替换iptables么?

答案 : 我对iptables很熟悉,它也工作的很好。如果没有任何需求需要firewalld的动态特性,那么没有理由把所有的配置都从iptables移动到firewalld。通常情况下,目前为止,我还没有看到iptables造成什么麻烦。IT技术的通用准则也说道“为什么要修一件没有坏的东西呢?”。上面是我自己的想法,但如果组织愿意用firewalld替换iptables的话,我不介意。

5. 你看上去对iptables很有信心,巧的是,我们的服务器也在使用iptables。

iptables使用的表有哪些?请简要的描述iptables使用的表以及它们所支持的链。

答案 : 谢谢您的赞赏。至于您问的问题,iptables使用的表有四个,它们是:

  • Nat 表
  • Mangle 表
  • Filter 表
  • Raw 表

Nat表 : Nat表主要用于网络地址转换。根据表中的每一条规则修改网络包的IP地址。流中的包仅遍历一遍Nat表。例如,如果一个通过某个接口的包被修饰(修改了IP地址),该流中其余的包将不再遍历这个表。通常不建议在这个表中进行过滤,由NAT表支持的链称为PREROUTING 链,POSTROUTING 链和OUTPUT 链。

Mangle表 : 正如它的名字一样,这个表用于校正网络包。它用来对特殊的包进行修改。它能够修改不同包的头部和内容。Mangle表不能用于地址伪装。支持的链包括PREROUTING 链,OUTPUT 链,Forward 链,Input 链和POSTROUTING 链。

Filter表 : Filter表是iptables中使用的默认表,它用来过滤网络包。如果没有定义任何规则,Filter表则被当作默认的表,并且基于它来过滤。支持的链有INPUT 链,OUTPUT 链,FORWARD 链。

Raw表 : Raw表在我们想要配置之前被豁免的包时被使用。它支持PREROUTING 链和OUTPUT 链。

6. 简要谈谈什么是iptables中的目标值(能被指定为目标),他们有什么用

答案 : 下面是在iptables中可以指定为目标的值:

  • ACCEPT : 接受包
  • QUEUE : 将包传递到用户空间 (应用程序和驱动所在的地方)
  • DROP : 丢弃包
  • RETURN : 将控制权交回调用的链并且为当前链中的包停止执行下一调用规则

7. 让我们来谈谈iptables技术方面的东西,我的意思是说实际使用方面

你怎么检测在CentOS中安装iptables时需要的iptables的rpm?

答案 : iptables已经被默认安装在CentOS中,我们不需要单独安装它。但可以这样检测rpm:

# rpm -qa iptables

iptables-1.4.21-13.el7.x86_64

如果您需要安装它,您可以用yum来安装。

# yum install iptables-services

8. 怎样检测并且确保iptables服务正在运行?

答案 : 您可以在终端中运行下面的命令来检测iptables的状态。

# service status iptables           [On CentOS 6/5]
# systemctl status iptables         [On CentOS 7]

如果iptables没有在运行,可以使用下面的语句

---------------- 在CentOS 6/5下 ---------------- 
# chkconfig --level 35 iptables on
# service iptables start

---------------- 在CentOS 7下 ---------------- 
# systemctl enable iptables 
# systemctl start iptables 

我们还可以检测iptables的模块是否被加载:

# lsmod | grep ip_tables

9. 你怎么检查iptables中当前定义的规则呢?

答案 : 当前的规则可以简单的用下面的命令查看:

# iptables -L

示例输出

Chain INPUT (policy ACCEPT)
target     prot opt source               destination         
ACCEPT     all  --  anywhere             anywhere             state RELATED,ESTABLISHED
ACCEPT     icmp --  anywhere             anywhere            
ACCEPT     all  --  anywhere             anywhere            
ACCEPT     tcp  --  anywhere             anywhere             state NEW tcp dpt:ssh
REJECT     all  --  anywhere             anywhere             reject-with icmp-host-prohibited

Chain FORWARD (policy ACCEPT)
target     prot opt source               destination         
REJECT     all  --  anywhere             anywhere             reject-with icmp-host-prohibited

Chain OUTPUT (policy ACCEPT)
target     prot opt source               destination

10. 你怎样刷新所有的iptables规则或者特定的链呢?

答案 : 您可以使用下面的命令来刷新一个特定的链。

# iptables --flush OUTPUT

要刷新所有的规则,可以用:

# iptables --flush

11. 请在iptables中添加一条规则,接受所有从一个信任的IP地址(例如,192.168.0.7)过来的包。

答案 : 上面的场景可以通过运行下面的命令来完成。

# iptables -A INPUT -s 192.168.0.7 -j ACCEPT 

我们还可以在源IP中使用标准的斜线和子网掩码:

# iptables -A INPUT -s 192.168.0.7/24 -j ACCEPT 
# iptables -A INPUT -s 192.168.0.7/255.255.255.0 -j ACCEPT

12. 怎样在iptables中添加规则以ACCEPT,REJECT,DENY和DROP ssh的服务?

答案 : 但愿ssh运行在22端口,那也是ssh的默认端口,我们可以在iptables中添加规则来ACCEPT ssh的tcp包(在22号端口上)。

# iptables -A INPUT -p tcp --dport 22 -j ACCEPT 

REJECT ssh服务(22号端口)的tcp包。

# iptables -A INPUT -p tcp --dport 22 -j REJECT

DENY ssh服务(22号端口)的tcp包。

# iptables -A INPUT -p tcp --dport 22 -j DENY

DROP ssh服务(22号端口)的tcp包。

# iptables -A INPUT -p tcp --dport 22 -j DROP

13. 让我给你另一个场景,假如有一台电脑的本地IP地址是192.168.0.6。你需要封锁在21、22、23和80号端口上的连接,你会怎么做?

答案 : 这时,我所需要的就是在iptables中使用‘multiport‘选项,并将要封锁的端口号跟在它后面。上面的场景可以用下面的一条语句搞定:

# iptables -A INPUT -s 192.168.0.6 -p tcp -m multiport --dport 22,23,80,8080 -j DROP

可以用下面的语句查看写入的规则。

# iptables -L

Chain INPUT (policy ACCEPT)
target     prot opt source               destination         
ACCEPT     all  --  anywhere             anywhere             state RELATED,ESTABLISHED
ACCEPT     icmp --  anywhere             anywhere            
ACCEPT     all  --  anywhere             anywhere            
ACCEPT     tcp  --  anywhere             anywhere             state NEW tcp dpt:ssh
REJECT     all  --  anywhere             anywhere             reject-with icmp-host-prohibited
DROP       tcp  --  192.168.0.6          anywhere             multiport dports ssh,telnet,http,webcache

Chain FORWARD (policy ACCEPT)
target     prot opt source               destination         
REJECT     all  --  anywhere             anywhere             reject-with icmp-host-prohibited

Chain OUTPUT (policy ACCEPT)
target     prot opt source               destination

面试官 : 好了,我问的就是这些。你是一个很有价值的雇员,我们不会错过你的。我将会向HR推荐你的名字。如果你有什么问题,请问我。

作为一个候选人我不愿不断的问将来要做的项目的事以及公司里其他的事,这样会打断愉快的对话。更不用说HR轮会不会比较难,总之,我获得了机会。

同时我要感谢Avishek和Ravi(我的朋友)花时间帮我整理我的面试。

朋友!如果您有过类似的面试,并且愿意与数百万Tecmint读者一起分享您的面试经历,请将您的问题和答案发送到admin@tecmint.com

谢谢!保持联系。如果我能更好的回答我上面的问题的话,请记得告诉我。


via: http://www.tecmint.com/linux-firewall-iptables-interview-questions-and-answers/

作者:Avishek Kumar 译者:wwy-hust 校对:wxy

本文由 LCTT 原创翻译,Linux中国 荣誉推出

在本文中,我们将了解如何在运行 Fedora 22 的电脑或服务器上使用 Proftpd 架设 FTP 服务器。ProFTPD 是一款基于 GPL 授权的自由开源 FTP 服务器软件,是 Linux 上的主流 FTP 服务器。它的主要设计目标是提供许多高级功能以及给用户提供丰富的配置选项以轻松实现定制。它具备许多在其他一些 FTP 服务器软件里仍然没有的配置选项。最初它是被开发作为 wu-ftpd 服务器的一个更安全更容易配置的替代。

FTP 服务器是这样一个软件,用户可以通过 FTP 客户端从安装了它的远端服务器上传或下载文件和目录。下面是一些 ProFTPD 服务器的主要功能,更详细的资料可以访问 http://www.proftpd.org/features.html

  • 每个目录都可以包含 ".ftpaccess" 文件用于访问控制,类似 Apache 的 ".htaccess"
  • 支持多个虚拟 FTP 服务器以及多用户登录和匿名 FTP 服务。
  • 可以作为独立进程启动服务或者通过 inetd/xinetd 启动
  • 它的文件/目录属性、属主和权限是基于 UNIX 方式的。
  • 它可以独立运行,保护系统避免 root 访问可能带来的损坏。
  • 模块化的设计让它可以轻松扩展其他模块,比如 LDAP 服务器,SSL/TLS 加密,RADIUS 支持,等等。
  • ProFTPD 服务器还支持 IPv6.

下面是如何在运行 Fedora 22 操作系统的计算机上使用 ProFTPD 架设 FTP 服务器的一些简单步骤。

1. 安装 ProFTPD

首先,我们将在运行 Fedora 22 的机器上安装 Proftpd 软件。因为 yum 包管理器已经被抛弃了,我们将使用最新最好的包管理器 dnf。DNF 很容易使用,是 Fedora 22 上采用的非常人性化的包管理器。我们将用它来安装 proftpd 软件。这需要在终端或控制台里用 sudo 模式运行下面的命令。

$ sudo dnf -y install proftpd proftpd-utils

2. 配置 ProFTPD

现在,我们将修改软件的一些配置。要配置它,我们需要用文本编辑器编辑 /etc/proftpd.conf 文件。/etc/proftpd.conf 文件是 ProFTPD 软件的主要配置文件,所以,这个文件的任何改动都会影响到 FTP 服务器。在这里,是我们在初始步骤里做出的改动。

$ sudo vi /etc/proftpd.conf

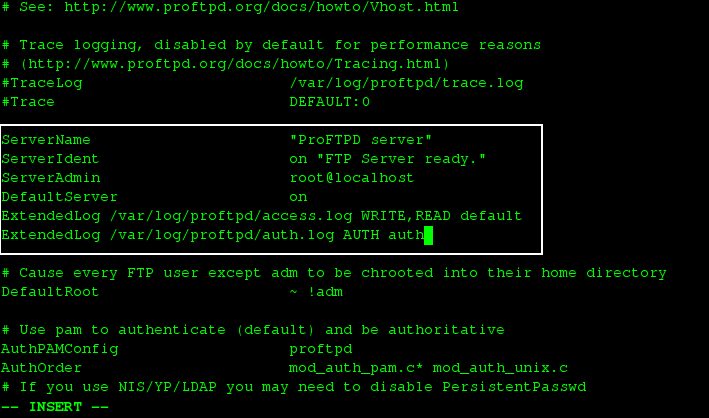
之后,在用文本编辑器打开这个文件后,我们会想改下 ServerName 以及 ServerAdmin,分别填入自己的域名和 email 地址。下面是我们改的。

ServerName       "ftp.linoxide.com"
ServerAdmin      arun@linoxide.com

在这之后,我们将把下面的设定加到配置文件里,这样可以让服务器将访问和授权记录到相应的日志文件里。

ExtendedLog /var/log/proftpd/access.log WRITE,READ default
ExtendedLog /var/log/proftpd/auth.log AUTH auth

调整 ProFTPD 设置

3. 添加 FTP 用户

在设定好了基本的配置文件后,我们很自然地希望添加一个以特定目录为根目录的 FTP 用户。目前登录的用户自动就可以使用 FTP 服务,可以用来登录到 FTP 服务器。但是,在这篇教程里,我们将创建一个以 ftp 服务器上指定目录为主目录的新用户。

下面,我们将建立一个名字是 ftpgroup 的新用户组。

$ sudo groupadd ftpgroup

然后,我们将以目录 /ftp-dir/ 作为主目录增加一个新用户 arunftp 并加入这个组中。

$ sudo useradd -G ftpgroup arunftp -s /sbin/nologin -d /ftp-dir/

在创建好用户并加入用户组后,我们将为用户 arunftp 设置一个密码。

$ sudo passwd arunftp

Changing password for user arunftp.
New password:
Retype new password:
passwd: all authentication tokens updated successfully.

现在,我们将通过下面命令为这个 ftp 用户设定主目录的读写权限(LCTT 译注:这是SELinux 相关设置,如果未启用 SELinux,可以不用)。

$ sudo setsebool -P allow_ftpd_full_access=1
$ sudo setsebool -P ftp_home_dir=1

然后,我们会设定不允许其他用户移动或重命名这个目录以及里面的内容。

$ sudo chmod -R 1777 /ftp-dir/

4. 打开 TLS 支持

目前 FTP 所用的加密手段并不安全,任何人都可以通过监听网卡来读取 FTP 传输的数据。所以,我们将为自己的服务器打开 TLS 加密支持。这样的话,需要编辑 /etc/proftpd.conf 配置文件。在这之前,我们先备份一下当前的配置文件,可以保证在改出问题后还可以恢复。

$ sudo cp /etc/proftpd.conf /etc/proftpd.conf.bak

然后,我们可以用自己喜欢的文本编辑器修改配置文件。

$ sudo vi /etc/proftpd.conf

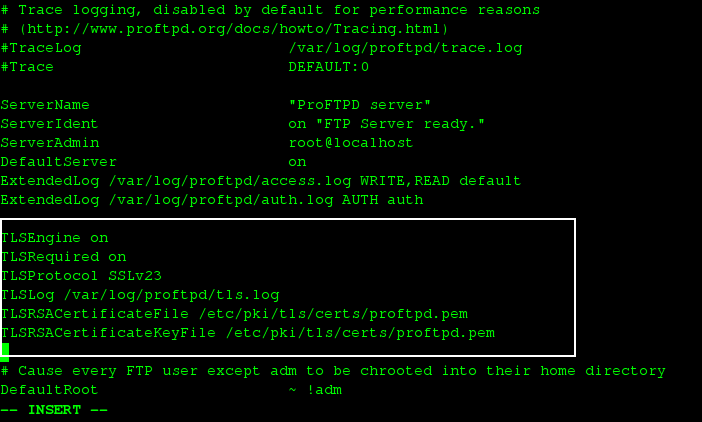
然后,把下面几行附加到我们在第 2 步中所增加内容的后面。

TLSEngine on
TLSRequired on
TLSProtocol SSLv23
TLSLog /var/log/proftpd/tls.log
TLSRSACertificateFile /etc/pki/tls/certs/proftpd.pem
TLSRSACertificateKeyFile /etc/pki/tls/certs/proftpd.pem

打开 TLS 配置

完成上面的设定后,保存退出。

然后,我们需要生成 SSL 凭证 proftpd.pem 并放到 /etc/pki/tls/certs/ 目录里。这样的话,首先需要在 Fedora 22 上安装 openssl。

$ sudo dnf install openssl

然后,可以通过执行下面的命令生成 SSL 凭证。

$ sudo openssl req -x509 -nodes -newkey rsa:2048 -keyout /etc/pki/tls/certs/proftpd.pem -out /etc/pki/tls/certs/proftpd.pem

系统会询问一些将写入凭证里的基本信息。在填完资料后,就会生成一个 2048 位的 RSA 私钥。

Generating a 2048 bit RSA private key
...................+++
...................+++
writing new private key to '/etc/pki/tls/certs/proftpd.pem'
-----
You are about to be asked to enter information that will be incorporated
into your certificate request.
What you are about to enter is what is called a Distinguished Name or a DN.
There are quite a few fields but you can leave some blank
For some fields there will be a default value,
If you enter '.', the field will be left blank.
-----
Country Name (2 letter code) [XX]:NP
State or Province Name (full name) []:Narayani
Locality Name (eg, city) [Default City]:Bharatpur
Organization Name (eg, company) [Default Company Ltd]:Linoxide
Organizational Unit Name (eg, section) []:Linux Freedom
Common Name (eg, your name or your server's hostname) []:ftp.linoxide.com
Email Address []:arun@linoxide.com

在这之后,我们要改变所生成凭证文件的权限以增加安全性。

$ sudo chmod 600 /etc/pki/tls/certs/proftpd.pem

5. 允许 FTP 通过 Firewall

现在,需要允许 ftp 端口,一般默认被防火墙阻止了。就是说,需要允许 ftp 端口能通过防火墙访问。

如果 打开了 TLS/SSL 加密,执行下面的命令。

$ sudo firewall-cmd --add-port=1024-65534/tcp
$ sudo firewall-cmd --add-port=1024-65534/tcp --permanent

如果 没有打开 TLS/SSL 加密,执行下面的命令。

$ sudo firewall-cmd --permanent --zone=public --add-service=ftp

success

然后,重新加载防火墙设定。

$ sudo firewall-cmd --reload

success

6. 启动并激活 ProFTPD

全部设定好后,最后就是启动 ProFTPD 并试一下。可以运行下面的命令来启动 proftpd ftp 守护程序。

$ sudo systemctl start proftpd.service

然后,我们可以设定开机启动。

$ sudo systemctl enable proftpd.service

Created symlink from /etc/systemd/system/multi-user.target.wants/proftpd.service to /usr/lib/systemd/system/proftpd.service.

7. 登录到 FTP 服务器

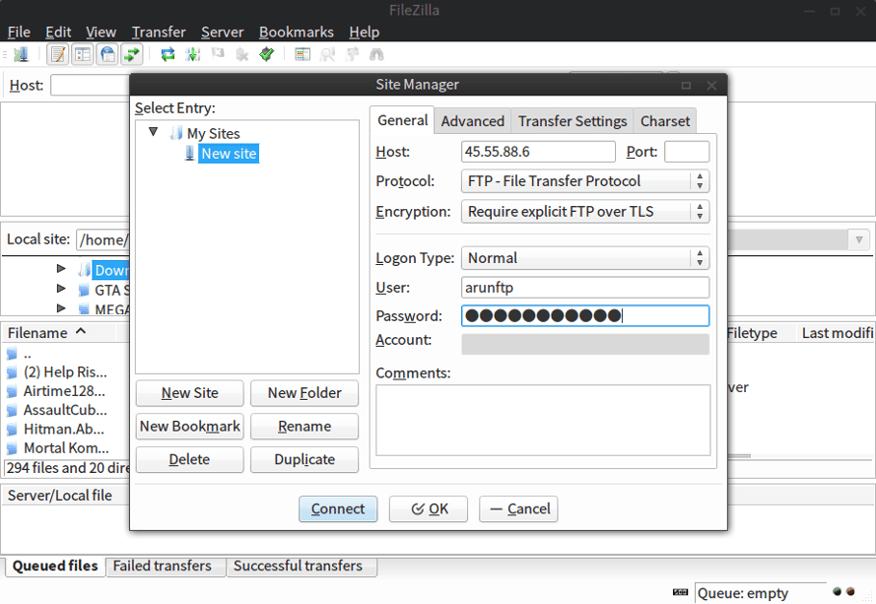
现在,如果都是按照本教程设置好的,我们一定可以连接到 ftp 服务器并使用以上设置的信息登录上去。在这里,我们将配置一下 FTP 客户端 filezilla,使用 服务器的 IP 或名称 *作为主机名,协议选择 *FTP,用户名填入 arunftp,密码是在上面第 3 步中设定的密码。如果你按照第 4 步中的方式打开了 TLS 支持,还需要在加密类型中选择 要求显式的基于 TLS 的 FTP,如果没有打开,也不想使用 TLS 加密,那么加密类型选择 简单 FTP

FTP 登录细节

要做上述设定,需要打开菜单里的文件,点击站点管理器,然后点击新建站点,再按上面的方式设置。

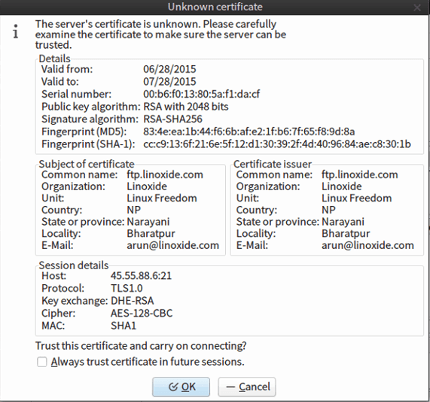
FTP SSL 凭证

随后系统会要求允许 SSL 凭证,点确定。之后,就可以从我们的 FTP 服务器上传下载文件和文件夹了。

总结

最后,我们成功地在 Fedora 22 机器上安装并配置好了 Proftpd FTP 服务器。Proftpd 是一个超级强大,能高度定制和扩展的 FTP 守护软件。上面的教程展示了如何配置一个采用 TLS 加密的安全 FTP 服务器。强烈建议设置 FTP 服务器支持 TLS 加密,因为它允许使用 SSL 凭证加密数据传输和登录。本文中,我们也没有配置 FTP 的匿名访问,因为一般受保护的 FTP 系统不建议这样做。 FTP 访问让人们的上传和下载变得非常简单也更高效。我们还可以改变用户端口增加安全性。好吧,如果你有任何疑问,建议,反馈,请在下面评论区留言,这样我们就能够改善并更新文章内容。谢谢!玩的开心 :-)


via: http://linoxide.com/linux-how-to/configure-ftp-proftpd-fedora-22/

作者:Arun Pyasi 译者:zpl1025 校对:wxy

本文由 LCTT 原创翻译,Linux中国 荣誉推出

大家好,今天我们来研究一下如何使用Docker Machine部署Swarm集群。Docker Machine提供了标准的Docker API 支持,所以任何可以与Docker守护进程进行交互的工具都可以使用Swarm来(透明地)扩增到多台主机上。Docker Machine可以用来在个人电脑、云端以及的数据中心里创建Docker主机。它为创建服务器,安装Docker以及根据用户设定来配置Docker客户端提供了便捷化的解决方案。我们可以使用任何驱动来部署swarm集群,并且swarm集群将由于使用了TLS加密具有极好的安全性。

下面是我提供的简便方法。

1. 安装Docker Machine

Docker Machine 在各种Linux系统上都支持的很好。首先,我们需要从Github上下载最新版本的Docker Machine。我们使用curl命令来下载最先版本Docker Machine ie 0.2.0。

64位操作系统:

# curl -L https://github.com/docker/machine/releases/download/v0.2.0/docker-machine_linux-amd64 > /usr/local/bin/docker-machine

32位操作系统:

# curl -L https://github.com/docker/machine/releases/download/v0.2.0/docker-machine_linux-i386 > /usr/local/bin/docker-machine

下载了最先版本的Docker Machine之后,我们需要对 /usr/local/bin/ 目录下的docker-machine文件的权限进行修改。命令如下:

# chmod +x /usr/local/bin/docker-machine

在做完上面的事情以后,我们要确保docker-machine已经安装正确。怎么检查呢?运行docker-machine -v指令,该指令将会给出我们系统上所安装的docker-machine版本。

# docker-machine -v

为了让Docker命令能够在我们的机器上运行,必须还要在机器上安装Docker客户端。命令如下。

# curl -L https://get.docker.com/builds/linux/x86_64/docker-latest > /usr/local/bin/docker
# chmod +x /usr/local/bin/docker

2. 创建Machine

在将Docker Machine安装到我们的设备上之后,我们需要使用Docker Machine创建一个machine。在这篇文章中,我们会将其部署在Digital Ocean Platform上。所以我们将使用“digitalocean”作为它的Driver API,然后将docker swarm运行在其中。这个Droplet会被设置为Swarm主控节点,我们还要创建另外一个Droplet,并将其设定为Swarm节点代理。

创建machine的命令如下:

# docker-machine create --driver digitalocean --digitalocean-access-token <API-Token> linux-dev

备注: 假设我们要创建一个名为“linux-dev”的machine。是用户在Digital Ocean Cloud Platform的Digital Ocean控制面板中生成的密钥。为了获取这个密钥,我们需要登录我们的Digital Ocean控制面板,然后点击API选项,之后点击Generate New Token,起个名字,然后在Read和Write两个选项上打钩。之后我们将得到一个很长的十六进制密钥,这个就是了。用其替换上面那条命令中的API-Token字段。

现在,运行下面的指令,将Machine 的配置变量加载进shell里。

# eval "$(docker-machine env linux-dev)"

Docker Machine Digitalocean Cloud

然后,我们使用如下命令将我们的machine标记为ACTIVE状态。

# docker-machine active linux-dev

现在,我们检查它(指machine)是否被标记为了 ACTIVE "*"。

# docker-machine ls

Docker Machine Active List

3. 运行Swarm Docker镜像

现在,在我们创建完成了machine之后。我们需要将swarm docker镜像部署上去。这个machine将会运行这个docker镜像,并且控制Swarm主控节点和从节点。使用下面的指令运行镜像:

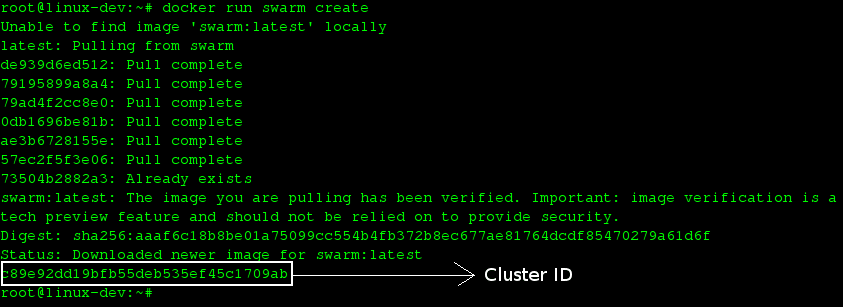
# docker run swarm create

Docker Machine Swarm Create

如果你想要在32位操作系统上运行swarm docker镜像。你需要SSH登录到Droplet当中。

# docker-machine ssh
# docker run swarm create
# exit

4. 创建Swarm主控节点

在我们的swarm image已经运行在machine当中之后,我们将要创建一个Swarm主控节点。使用下面的语句,添加一个主控节点。

# docker-machine create \
-d digitalocean \
--digitalocean-access-token <DIGITALOCEAN-TOKEN>
--swarm \
--swarm-master \
--swarm-discovery token://<CLUSTER-ID> \
swarm-master

Docker Machine Swarm Master Create

5. 创建Swarm从节点

现在,我们将要创建一个swarm从节点,此节点将与Swarm主控节点相连接。下面的指令将创建一个新的名为swarm-node的droplet,其与Swarm主控节点相连。到此,我们就拥有了一个两节点的swarm集群了。

# docker-machine create \
-d digitalocean \
--digitalocean-access-token <DIGITALOCEAN-TOKEN>
--swarm \
--swarm-discovery token://<TOKEN-FROM-ABOVE> \
swarm-node

Docker Machine Swarm Nodes

6. 与Swarm主控节点连接

现在,我们连接Swarm主控节点以便我们可以依照需求和配置文件在节点间部署Docker容器。运行下列命令将Swarm主控节点的Machine配置文件加载到环境当中。

# eval "$(docker-machine env --swarm swarm-master)"

然后,我们就可以跨节点地运行我们所需的容器了。在这里,我们还要检查一下是否一切正常。所以,运行docker info命令来检查Swarm集群的信息。

# docker info

总结

我们可以用Docker Machine轻而易举地创建Swarm集群。这种方法有非常高的效率,因为它极大地减少了系统管理员和用户的时间消耗。在这篇文章中,我们以Digital Ocean作为驱动,通过创建一个主控节点和一个从节点成功地部署了集群。其他类似的驱动还有VirtualBox,Google Cloud Computing,Amazon Web Service,Microsoft Azure等等。这些连接都是通过TLS进行加密的,具有很高的安全性。如果你有任何的疑问,建议,反馈,欢迎在下面的评论框中注明以便我们可以更好地提高文章的质量!


via: http://linoxide.com/linux-how-to/provision-swarm-clusters-using-docker-machine/

作者:Arun Pyasi 译者:DongShuaike 校对:wxy

本文由 LCTT 原创翻译,Linux中国 荣誉推出

在 Ubuntu 中管理开机启动应用

你曾经考虑过 在 Ubuntu 中管理开机启动应用 吗?如果在开机时,你的 Ubuntu 系统启动得非常缓慢,那么你就需要考虑这个问题了。

每当你开机进入一个操作系统,一系列的应用将会自动启动。这些应用被称为‘开机启动应用’ 或‘开机启动程序’。随着时间的推移,当你在系统中安装了足够多的应用时,你将发现有太多的‘开机启动应用’在开机时自动地启动了,它们吃掉了很多的系统资源,并将你的系统拖慢。这可能会让你感觉卡顿,我想这种情况并不是你想要的。

让 Ubuntu 变得更快的方法之一是对这些开机启动应用进行控制。 Ubuntu 为你提供了一个 GUI 工具来让你找到这些开机启动应用,然后完全禁止或延迟它们的启动,这样就可以不让每个应用在开机时同时运行。

在这篇文章中,我们将看到 在 Ubuntu 中,如何控制开机启动应用,如何让一个应用在开机时启动以及如何发现隐藏的开机启动应用。这里提供的指导对所有的 Ubuntu 版本均适用,例如 Ubuntu 12.04, Ubuntu 14.04 和 Ubuntu 15.04。

在 Ubuntu 中管理开机启动应用

默认情况下, Ubuntu 提供了一个Startup Applications工具来供你使用,你不必再进行安装。只需到 Unity 面板中就可以查找到该工具。

ubuntu 中的开机启动应用工具

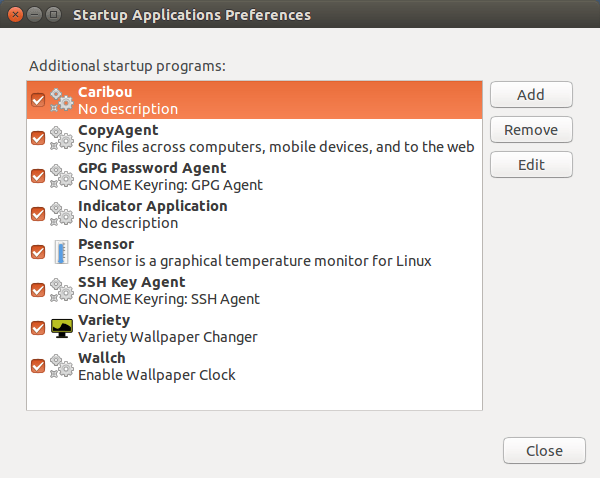
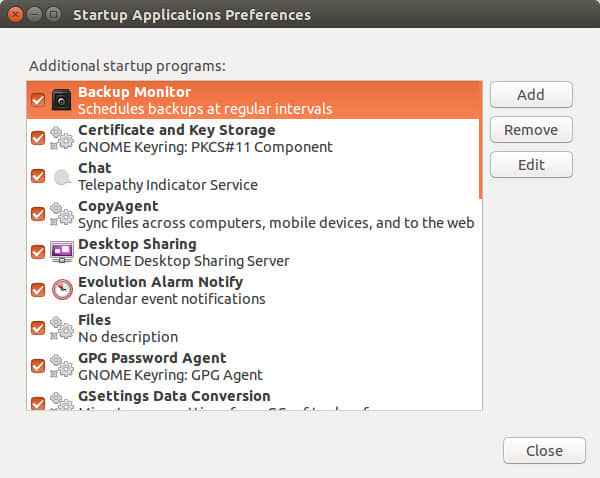
点击它来启动。下面是我的Startup Applications的样子:

在 Ubuntu 中查看开机启动程序

在 Ubuntu 中移除开机启动应用

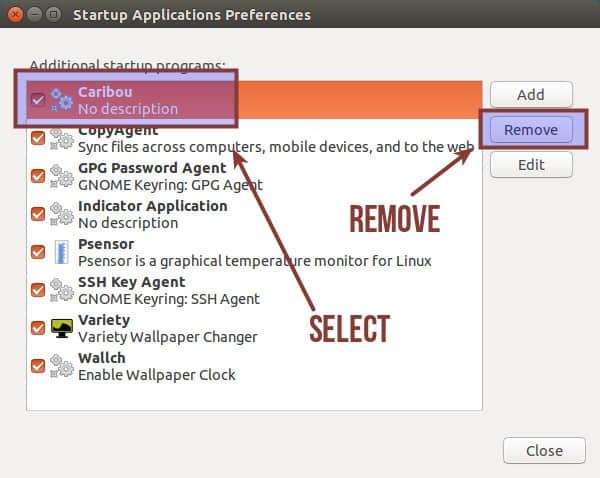
现在由你来发现哪个程序对你用处不大,对我来说,是 Caribou 这个软件,它是一个屏幕键盘程序,在开机时它并没有什么用处,所以我想将它移除出开机启动程序的列表中。

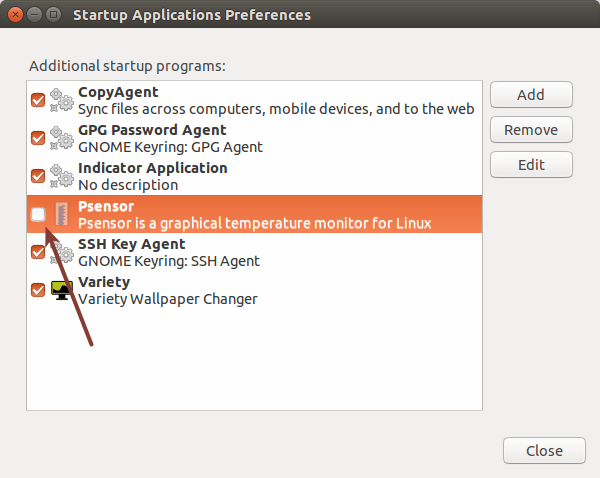
你可以选择阻止某个程序在开机时启动,而在开机启动程序列表中保留该选项以便以后再进行激活。点击 关闭按钮来保留你的偏好设置。

在 Ubuntu 中移除开机启动程序

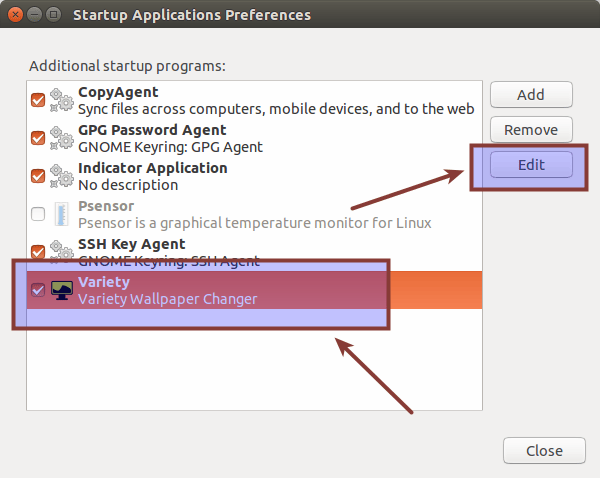
要将一个程序从开机启动程序列表中移除,选择对应的选项然后从窗口右边的面板中点击移除按钮来保留你的偏好设置。

在 Ubuntu 中将程序从开机启动列表中移除

需要提醒的是,这并不会将该程序卸载掉,只是让该程序不再在每次开机时自动启动。你可以对所有你不喜欢的程序做类似的处理。

让开机启动程序延迟启动

若你并不想在开机启动列表中移除掉程序,但同时又忧虑着系统性能的问题,那么你所需要做的是给程序添加一个延迟启动命令,这样所有的程序就不会在开机时同时启动。

选择一个程序然后点击 编辑 按钮。

编辑开机启动应用列表

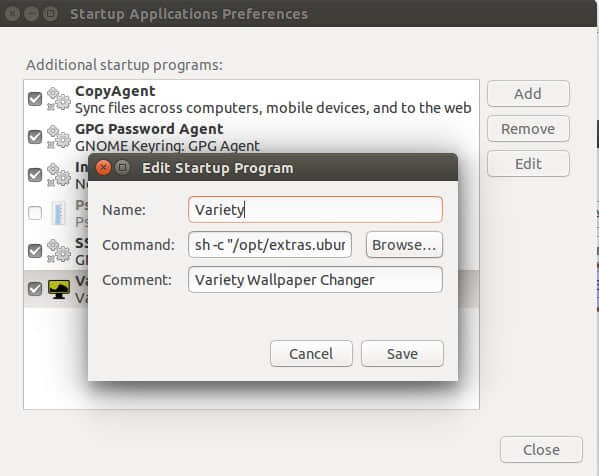
这将展示出运行这个特定的程序所需的命令。

在开机启动列表的程序运行所需的命令

所有你需要做的就是在程序运行命令前添加一句 sleep XX; 。这样就为实际运行该命令来启动的对应程序添加了 XX 秒的延迟。例如,假如我想让 Variety 壁纸管理应用 延迟启动 2 分钟,我就需要像下面那样在命令前添加 sleep 120;

在 Ubuntu 中延迟开机启动的程序

保存并关闭设置。你将在下一次启动时看到效果。

增添一个程序到开机启动应用列表中

这对于新手来说需要一点技巧。我们知道,在 Linux 的底层都是一些命令,在上一节我们看到这些开机启动程序只是在每次开机时运行一些命令。假如你想在开机启动列表中添加一个新的程序,你需要知道运行该应用所需的命令。

第 1 步:如何查找运行一个程序所需的命令?

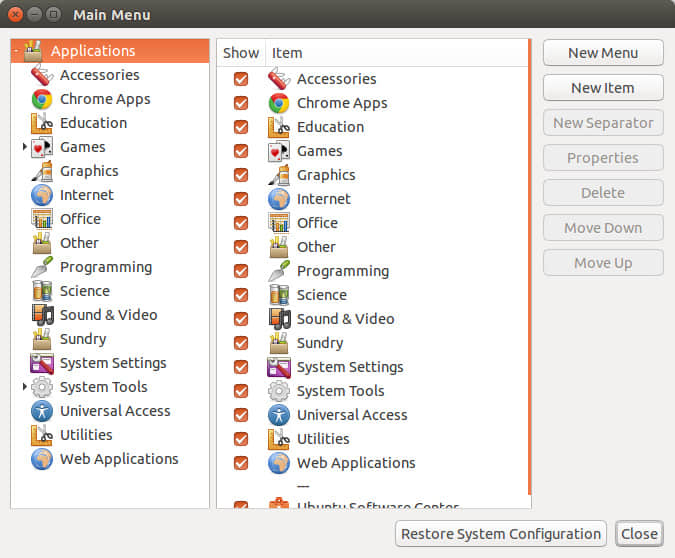
首先来到 Unity Dash 面板然后搜索 Main Menu:

Ubuntu 下的程序菜单

这将展示出在各种类别下你安装的所有程序。在 Ubuntu 的低版本中,你将看到一个相似的菜单,通过它来选择并运行应用。

Ubuntu 下的 main menu

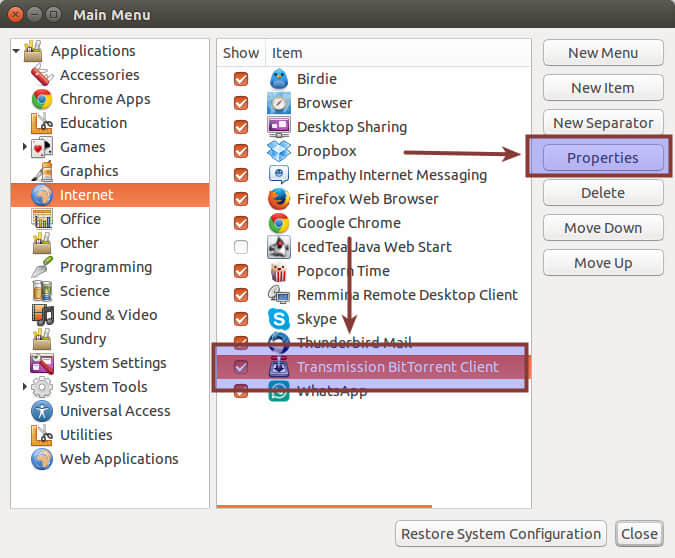
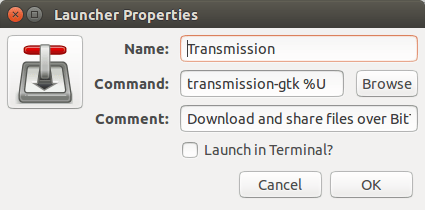
在各种类别下找到你找寻的应用,然后点击 属性 按钮来查看运行该应用所需的命令。例如,我想在开机时运行 Transmission Torrent 客户端

在 Ubuntu 下查找运行程序所需的命令

这就会向我给出运行 Transmission 应用的命令:

在 Ubuntu 下查找运行某个程序所需的命令

接着,我将用相同的信息来将 Transmission 应用添加到开机启动列表中。

第 2 步: 添加一个程序到开机启动列表中

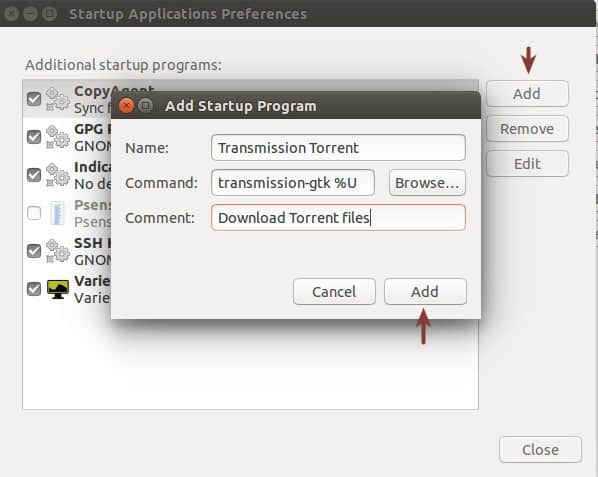
再次来到开机启动应用工具中并点击 添加 按钮。这将让你输入一个应用的名称,对应的命令和相关的描述。其中命令最为重要,你可以使用任何你想用的名称和描述。使用上一步得到的命令然后点击 添加 按钮。

在 Ubuntu 中添加一个开机启动程序

就这样,你将在下一次开机时看到这个程序会自动运行。这就是在 Ubuntu 中你能做的关于开机启动应用的所有事情。

到现在为止,我们已经讨论在开机时可见到的应用,但仍有更多的服务,守护进程和程序并不在开机启动应用工具中可见。下一节中,我们将看到如何在 Ubuntu 中查看这些隐藏的开机启动程序。

在 Ubuntu 中查看隐藏的开机启动程序

要查看在开机时哪些服务在运行,可以打开一个终端并使用下面的命令:

sudo sed -i 's/NoDisplay=true/NoDisplay=false/g' /etc/xdg/autostart/*.desktop

上面的命令是一个快速查找和替换命令,它将在所有自动启动的程序里的 NoDisplay=false 改为 NoDisplay=true ,一旦执行了这个命令后,再次打开开机启动应用工具,现在你应该可以看到更多的程序:

在 Ubuntu 中查看隐藏的开机启动程序

你可以像先前我们讨论的那样管理这些开机启动应用。我希望这篇教程可以帮助你在 Ubuntu 中控制开机启动程序。任何的问题或建议总是欢迎的。


via: http://itsfoss.com/manage-startup-applications-ubuntu/

作者:Abhishek 译者:FSSlc 校对:wxy

本文由 LCTT 原创翻译,Linux中国 荣誉推出

日志中有大量的信息需要你处理,尽管有时候想要提取并非想象中的容易。在这篇文章中我们会介绍一些你现在就能做的基本日志分析例子(只需要搜索即可)。我们还将涉及一些更高级的分析,但这些需要你前期努力做出适当的设置,后期就能节省很多时间。对数据进行高级分析的例子包括生成汇总计数、对有效值进行过滤,等等。

我们首先会向你展示如何在命令行中使用多个不同的工具,然后展示了一个日志管理工具如何能自动完成大部分繁重工作从而使得日志分析变得简单。

用 Grep 搜索

搜索文本是查找信息最基本的方式。搜索文本最常用的工具是 grep。这个命令行工具在大部分 Linux 发行版中都有,它允许你用正则表达式搜索日志。正则表达式是一种用特殊的语言写的、能识别匹配文本的模式。最简单的模式就是用引号把你想要查找的字符串括起来。

正则表达式

这是一个在 Ubuntu 系统的认证日志中查找 “user hoover” 的例子:

$ grep "user hoover" /var/log/auth.log
Accepted password for hoover from 10.0.2.2 port 4792 ssh2
pam_unix(sshd:session): session opened for user hoover by (uid=0)
pam_unix(sshd:session): session closed for user hoover

构建精确的正则表达式可能很难。例如,如果我们想要搜索一个类似端口 “4792” 的数字,它可能也会匹配时间戳、URL 以及其它不需要的数据。Ubuntu 中下面的例子,它匹配了一个我们不想要的 Apache 日志。

$ grep "4792" /var/log/auth.log
Accepted password for hoover from 10.0.2.2 port 4792 ssh2
74.91.21.46 - - [31/Mar/2015:19:44:32 +0000] "GET /scripts/samples/search?q=4972 HTTP/1.0" 404 545 "-" "-”

环绕搜索

另一个有用的小技巧是你可以用 grep 做环绕搜索。这会向你展示一个匹配前面或后面几行是什么。它能帮助你调试导致错误或问题的东西。B 选项展示前面几行,A 选项展示后面几行。举个例子,我们知道当一个人以管理员员身份登录失败时,同时他们的 IP 也没有反向解析,也就意味着他们可能没有有效的域名。这非常可疑!

$ grep -B 3 -A 2 'Invalid user' /var/log/auth.log
Apr 28 17:06:20 ip-172-31-11-241 sshd[12545]: reverse mapping checking getaddrinfo for 216-19-2-8.commspeed.net [216.19.2.8] failed - POSSIBLE BREAK-IN ATTEMPT!
Apr 28 17:06:20 ip-172-31-11-241 sshd[12545]: Received disconnect from 216.19.2.8: 11: Bye Bye [preauth]
Apr 28 17:06:20 ip-172-31-11-241 sshd[12547]: Invalid user admin from 216.19.2.8
Apr 28 17:06:20 ip-172-31-11-241 sshd[12547]: input_userauth_request: invalid user admin [preauth]
Apr 28 17:06:20 ip-172-31-11-241 sshd[12547]: Received disconnect from 216.19.2.8: 11: Bye Bye [preauth]

Tail

你也可以把 grep 和 tail 结合使用来获取一个文件的最后几行,或者跟踪日志并实时打印。这在你做交互式更改的时候非常有用,例如启动服务器或者测试代码更改。

$ tail -f /var/log/auth.log | grep 'Invalid user'
Apr 30 19:49:48 ip-172-31-11-241 sshd[6512]: Invalid user ubnt from 219.140.64.136
Apr 30 19:49:49 ip-172-31-11-241 sshd[6514]: Invalid user admin from 219.140.64.136

关于 grep 和正则表达式的详细介绍并不在本指南的范围,但 Ryan’s Tutorials 有更深入的介绍。

日志管理系统有更高的性能和更强大的搜索能力。它们通常会索引数据并进行并行查询,因此你可以很快的在几秒内就能搜索 GB 或 TB 的日志。相比之下,grep 就需要几分钟,在极端情况下可能甚至几小时。日志管理系统也使用类似 Lucene 的查询语言,它提供更简单的语法来检索数字、域以及其它。

用 Cut、 AWK、 和 Grok 解析

命令行工具

Linux 提供了多个命令行工具用于文本解析和分析。当你想要快速解析少量数据时非常有用,但处理大量数据时可能需要很长时间。

Cut

cut 命令允许你从有分隔符的日志解析字段。分隔符是指能分开字段或键值对的等号或逗号等。

假设我们想从下面的日志中解析出用户:

pam_unix(su:auth): authentication failure; logname=hoover uid=1000 euid=0 tty=/dev/pts/0 ruser=hoover rhost=  user=root

我们可以像下面这样用 cut 命令获取用等号分割后的第八个字段的文本。这是一个 Ubuntu 系统上的例子:

$ grep "authentication failure" /var/log/auth.log | cut -d '=' -f 8
root
hoover
root
nagios
nagios

AWK

另外,你也可以使用 awk,它能提供更强大的解析字段功能。它提供了一个脚本语言,你可以过滤出几乎任何不相干的东西。

例如,假设在 Ubuntu 系统中我们有下面的一行日志,我们想要提取登录失败的用户名称:

Mar 24 08:28:18 ip-172-31-11-241 sshd[32701]: input_userauth_request: invalid user guest [preauth]

你可以像下面这样使用 awk 命令。首先,用一个正则表达式 /sshd.*invalid user/ 来匹配 sshd invalid user 行。然后用 { print $9 } 根据默认的分隔符空格打印第九个字段。这样就输出了用户名。

$ awk '/sshd.*invalid user/ { print $9 }' /var/log/auth.log
guest
admin
info
test
ubnt

你可以在 Awk 用户指南 中阅读更多关于如何使用正则表达式和输出字段的信息。

日志管理系统

日志管理系统使得解析变得更加简单,使用户能快速的分析很多的日志文件。他们能自动解析标准的日志格式,比如常见的 Linux 日志和 Web 服务器日志。这能节省很多时间,因为当处理系统问题的时候你不需要考虑自己写解析逻辑。

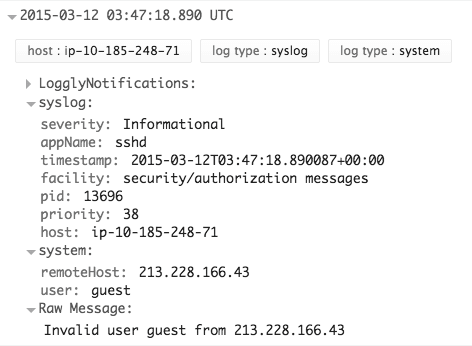
下面是一个 sshd 日志消息的例子,解析出了每个 remoteHost 和 user。这是 Loggly 中的一张截图,它是一个基于云的日志管理服务。

你也可以对非标准格式自定义解析。一个常用的工具是 Grok,它用一个常见正则表达式库,可以解析原始文本为结构化 JSON。下面是一个 Grok 在 Logstash 中解析内核日志文件的事例配置:

filter{
  grok  {
    match => {"message" => "%{CISCOTIMESTAMP:timestamp} %{HOST:host} %{WORD:program}%{NOTSPACE} %{NOTSPACE}%{NUMBER:duration}%{NOTSPACE} %{GREEDYDATA:kernel_logs}"
  }
}

下图是 Grok 解析后输出的结果:

用 Rsyslog 和 AWK 过滤

过滤使得你能检索一个特定的字段值而不是进行全文检索。这使你的日志分析更加准确,因为它会忽略来自其它部分日志信息不需要的匹配。为了对一个字段值进行搜索,你首先需要解析日志或者至少有对事件结构进行检索的方式。

如何对应用进行过滤

通常,你可能只想看一个应用的日志。如果你的应用把记录都保存到一个文件中就会很容易。如果你需要在一个聚集或集中式日志中过滤一个应用就会比较复杂。下面有几种方法来实现:

  1. 用 rsyslog 守护进程解析和过滤日志。下面的例子将 sshd 应用的日志写入一个名为 sshd-message 的文件,然后丢弃事件以便它不会在其它地方重复出现。你可以将它添加到你的 rsyslog.conf 文件中测试这个例子。
:programname, isequal, “sshd” /var/log/sshd-messages
&~
  1. 用类似 awk 的命令行工具提取特定字段的值,例如 sshd 用户名。下面是 Ubuntu 系统中的一个例子。
$ awk '/sshd.*invalid user/ { print $9 }' /var/log/auth.log
guest
admin
info
test
ubnt
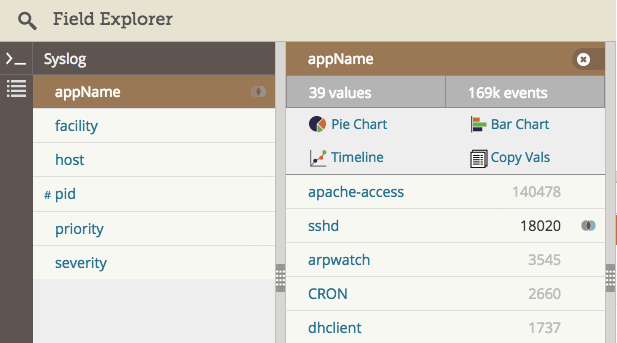
  1. 用日志管理系统自动解析日志,然后在需要的应用名称上点击过滤。下面是在 Loggly 日志管理服务中提取 syslog 域的截图。我们对应用名称 “sshd” 进行过滤,如维恩图图标所示。

如何过滤错误

一个人最希望看到日志中的错误。不幸的是,默认的 syslog 配置不直接输出错误的严重性,也就使得难以过滤它们。

这里有两个解决该问题的方法。首先,你可以修改你的 rsyslog 配置,在日志文件中输出错误的严重性,使得便于查看和检索。在你的 rsyslog 配置中你可以用 pri-text 添加一个 模板,像下面这样:

"<%pri-text%> : %timegenerated%,%HOSTNAME%,%syslogtag%,%msg%n"

这个例子会按照下面的格式输出。你可以看到该信息中指示错误的 err。

<authpriv.err> : Mar 11 18:18:00,hoover-VirtualBox,su[5026]:, pam_authenticate: Authentication failure

你可以用 awk 或者 grep 检索错误信息。在 Ubuntu 中,对这个例子,我们可以用一些语法特征,例如 . 和 >,它们只会匹配这个域。

$ grep '.err>' /var/log/auth.log
<authpriv.err> : Mar 11 18:18:00,hoover-VirtualBox,su[5026]:, pam_authenticate: Authentication failure

你的第二个选择是使用日志管理系统。好的日志管理系统能自动解析 syslog 消息并抽取错误域。它们也允许你用简单的点击过滤日志消息中的特定错误。

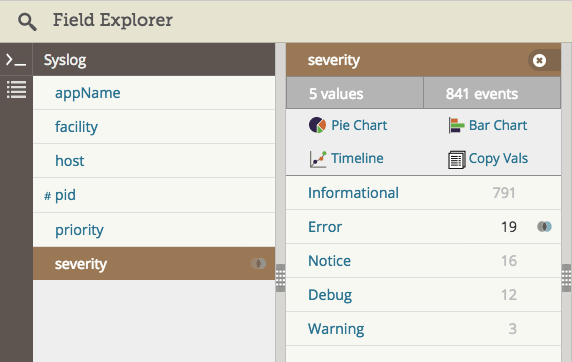
下面是 Loggly 中一个截图,显示了高亮错误严重性的 syslog 域,表示我们正在过滤错误:


via: http://www.loggly.com/ultimate-guide/logging/analyzing-linux-logs/

作者:Jason Skowronski,Amy Echeverri, Sadequl Hussain 译者:ictlyh 校对:wxy

本文由 LCTT 原创翻译,Linux中国 荣誉推出

Systemctl是一个systemd工具,主要负责控制systemd系统和服务管理器。

Systemd是一个系统管理守护进程、工具和库的集合,用于取代System V初始进程。Systemd的功能是用于集中管理和配置类UNIX系统。

在Linux生态系统中,Systemd被部署到了大多数的标准Linux发行版中,只有为数不多的几个发行版尚未部署。Systemd通常是所有其它守护进程的父进程,但并非总是如此。

Manage Linux Services Using Systemctl

使用Systemctl管理Linux服务

本文旨在阐明在运行systemd的系统上“如何控制系统和服务”。

Systemd初体验和Systemctl基础

1. 首先检查你的系统中是否安装有systemd并确定当前安装的版本

# systemctl --version

systemd 215
+PAM +AUDIT +SELINUX +IMA +SYSVINIT +LIBCRYPTSETUP +GCRYPT +ACL +XZ -SECCOMP -APPARMOR

上例中很清楚地表明,我们安装了215版本的systemd。

2. 检查systemd和systemctl的二进制文件和库文件的安装位置

# whereis systemd 
systemd: /usr/lib/systemd /etc/systemd /usr/share/systemd /usr/share/man/man1/systemd.1.gz


# whereis systemctl
systemctl: /usr/bin/systemctl /usr/share/man/man1/systemctl.1.gz

3. 检查systemd是否运行

# ps -eaf | grep [s]ystemd

root         1     0  0 16:27 ?        00:00:00 /usr/lib/systemd/systemd --switched-root --system --deserialize 23
root       444     1  0 16:27 ?        00:00:00 /usr/lib/systemd/systemd-journald
root       469     1  0 16:27 ?        00:00:00 /usr/lib/systemd/systemd-udevd
root       555     1  0 16:27 ?        00:00:00 /usr/lib/systemd/systemd-logind
dbus       556     1  0 16:27 ?        00:00:00 /bin/dbus-daemon --system --address=systemd: --nofork --nopidfile --systemd-activation

注意:systemd是作为父进程(PID=1)运行的。在上面带(-e)参数的ps命令输出中,选择所有进程,(-a)选择除会话前导外的所有进程,并使用(-f)参数输出完整格式列表(即 -eaf)。

也请注意上例中后随的方括号和例子中剩余部分。方括号表达式是grep的字符类表达式的一部分。

4. 分析systemd启动进程

# systemd-analyze
Startup finished in 487ms (kernel) + 2.776s (initrd) + 20.229s (userspace) = 23.493s

5. 分析启动时各个进程花费的时间

# systemd-analyze blame

8.565s mariadb.service
7.991s webmin.service
6.095s postfix.service
4.311s httpd.service
3.926s firewalld.service
3.780s kdump.service
3.238s tuned.service
1.712s network.service
1.394s lvm2-monitor.service
1.126s systemd-logind.service
....

6. 分析启动时的关键链

# systemd-analyze critical-chain

The time after the unit is active or started is printed after the "@" character.
The time the unit takes to start is printed after the "+" character.

multi-user.target @20.222s
└─mariadb.service @11.657s +8.565s
  └─network.target @11.168s
    └─network.service @9.456s +1.712s
      └─NetworkManager.service @8.858s +596ms
        └─firewalld.service @4.931s +3.926s
          └─basic.target @4.916s
            └─sockets.target @4.916s
              └─dbus.socket @4.916s
                └─sysinit.target @4.905s
                  └─systemd-update-utmp.service @4.864s +39ms
                    └─auditd.service @4.563s +301ms
                      └─systemd-tmpfiles-setup.service @4.485s +69ms
                        └─rhel-import-state.service @4.342s +142ms
                          └─local-fs.target @4.324s
                            └─boot.mount @4.286s +31ms
                              └─systemd-fsck@dev-disk-by\x2duuid-79f594ad\x2da332\x2d4730\x2dbb5f\x2d85d19608096
                                └─dev-disk-by\x2duuid-79f594ad\x2da332\x2d4730\x2dbb5f\x2d85d196080964.device @4

重要:Systemctl接受服务(.service),挂载点(.mount),套接口(.socket)和设备(.device)作为单元。

7. 列出所有可用单元

# systemctl list-unit-files

UNIT FILE                                   STATE   
proc-sys-fs-binfmt_misc.automount           static  
dev-hugepages.mount                         static  
dev-mqueue.mount                            static  
proc-sys-fs-binfmt_misc.mount               static  
sys-fs-fuse-connections.mount               static  
sys-kernel-config.mount                     static  
sys-kernel-debug.mount                      static  
tmp.mount                                   disabled
brandbot.path                               disabled
.....

8. 列出所有运行中单元

# systemctl list-units

UNIT                                        LOAD   ACTIVE SUB       DESCRIPTION
proc-sys-fs-binfmt_misc.automount           loaded active waiting   Arbitrary Executable File Formats File Syste
sys-devices-pc...0-1:0:0:0-block-sr0.device loaded active plugged   VBOX_CD-ROM
sys-devices-pc...:00:03.0-net-enp0s3.device loaded active plugged   PRO/1000 MT Desktop Adapter
sys-devices-pc...00:05.0-sound-card0.device loaded active plugged   82801AA AC'97 Audio Controller
sys-devices-pc...:0:0-block-sda-sda1.device loaded active plugged   VBOX_HARDDISK
sys-devices-pc...:0:0-block-sda-sda2.device loaded active plugged   LVM PV Qzyo3l-qYaL-uRUa-Cjuk-pljo-qKtX-VgBQ8
sys-devices-pc...0-2:0:0:0-block-sda.device loaded active plugged   VBOX_HARDDISK
sys-devices-pl...erial8250-tty-ttyS0.device loaded active plugged   /sys/devices/platform/serial8250/tty/ttyS0
sys-devices-pl...erial8250-tty-ttyS1.device loaded active plugged   /sys/devices/platform/serial8250/tty/ttyS1
sys-devices-pl...erial8250-tty-ttyS2.device loaded active plugged   /sys/devices/platform/serial8250/tty/ttyS2
sys-devices-pl...erial8250-tty-ttyS3.device loaded active plugged   /sys/devices/platform/serial8250/tty/ttyS3
sys-devices-virtual-block-dm\x2d0.device    loaded active plugged   /sys/devices/virtual/block/dm-0
sys-devices-virtual-block-dm\x2d1.device    loaded active plugged   /sys/devices/virtual/block/dm-1
sys-module-configfs.device                  loaded active plugged   /sys/module/configfs
...

9. 列出所有失败单元

# systemctl --failed

UNIT          LOAD   ACTIVE SUB    DESCRIPTION
kdump.service loaded failed failed Crash recovery kernel arming

LOAD   = Reflects whether the unit definition was properly loaded.
ACTIVE = The high-level unit activation state, i.e. generalization of SUB.
SUB    = The low-level unit activation state, values depend on unit type.

1 loaded units listed. Pass --all to see loaded but inactive units, too.
To show all installed unit files use 'systemctl list-unit-files'.

10. 检查某个单元(如 cron.service)是否启用

# systemctl is-enabled crond.service

enabled

11. 检查某个单元或服务是否运行

# systemctl status firewalld.service

firewalld.service - firewalld - dynamic firewall daemon
   Loaded: loaded (/usr/lib/systemd/system/firewalld.service; enabled)
   Active: active (running) since Tue 2015-04-28 16:27:55 IST; 34min ago
 Main PID: 549 (firewalld)
   CGroup: /system.slice/firewalld.service
           └─549 /usr/bin/python -Es /usr/sbin/firewalld --nofork --nopid

Apr 28 16:27:51 tecmint systemd[1]: Starting firewalld - dynamic firewall daemon...
Apr 28 16:27:55 tecmint systemd[1]: Started firewalld - dynamic firewall daemon.

使用Systemctl控制并管理服务

12. 列出所有服务(包括启用的和禁用的)

# systemctl list-unit-files --type=service

UNIT FILE                                   STATE   
arp-ethers.service                          disabled
auditd.service                              enabled 
autovt@.service                             disabled
blk-availability.service                    disabled
brandbot.service                            static  
collectd.service                            disabled
console-getty.service                       disabled
console-shell.service                       disabled
cpupower.service                            disabled
crond.service                               enabled 
dbus-org.fedoraproject.FirewallD1.service   enabled 
....

13. Linux中如何启动、重启、停止、重载服务以及检查服务(如 httpd.service)状态

# systemctl start httpd.service
# systemctl restart httpd.service
# systemctl stop httpd.service
# systemctl reload httpd.service
# systemctl status httpd.service

httpd.service - The Apache HTTP Server
   Loaded: loaded (/usr/lib/systemd/system/httpd.service; enabled)
   Active: active (running) since Tue 2015-04-28 17:21:30 IST; 6s ago
  Process: 2876 ExecStop=/bin/kill -WINCH ${MAINPID} (code=exited, status=0/SUCCESS)
 Main PID: 2881 (httpd)
   Status: "Processing requests..."
   CGroup: /system.slice/httpd.service
           ├─2881 /usr/sbin/httpd -DFOREGROUND
           ├─2884 /usr/sbin/httpd -DFOREGROUND
           ├─2885 /usr/sbin/httpd -DFOREGROUND
           ├─2886 /usr/sbin/httpd -DFOREGROUND
           ├─2887 /usr/sbin/httpd -DFOREGROUND
           └─2888 /usr/sbin/httpd -DFOREGROUND

Apr 28 17:21:30 tecmint systemd[1]: Starting The Apache HTTP Server...
Apr 28 17:21:30 tecmint httpd[2881]: AH00558: httpd: Could not reliably determine the server's fully q...ssage
Apr 28 17:21:30 tecmint systemd[1]: Started The Apache HTTP Server.
Hint: Some lines were ellipsized, use -l to show in full.

注意:当我们使用systemctl的start,restart,stop和reload命令时,我们不会从终端获取到任何输出内容,只有status命令可以打印输出。

14. 如何激活服务并在启动时启用或禁用服务(即系统启动时自动启动服务)

# systemctl is-active httpd.service
# systemctl enable httpd.service
# systemctl disable httpd.service

15. 如何屏蔽(让它不能启动)或显示服务(如 httpd.service)

# systemctl mask httpd.service
ln -s '/dev/null' '/etc/systemd/system/httpd.service'

# systemctl unmask httpd.service
rm '/etc/systemd/system/httpd.service'

16. 使用systemctl命令杀死服务

# systemctl kill httpd
# systemctl status httpd

httpd.service - The Apache HTTP Server
   Loaded: loaded (/usr/lib/systemd/system/httpd.service; enabled)
   Active: failed (Result: exit-code) since Tue 2015-04-28 18:01:42 IST; 28min ago
 Main PID: 2881 (code=exited, status=0/SUCCESS)
   Status: "Total requests: 0; Current requests/sec: 0; Current traffic:   0 B/sec"

Apr 28 17:37:29 tecmint systemd[1]: httpd.service: Got notification message from PID 2881, but recepti...bled.
Apr 28 17:37:39 tecmint systemd[1]: httpd.service: Got notification message from PID 2881, but recepti...bled.
Apr 28 17:37:49 tecmint systemd[1]: httpd.service: Got notification message from PID 2881, but recepti...bled.
Apr 28 17:37:59 tecmint systemd[1]: httpd.service: Got notification message from PID 2881, but recepti...bled.
Apr 28 18:01:42 tecmint systemd[1]: httpd.service: control process exited, code=exited status=226
Apr 28 18:01:42 tecmint systemd[1]: Unit httpd.service entered failed state.
Hint: Some lines were ellipsized, use -l to show in full.

使用Systemctl控制并管理挂载点

17. 列出所有系统挂载点

# systemctl list-unit-files --type=mount

UNIT FILE                     STATE   
dev-hugepages.mount           static  
dev-mqueue.mount              static  
proc-sys-fs-binfmt_misc.mount static  
sys-fs-fuse-connections.mount static  
sys-kernel-config.mount       static  
sys-kernel-debug.mount        static  
tmp.mount                     disabled

18. 挂载、卸载、重新挂载、重载系统挂载点并检查系统中挂载点状态

# systemctl start tmp.mount
# systemctl stop tmp.mount
# systemctl restart tmp.mount
# systemctl reload tmp.mount
# systemctl status tmp.mount

tmp.mount - Temporary Directory
   Loaded: loaded (/usr/lib/systemd/system/tmp.mount; disabled)
   Active: active (mounted) since Tue 2015-04-28 17:46:06 IST; 2min 48s ago
    Where: /tmp
     What: tmpfs
     Docs: man:hier(7)

http://www.freedesktop.org/wiki/Software/systemd/APIFileSystems

  Process: 3908 ExecMount=/bin/mount tmpfs /tmp -t tmpfs -o mode=1777,strictatime (code=exited, status=0/SUCCESS)

Apr 28 17:46:06 tecmint systemd[1]: Mounting Temporary Directory...
Apr 28 17:46:06 tecmint systemd[1]: tmp.mount: Directory /tmp to mount over is not empty, mounting anyway.
Apr 28 17:46:06 tecmint systemd[1]: Mounted Temporary Directory.

19. 在启动时激活、启用或禁用挂载点(系统启动时自动挂载)

# systemctl is-active tmp.mount
# systemctl enable tmp.mount
# systemctl disable  tmp.mount

20. 在Linux中屏蔽(让它不能启用)或可见挂载点

# systemctl mask tmp.mount

ln -s '/dev/null' '/etc/systemd/system/tmp.mount'

# systemctl unmask tmp.mount

rm '/etc/systemd/system/tmp.mount'

使用Systemctl控制并管理套接口

21. 列出所有可用系统套接口

# systemctl list-unit-files --type=socket

UNIT FILE                    STATE   
dbus.socket                  static  
dm-event.socket              enabled 
lvm2-lvmetad.socket          enabled 
rsyncd.socket                disabled
sshd.socket                  disabled
syslog.socket                static  
systemd-initctl.socket       static  
systemd-journald.socket      static  
systemd-shutdownd.socket     static  
systemd-udevd-control.socket static  
systemd-udevd-kernel.socket  static  

11 unit files listed.

22. 在Linux中启动、重启、停止、重载套接口并检查其状态

# systemctl start cups.socket
# systemctl restart cups.socket
# systemctl stop cups.socket
# systemctl reload cups.socket
# systemctl status cups.socket

cups.socket - CUPS Printing Service Sockets
   Loaded: loaded (/usr/lib/systemd/system/cups.socket; enabled)
   Active: active (listening) since Tue 2015-04-28 18:10:59 IST; 8s ago
   Listen: /var/run/cups/cups.sock (Stream)

Apr 28 18:10:59 tecmint systemd[1]: Starting CUPS Printing Service Sockets.
Apr 28 18:10:59 tecmint systemd[1]: Listening on CUPS Printing Service Sockets.

23. 在启动时激活套接口,并启用或禁用它(系统启动时自启动)

# systemctl is-active cups.socket
# systemctl enable cups.socket
# systemctl disable cups.socket

24. 屏蔽(使它不能启动)或显示套接口

# systemctl mask cups.socket
ln -s '/dev/null' '/etc/systemd/system/cups.socket'

# systemctl unmask cups.socket
rm '/etc/systemd/system/cups.socket'

服务的CPU利用率(分配额)

25. 获取当前某个服务的CPU分配额(如httpd)

# systemctl show -p CPUShares httpd.service

CPUShares=1024

注意:各个服务的默认CPU分配份额=1024,你可以增加/减少某个进程的CPU分配份额。

26. 将某个服务(httpd.service)的CPU分配份额限制为2000 CPUShares/

# systemctl set-property httpd.service CPUShares=2000
# systemctl show -p CPUShares httpd.service

CPUShares=2000

注意:当你为某个服务设置CPUShares,会自动创建一个以服务名命名的目录(如 httpd.service),里面包含了一个名为90-CPUShares.conf的文件,该文件含有CPUShare限制信息,你可以通过以下方式查看该文件:

# vi /etc/systemd/system/httpd.service.d/90-CPUShares.conf 

[Service]
CPUShares=2000        

27. 检查某个服务的所有配置细节

# systemctl show httpd

Id=httpd.service
Names=httpd.service
Requires=basic.target
Wants=system.slice
WantedBy=multi-user.target
Conflicts=shutdown.target
Before=shutdown.target multi-user.target
After=network.target remote-fs.target nss-lookup.target systemd-journald.socket basic.target system.slice
Description=The Apache HTTP Server
LoadState=loaded
ActiveState=active
SubState=running
FragmentPath=/usr/lib/systemd/system/httpd.service
....

28. 分析某个服务(httpd)的关键链

# systemd-analyze critical-chain httpd.service

The time after the unit is active or started is printed after the "@" character.
The time the unit takes to start is printed after the "+" character.

httpd.service +142ms
└─network.target @11.168s
  └─network.service @9.456s +1.712s
    └─NetworkManager.service @8.858s +596ms
      └─firewalld.service @4.931s +3.926s
        └─basic.target @4.916s
          └─sockets.target @4.916s
            └─dbus.socket @4.916s
              └─sysinit.target @4.905s
                └─systemd-update-utmp.service @4.864s +39ms
                  └─auditd.service @4.563s +301ms
                    └─systemd-tmpfiles-setup.service @4.485s +69ms
                      └─rhel-import-state.service @4.342s +142ms
                        └─local-fs.target @4.324s
                          └─boot.mount @4.286s +31ms
                            └─systemd-fsck@dev-disk-by\x2duuid-79f594ad\x2da332\x2d4730\x2dbb5f\x2d85d196080964.service @4.092s +149ms
                              └─dev-disk-by\x2duuid-79f594ad\x2da332\x2d4730\x2dbb5f\x2d85d196080964.device @4.092s

29. 获取某个服务(httpd)的依赖性列表

# systemctl list-dependencies httpd.service

httpd.service
├─system.slice
└─basic.target
  ├─firewalld.service
  ├─microcode.service
  ├─rhel-autorelabel-mark.service
  ├─rhel-autorelabel.service
  ├─rhel-configure.service
  ├─rhel-dmesg.service
  ├─rhel-loadmodules.service
  ├─paths.target
  ├─slices.target
  │ ├─-.slice
  │ └─system.slice
  ├─sockets.target
  │ ├─dbus.socket
....

30. 按等级列出控制组

# systemd-cgls

├─1 /usr/lib/systemd/systemd --switched-root --system --deserialize 23
├─user.slice
│ └─user-0.slice
│   └─session-1.scope
│     ├─2498 sshd: root@pts/0    
│     ├─2500 -bash
│     ├─4521 systemd-cgls
│     └─4522 systemd-cgls
└─system.slice
  ├─httpd.service
  │ ├─4440 /usr/sbin/httpd -DFOREGROUND
  │ ├─4442 /usr/sbin/httpd -DFOREGROUND
  │ ├─4443 /usr/sbin/httpd -DFOREGROUND
  │ ├─4444 /usr/sbin/httpd -DFOREGROUND
  │ ├─4445 /usr/sbin/httpd -DFOREGROUND
  │ └─4446 /usr/sbin/httpd -DFOREGROUND
  ├─polkit.service
  │ └─721 /usr/lib/polkit-1/polkitd --no-debug
....

31. 按CPU、内存、输入和输出列出控制组

# systemd-cgtop

Path                                                              Tasks   %CPU   Memory  Input/s Output/s

/                                                                    83    1.0   437.8M        -        -
/system.slice                                                         -    0.1        -        -        -
/system.slice/mariadb.service                                         2    0.1        -        -        -
/system.slice/tuned.service                                           1    0.0        -        -        -
/system.slice/httpd.service                                           6    0.0        -        -        -
/system.slice/NetworkManager.service                                  1      -        -        -        -
/system.slice/atop.service                                            1      -        -        -        -
/system.slice/atopacct.service                                        1      -        -        -        -
/system.slice/auditd.service                                          1      -        -        -        -
/system.slice/crond.service                                           1      -        -        -        -
/system.slice/dbus.service                                            1      -        -        -        -
/system.slice/firewalld.service                                       1      -        -        -        -
/system.slice/lvm2-lvmetad.service                                    1      -        -        -        -
/system.slice/polkit.service                                          1      -        -        -        -
/system.slice/postfix.service                                         3      -        -        -        -
/system.slice/rsyslog.service                                         1      -        -        -        -
/system.slice/system-getty.slice/getty@tty1.service                   1      -        -        -        -
/system.slice/systemd-journald.service                                1      -        -        -        -
/system.slice/systemd-logind.service                                  1      -        -        -        -
/system.slice/systemd-udevd.service                                   1      -        -        -        -
/system.slice/webmin.service                                          1      -        -        -        -
/user.slice/user-0.slice/session-1.scope                              3      -        -        -        -

控制系统运行等级

32. 启动系统救援模式

# systemctl rescue

Broadcast message from root@tecmint on pts/0 (Wed 2015-04-29 11:31:18 IST):

The system is going down to rescue mode NOW!

33. 进入紧急模式

# systemctl emergency

Welcome to emergency mode! After logging in, type "journalctl -xb" to view
system logs, "systemctl reboot" to reboot, "systemctl default" to try again
to boot into default mode.

34. 列出当前使用的运行等级

# systemctl get-default

multi-user.target

35. 启动运行等级5,即图形模式

# systemctl isolate runlevel5.target
或
# systemctl isolate graphical.target

36. 启动运行等级3,即多用户模式(命令行)

# systemctl isolate runlevel3.target
或
# systemctl isolate multiuser.target

36. 设置多用户模式或图形模式为默认运行等级

# systemctl set-default runlevel3.target

# systemctl set-default runlevel5.target

37. 重启、停止、挂起、休眠系统或使系统进入混合睡眠

# systemctl reboot

# systemctl halt

# systemctl suspend

# systemctl hibernate

# systemctl hybrid-sleep

对于不知运行等级为何物的人,说明如下。

  • Runlevel 0 : 关闭系统
  • Runlevel 1 : 救援?维护模式
  • Runlevel 3 : 多用户,无图形系统
  • Runlevel 4 : 多用户,无图形系统
  • Runlevel 5 : 多用户,图形化系统
  • Runlevel 6 : 关闭并重启机器

到此为止吧。保持连线,进行评论。别忘了在下面的评论中为我们提供一些有价值的反馈哦。喜欢我们、与我们分享,求扩散。


via: http://www.tecmint.com/manage-services-using-systemd-and-systemctl-in-linux/

作者:Avishek Kumar 译者:GOLinux 校对:wxy

本文由 LCTT 原创翻译,Linux中国 荣誉推出