Vinoth Kumar 发布的文章

在 Linux 中创建用户账号时,设置用户密码是一件基本的事情。每个人都使用 passwd 命令跟上用户名,比如 passwd USERNAME 来为用户设置密码。

确保你一定要设置一个难以猜测的密码,这可以帮助你使系统更安全。我的意思是,密码应该是字母、符号和数字的组合。此外,出于安全原因,我建议你至少每月更改一次密码。

当你使用 passwd 命令时,它会要求你输入两次密码来设置。这是一种设置用户密码的原生方法。

如果你不想两次更新密码,并希望以不同的方式进行更新,怎么办呢?当然,这可以的,有可能做到。

如果你是 Linux 管理员,你可能已经多次问过下面的问题。你可能、也可能没有得到这些问题的答案。

无论如何,不要担心,我们会回答你所有的问题。

  • 如何用一条命令更改用户密码?
  • 如何在 Linux 中为多个用户更改为相同的密码?
  • 如何在 Linux 中更改多个用户的密码?
  • 如何在 Linux 中为多个用户更改为不同的密码?
  • 如何在多个 Linux 服务器中更改用户的密码?
  • 如何在多个 Linux 服务器中更改多个用户的密码?

方法-1:使用 passwd 命令

passwd 命令是在 Linux 中为用户设置、更改密码的标准方法。以下是标准方法。

# passwd renu
Changing password for user renu.
New password:
BAD PASSWORD: The password contains the user name in some form
Retype new password:
passwd: all authentication tokens updated successfully.

如果希望在一条命令中设置或更改密码,运行以下命令。它允许用户在一条命令中更新密码。

# echo "new_password" | passwd --stdin thanu
Changing password for user thanu.
passwd: all authentication tokens updated successfully.

方法-2:使用 chpasswd 命令

chpasswd 是另一个命令,允许我们为 Linux 中的用户设置、更改密码。如果希望在一条命令中使用 chpasswd 命令更改用户密码,用以下格式。

# echo "thanu:new_password" | chpasswd

方法-3:如何为多个用户设置不同的密码

如果你要为 Linux 中的多个用户设置、更改密码,并且使用不同的密码,使用以下脚本。

为此,首先我们需要使用以下命令获取用户列表。下面的命令将列出拥有 /home 目录的用户,并将输出重定向到 user-list.txt 文件。

# cat /etc/passwd | grep "/home" | cut -d":" -f1 > user-list.txt

使用 cat 命令列出用户。如果你不想重置特定用户的密码,那么从列表中移除该用户。

# cat user-list.txt
centos
magi
daygeek
thanu
renu

创建以下 shell 小脚本来实现此目的。

# vi password-update.sh

#!/bin/sh
for user in `more user-list.txt`
do
echo "[email protected]" | passwd --stdin "$user"
chage -d 0 $user
done

password-update.sh 文件设置可执行权限。

# chmod +x password-update.sh

最后运行脚本来实现这一目标。

# ./password-up.sh

magi
Changing password for user magi.
passwd: all authentication tokens updated successfully.
daygeek
Changing password for user daygeek.
passwd: all authentication tokens updated successfully.
thanu
Changing password for user thanu.
passwd: all authentication tokens updated successfully.
renu
Changing password for user renu.
passwd: all authentication tokens updated successfully.

方法-4:如何为多个用户设置相同的密码

如果要在 Linux 中为多个用户设置、更改相同的密码,使用以下脚本。

# vi password-update.sh

#!/bin/sh
for user in `more user-list.txt`
do
echo "new_password" | passwd --stdin "$user"
chage -d 0 $user
done

方法-5:如何在多个服务器中更改用户密码

如果希望更改多个服务器中的用户密码,使用以下脚本。在本例中,我们将更改 renu 用户的密码,确保你必须提供你希望更新密码的用户名而不是我们的用户名。

确保你必须将服务器列表保存在 server-list.txt 文件中,每个服务器应该在单独一行中。

# vi password-update.sh

#!/bin/bash
for server in `cat server-list.txt`
do
ssh [email protected]$server 'passwd --stdin renu <<EOF
new_passwd
new_passwd
EOF';
done

你将得到与我们类似的输出。

# ./password-update.sh

New password: BAD PASSWORD: it is based on a dictionary word
BAD PASSWORD: is too simple
Retype new password: Changing password for user renu.
passwd: all authentication tokens updated successfully.
New password: BAD PASSWORD: it is based on a dictionary word
BAD PASSWORD: is too simple
Retype new password: Changing password for user renu.
passwd: all authentication tokens updated successfully.

方法-6:如何使用 pssh 命令更改多个服务器中的用户密码

pssh 是一个在多个主机上并行执行 ssh 连接的程序。它提供了一些特性,例如向所有进程发送输入,向 ssh 传递密码,将输出保存到文件以及超时处理。导航到以下链接以了解关于 PSSH 命令的更多信息。

# pssh -i -h /tmp/server-list.txt "printf '%s\n' new_pass new_pass | passwd --stdin root"

你将获得与我们类似的输出。

[1] 07:58:07 [SUCCESS] CentOS.2daygeek.com
Changing password for user root.
passwd: all authentication tokens updated successfully.
Stderr: New password: BAD PASSWORD: it is based on a dictionary word
BAD PASSWORD: is too simple
Retype new password:
[2] 07:58:07 [SUCCESS] ArchLinux.2daygeek.com
Changing password for user root.
passwd: all authentication tokens updated successfully.
Stderr: New password: BAD PASSWORD: it is based on a dictionary word
BAD PASSWORD: is too simple

方法-7:如何使用 chpasswd 命令更改多个服务器中的用户密码

或者,我们可以使用 chpasswd 命令更新多个服务器中的用户密码。

# ./password-update.sh

#!/bin/bash
for server in `cat server-list.txt`
do
ssh [email protected]$server 'echo "magi:new_password" | chpasswd'
done

方法-8:如何使用 chpasswd 命令在 Linux 服务器中更改多个用户的密码

为此,首先创建一个文件,以下面的格式更新用户名和密码。在本例中,我创建了一个名为 user-list.txt 的文件。

参考下面的详细信息。

# cat user-list.txt
magi:new@123
daygeek:new@123
thanu:new@123
renu:new@123

创建下面的 shell 小脚本来实现这一点。

# vi password-update.sh

#!/bin/bash
for users in `cat user-list.txt`
do
echo $users | chpasswd
done

via: https://www.2daygeek.com/linux-passwd-chpasswd-command-set-update-change-users-password-in-linux-using-shell-script/

作者:Vinoth Kumar 选题:lujun9972 译者:MjSeven 校对: wxy

本文由 LCTT 原创编译,Linux中国 荣誉推出

对于 Linux 图形界面用户和 Windows 用户来说获取系统硬件信息都不算问题,但是对命令行用户来说想要获取这些细节时有点儿麻烦。

甚至我们中的大多数都不知道获取这些信息最好的命令是什么。Linux 中有许多可用的工具集来获取诸如制造商、型号和序列号等硬件信息。

在这里我尝试写下获取这些细节的可能的方式,你可以挑选一种最好用的。

你必须知道所有这些信息,因为当你向硬件制造商提交任何硬件问题时,你会需要它们。

这可以通过 6 种方法来实现,下面我来演示一下怎么做。

方法一:使用 dmidecode 命令

dmidecode 是一个读取电脑 DMI( 桌面管理接口 Desktop Management Interface )表内容并且以人类可读的格式显示系统硬件信息的工具。(也有人说是读取 SMBIOS —— 系统管理 BIOS System Management BIOS

这个表包含系统硬件组件的说明,也包含如序列号、制造商、发布日期以及 BIOS 修订版本号等其它有用的信息。

DMI 表不仅描述了当前的系统构成,还可以报告可能的升级信息(比如可以支持的最快的 CPU 或者最大的内存容量)。

这将有助于分析你的硬件兼容性,比如是否支持最新版本的程序。

# dmidecode -t system

# dmidecode 2.12
# SMBIOS entry point at 0x7e7bf000
SMBIOS 2.7 present.

Handle 0x0024, DMI type 1, 27 bytes
System Information
 Manufacturer: IBM
 Product Name: System x2530 M4: -[1214AC1]-
 Version: 0B
 Serial Number: MK2RL11
 UUID: 762A99BF-6916-450F-80A6-B2E9E78FC9A1
 Wake-up Type: Power Switch
 SKU Number: Not Specified
 Family: System X

Handle 0x004B, DMI type 12, 5 bytes
System Configuration Options
 Option 1: JP20 pin1-2: TPM PP Disable, pin2-3: TPM PP Enable

Handle 0x004D, DMI type 32, 20 bytes
System Boot Information
 Status: No errors detected

推荐阅读: Dmidecode –– 获取 Linux 系统硬件信息的简单方式

方法二:使用 inxi 命令

inxi 是 Linux 上查看硬件信息的一个灵巧的小工具,它提供了大量的选项来获取所有硬件信息,这是我在现有的其它 Linux 工具集里所没见到过的。它是从 locsmif 编写的古老的但至今看来都异常灵活的 infobash fork 出来的。

inxi 是一个可以快速显示系统硬件、CPU、驱动、Xorg、桌面、内核、GCC 版本、进程、内存使用以及大量其它有用信息的脚本,也可以用来做技术支持和调试工具。

# inxi -M
Machine: Device: server System: IBM product: N/A v: 0B serial: MK2RL11
 Mobo: IBM model: 00Y8494 serial: 37M17D UEFI: IBM v: -[VVE134MUS-1.50]- date: 08/30/2013

推荐阅读: inxi —— 一个很棒的查看 Linux 硬件信息的工具

方法三:使用 lshw 命令

lshw(指 硬件监听器 Hardware Lister )是一个小巧灵活的工具,可以生成如内存配置、固件版本、主板配置、CPU 版本和速度、缓存配置、USB、网卡、显卡、多媒体、打印机以及总线速度等机器中各种硬件组件的详细报告。

它通过读取 /proc 目录下各种文件的内容和 DMI 表来生成硬件信息。

lshw 必须以超级用户的权限运行来检测完整的硬件信息,否则它只汇报部分信息。lshw 里有一个叫做 class 的特殊选项,它可以以详细的模式显示特定的硬件信息。

# lshw -C system
enal-dbo01t
 description: Blade
 product: System x2530 M4: -[1214AC1]-
 vendor: IBM
 version: 0B
 serial: MK2RL11
 width: 64 bits
 capabilities: smbios-2.7 dmi-2.7 vsyscall32
 configuration: boot=normal chassis=enclosure family=System X uuid=762A99BF-6916-450F-80A6-B2E9E78FC9A1

推荐阅读: LSHW (Hardware Lister) –– 获取 Linux 硬件信息的灵巧的小工具

方法四:使用 /sys 文件系统

内核在 /sys 目录下的文件中公开了一些 DMI 信息。因此,我们可以通过如下方式运行 grep 命令来轻易地获取机器类型。

# grep "" /sys/class/dmi/id/[pbs]*

或者,可以使用 cat 命令仅打印出特定的详细信息。

# cat /sys/class/dmi/id/board_vendor
IBM

# cat /sys/class/dmi/id/product_name
System x2530 M4: -[1214AC1]-

# cat /sys/class/dmi/id/product_serial
MK2RL11

# cat /sys/class/dmi/id/bios_version
-[VVE134MUS-1.50]-

方法五:使用 dmesg 命令

dmesg 命令是在 Linux 上 syslogdklogd 启动前用来记录内核消息(启动阶段的消息)的。它通过读取内核的环形缓冲区来获取数据。在排查问题或只是尝试获取系统硬件信息时,dmesg 非常有用。

# dmesg | grep -i DMI
DMI: System x2530 M4: -[1214AC1]-/00Y8494, BIOS -[VVE134MUS-1.50]- 08/30/2013

方法六:使用 hwinfo 命令

hwinfo 硬件信息 hardware information )是另一个很棒的工具,用于检测当前系统存的硬件,并以人类可读的方式显示各种硬件模块的详细信息。

它报告关于 CPU、内存、键盘、鼠标、显卡、声卡、存储、网络接口、磁盘、分区、BIOS 以及桥接器等信息。它可以比其它像 lshwdmidecodeinxi 等工具显示更为详细的信息。

hwinfo 使用 libhd 库 libhd.so 来收集系统上的硬件信息。该工具是为 openSuse 特别设计的,后来其它发行版也将它包含在其官方仓库中。

# hwinfo | egrep "system.hardware.vendor|system.hardware.product"
 system.hardware.vendor = 'IBM'
 system.hardware.product = 'System x2530 M4: -[1214AC1]-'

推荐阅读: hwinfo (Hardware Info) –– 一款灵活的检测 Linux 系统硬件信息的工具


via: https://www.2daygeek.com/how-to-check-system-hardware-manufacturer-model-and-serial-number-in-linux/

作者:VINOTH KUMAR 选题:lujun9972 译者:icecoobe 校对:pityonline

本文由 LCTT 原创编译,Linux中国 荣誉推出

大多数人都知道 RHEL 的订阅 ,但是知道 Oracle 订阅及细节的人却很少。

甚至我也不知道关于它的信息,我是最近才了解了有关它的信息,想将这些内容共享给其他人。因此写了这篇文章,它将指导你去注册 Oracle Linux 系统去使用坚不可摧 Linux 网络(ULN) 。

这将允许你去注册系统以尽快获得软件更新和其它的补丁。

什么是坚不可摧 Linux 网络

ULN 代表 坚不可摧 Linux 网络 Unbreakable Linux Network ,它是由 Oracle 所拥有的。如果你去 Oracle OS 支持中去激活这个订阅,你就可以注册你的系统去使用坚不可摧 Linux 网络(ULN)。

ULN 为 Oracle Linux 和 Oracle VM 提供软件补丁、更新、以及修复,这些信息同时提供在 yum、Ksplice、并提供支持策略。你也可以通过它来下载原始发行版中没有包含的有用的安装包。

ULN 的告警提示工具会周期性地使用 ULN 进行检查,当有更新的时候它给你发送警报信息。

如果你想在 yum 上使用 ULN 仓库去管理你的系统,需要确保你的系统已经注册到 ULN 上,并且订阅了一个或多个 ULN 频道。当你注册一个系统使用 ULN,它将基于你的系统架构和操作系统去自动选择频道中最新的版本。

如何注册为一个 ULN 用户

要注册为一个 ULN 用户,需要你有一个 Oracle Linux 支持或者 Oracle VM 支持的有效客户支持代码(CSI)。

请按以下步骤去注册为一个 ULN 用户。

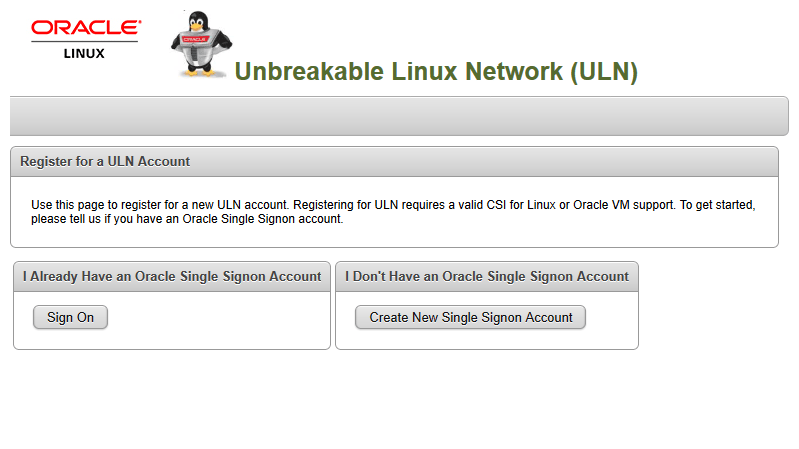
请访问 linux.oracle.com

如果你已经有一个 SSO 帐户,请点击 “Sign On”。

如果你没有帐户,点击 “Create New Single Signon Account” 然后按屏幕上的要求去创建一个帐户。
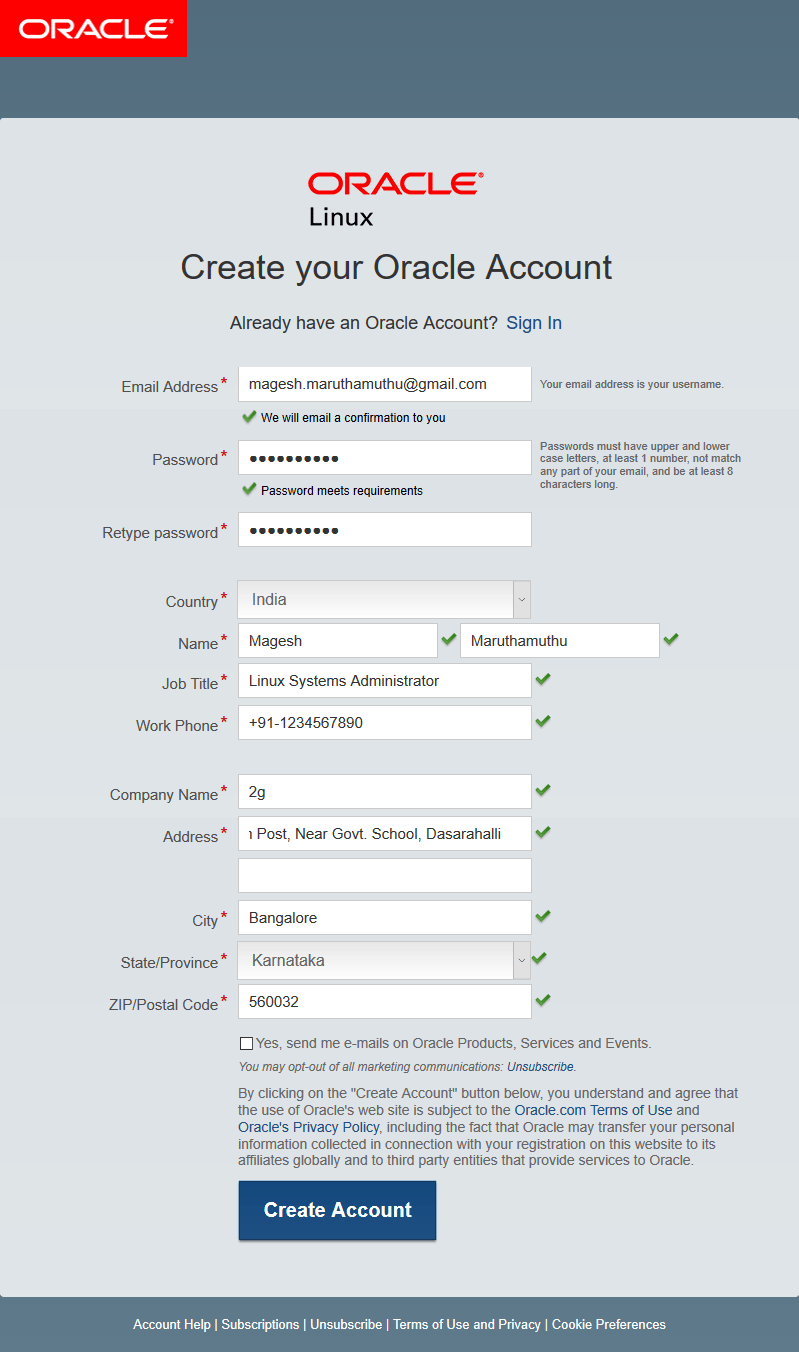
验证你的电子邮件地址以完成帐户设置。

使用你的 SSO 帐户的用户名和密码去登入。在 “Create New ULN User” 页面上,输入你的 CSI 然后点击 “Create New User”。
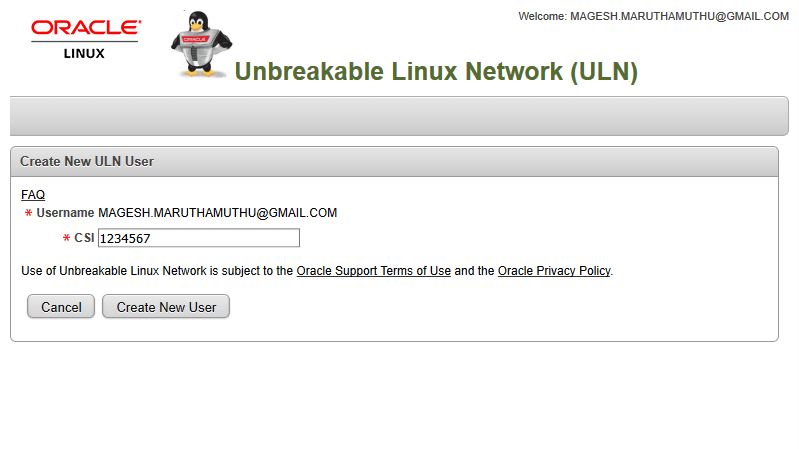
注意:

  • 如果当前没有分配管理员去管理 CSI,将会提示你去点击确认让你成为 CSI 管理员。
  • 如果你的用户名已经在系统上存在,你将被提示通过点击坚不可摧 Linux 网络的链接去操作 ULN。

如何注册 Oracle Linux 6/7 系统使用 ULN

只需要运行下列的命令,并按随后的指令提示去注册系统。

# uln_register

确保你的系统有一个激活的因特网连接。同时准备好你的 Oracle 单点登录帐户(SSO)的用户名和密码,然后点击 Next

Copyright ▪© 2006--2010 Red Hat, Inc. All rights reserved.

▪▪▪▪▪▪▪▪▪▪▪▪▪▪▪▪▪▪▪▪▪▪▪▪▪▪▪▪▪▪▪▪▪▪▪▪▪▪▪▪▪▪▪▪▪▪▪▪▪▪▪▪▪¤ Setting up software updates ▪▪▪▪▪▪▪▪▪▪▪▪▪▪▪▪▪▪▪▪▪▪▪▪▪▪▪▪▪▪▪▪▪▪▪▪▪▪▪▪▪▪▪▪▪▪▪▪▪▪▪▪▪
▪ This assistant will guide you through connecting your system to Unbreakable Linux Network (ULN) to receive software updates,         ▪
▪ including security updates, to keep your system supported and compliant.  You will need the following at this time:                  ▪
▪                                                                                                                                      ▪
▪  * A network connection                                                                                                              ▪
▪  * Your Oracle Single Sign-On Login & password                                                                                       ▪
▪                                                                                                                                      ▪
▪                                                                                                                                      ▪
▪                                                                                                                                      ▪
▪                                                                                                                                      ▪
▪                                                                                                                                      ▪
▪                                                                                                                                      ▪
▪                                                                                                                                      ▪
▪                                                                                                                                      ▪
▪              ▪▪▪▪▪▪▪▪▪▪▪▪▪▪▪▪▪▪▪▪▪▪▪▪▪▪▪▪▪▪▪▪▪▪▪▪                           ▪▪▪▪▪▪▪▪                          ▪▪▪▪▪▪▪▪▪▪             ▪
▪              ▪ Why Should I Connect to ULN? ... ▪                           ▪ Next ▪                          ▪ Cancel ▪             ▪
▪              ▪▪▪▪▪▪▪▪▪▪▪▪▪▪▪▪▪▪▪▪▪▪▪▪▪▪▪▪▪▪▪▪▪▪▪▪                           ▪▪▪▪▪▪▪▪                          ▪▪▪▪▪▪▪▪▪▪             ▪
▪                                                                    ▪
▪▪▪▪▪▪▪▪▪▪▪▪▪▪▪▪▪▪▪▪▪▪▪▪▪▪▪▪▪▪▪▪▪▪▪▪▪▪▪▪▪▪▪▪▪▪▪▪▪▪▪▪▪▪▪▪▪▪▪▪▪▪▪▪▪▪▪▪▪▪▪▪▪▪▪▪▪▪▪▪▪▪▪▪▪▪▪▪▪▪▪▪▪▪▪▪▪▪▪▪▪▪▪▪▪▪▪▪▪▪▪▪▪▪▪▪▪▪▪▪▪▪▪▪▪▪▪▪▪▪▪▪▪▪▪▪

输入你的 ULN 登录信息,然后点击 Next

Copyright ▪© 2006--2010 Red Hat, Inc. All rights reserved.

▪▪▪▪▪▪▪▪▪▪▪▪▪▪▪▪▪▪▪▪▪▪▪▪▪▪▪▪▪▪▪▪▪▪▪▪▪▪▪▪▪▪▪▪▪▪▪▪▪▪▪▪▪¤ Setting up software updates ▪▪▪▪▪▪▪▪▪▪▪▪▪▪▪▪▪▪▪▪▪▪▪▪▪▪▪▪▪▪▪▪▪▪▪▪▪▪▪▪▪▪▪▪▪▪▪▪▪▪▪▪▪
▪                                                                                                                                      ▪
▪ Please enter your login information for Unbreakable Linux Network (http://linux.oracle.com/):                                        ▪
▪                                                                                                                                      ▪
▪                                                                                                                                      ▪
▪                                          Oracle Single Sign-On Login: [email protected]_                                            ▪
▪                                                             Password: **********__________                                           ▪
▪                                                                  CSI: 12345678____________                                           ▪
▪ Tip: Forgot your login or password? Visit: http://www.oracle.com/corporate/contact/getaccthelp.html                                  ▪
▪                                                                                                                                      ▪
▪                  ▪▪▪▪▪▪▪▪                                    ▪▪▪▪▪▪▪▪                                   ▪▪▪▪▪▪▪▪▪▪                   ▪
▪                  ▪ Next ▪                                    ▪ Back ▪                                   ▪ Cancel ▪                   ▪
▪                  ▪▪▪▪▪▪▪▪                                    ▪▪▪▪▪▪▪▪                                   ▪▪▪▪▪▪▪▪▪▪                   ▪
▪                                                                                                                                      ▪
▪                                                                                                                                      ▪
▪▪▪▪▪▪▪▪▪▪▪▪▪▪▪▪▪▪▪▪▪▪▪▪▪▪▪▪▪▪▪▪▪▪▪▪▪▪▪▪▪▪▪▪▪▪▪▪▪▪▪▪▪▪▪▪▪▪▪▪▪▪▪▪▪▪▪▪▪▪▪▪▪▪▪▪▪▪▪▪▪▪▪▪▪▪▪▪▪▪▪▪▪▪▪▪▪▪▪▪▪▪▪▪▪▪▪▪▪▪▪▪▪▪▪▪▪▪▪▪▪▪▪▪▪▪▪▪▪▪▪▪▪▪▪▪

注册一个系统概要 – 硬件信息,然后点击 Next

Copyright ▪© 2006--2010 Red Hat, Inc. All rights reserved.

▪▪▪▪▪▪▪▪▪▪▪▪▪▪▪▪▪▪▪▪▪▪▪▪▪▪▪▪▪▪▪▪▪▪▪▪▪▪▪▪▪▪▪▪▪▪¤ Register a System Profile - Hardware ▪▪▪▪▪▪▪▪▪▪▪▪▪▪▪▪▪▪▪▪▪▪▪▪▪▪▪▪▪▪▪▪▪▪▪▪▪▪▪▪▪▪▪▪▪▪
▪                                                                                                                                 ▪
▪ A Profile Name is a descriptive name that you choose to identify this                                                           ▪
▪ System Profile on the Unbreakable Linux Network web pages. Optionally,                                                          ▪
▪ include a computer serial or identification number.                                                                             ▪
▪ Profile name: 2g-oracle-sys___________________________                                                                          ▪
▪                                                                                                                                 ▪
▪ [*] Include the following information about hardware and network:                                                               ▪
▪ Press  to deselect the option.                                                                                           ▪
▪                                                                                                                                 ▪
▪                           Version: 6  CPU model: Intel(R) Xeon(R) CPU E5-5650 0 @ 2.00GHz                                       ▪
▪                           Hostname: 2g-oracle-sys                                                                               ▪
▪                           CPU speed: 1199 MHz  IP Address: 192.168.1.101  Memory:                                               ▪
▪                                                                                                                                 ▪
▪ Additional hardware information including PCI devices, disk sizes and mount points will be included in the profile.             ▪
▪                                                                                                                                 ▪
▪                 ▪▪▪▪▪▪▪▪                                  ▪▪▪▪▪▪▪▪                                  ▪▪▪▪▪▪▪▪▪▪                  ▪
▪                 ▪ Next ▪                                  ▪ Back ▪                                  ▪ Cancel ▪                  ▪
▪                 ▪▪▪▪▪▪▪▪                                  ▪▪▪▪▪▪▪▪                                  ▪▪▪▪▪▪▪▪▪▪                  ▪
▪                                                                                                                                 ▪
▪                                                                                                                                 ▪
▪▪▪▪▪▪▪▪▪▪▪▪▪▪▪▪▪▪▪▪▪▪▪▪▪▪▪▪▪▪▪▪▪▪▪▪▪▪▪▪▪▪▪▪▪▪▪▪▪▪▪▪▪▪▪▪▪▪▪▪▪▪▪▪▪▪▪▪▪▪▪▪▪▪▪▪▪▪▪▪▪▪▪▪▪▪▪▪▪▪▪▪▪▪▪▪▪▪▪▪▪▪▪▪▪▪▪▪▪▪▪▪▪▪▪▪▪▪▪▪▪▪▪▪▪▪▪▪▪▪▪

注册一个系统概要 – 包配置,然后点击 Next

Copyright ▪© 2006--2010 Red Hat, Inc. All rights reserved.

▪▪▪▪▪▪▪▪▪▪▪▪▪▪▪▪▪▪▪▪▪▪▪▪▪▪▪▪▪▪▪▪▪▪▪▪▪▪▪▪▪▪▪▪▪▪¤ Register a System Profile - Packages ▪▪▪▪▪▪▪▪▪▪▪▪▪▪▪▪▪▪▪▪▪▪▪▪▪▪▪▪▪▪▪▪▪▪▪▪▪▪▪▪▪▪▪▪▪▪▪
▪                                                                                                                                 ▪
▪ RPM information is important to determine what updated software packages are relevant to this system.                           ▪
▪                                                                                                                                 ▪
▪ [*] Include RPM packages installed on this system in my System Profile                                                          ▪
▪                                                                                                                                 ▪
▪ You may deselect individual packages by unchecking them below.                                                                  ▪
▪                                    [*] ConsoleKit-0.4.1-6.el6                             ▪                                     ▪
▪                                    [*] ConsoleKit-libs-0.4.1-6.el6                        ▪                                     ▪
▪                                    [*] ConsoleKit-x11-0.4.1-6.el6                         ▪                                     ▪
▪                                    [*] DeviceKit-power-014-3.el6                          ▪                                     ▪
▪                                    [*] GConf2-2.28.0-7.el6                                ▪                                     ▪
▪                                    [*] GConf2-devel-2.28.0-7.el6                          ▪                                     ▪
▪                                    [*] GConf2-gtk-2.28.0-7.el6                            ▪                                     ▪
▪                                    [*] MAKEDEV-3.24-6.el6                                 ▪                                     ▪
▪                                    [*] MySQL-python-1.2.3-0.3.c1.1.el6                    ▪                                     ▪
▪                                    [*] NessusAgent-7.0.3-es6                              ▪                                     ▪
▪                                    [*] ORBit2-2.14.17-6.el6_8                             ▪                                     ▪
▪                                    [*] ORBit2-devel-2.14.17-6.el6_8                       ▪                                     ▪
▪                                    [*] PackageKit-0.5.8-26.0.1.el6                        ▪                                     ▪
▪                                    [*] PackageKit-device-rebind-0.5.8-26.0.1.el6          ▪                                     ▪
▪                                    [*] PackageKit-glib-0.5.8-26.0.1.el6                   ▪                                     ▪
▪                                                                                                                                 ▪
▪                 ▪▪▪▪▪▪▪▪                                  ▪▪▪▪▪▪▪▪                                  ▪▪▪▪▪▪▪▪▪▪                  ▪
▪                 ▪ Next ▪                                  ▪ Back ▪                                  ▪ Cancel ▪                  ▪
▪                 ▪▪▪▪▪▪▪▪                                  ▪▪▪▪▪▪▪▪                                  ▪▪▪▪▪▪▪▪▪▪                  ▪
▪                                                                                                                                 ▪
▪                                                                                                                                 ▪
▪▪▪▪▪▪▪▪▪▪▪▪▪▪▪▪▪▪▪▪▪▪▪▪▪▪▪▪▪▪▪▪▪▪▪▪▪▪▪▪▪▪▪▪▪▪▪▪▪▪▪▪▪▪▪▪▪▪▪▪▪▪▪▪▪▪▪▪▪▪▪▪▪▪▪▪▪▪▪▪▪▪▪▪▪▪▪▪▪▪▪▪▪▪▪▪▪▪▪▪▪▪▪▪▪▪▪▪▪▪▪▪▪▪▪▪▪▪▪▪▪▪▪▪▪▪▪▪▪▪▪

按下 “Next” 去发送系统概要到 ULN。

Copyright ▪© 2006--2010 Red Hat, Inc. All rights reserved.

▪▪▪▪▪▪▪▪▪▪▪▪▪▪▪▪▪▪▪▪▪▪▪▪▪▪▪▪▪▪▪▪▪▪▪▪¤ Send Profile Information to Unbreakable Linux Network ▪▪▪▪▪▪▪▪▪▪▪▪▪▪▪▪▪▪▪▪▪▪▪▪▪▪▪▪▪▪▪▪▪▪▪▪▪
▪                                                                                                                              ▪
▪ We are finished collecting information for the System Profile.                                                               ▪
▪                                                                                                                              ▪
▪ Press "Next" to send this System Profile to Unbreakable Linux Network.  Click "Cancel" and no information will be sent.  You ▪
▪ can run the registration program later by typing `uln_register` at the command line.                                         ▪
▪                                                                                                                              ▪
▪                 ▪▪▪▪▪▪▪▪                                 ▪▪▪▪▪▪▪▪                                ▪▪▪▪▪▪▪▪▪▪                  ▪
▪                 ▪ Next ▪                                 ▪ Back ▪                                ▪ Cancel ▪                  ▪
▪                 ▪▪▪▪▪▪▪▪                                 ▪▪▪▪▪▪▪▪                                ▪▪▪▪▪▪▪▪▪▪                  ▪
▪                                                                                                                              ▪
▪                                                                                                                              ▪
▪▪▪▪▪▪▪▪▪▪▪▪▪▪▪▪▪▪▪▪▪▪▪▪▪▪▪▪▪▪▪▪▪▪▪▪▪▪▪▪▪▪▪▪▪▪▪▪▪▪▪▪▪▪▪▪▪▪▪▪▪▪▪▪▪▪▪▪▪▪▪▪▪▪▪▪▪▪▪▪▪▪▪▪▪▪▪▪▪▪▪▪▪▪▪▪▪▪▪▪▪▪▪▪▪▪▪▪▪▪▪▪▪▪▪▪▪▪▪▪▪▪▪▪▪▪▪▪

发送概要到 ULN 是如下的一个过程。

Copyright ▪© 2006--2010 Red Hat, Inc. All rights reserved.


▪▪¤ Sending Profile to Unbreakable Linux Network ▪
▪                                                ▪
▪                       75%                      ▪
▪                                                ▪
▪▪▪▪▪▪▪▪▪▪▪▪▪▪▪▪▪▪▪▪▪▪▪▪▪▪▪▪▪▪▪▪▪▪▪▪▪▪▪▪▪▪▪▪▪▪▪▪▪▪

ULN 注册做完后,重新回顾系统订阅的详细情况。如果一切正确,然后点击 ok

Copyright ▪© 2006--2010 Red Hat, Inc. All rights reserved.

▪▪▪▪▪▪▪▪▪▪▪▪▪▪▪▪▪▪▪▪▪▪▪▪▪▪▪▪▪▪▪▪▪▪▪▪▪▪▪▪▪▪▪▪▪▪▪▪▪▪▪¤ Review system subscription details ▪▪▪▪▪▪▪▪▪▪▪▪▪▪▪▪▪▪▪▪▪▪▪▪▪▪▪▪▪▪▪▪▪▪▪▪▪▪▪▪▪▪▪▪▪▪▪▪▪▪
▪                                                                                                                                        ▪
▪                                                                                                                                        ▪
▪ Note: yum-rhn-plugin has been enabled.                                                                                                 ▪
▪                                                                                                                                        ▪
▪ Please review the subscription details below:                                                                                          ▪
▪                                                                                                                                        ▪
▪ Software channel subscriptions:                                                                                                        ▪
▪ This system will receive updates from the following Unbreakable Linux Network software channels:                                       ▪
▪ Oracle Linux 6 Latest (x86_64)                                                                                                         ▪
▪ Unbreakable Enterprise Kernel Release 4 for Oracle Linux 6 (x86_64)                                                                    ▪
▪                                                                                                                                        ▪
▪ Warning: If an installed product on this system is not listed above, you will not receive updates or support for that product. If      ▪
▪ you would like to receive updates for that product, please visit http://linux.oracle.com/ and subscribe this system to the             ▪
▪ appropriate software channels to get updates for that product.                                                                         ▪
▪                                                                                                                                        ▪
▪                                                                                                                                        ▪
▪                                                                                                                                        ▪
▪                                                                                                                                        ▪
▪                                                                                                                                        ▪
▪                                                                                                                                        ▪
▪                                                                                                                                        ▪
▪                                                                ▪▪▪▪▪▪                                                                  ▪
▪                                                                ▪ OK ▪                                                                  ▪
▪                                                                ▪▪▪▪▪▪                                                                  ▪
▪                                                                                                                                        ▪
▪                                                                                                                                        ▪
▪▪▪▪▪▪▪▪▪▪▪▪▪▪▪▪▪▪▪▪▪▪▪▪▪▪▪▪▪▪▪▪▪▪▪▪▪▪▪▪▪▪▪▪▪▪▪▪▪▪▪▪▪▪▪▪▪▪▪▪▪▪▪▪▪▪▪▪▪▪▪▪▪▪▪▪▪▪▪▪▪▪▪▪▪▪▪▪▪▪▪▪▪▪▪▪▪▪▪▪▪▪▪▪▪▪▪▪▪▪▪▪▪▪▪▪▪▪▪▪▪▪▪▪▪▪▪▪▪▪▪▪▪▪▪▪▪▪

最后点击 Finish 完成注册。

Copyright ▪© 2006--2010 Red Hat, Inc. All rights reserved.


▪▪▪▪▪▪▪▪▪▪▪▪▪▪▪▪▪▪▪▪▪▪▪▪▪▪▪▪▪▪▪▪▪▪▪▪▪▪▪▪▪▪▪▪▪▪▪¤ Finish setting up software updates ▪▪▪▪▪▪▪▪▪▪▪▪▪▪▪▪▪▪▪▪▪▪▪▪▪▪▪▪▪▪▪▪▪▪▪▪▪▪▪▪▪▪▪▪▪▪▪
▪                                                                                                                                 ▪
▪ You may now run 'yum update' from this system's command line to get the latest software updates from Unbreakable Linux Network. ▪
▪ You will need to run this periodically to get the latest updates.                                                               ▪
▪                                                                                                                                 ▪
▪                                                           ▪▪▪▪▪▪▪▪▪▪                                                            ▪
▪                                                           ▪ Finish ▪                                                            ▪
▪                                                           ▪▪▪▪▪▪▪▪▪▪                                                            ▪
▪                                                                                                                                 ▪
▪                                                                                                                                 ▪
▪▪▪▪▪▪▪▪▪▪▪▪▪▪▪▪▪▪▪▪▪▪▪▪▪▪▪▪▪▪▪▪▪▪▪▪▪▪▪▪▪▪▪▪▪▪▪▪▪▪▪▪▪▪▪▪▪▪▪▪▪▪▪▪▪▪▪▪▪▪▪▪▪▪▪▪▪▪▪▪▪▪▪▪▪▪▪▪▪▪▪▪▪▪▪▪▪▪▪▪▪▪▪▪▪▪▪▪▪▪▪▪▪▪▪▪▪▪▪▪▪▪▪▪▪▪▪▪▪▪▪

ULN 注册已经成功,为了从 ULN 中得到仓库,运行如下的命令。

# yum repolist
Loaded plugins: aliases, changelog, presto, refresh-packagekit, rhnplugin, security, tmprepo, ulninfo, verify, versionlock
This system is receiving updates from ULN.
ol6_x86_64_UEKR3_latest                                                                                                | 1.2 kB     00:00
ol6_x86_64_UEKR3_latest/primary                                                                                        |  35 MB     00:14
ol6_x86_64_UEKR3_latest                                                                                                               874/874
repo id                                  repo name                                                                                      status
ol6_x86_64_UEKR3_latest                  Unbreakable Enterprise Kernel Release 3 for Oracle Linux 6 (x86_64) - Latest                      874
ol6_x86_64_latest                        Oracle Linux 6 Latest (x86_64)                                                                 40,092
repolist: 40,966

另外,你也可以在 ULN 网站上查看到相同的信息。转到 System 标签页去查看已注册的系统列表。
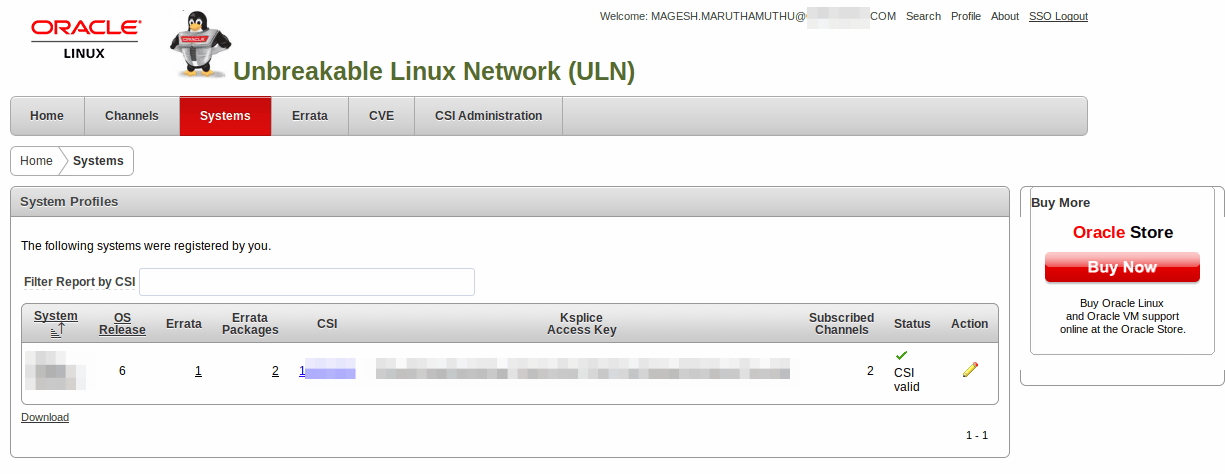
去查看已经启用的仓库列表。转到 System 标签页,然后点击相应的系统。另外,你也能够看到系统勘误及可用更新。

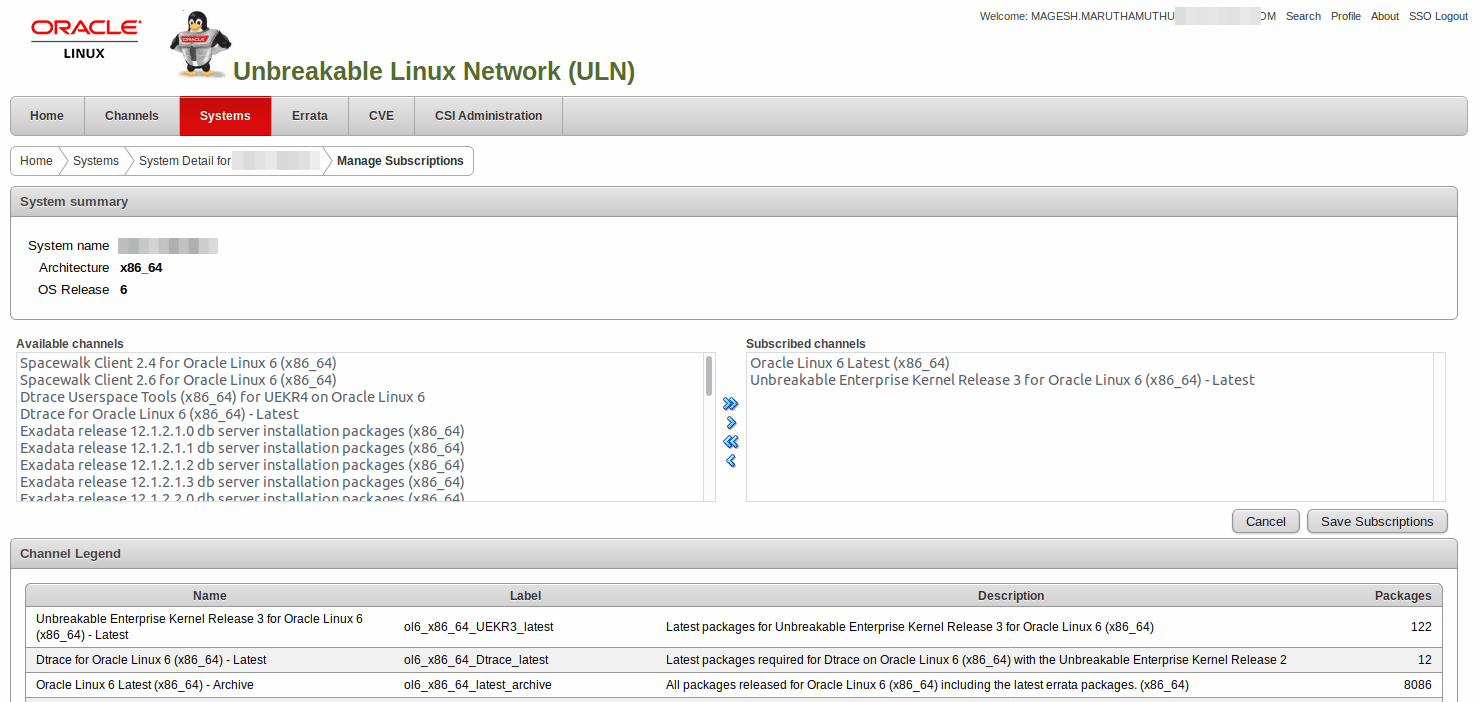
去管理订阅的频道。转到 System 标签页,然后点击有关的 system name,最后点击 Manage Subscriptions


via: https://www.2daygeek.com/how-to-register-the-oracle-linux-system-with-the-unbreakable-linux-network-uln/

作者:Vinoth Kumar 选题:lujun9972 译者:qhwdw 校对:wxy

本文由 LCTT 原创编译,Linux中国 荣誉推出