Vinoth Kumar 发布的文章

Linux 用户偏爱使用 scprsync 来进行文件或目录的复制拷贝。不过在 Linux 上正出现了许多新的可选方式,因为 Linux 是开源的,所以任何人都可以为 Linux 开发一个安全软件。

在过去我们已经写了多篇有关安全分享这个话题的文章,它们分别是 OnionShareMagic WormholeTransfer.shDcp – Dat Copy

今天我们甚至还将继续讨论这个话题,我们将介绍名为 ffsend 的工具。

ffsend 是什么?

ffsend 是 Firefox Send 服务的一个命令行客户端,允许用户通过命令行来传递和接收文件或目录。

它允许我们通过一个安全、私密、加密的链接,使用一个简单的命令来轻易安全地分享文件和目录。

通过 Firefox 的 Send 服务共享的文件最大大小为 2GB(LCTT 译注:现在官网上写的是最大 1GB,登录后最大 2.5GB)。其他人可以通过这个工具或者网页浏览器来下载这些分享的文件。

所有的文件都是在客户端加密的,并且秘钥将不会被共享到远程主机。另外,你还可以为上传的文件额外设置一个密码。

上传的文件在下载(默认被下载 1 次,最多可被下载 10 次)后或者 24 小时后,就会自动删除。这将确保你的文件不会一直保留在网络上。

该工具当前处于 alpha 阶段,使用时请自担风险。而且,当前只有有限的安装方式可用。

ffsend 的特点:

  • 全功能且使用友好的命令行工具
  • 可以安全地上传和下载文件与目录
  • 总是在客户端加密
  • 可用额外的密码进行保护、密码生成和可配置下载次数限制
  • 内置的文件或目录的打包和解压
  • 可以轻松地管理你的历史分享记录
  • 能够使用你自己的 Send 主机
  • 审查或者删除共享文件
  • 精准的错误报告
  • 低内存消耗,用于加密或上传下载
  • 无需交互,可以集成在脚本中

如何在 LInux 中安装 ffsend 呢?

当前除了 Debian 和 Arch Linux 系统,其他发行版还没有相应的安装包(LCTT 译注:这个信息已过时,最新内容请看这里)。然而,我们可以轻易地根据我们自己的操作系统和架构下载到相应的预编译二进制文件。

运行下面的命令来为你的操作系统下载 ffsend 最新可用的版本(LCTT 译注:当前最新版本为 v0.2.58):

$ wget https://github.com/timvisee/ffsend/releases/download/v0.1.2/ffsend-v0.1.2-linux-x64.tar.gz

然后使用下面的命令来解压 tar 包:

$ tar -xvf ffsend-v0.1.2-linux-x64.tar.gz

接着运行下面的命令来查看你的 PATH 环境变量:

$ echo $PATH
/home/daygeek/.cargo/bin:/usr/local/bin:/usr/local/sbin:/usr/bin:/usr/lib/jvm/default/bin:/usr/bin/site_perl:/usr/bin/vendor_perl:/usr/bin/core_perl

正如我先前告知的那样,下面我们要做的就是将这个可执行文件放置到 PATH 环境变量中的某个目录中:

$ sudo mv ffsend /usr/local/sbin

直接运行 ffsend 可以获取其基本使用信息:

$ ffsend
ffsend 0.1.2
Usage: ffsend [FLAGS] ...

Easily and securely share files from the command line.
A fully featured Firefox Send client.

Missing subcommand. Here are the most used:
 ffsend upload ...
 ffsend download ...

To show all subcommands, features and other help:
 ffsend help [SUBCOMMAND]

对于使用基于 Arch Linux 系统的用户可以简单地借助 AUR 助手来安装它,因为这个包已经在 AUR 软件仓库中了。

$ yay -S ffsend

对于使用 Debian/Ubuntu 系统的用户,使用 DPKG 命令来安装 ffsend

$ wget https://github.com/timvisee/ffsend/releases/download/v0.1.2/ffsend_0.1.2_amd64.deb
$ sudo dpkg -i ffsend_0.1.2_amd64.deb

如何使用 ffsend

这并不复杂,我们可以简单地通过下面的语法来发送文件。

语法:

$ ffsend upload [/Path/to/the/file/name]

在下面的例子中,我们将上传一个名为 passwd-up1.sh 的文件,一旦你上传了该文件,你将得到一个唯一的 URL。

$ ffsend upload passwd-up1.sh --copy
Upload complete
Share link: https://send.firefox.com/download/a4062553f4/#yy2_VyPaUMG5HwXZzYRmpQ

在任何远端的系统上,只需要使用上面那个唯一的 URL 就可以下载上传的文件了。

语法:

$ ffsend download [Generated URL]

命令的输出如下:

$ ffsend download https://send.firefox.com/download/a4062553f4/#yy2_VyPaUMG5HwXZzYRmpQ
Download complete

使用下面的语法来对目录进行上传:

$ ffsend upload [/Path/to/the/Directory] --copy

在下面的例子中,我们将上传一个名为 2g 的目录:

$ ffsend upload /home/daygeek/2g --copy
You've selected a directory, only a single file may be uploaded.
Archive the directory into a single file? [Y/n]: y
Archiving...
Upload complete
Share link: https://send.firefox.com/download/90aa5cfe67/#hrwu6oXZRG2DNh8vOc3BGg

在任意的远端系统中,只需要利用上面生成的唯一 URL 就可以获取到刚才上传的目录了。

$ ffsend download https://send.firefox.com/download/90aa5cfe67/#hrwu6oXZRG2DNh8vOc3BGg
You're downloading an archive, extract it into the selected directory? [Y/n]: y
Extracting...
Download complete

上面已经通过安全、私密和加密过的链接来发送了文件。然而,如果你想在你的掌控范围内再添加额外的安全措施,你可以为文件添加密码。

$ ffsend upload file-copy-rsync.sh --copy --password
Password:
Upload complete
Share link: https://send.firefox.com/download/0742d24515/#P7gcNiwZJ87vF8cumU71zA

当你在远端系统中尝试下载该文件时,它将要求你输入密码:

$ ffsend download https://send.firefox.com/download/0742d24515/#P7gcNiwZJ87vF8cumU71zA
This file is protected with a password.
Password:
Download complete

另外,你还可以在上传过程中提供下载次数限制来限制文件被下载的次数。

$ ffsend upload file-copy-scp.sh --copy --downloads 10
Upload complete
Share link: https://send.firefox.com/download/23cb923c4e/#LVg6K0CIb7Y9KfJRNZDQGw

然后你可以在任意的远程系统中使用上面的唯一 URL 来下载该文件:

ffsend download https://send.firefox.com/download/23cb923c4e/#LVg6K0CIb7Y9KfJRNZDQGw
Download complete

假如你想看这个链接的更多细节,你可以使用下面的命令来查看它的信息,它将为你展示文件名称、文件大小、被下载次数以及过期时间。

语法:

$ ffsend info [Generated URL]

$ ffsend info https://send.firefox.com/download/23cb923c4e/#LVg6K0CIb7Y9KfJRNZDQGw
ID: 23cb923c4e
Name: file-copy-scp.sh
Size: 115 B
MIME: application/x-sh
Downloads: 3 of 10
Expiry: 23h58m (86280s)

此外,你还可以使用下面的命令来查看你的传输历史:

$ ffsend history
# LINK EXPIRY
1 https://send.firefox.com/download/23cb923c4e/#LVg6K0CIb7Y9KfJRNZDQGw 23h57m
2 https://send.firefox.com/download/0742d24515/#P7gcNiwZJ87vF8cumU71zA 23h55m
3 https://send.firefox.com/download/90aa5cfe67/#hrwu6oXZRG2DNh8vOc3BGg 23h52m
4 https://send.firefox.com/download/a4062553f4/#yy2_VyPaUMG5HwXZzYRmpQ 23h46m
5 https://send.firefox.com/download/74ff30e43e/#NYfDOUp_Ai-RKg5g0fCZXw 23h44m
6 https://send.firefox.com/download/69afaab1f9/#5z51_94jtxcUCJNNvf6RcA 23h43m

假如你不想再分享某个链接,你可以使用下面的语法来删除它:

语法:

$ ffsend delete [Generated URL]

$ ffsend delete https://send.firefox.com/download/69afaab1f9/#5z51_94jtxcUCJNNvf6RcA
File deleted

如何在浏览器中使用 Send

另外,你还可以通过使用 firefox 浏览器打开 https://send.firefox.com/ 来完成相应的分享。

只需要拖拽该文件就可以上传它:
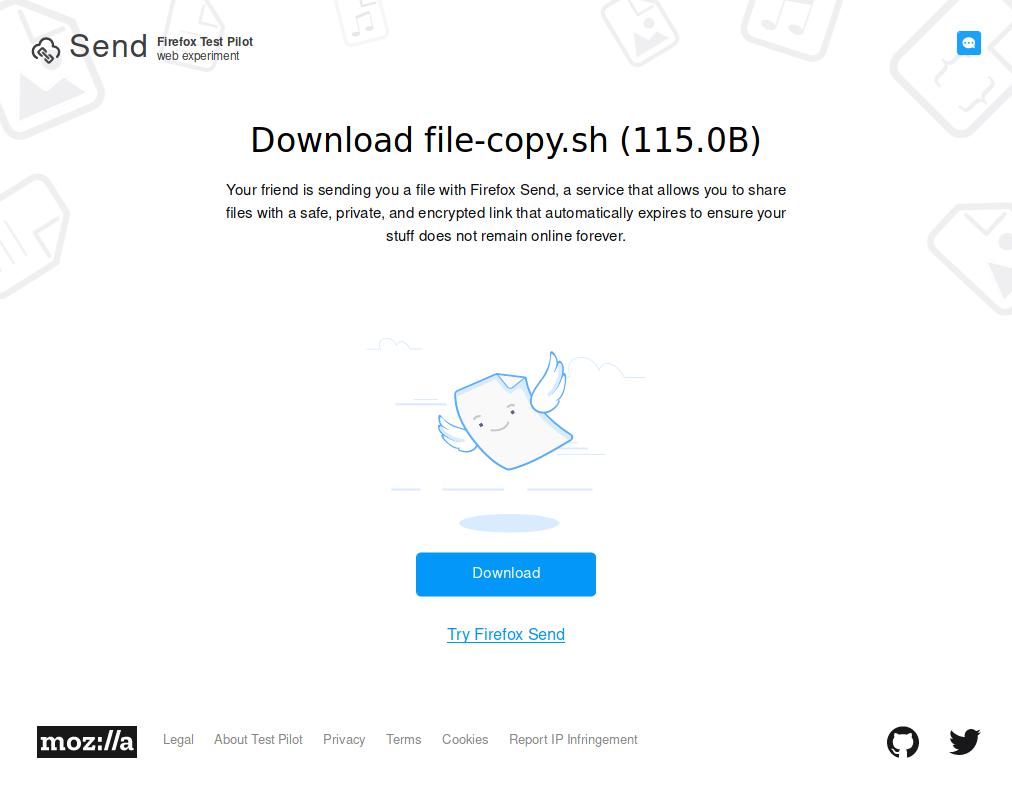
一旦该文件被下载,它将展示 100% 的下载状态。

想查看其他的可能选项,请浏览它对应的 man 信息或者帮助页。


via: https://www.2daygeek.com/ffsend-securely-share-files-folders-from-linux-command-line-using-firefox-send-client/

作者:Vinoth Kumar 选题:lujun9972 译者:FSSlc 校对:wxy

本文由 LCTT 原创编译,Linux中国 荣誉推出

分析日志文件对于 Linux 管理员来说是一件非常令人头疼的事情,因为它记录了很多东西。大多数新手和初级管理员都不知道如何分析。如果你在分析日志方面拥有很多知识,那么你就成了 *NIX 系统高手。

Linux 中有许多工具可以轻松分析日志。GoAccess 是允许用户轻松分析 Web 服务器日志的工具之一。我们将在本文中详细讨论 GoAccess 工具。

GoAccess

GoAccess 是一个实时 Web 日志分析器和交互式查看器,可以在 *nix 系统中的终端运行或通过浏览器访问。

GoAccess 需要的依赖极少,它是用 C 语言编写的,只需要 ncurses。

它支持 Apache、Nginx 和 Lighttpd 日志。它为需要动态可视化服务器报告的系统管理员即时提供了快速且有价值的 HTTP 统计信息。

GoAccess 可以解析指定的 Web 日志文件并将数据输出到 X 终端和浏览器。

GoAccess 被设计成一个基于终端的快速日志分析器。其核心思想是实时快速分析和查看 Web 服务器统计信息,而无需使用浏览器。

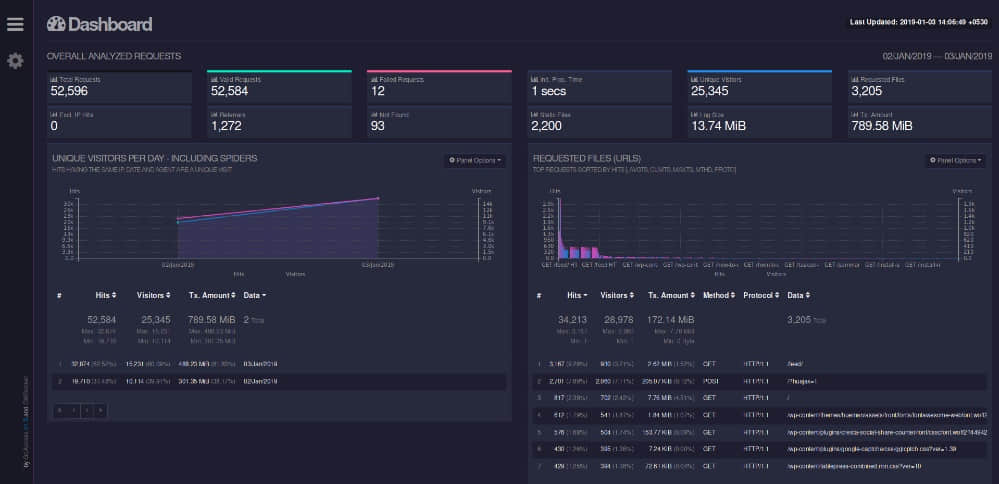
默认输出是在终端输出,它也能够生成完整的、自包含的实时 HTML 报告,以及 JSON 和 CSV 报告。

GoAccess 支持任何自定义日志格式,并包含以下预定义日志格式选项:Apache/Nginx 中的组合日志格式 XLF/ELF,Apache 中的通用日志格式 CLF,但不限于此。

GoAccess 功能

  • 完全实时:所有指标在终端上每 200 毫秒更新一次,在 HTML 输出上每秒更新一次。
  • 跟踪应用程序响应时间:跟踪服务请求所需的时间。如果你想跟踪减慢了网站速度的网页,则非常有用。
  • 访问者:按小时或日期确定最慢运行的请求的点击量、访问者数、带宽数和指标。
  • 按虚拟主机的度量标准:如果有多个虚拟主机(Server),它提供了一个面板,可显示哪些虚拟主机正在消耗大部分 Web 服务器资源。

如何安装 GoAccess?

我建议用户在包管理器的帮助下从发行版官方的存储库安装 GoAccess。它在大多数发行版官方存储库中都可用。

我们知道,我们在标准发行方式的发行版中得到的是过时的软件包,而滚动发行方式的发行版总是包含最新的软件包。

如果你使用标准发行方式的发行版运行操作系统,我建议你检查替代选项,如 PPA 或 GoAccess 官方维护者存储库等,以获取最新的软件包。

对于 Debian / Ubuntu 系统,使用 APT-GET 命令APT 命令在你的系统上安装 GoAccess。

# apt install goaccess

要获取最新的 GoAccess 包,请使用以下 GoAccess 官方存储库。

$ echo "deb https://deb.goaccess.io/ $(lsb_release -cs) main" | sudo tee -a /etc/apt/sources.list.d/goaccess.list
$ wget -O - https://deb.goaccess.io/gnugpg.key | sudo apt-key add -
$ sudo apt-get update
$ sudo apt-get install goaccess

对于 RHEL / CentOS 系统,使用 YUM 包管理器在你的系统上安装 GoAccess。

# yum install goaccess

对于 Fedora 系统,使用 DNF 包管理器在你的系统上安装 GoAccess。

# dnf install goaccess

对于基于 ArchLinux / Manjaro 的系统,使用 Pacman 包管理器在你的系统上安装 GoAccess。

# pacman -S goaccess

对于 openSUSE Leap 系统,使用Zypper 包管理器在你的系统上安装 GoAccess。

# zypper install goaccess
# zypper ar -f obs://server:http
# zypper ref && zypper in goaccess

如何使用 GoAccess?

成功安装 GoAccess 后。只需输入 goaccess 命令,然后输入 Web 服务器日志位置即可查看。

# goaccess [options] /path/to/Web Server/access.log
# goaccess /var/log/apache/2daygeek_access.log

执行上述命令时,它会要求您选择日志格式配置。

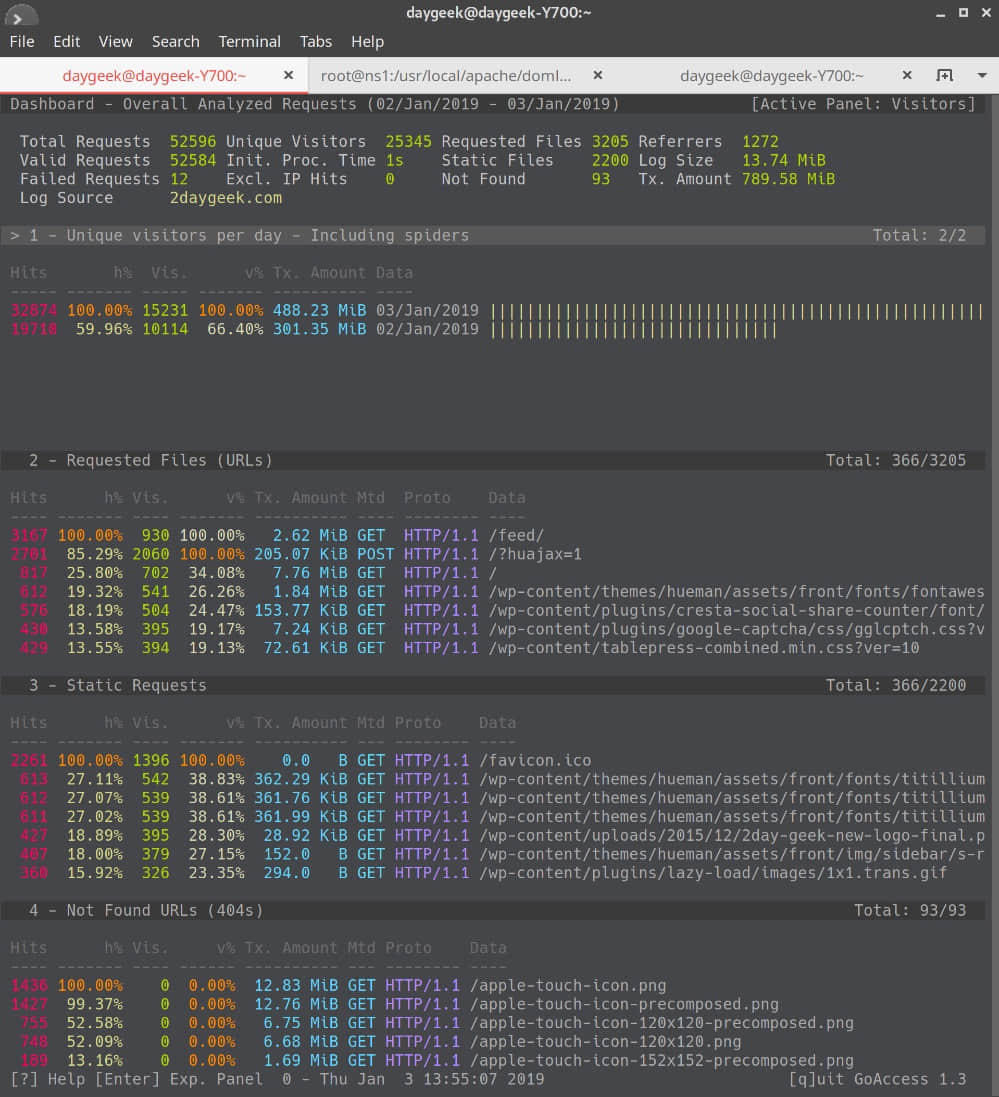
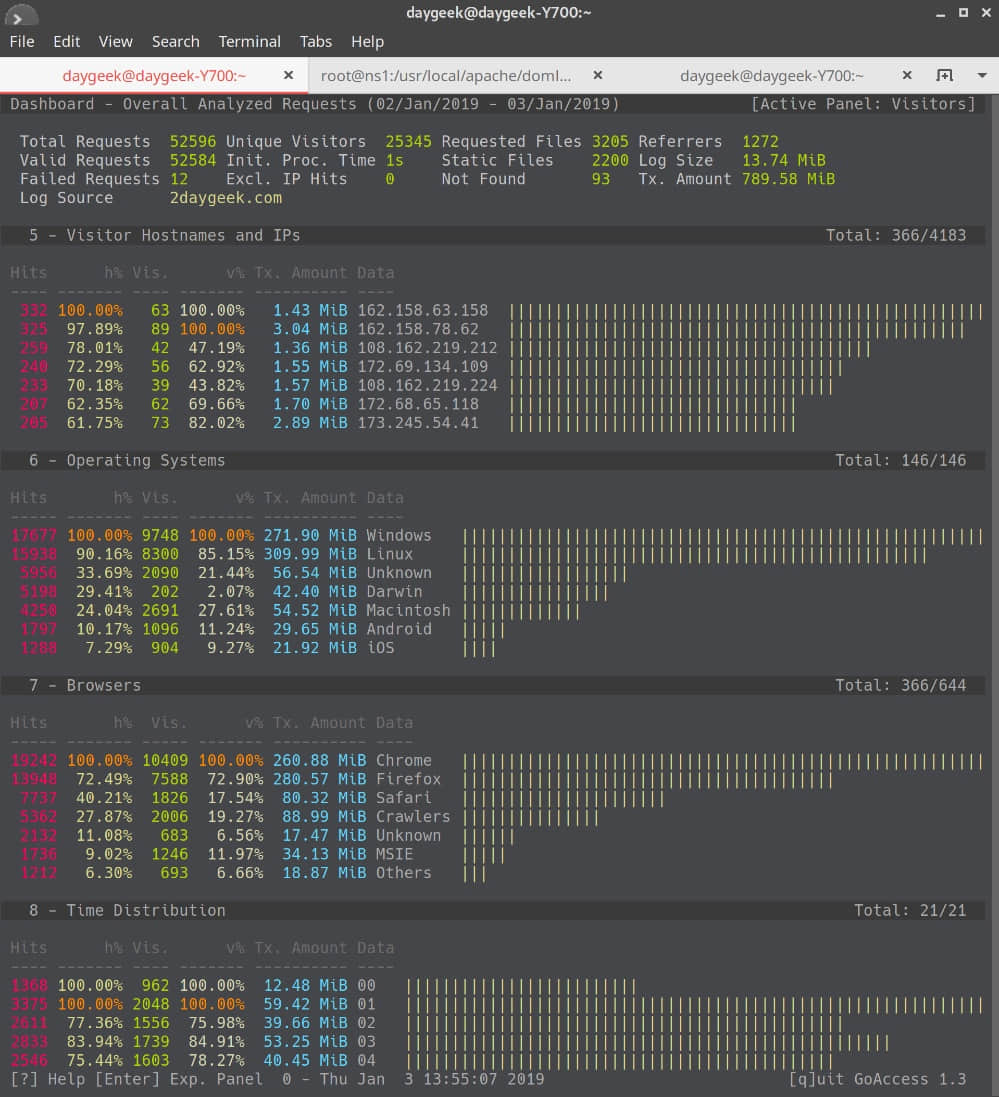
我用 Apache 访问日志对此进行了测试。Apache 日志被分为十五个部分。详情如下。主要部分显示了这十五个部分的摘要。

以下屏幕截图包括四个部分,例如唯一身份访问者、请求的文件、静态请求、未找到的网址。

以下屏幕截图包括四个部分,例如访客主机名和 IP、操作系统、浏览器、时间分布。

以下屏幕截图包括四个部分,例如来源网址、来源网站,Google 的搜索引擎结果、HTTP状态代码。

如果要生成 html 报告,请使用以下命令。最初我在尝试生成 html 报告时遇到错误。

# goaccess 2daygeek_access.log -a > report.html

GoAccess - version 1.3 - Nov 23 2018 11:28:19
Config file: No config file used

Fatal error has occurred
Error occurred at: src/parser.c - parse_log - 2764
No time format was found on your conf file.Parsing... [0] [0/s]

它说“你的 conf 文件没有找到时间格式”。要解决此问题,请为其添加 “COMBINED” 日志格式选项。

# goaccess -f 2daygeek_access.log --log-format=COMBINED -o 2daygeek.html
Parsing...[0,165] [50,165/s]

GoAccess 也允许你访问和分析实时日志并进行过滤和解析。

# tail -f /var/log/apache/2daygeek_access.log | goaccess -

更多细节请参考其 man 手册页或帮助。

# man goaccess
或
# goaccess --help

via: https://www.2daygeek.com/goaccess-a-real-time-web-server-log-analyzer-and-interactive-viewer/

作者:Vinoth Kumar 选题:lujun9972 译者:wxy 校对:wxy

本文由 LCTT 原创编译,Linux中国 荣誉推出

在 Linux 下有很多可以用来查看内存占用情况的命令和选项,但是我并没有看见关于内存占用率的更多的信息。

在大多数情况下我们只想查看内存使用情况,并没有考虑占用的百分比究竟是多少。如果你想要了解这些信息,那你看这篇文章就对了。我们将会详细地在这里帮助你解决这个问题。

这篇教程将会帮助你在面对 Linux 服务器下频繁的内存高占用情况时,确定内存使用情况。

而在同时,如果你使用的是 free -m 或者 free -g,占用情况描述地也并不是十分清楚。

这些格式化命令属于 Linux 高级命令。它将会对 Linux 专家和中等水平 Linux 使用者非常有用。

方法-1:如何查看 Linux 下内存占用率?

我们可以使用下面命令的组合来达到此目的。在该方法中,我们使用的是 freeawk 命令的组合来获取内存占用率。

如果你正在寻找其他有关于内存的文章,你可以导航到如下链接。这些文章有 free 命令smem 命令ps\_mem 命令vmstat 命令查看物理内存大小的多种方式

要获取不包含百分比符号的内存占用率:

$ free -t | awk 'NR == 2 {print "Current Memory Utilization is : " $3/$2*100}'
或
$ free -t | awk 'FNR == 2 {print "Current Memory Utilization is : " $3/$2*100}'

Current Memory Utilization is : 20.4194

要获取不包含百分比符号的交换分区占用率:

$ free -t | awk 'NR == 3 {print "Current Swap Utilization is : " $3/$2*100}'
或
$ free -t | awk 'FNR == 3 {print "Current Swap Utilization is : " $3/$2*100}'

Current Swap Utilization is : 0

要获取包含百分比符号及保留两位小数的内存占用率:

$ free -t | awk 'NR == 2 {printf("Current Memory Utilization is : %.2f%"), $3/$2*100}'
或
$ free -t | awk 'FNR == 2 {printf("Current Memory Utilization is : %.2f%"), $3/$2*100}'

Current Memory Utilization is : 20.42%

要获取包含百分比符号及保留两位小数的交换分区占用率:

$ free -t | awk 'NR == 3 {printf("Current Swap Utilization is : %.2f%"), $3/$2*100}'
或
$ free -t | awk 'FNR == 3 {printf("Current Swap Utilization is : %.2f%"), $3/$2*100}'

Current Swap Utilization is : 0.00%

如果你正在寻找有关于交换分区的其他文章,你可以导航至如下链接。这些链接有 使用 LVM(逻辑盘卷管理)创建和扩展交换分区创建或扩展交换分区的多种方式创建/删除和挂载交换分区文件的多种方式

键入 free 命令会更好地作出阐释:

$ free
              total        used        free      shared  buff/cache   available
Mem:          15867        3730        9868        1189        2269       10640
Swap:         17454           0       17454
Total:        33322        3730       27322

细节如下:

  • free:是一个标准命令,用于在 Linux 下查看内存使用情况。
  • awk:是一个专门用来做文本数据处理的强大命令。
  • FNR == 2:该命令给出了每一个输入文件的行数。其基本上用于挑选出给定的行(针对于这里,它选择的是行号为 2 的行)
  • NR == 2:该命令给出了处理的行总数。其基本上用于过滤给出的行(针对于这里,它选择的是行号为 2 的行)
  • $3/$2*100:该命令将列 3 除以列 2 并将结果乘以 100。
  • printf:该命令用于格式化和打印数据。
  • %.2f%:默认情况下,其打印小数点后保留 6 位的浮点数。使用后跟的格式来约束小数位。

方法-2:如何查看 Linux 下内存占用率?

我们可以使用下面命令的组合来达到此目的。在这种方法中,我们使用 freegrepawk 命令的组合来获取内存占用率。

要获取不包含百分比符号的内存占用率:

$ free -t | grep Mem | awk '{print "Current Memory Utilization is : " $3/$2*100}'
Current Memory Utilization is : 20.4228

要获取不包含百分比符号的交换分区占用率:

$ free -t | grep Swap | awk '{print "Current Swap Utilization is : " $3/$2*100}'
Current Swap Utilization is : 0

要获取包含百分比符号及保留两位小数的内存占用率:

$ free -t | grep Mem | awk '{printf("Current Memory Utilization is : %.2f%"), $3/$2*100}'
Current Memory Utilization is : 20.43%

要获取包含百分比符号及保留两位小数的交换空间占用率:

$ free -t | grep Swap | awk '{printf("Current Swap Utilization is : %.2f%"), $3/$2*100}'
Current Swap Utilization is : 0.00%

方法-1:如何查看 Linux 下 CPU 的占用率?

我们可以使用如下命令的组合来达到此目的。在这种方法中,我们使用 topprintawk 命令的组合来获取 CPU 的占用率。

如果你正在寻找其他有关于 CPU(LCTT 译注:原文误为 memory)的文章,你可以导航至如下链接。这些文章有 top 命令htop 命令atop 命令Glances 命令

如果在输出中展示的是多个 CPU 的情况,那么你需要使用下面的方法。

$ top -b -n1 | grep ^%Cpu
%Cpu0  :  5.3 us,  0.0 sy,  0.0 ni, 94.7 id,  0.0 wa,  0.0 hi,  0.0 si,  0.0 st
%Cpu1  :  0.0 us,  0.0 sy,  0.0 ni,100.0 id,  0.0 wa,  0.0 hi,  0.0 si,  0.0 st
%Cpu2  :  0.0 us,  0.0 sy,  0.0 ni, 94.7 id,  0.0 wa,  0.0 hi,  5.3 si,  0.0 st
%Cpu3  :  5.3 us,  0.0 sy,  0.0 ni, 94.7 id,  0.0 wa,  0.0 hi,  0.0 si,  0.0 st
%Cpu4  : 10.5 us, 15.8 sy,  0.0 ni, 73.7 id,  0.0 wa,  0.0 hi,  0.0 si,  0.0 st
%Cpu5  :  0.0 us,  5.0 sy,  0.0 ni, 95.0 id,  0.0 wa,  0.0 hi,  0.0 si,  0.0 st
%Cpu6  :  5.3 us,  0.0 sy,  0.0 ni, 94.7 id,  0.0 wa,  0.0 hi,  0.0 si,  0.0 st
%Cpu7  :  5.3 us,  0.0 sy,  0.0 ni, 94.7 id,  0.0 wa,  0.0 hi,  0.0 si,  0.0 st

要获取不包含百分比符号的 CPU 占用率:

$ top -b -n1 | grep ^%Cpu | awk '{cpu+=$9}END{print "Current CPU Utilization is : " 100-cpu/NR}'
Current CPU Utilization is : 21.05

要获取包含百分比符号及保留两位小数的 CPU 占用率:

$ top -b -n1 | grep ^%Cpu | awk '{cpu+=$9}END{printf("Current CPU Utilization is : %.2f%"), 100-cpu/NR}'
Current CPU Utilization is : 14.81%

方法-2:如何查看 Linux 下 CPU 的占用率?

我们可以使用如下命令的组合来达到此目的。在这种方法中,我们使用的是 topprint/printfawk 命令的组合来获取 CPU 的占用率。

如果在单个输出中一起展示了所有的 CPU 的情况,那么你需要使用下面的方法。

$ top -b -n1 | grep ^%Cpu
%Cpu(s): 15.3 us, 7.2 sy, 0.8 ni, 69.0 id, 6.7 wa, 0.0 hi, 1.0 si, 0.0 st

要获取不包含百分比符号的 CPU 占用率:

$ top -b -n1 | grep ^%Cpu | awk '{print "Current CPU Utilization is : " 100-$8}'
Current CPU Utilization is : 5.6

要获取包含百分比符号及保留两位小数的 CPU 占用率:

$ top -b -n1 | grep ^%Cpu | awk '{printf("Current CPU Utilization is : %.2f%"), 100-$8}'
Current CPU Utilization is : 5.40%

如下是一些细节:

  • top:是一种用于查看当前 Linux 系统下正在运行的进程的非常好的命令。
  • -b:选项允许 top 命令切换至批处理的模式。当你从本地系统运行 top 命令至远程系统时,它将会非常有用。
  • -n1:迭代次数。
  • ^%Cpu:过滤以 %CPU 开头的行。
  • awk:是一种专门用来做文本数据处理的强大命令。
  • cpu+=$9:对于每一行,将第 9 列添加至变量 cpu
  • printf:该命令用于格式化和打印数据。
  • %.2f%:默认情况下,它打印小数点后保留 6 位的浮点数。使用后跟的格式来限制小数位数。
  • 100-cpu/NR:最终打印出 CPU 平均占用率,即用 100 减去其并除以行数。

via: https://www.2daygeek.com/linux-check-cpu-memory-swap-utilization-percentage/

作者:Vinoth Kumar 选题:lujun9972 译者:An-DJ 校对:wxy

本文由 LCTT 原创编译,Linux中国 荣誉推出

我们都知道,现在几乎都从 PC 机换到了笔记本电脑了。但是使用笔记本有个问题,我们希望电池耐用,我们可以使用到每一点电量。所以,我们需要知道电量都去哪里了,是不是浪费了。

你可以使用 PowerTOP 工具来查看没有接入电源线时电量都用在了何处。你需要在终端中使用超级用户权限来运行 PowerTOP 工具。它可以访问该电池硬件并测量电量使用情况。

什么是 PowerTOP

PowerTOP 是一个 Linux 工具,用于诊断电量消耗和电源管理的问题。

它是由 Intel 开发的,可以在内核、用户空间和硬件中启用各种节电模式。

除了作为一个一个诊断工具之外,PowerTop 还有一个交互模式,可以让你实验 Linux 发行版没有启用的各种电源管理设置。

它也能监控进程,并展示其中哪个正在使用 CPU,以及从休眠状态页将其唤醒,也可以找出电量消耗特别高的应用程序。

如何安装 PowerTOP

PowerTOP 软件包在大多数发行版的软件库中可用,使用发行版的 包管理器 安装即可。

对于 Fedora 系统,使用 dnf 命令 来安装 PowerTOP。

$ sudo dnf install powertop

对于 Debian/Ubuntu 系统,使用 apt-get 命令 或 apt 命令 来安装 PowerTOP。

$ sudo apt install powertop

对于基于 Arch Linux 的系统,使用 pacman 命令 来安装 PowerTOP。

$ sudo pacman -S powertop

对于 RHEL/CentOS 系统,使用 yum 命令 来安装 PowerTOP。

$ sudo yum install powertop

对于 openSUSE Leap 系统,使用 zypper 命令 来安装 PowerTOP。

$ sudo zypper install powertop

如何使用 PowerTOP

PowerTOP 需要超级用户权限,所以在 Linux 系统中以 root 身份运行 PowerTOP 工具。

默认情况下其显示 “概览” 页,在这里我们可以看到所有设备的电量消耗情况,也可以看到系统的唤醒秒数。

$ sudo powertop

PowerTOP v2.9     Overview   Idle stats   Frequency stats   Device stats   Tunables                                     

The battery reports a discharge rate of 12.6 W
The power consumed was 259 J
The estimated remaining time is 1 hours, 52 minutes

Summary: 1692.9 wakeups/second,  0.0 GPU ops/seconds, 0.0 VFS ops/sec and 54.9% CPU use

                Usage       Events/s    Category       Description
              9.3 ms/s     529.4        Timer          tick_sched_timer
            378.5 ms/s     139.8        Process        [PID 2991] /usr/lib/firefox/firefox -contentproc -childID 7 -isForBrowser -prefsLen 8314 -prefMapSize 173895 -schedulerPrefs 00
              7.5 ms/s     141.7        Timer          hrtimer_wakeup
              3.3 ms/s     102.7        Process        [PID 1527] /usr/lib/firefox/firefox --new-window
             11.6 ms/s      69.1        Process        [PID 1568] /usr/lib/firefox/firefox -contentproc -childID 1 -isForBrowser -prefsLen 1 -prefMapSize 173895 -schedulerPrefs 0001,
              6.2 ms/s      59.0        Process        [PID 1496] /usr/lib/firefox/firefox --new-window
              2.1 ms/s      59.6        Process        [PID 2466] /usr/lib/firefox/firefox -contentproc -childID 3 -isForBrowser -prefsLen 5814 -prefMapSize 173895 -schedulerPrefs 00
              1.8 ms/s      52.3        Process        [PID 2052] /usr/lib/firefox/firefox -contentproc -childID 4 -isForBrowser -prefsLen 5814 -prefMapSize 173895 -schedulerPrefs 00
              1.8 ms/s      50.8        Process        [PID 3034] /usr/lib/firefox/firefox -contentproc -childID 7 -isForBrowser -prefsLen 8314 -prefMapSize 173895 -schedulerPrefs 00
              3.6 ms/s      48.4        Process        [PID 3009] /usr/lib/firefox/firefox -contentproc -childID 7 -isForBrowser -prefsLen 8314 -prefMapSize 173895 -schedulerPrefs 00
              7.5 ms/s      46.2        Process        [PID 2996] /usr/lib/firefox/firefox -contentproc -childID 7 -isForBrowser -prefsLen 8314 -prefMapSize 173895 -schedulerPrefs 00
             25.2 ms/s      33.6        Process        [PID 1528] /usr/lib/firefox/firefox --new-window
              5.7 ms/s      32.2        Interrupt      [7] sched(softirq)
              2.1 ms/s      32.2        Process        [PID 1811] /usr/lib/firefox/firefox -contentproc -childID 4 -isForBrowser -prefsLen 5814 -prefMapSize 173895 -schedulerPrefs 00
             19.7 ms/s      25.0        Process        [PID 1794] /usr/lib/firefox/firefox -contentproc -childID 4 -isForBrowser -prefsLen 5814 -prefMapSize 173895 -schedulerPrefs 00
              1.9 ms/s      31.5        Process        [PID 1596] /usr/lib/firefox/firefox -contentproc -childID 1 -isForBrowser -prefsLen 1 -prefMapSize 173895 -schedulerPrefs 0001,
              3.1 ms/s      29.9        Process        [PID 1535] /usr/lib/firefox/firefox --new-window
              7.1 ms/s      28.2        Process        [PID 1488] /usr/lib/firefox/firefox --new-window
              1.8 ms/s      29.5        Process        [PID 1762] /usr/lib/firefox/firefox -contentproc -childID 3 -isForBrowser -prefsLen 5814 -prefMapSize 173895 -schedulerPrefs 00
              8.8 ms/s      23.3        Process        [PID 1121] /usr/bin/gnome-shell
              1.2 ms/s      21.8        Process        [PID 1657] /usr/lib/firefox/firefox -contentproc -childID 2 -isForBrowser -prefsLen 920 -prefMapSize 173895 -schedulerPrefs 000
             13.3 ms/s      13.9        Process        [PID 1746] /usr/lib/firefox/firefox -contentproc -childID 3 -isForBrowser -prefsLen 5814 -prefMapSize 173895 -schedulerPrefs 00
              2.7 ms/s      11.1        Process        [PID 3410] /usr/lib/gnome-terminal-server
              3.8 ms/s      10.8        Process        [PID 1057] /usr/lib/Xorg vt2 -displayfd 3 -auth /run/user/1000/gdm/Xauthority -nolisten tcp -background none -noreset -keeptty
              3.1 ms/s       9.8        Process        [PID 1629] /usr/lib/firefox/firefox -contentproc -childID 2 -isForBrowser -prefsLen 920 -prefMapSize 173895 -schedulerPrefs 000
              0.9 ms/s       6.7        Interrupt      [136] xhci_hcd
            278.0 us/s       6.4        Process        [PID 414] [irq/141-iwlwifi]
            128.7 us/s       5.7        Process        [PID 1] /sbin/init
            118.5 us/s       5.2        Process        [PID 10] [rcu_preempt]
             49.0 us/s       4.7        Interrupt      [0] HI_SOFTIRQ
            459.3 us/s       3.1        Interrupt      [142] i915
              2.1 ms/s       2.3        Process        [PID 3451] powertop
              8.4 us/s       2.7        kWork          intel_atomic_helper_free_state_
              1.2 ms/s       1.8        kWork          intel_atomic_commit_work
            374.2 us/s       2.1        Interrupt      [9] acpi
             42.1 us/s       1.8        kWork          intel_atomic_cleanup_work
              3.5 ms/s      0.25        kWork          delayed_fput
            238.0 us/s       1.5        Process        [PID 907] /usr/lib/upowerd
             17.7 us/s       1.5        Timer          intel_uncore_fw_release_timer
             26.4 us/s       1.4        Process        [PID 576] [i915/signal:0]
             19.8 us/s       1.3        Timer          watchdog_timer_fn
              1.1 ms/s      0.00        Process        [PID 206] [kworker/7:2]
              2.4 ms/s      0.00        Interrupt      [1] timer(softirq)
             13.4 us/s       0.9        Process        [PID 9] [ksoftirqd/0]

 Exit |  /  Navigate |

PowerTOP 的输出类似如上截屏,在你的机器上由于硬件不同会稍有不同。它的显示有很多页,你可以使用 TabShift+Tab 在它们之间切换。

空闲状态页

它会显示处理器的各种信息。

PowerTOP v2.9     Overview   Idle stats   Frequency stats   Device stats   Tunables                                     


          Package   |             Core    |            CPU 0       CPU 4
                    |                     | C0 active   6.7%        7.2%
                    |                     | POLL        0.0%    0.1 ms  0.0%    0.1 ms
                    |                     | C1E         1.2%    0.2 ms  1.6%    0.3 ms
C2 (pc2)    7.5%    |                     |
C3 (pc3)   25.2%    | C3 (cc3)    0.7%    | C3          0.5%    0.2 ms  0.6%    0.1 ms
C6 (pc6)    0.0%    | C6 (cc6)    7.1%    | C6          6.6%    0.5 ms  6.3%    0.5 ms
C7 (pc7)    0.0%    | C7 (cc7)   59.8%    | C7s         0.0%    0.0 ms  0.0%    0.0 ms
C8 (pc8)    0.0%    |                     | C8         33.9%    1.6 ms 32.3%    1.5 ms
C9 (pc9)    0.0%    |                     | C9          2.1%    3.4 ms  0.7%    2.8 ms
C10 (pc10)  0.0%    |                     | C10        39.5%    4.7 ms 41.4%    4.7 ms

                    |             Core    |            CPU 1       CPU 5
                    |                     | C0 active   8.3%        7.2%
                    |                     | POLL        0.0%    0.0 ms  0.0%    0.1 ms
                    |                     | C1E         1.3%    0.2 ms  1.4%    0.3 ms
                    |                     |
                    | C3 (cc3)    0.5%    | C3          0.5%    0.2 ms  0.4%    0.2 ms
                    | C6 (cc6)    6.0%    | C6          5.3%    0.5 ms  4.7%    0.5 ms
                    | C7 (cc7)   59.3%    | C7s         0.0%    0.8 ms  0.0%    1.0 ms
                    |                     | C8         27.2%    1.5 ms 23.8%    1.4 ms
                    |                     | C9          1.6%    3.0 ms  0.5%    3.0 ms
                    |                     | C10        44.5%    4.7 ms 52.2%    4.6 ms

                    |             Core    |            CPU 2       CPU 6
                    |                     | C0 active  11.2%        8.4%
                    |                     | POLL        0.0%    0.0 ms  0.0%    0.0 ms
                    |                     | C1E         1.4%    0.4 ms  1.3%    0.3 ms
                    |                     |
                    | C3 (cc3)    0.3%    | C3          0.2%    0.1 ms  0.4%    0.2 ms
                    | C6 (cc6)    4.0%    | C6          3.7%    0.5 ms  4.3%    0.5 ms
                    | C7 (cc7)   54.2%    | C7s         0.0%    0.0 ms  0.0%    1.0 ms
                    |                     | C8         20.0%    1.5 ms 20.7%    1.4 ms
                    |                     | C9          1.0%    3.4 ms  0.4%    3.8 ms
                    |                     | C10        48.8%    4.6 ms 52.3%    5.0 ms

                    |             Core    |            CPU 3       CPU 7
                    |                     | C0 active   8.8%        8.1%
                    |                     | POLL        0.0%    0.1 ms  0.0%    0.0 ms
                    |                     | C1E         1.2%    0.2 ms  1.2%    0.2 ms
                    |                     |
                    | C3 (cc3)    0.6%    | C3          0.6%    0.2 ms  0.4%    0.2 ms
                    | C6 (cc6)    7.0%    | C6          7.5%    0.5 ms  4.4%    0.5 ms
                    | C7 (cc7)   56.8%    | C7s         0.0%    0.0 ms  0.0%    0.9 ms
                    |                     | C8         29.4%    1.4 ms 23.8%    1.4 ms
                    |                     | C9          1.1%    2.7 ms  0.7%    3.9 ms
                    |                     | C10        41.0%    4.0 ms 50.0%    4.8 ms


 Exit |  /  Navigate |

频率状态页

它会显示 CPU 的主频。

PowerTOP v2.9     Overview   Idle stats   Frequency stats   Device stats   Tunables                                     


            Package |             Core    |            CPU 0       CPU 4
                    |                     | Average      930 MHz    1101 MHz
Idle                | Idle                | Idle

                    |             Core    |            CPU 1       CPU 5
                    |                     | Average     1063 MHz     979 MHz
                    | Idle                | Idle

                    |             Core    |            CPU 2       CPU 6
                    |                     | Average      976 MHz     942 MHz
                    | Idle                | Idle

                    |             Core    |            CPU 3       CPU 7
                    |                     | Average      924 MHz     957 MHz
                    | Idle                | Idle

设备状态页

它仅针对设备显示其电量使用信息。

PowerTOP v2.9     Overview   Idle stats   Frequency stats   Device stats   Tunables                                     


The battery reports a discharge rate of 13.8 W
The power consumed was 280 J

              Usage     Device name
             46.7%        CPU misc
             46.7%        DRAM
             46.7%        CPU core
             19.0%        Display backlight
              0.0%        Audio codec hwC0D0: Realtek
              0.0%        USB device: Lenovo EasyCamera (160709000341)
            100.0%        PCI Device: Intel Corporation HD Graphics 530
            100.0%        Radio device: iwlwifi
            100.0%        PCI Device: O2 Micro, Inc. SD/MMC Card Reader Controller
            100.0%        PCI Device: Intel Corporation Xeon E3-1200 v5/E3-1500 v5/6th Gen Core Processor Host Bridge/DRAM Registers
            100.0%        USB device: Lenovo Wireless Optical Mouse N100
            100.0%        PCI Device: Intel Corporation Wireless 8260
            100.0%        PCI Device: Intel Corporation HM170/QM170 Chipset SATA Controller [AHCI Mode]
            100.0%        Radio device: btusb
            100.0%        PCI Device: Intel Corporation 100 Series/C230 Series Chipset Family PCI Express Root Port #4
            100.0%        USB device: xHCI Host Controller
            100.0%        PCI Device: Intel Corporation 100 Series/C230 Series Chipset Family USB 3.0 xHCI Controller
            100.0%        PCI Device: Realtek Semiconductor Co., Ltd. RTL8111/8168/8411 PCI Express Gigabit Ethernet Controller
            100.0%        PCI Device: Intel Corporation 100 Series/C230 Series Chipset Family PCI Express Root Port #3
            100.0%        PCI Device: Samsung Electronics Co Ltd NVMe SSD Controller SM951/PM951
            100.0%        PCI Device: Intel Corporation 100 Series/C230 Series Chipset Family PCI Express Root Port #2
            100.0%        PCI Device: Intel Corporation 100 Series/C230 Series Chipset Family PCI Express Root Port #9
            100.0%        PCI Device: Intel Corporation 100 Series/C230 Series Chipset Family SMBus
             26.1 pkts/s  Network interface: wlp8s0 (iwlwifi)
              0.0%        USB device: usb-device-8087-0a2b
              0.0%        runtime-reg-dummy
              0.0%        Audio codec hwC0D2: Intel
              0.0 pkts/s  Network interface: enp9s0 (r8168)
              0.0%        PCI Device: Intel Corporation 100 Series/C230 Series Chipset Family Power Management Controller
              0.0%        PCI Device: Intel Corporation HM170 Chipset LPC/eSPI Controller
              0.0%        PCI Device: Intel Corporation Xeon E3-1200 v5/E3-1500 v5/6th Gen Core Processor PCIe Controller (x16)
              0.0%        PCI Device: Intel Corporation 100 Series/C230 Series Chipset Family MEI Controller #1
              0.0%        PCI Device: NVIDIA Corporation GM107M [GeForce GTX 960M]
              0.0%        I2C Adapter (i2c-8): nvkm-0000:01:00.0-bus-0005
              0.0%        runtime-PNP0C14:00
              0.0%        PCI Device: Intel Corporation 100 Series/C230 Series Chipset Family HD Audio Controller
              0.0%        runtime-PNP0C0C:00
              0.0%        USB device: xHCI Host Controller
              0.0%        runtime-ACPI000C:00
              0.0%        runtime-regulatory.0
              0.0%        runtime-PNP0C14:01
              0.0%        runtime-vesa-framebuffer.0
              0.0%        runtime-coretemp.0
              0.0%        runtime-alarmtimer

 Exit |  /  Navigate |    

可调整状态页

这个页面是个重要区域,可以为你的笔记本电池优化提供建议。

PowerTOP v2.9     Overview   Idle stats   Frequency stats   Device stats   Tunables                                     


>> Bad           Enable SATA link power management for host2                                                            
   Bad           Enable SATA link power management for host3
   Bad           Enable SATA link power management for host0
   Bad           Enable SATA link power management for host1
   Bad           VM writeback timeout
   Bad           Autosuspend for USB device Lenovo Wireless Optical Mouse N100 [1-2]
   Good          Bluetooth device interface status
   Good          Enable Audio codec power management
   Good          NMI watchdog should be turned off
   Good          Runtime PM for I2C Adapter i2c-7 (nvkm-0000:01:00.0-bus-0002)
   Good          Autosuspend for unknown USB device 1-11 (8087:0a2b)
   Good          Runtime PM for I2C Adapter i2c-3 (i915 gmbus dpd)
   Good          Autosuspend for USB device Lenovo EasyCamera [160709000341]
   Good          Runtime PM for I2C Adapter i2c-1 (i915 gmbus dpc)
   Good          Runtime PM for I2C Adapter i2c-12 (nvkm-0000:01:00.0-bus-0009)
   Good          Autosuspend for USB device xHCI Host Controller [usb1]
   Good          Runtime PM for I2C Adapter i2c-13 (nvkm-0000:01:00.0-aux-000a)
   Good          Runtime PM for I2C Adapter i2c-2 (i915 gmbus dpb)
   Good          Runtime PM for I2C Adapter i2c-8 (nvkm-0000:01:00.0-bus-0005)
   Good          Runtime PM for I2C Adapter i2c-15 (nvkm-0000:01:00.0-aux-000c)
   Good          Runtime PM for I2C Adapter i2c-16 (nvkm-0000:01:00.0-aux-000d)
   Good          Runtime PM for I2C Adapter i2c-5 (nvkm-0000:01:00.0-bus-0000)
   Good          Runtime PM for I2C Adapter i2c-0 (SMBus I801 adapter at 6040)
   Good          Runtime PM for I2C Adapter i2c-11 (nvkm-0000:01:00.0-bus-0008)
   Good          Runtime PM for I2C Adapter i2c-14 (nvkm-0000:01:00.0-aux-000b)
   Good          Autosuspend for USB device xHCI Host Controller [usb2]
   Good          Runtime PM for I2C Adapter i2c-9 (nvkm-0000:01:00.0-bus-0006)
   Good          Runtime PM for I2C Adapter i2c-10 (nvkm-0000:01:00.0-bus-0007)
   Good          Runtime PM for I2C Adapter i2c-6 (nvkm-0000:01:00.0-bus-0001)
   Good          Runtime PM for PCI Device Intel Corporation 100 Series/C230 Series Chipset Family HD Audio Controller
   Good          Runtime PM for PCI Device Intel Corporation 100 Series/C230 Series Chipset Family USB 3.0 xHCI Controller
   Good          Runtime PM for PCI Device Intel Corporation Xeon E3-1200 v5/E3-1500 v5/6th Gen Core Processor Host Bridge/DRAM Registers
   Good          Runtime PM for PCI Device Intel Corporation 100 Series/C230 Series Chipset Family PCI Express Root Port #9
   Good          Runtime PM for PCI Device Intel Corporation HD Graphics 530
   Good          Runtime PM for PCI Device Realtek Semiconductor Co., Ltd. RTL8111/8168/8411 PCI Express Gigabit Ethernet Controller
   Good          Runtime PM for PCI Device Intel Corporation 100 Series/C230 Series Chipset Family PCI Express Root Port #3
   Good          Runtime PM for PCI Device O2 Micro, Inc. SD/MMC Card Reader Controller
   Good          Runtime PM for PCI Device Intel Corporation HM170 Chipset LPC/eSPI Controller
   Good          Runtime PM for PCI Device Intel Corporation 100 Series/C230 Series Chipset Family MEI Controller #1
   Good          Runtime PM for PCI Device Samsung Electronics Co Ltd NVMe SSD Controller SM951/PM951
   Good          Runtime PM for PCI Device Intel Corporation HM170/QM170 Chipset SATA Controller [AHCI Mode]
   Good          Runtime PM for PCI Device Intel Corporation 100 Series/C230 Series Chipset Family Power Management Controller
   Good          Runtime PM for PCI Device Intel Corporation 100 Series/C230 Series Chipset Family PCI Express Root Port #2
   Good          Runtime PM for PCI Device Intel Corporation Wireless 8260
   Good          Runtime PM for PCI Device Intel Corporation Xeon E3-1200 v5/E3-1500 v5/6th Gen Core Processor PCIe Controller (x16)
   Good          Runtime PM for PCI Device Intel Corporation 100 Series/C230 Series Chipset Family PCI Express Root Port #4
   Good          Runtime PM for PCI Device Intel Corporation 100 Series/C230 Series Chipset Family SMBus
   Good          Runtime PM for PCI Device NVIDIA Corporation GM107M [GeForce GTX 960M]

  Exit |  Toggle tunable |  Window refresh

如何生成 PowerTop 的 HTML 报告

运行如下命令生成 PowerTop 的 HTML 报告。

$ sudo powertop --html=powertop.html
modprobe cpufreq_stats failedLoaded 100 prior measurements
Cannot load from file /var/cache/powertop/saved_parameters.powertop
File will be loaded after taking minimum number of measurement(s) with battery only
RAPL device for cpu 0
RAPL Using PowerCap Sysfs : Domain Mask f
RAPL device for cpu 0
RAPL Using PowerCap Sysfs : Domain Mask f
Devfreq not enabled
glob returned GLOB_ABORTED
Cannot load from file /var/cache/powertop/saved_parameters.powertop
File will be loaded after taking minimum number of measurement(s) with battery only
Preparing to take measurements
To show power estimates do 182 measurement(s) connected to battery only
Taking 1 measurement(s) for a duration of 20 second(s) each.
PowerTOP outputing using base filename powertop.html

打开 file:///home/daygeek/powertop.html 文件以访问生成的 PowerTOP 的 HTML 报告。

自动调整模式

这个功能可以将所有可调整选项从 BAD 设置为 GOOD,这可以提升 Linux 中的笔记本电池寿命。

$ sudo powertop --auto-tune
modprobe cpufreq_stats failedLoaded 210 prior measurements
Cannot load from file /var/cache/powertop/saved_parameters.powertop
File will be loaded after taking minimum number of measurement(s) with battery only
RAPL device for cpu 0
RAPL Using PowerCap Sysfs : Domain Mask f
RAPL device for cpu 0
RAPL Using PowerCap Sysfs : Domain Mask f
Devfreq not enabled
glob returned GLOB_ABORTED
Cannot load from file /var/cache/powertop/saved_parameters.powertop
File will be loaded after taking minimum number of measurement(s) with battery only
To show power estimates do 72 measurement(s) connected to battery only
Leaving PowerTOP

via: https://www.2daygeek.com/powertop-monitors-laptop-battery-usage-linux/

作者:Vinoth Kumar 选题:lujun9972 译者:wxy 校对:wxy

本文由 LCTT 原创编译,Linux中国 荣誉推出

我们都知道,在 Linux 上,包括设备在内的一切都是文件。Linux 管理员每天应该会多次执行文件创建活动(可能是 20 次,50 次,甚至是更多,这依赖于他们的环境)。如果你想 在Linux上创建一个特定大小的文件,查看前面的这个链接。

高效创建一个文件是非常重要的能力。为什么我说高效?如果你了解一些高效进行你当前活动的方式,你就可以事半功倍。这将会节省你很多的时间。你可以把这些有用的时间用到到其他重要的事情上。

我下面将会介绍多个在 Linux 上创建文件的方法。我建议你选择几个简单高效的来辅助你的工作。你不必安装下列的任何一个命令,因为它们已经作为 Linux 核心工具的一部分安装到你的系统上了。

创建文件可以通过以下六个方式来完成。

  • >:标准重定向符允许我们创建一个 0KB 的空文件。
  • touch:如果文件不存在的话,touch 命令将会创建一个 0KB 的空文件。
  • echo:通过一个参数显示文本的某行。
  • printf:用于显示在终端给定的文本。
  • cat:它串联并打印文件到标准输出。
  • vi/vim:Vim 是一个向上兼容 Vi 的文本编辑器。它常用于编辑各种类型的纯文本。
  • nano:是一个简小且用户友好的编辑器。它复制了 pico 的外观和优点,但它是自由软件。
  • head:用于打印一个文件开头的一部分。
  • tail:用于打印一个文件的最后一部分。
  • truncate:用于缩小或者扩展文件的尺寸到指定大小。

在 Linux 上使用重定向符(>)创建一个文件

标准重定向符允许我们创建一个 0KB 的空文件。它通常用于重定向一个命令的输出到一个新文件中。在没有命令的情况下使用重定向符号时,它会创建一个文件。

但是它不允许你在创建文件时向其中输入任何文本。然而它对于不是很勤劳的管理员是非常简单有用的。只需要输入重定向符后面跟着你想要的文件名。

$ > daygeek.txt

使用 ls 命令查看刚刚创建的文件。

$ ls -lh daygeek.txt
-rw-rw-r-- 1 daygeek daygeek 0 Feb 4 02:00 daygeek.txt

在 Linux 上使用 touch 命令创建一个文件

touch 命令常用于将每个文件的访问和修改时间更新为当前时间。

如果指定的文件名不存在,将会创建一个新的文件。touch 不允许我们在创建文件的同时向其中输入一些文本。它默认创建一个 0KB 的空文件。

$ touch daygeek1.txt

使用 ls 命令查看刚刚创建的文件。

$ ls -lh daygeek1.txt
-rw-rw-r-- 1 daygeek daygeek 0 Feb 4 02:02 daygeek1.txt

在 Linux 上使用 echo 命令创建一个文件

echo 内置于大多数的操作系统中。它常用于脚本、批处理文件,以及作为插入文本的单个命令的一部分。

它允许你在创建一个文件时就向其中输入一些文本。当然也允许你在之后向其中输入一些文本。

$ echo "2daygeek.com is a best Linux blog to learn Linux" > daygeek2.txt

使用 ls 命令查看刚刚创建的文件。

$ ls -lh daygeek2.txt
-rw-rw-r-- 1 daygeek daygeek 49 Feb 4 02:04 daygeek2.txt

可以使用 cat 命令查看文件的内容。

$ cat daygeek2.txt
2daygeek.com is a best Linux blog to learn Linux

你可以使用两个重定向符 (>>) 添加其他内容到同一个文件。

$ echo "It's FIVE years old blog" >> daygeek2.txt

你可以使用 cat 命令查看添加的内容。

$ cat daygeek2.txt
2daygeek.com is a best Linux blog to learn Linux
It's FIVE years old blog

在 Linux 上使用 printf 命令创建一个新的文件

printf 命令也可以以类似 echo 的方式执行。

printf 命令常用来显示在终端窗口给出的字符串。printf 可以有格式说明符、转义序列或普通字符。

$ printf "2daygeek.com is a best Linux blog to learn Linux\n" > daygeek3.txt

使用 ls 命令查看刚刚创建的文件。

$ ls -lh daygeek3.txt
-rw-rw-r-- 1 daygeek daygeek 48 Feb 4 02:12 daygeek3.txt

使用 cat 命令查看文件的内容。

$ cat daygeek3.txt
2daygeek.com is a best Linux blog to learn Linux

你可以使用两个重定向符 (>>) 添加其他的内容到同一个文件中去。

$ printf "It's FIVE years old blog\n" >> daygeek3.txt

你可以使用 cat 命令查看这个文件中添加的内容。

$ cat daygeek3.txt
2daygeek.com is a best Linux blog to learn Linux
It's FIVE years old blog

在 Linux 中使用 cat 创建一个文件

cat 表示 串联 concatenate 。在 Linux 经常用于读取一个文件中的数据。

cat 是在类 Unix 系统中最常使用的命令之一。它提供了三个与文本文件相关的功能:显示一个文件的内容、组合多个文件的内容到一个输出以及创建一个新的文件。(LCTT 译注:如果 cat 命令后如果不带任何文件的话,下面的命令在回车后也不会立刻结束,回车后的操作可以按 Ctrl-CCtrl-D 来结束。)

$ cat > daygeek4.txt
2daygeek.com is a best Linux blog to learn Linux
It's FIVE years old blog

使用 ls 命令查看创建的文件。

$ ls -lh daygeek4.txt
-rw-rw-r-- 1 daygeek daygeek 74 Feb 4 02:18 daygeek4.txt

使用 cat 命令查看文件的内容。

$ cat daygeek4.txt
2daygeek.com is a best Linux blog to learn Linux
It's FIVE years old blog

如果你想向同一个文件中添加其他内容,使用两个连接的重定向符(>>)。

$ cat >> daygeek4.txt
This website is maintained by Magesh M, It's licensed under CC BY-NC 4.0.

你可以使用 cat 命令查看添加的内容。

$ cat daygeek4.txt
2daygeek.com is a best Linux blog to learn Linux
It's FIVE years old blog
This website is maintained by Magesh M, It's licensed under CC BY-NC 4.0.

在 Linux 上使用 vi/vim 命令创建一个文件

vim 是一个向上兼容 vi 的文本编辑器。它通常用来编辑所有种类的纯文本。在编辑程序时特别有用。

vim 中有很多功能可以用于编辑单个文件。

$ vi daygeek5.txt

2daygeek.com is a best Linux blog to learn Linux
It's FIVE years old blog

使用 ls 查看刚才创建的文件。

$ ls -lh daygeek5.txt
-rw-rw-r-- 1 daygeek daygeek 75 Feb 4 02:23 daygeek5.txt

使用 cat 命令查看文件的内容。

$ cat daygeek5.txt
2daygeek.com is a best Linux blog to learn Linux
It's FIVE years old blog

在 Linux 上使用 nano 命令创建一个文件

nano 是一个编辑器,它是一个自由版本的 pico 克隆。nano 是一个小且用户友好的编辑器。它复制了 pico 的外观及优点,并且是一个自由软件,它添加了 pico 缺乏的一系列特性,像是打开多个文件、逐行滚动、撤销/重做、语法高亮、行号等等。

$ nano daygeek6.txt

2daygeek.com is a best Linux blog to learn Linux
It's FIVE years old blog
This website is maintained by Magesh M, It's licensed under CC BY-NC 4.0.

使用 ls 命令查看创建的文件。

$ ls -lh daygeek6.txt
-rw-rw-r-- 1 daygeek daygeek 148 Feb 4 02:26 daygeek6.txt

使用 cat 命令来查看一个文件的内容。

$ cat daygeek6.txt
2daygeek.com is a best Linux blog to learn Linux
It's FIVE years old blog
This website is maintained by Magesh M, It's licensed under CC BY-NC 4.0.

在 Linux 上使用 head 命令创建一个文件

head 命令通常用于输出一个文件开头的一部分。它默认会打印一个文件的开头 10 行到标准输出。如果有多个文件,则每个文件前都会有一个标题,用来表示文件名。

$ head -c 0K /dev/zero > daygeek7.txt

使用 ls 命令查看创建的文件。

$ ls -lh daygeek7.txt
-rw-rw-r-- 1 daygeek daygeek 0 Feb 4 02:30 daygeek7.txt

在 Linux 上使用 tail 创建一个文件

tail 命令通常用来输出一个文件最后的一部分。它默认会打印每个文件的最后 10 行到标准输出。如果有多个文件,则每个文件前都会有一个标题,用来表示文件名。

$ tail -c 0K /dev/zero > daygeek8.txt

使用 ls 命令查看创建的文件。

$ ls -lh daygeek8.txt
-rw-rw-r-- 1 daygeek daygeek 0 Feb 4 02:31 daygeek8.txt

在 Linux 上使用 truncate 命令创建一个文件

truncate 命令通常用作将一个文件的尺寸缩小或者扩展为某个指定的尺寸。

$ truncate -s 0K daygeek9.txt

使用 ls 命令检查创建的文件。

$ ls -lh daygeek9.txt
-rw-rw-r-- 1 daygeek daygeek 0 Feb 4 02:37 daygeek9.txt

在这篇文章中,我使用这十个命令分别创建了下面的这十个文件。

$ ls -lh daygeek*
-rw-rw-r-- 1 daygeek daygeek 0 Feb 4 02:02 daygeek1.txt
-rw-rw-r-- 1 daygeek daygeek 74 Feb 4 02:07 daygeek2.txt
-rw-rw-r-- 1 daygeek daygeek 74 Feb 4 02:15 daygeek3.txt
-rw-rw-r-- 1 daygeek daygeek 148 Feb 4 02:20 daygeek4.txt
-rw-rw-r-- 1 daygeek daygeek 75 Feb 4 02:23 daygeek5.txt
-rw-rw-r-- 1 daygeek daygeek 148 Feb 4 02:26 daygeek6.txt
-rw-rw-r-- 1 daygeek daygeek 148 Feb 4 02:32 daygeek7.txt
-rw-rw-r-- 1 daygeek daygeek 148 Feb 4 02:32 daygeek8.txt
-rw-rw-r-- 1 daygeek daygeek 148 Feb 4 02:38 daygeek9.txt
-rw-rw-r-- 1 daygeek daygeek 0 Feb 4 02:00 daygeek.txt

via: https://www.2daygeek.com/linux-command-to-create-a-file/

作者:Vinoth Kumar 选题:lujun9972 译者:dianbanjiu 校对:wxy

本文由 LCTT 原创编译,Linux中国 荣誉推出

Linux 本就有 scprsync 可以完美地完成这个任务。然而我们今天还是想试点新东西。同时我们也想鼓励那些使用不同的理论和新技术开发新东西的开发者。

我们也写过其他很多有关这个主题的文章,你可以点击下面的链接访问这些内容。

它们分别是 OnionShareMagic WormholeTransfer.sh 和 ffsend。

什么是 dcp?

dcp 可以在不同主机之间使用 Dat 对等网络复制文件。

dcp 被视作一个像是 scp 这样工具的替代品,而无需在主机间进行 SSH 授权。

这可以让你在两个主机间传输文件时,无需操心所述主机之间互相访问的细节,以及这些主机是否使用了 NAT。

dcp 零配置、安全、快速、且是 P2P 传输。这并不是一个商用软件,使用产生的风险将由使用者自己承担。

什么是 Dat 协议

Dat 是一个 P2P 协议,是一个致力于下一代 Web 的由社区驱动的项目。

dcp 如何工作

dcp 将会为指定的文件或者文件夹创建一个 dat 归档,并生成一个公开密钥,使用这个公开密钥可以让其他人从另外一台主机上下载上面的文件。

使用网络共享的任何数据都使用该归档的公开密钥加密,也就是说文件的接收权仅限于那些拥有该公开密钥的人。

dcp 使用案例

  • 向多个同事发送文件 —— 只需要告诉他们生成的公开密钥,然后他们就可以在他们的机器上收到对应的文件了。
  • 无需设置 SSH 授权就可以在你本地网络的两个不同物理机上同步文件。
  • 无需压缩文件并把文件上传到云端就可以轻松地发送文件。
  • 当你有 shell 授权而没有 SSH 授权时也可以复制文件到远程服务器上。
  • 在没有很好的 SSH 支持的 Linux/macOS 以及 Windows 系统之间分享文件。

如何在 Linux 上安装 NodeJS & npm?

dcp 是用 JavaScript 写成的,所以在安装 dcp 前,需要先安装 NodeJS。在 Linux 上使用下面的命令安装 NodeJS。

Fedora 系统,使用 DNF 命令 安装 NodeJS & npm。

$ sudo dnf install nodejs npm

Debian/Ubuntu 系统,使用 APT-GET 命令 或者 APT 命令 安装 NodeJS & npm。

$ sudo apt install nodejs npm

Arch Linux 系统,使用 Pacman 命令 安装 NodeJS & npm。

$ sudo pacman -S nodejs npm

RHEL/CentOS 系统,使用 YUM 命令 安装 NodeJS & npm。

$ sudo yum install epel-release
$ sudo yum install nodejs npm

openSUSE Leap 系统,使用 Zypper 命令 安装 NodeJS & npm。

$ sudo zypper nodejs6

如何在 Linux 上安装 dcp?

在安装好 NodeJS 后,使用下面的 npm 命令安装 dcp

npm 是一个 JavaScript 的包管理器。它是 JavaScript 的运行环境 Node.js 的默认包管理器。

# npm i -g dat-cp

如何通过 dcp 发送文件?

dcp 命令后跟你想要传输的文件或者文件夹。而且无需注明目标机器的名字。

# dcp [File Name Which You Want To Transfer]

在你运行 dcp 命令时将会为传送的文件生成一个 dat 归档。一旦执行完成将会在页面底部生成一个公开密钥。(LCTT 译注:此处并非非对称加密中的公钥/私钥对,而是一种公开的密钥,属于对称加密。)

如何通过 dcp 接收文件

在远程服务器上输入公开密钥即可接收对应的文件或者文件夹。

# dcp [Public Key]

以递归形式复制目录。

# dcp [Folder Name Which You Want To Transfer] -r

下面这个例子我们将会传输单个文件。

上述文件传输的输出。

如果你想传输不止一个文件,使用下面的格式。

上述文件传输的输出。

递归复制文件夹。

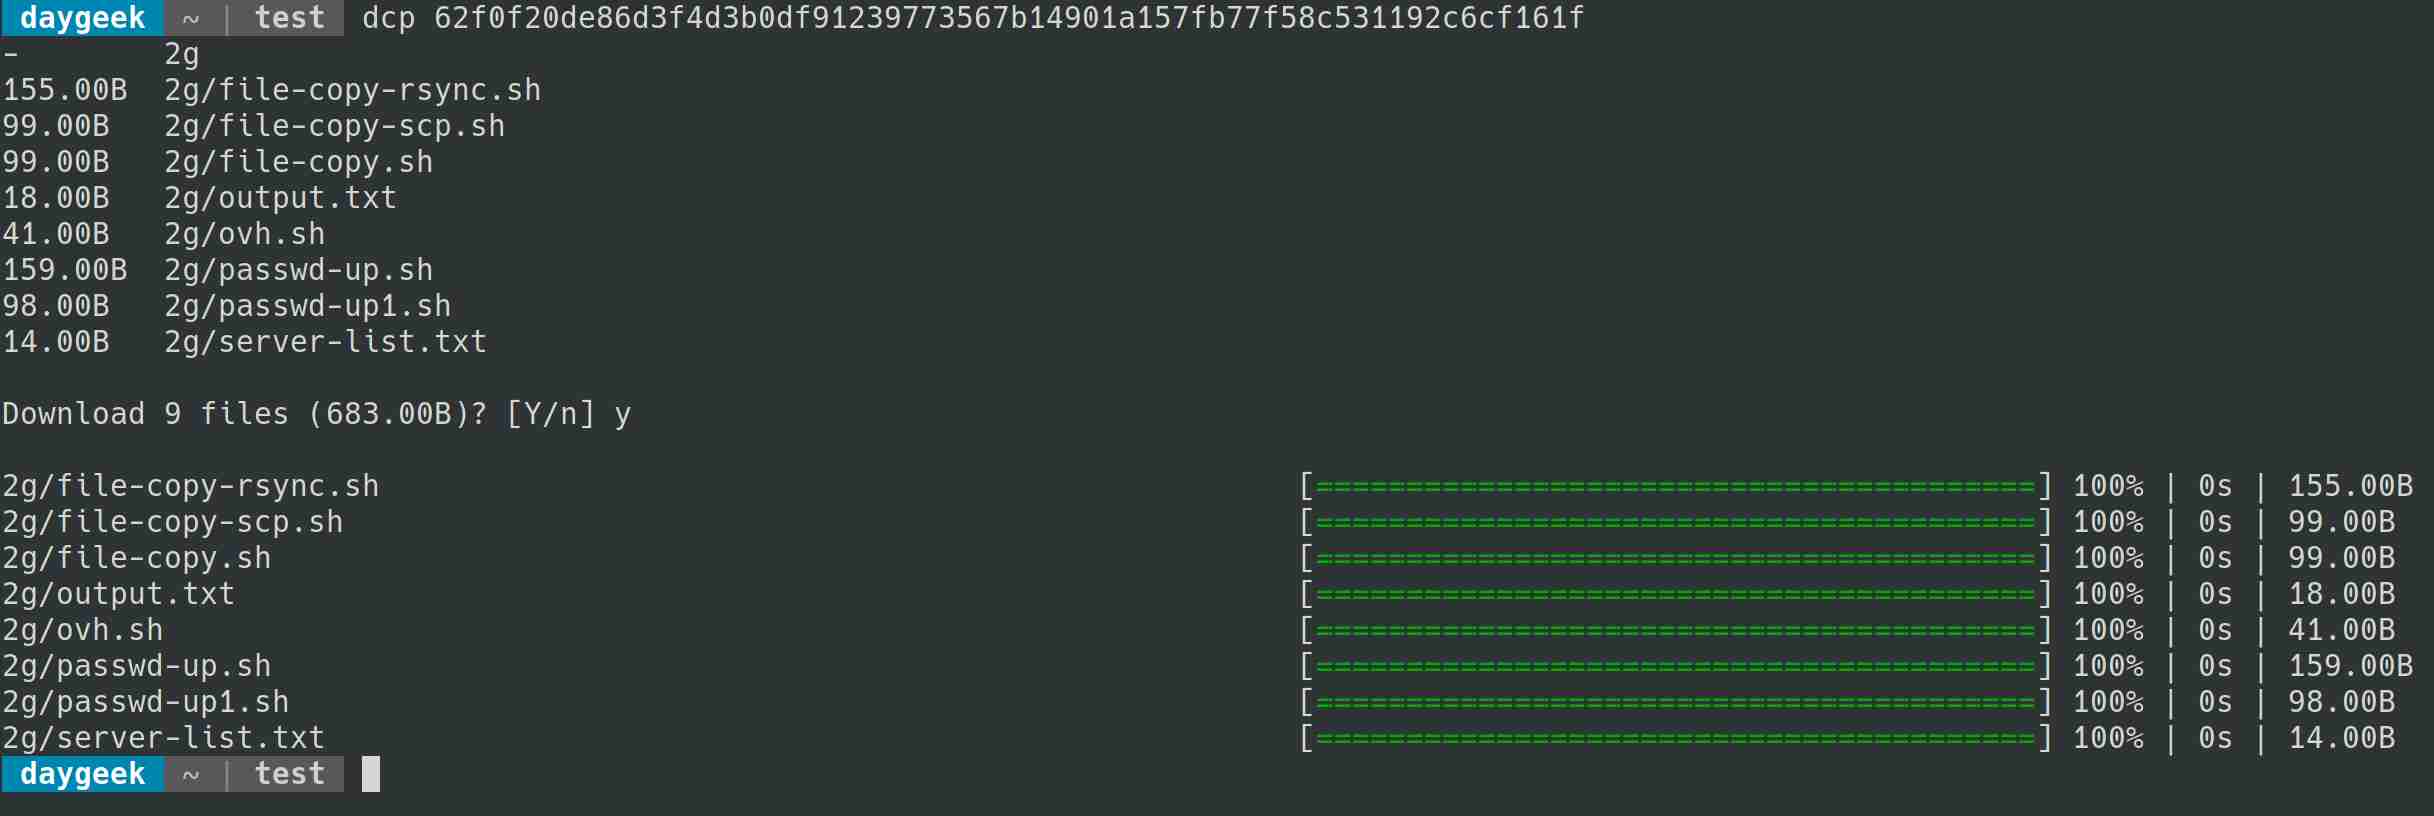
上述文件夹传输的输出。

这种方式下你只能够下载一次文件或者文件夹,不可以多次下载。这也就意味着一旦你下载了这些文件或者文件夹,这个链接就会立即失效。

也可以在手册页查看更多的相关选项。

# dcp --help

via: https://www.2daygeek.com/dcp-dat-copy-secure-way-to-transfer-files-between-linux-systems/

作者:Vinoth Kumar 选题:lujun9972 译者:dianbanjiu 校对:wxy

本文由 LCTT 原创编译,Linux中国 荣誉推出