Prakash Subramanian 发布的文章

一般每个 Linux 管理员都会使用 lm\_sensors 监控 CPU 温度。lm\_sensors (Linux 监控传感器)是一个自由开源程序,它提供了监控温度、电压和风扇的驱动和工具。

如果你正在找替代的 CLI 工具,我会建议你尝试 s-tui。

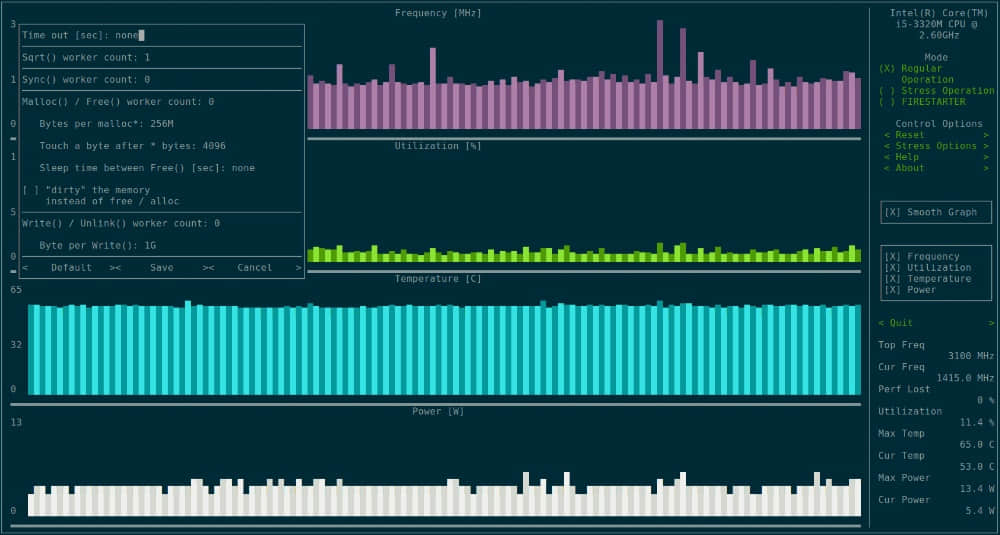
它其实是一个压力测试的终端 UI,可以帮助管理员通过颜色查看 CPU 温度。

s-tui 是什么

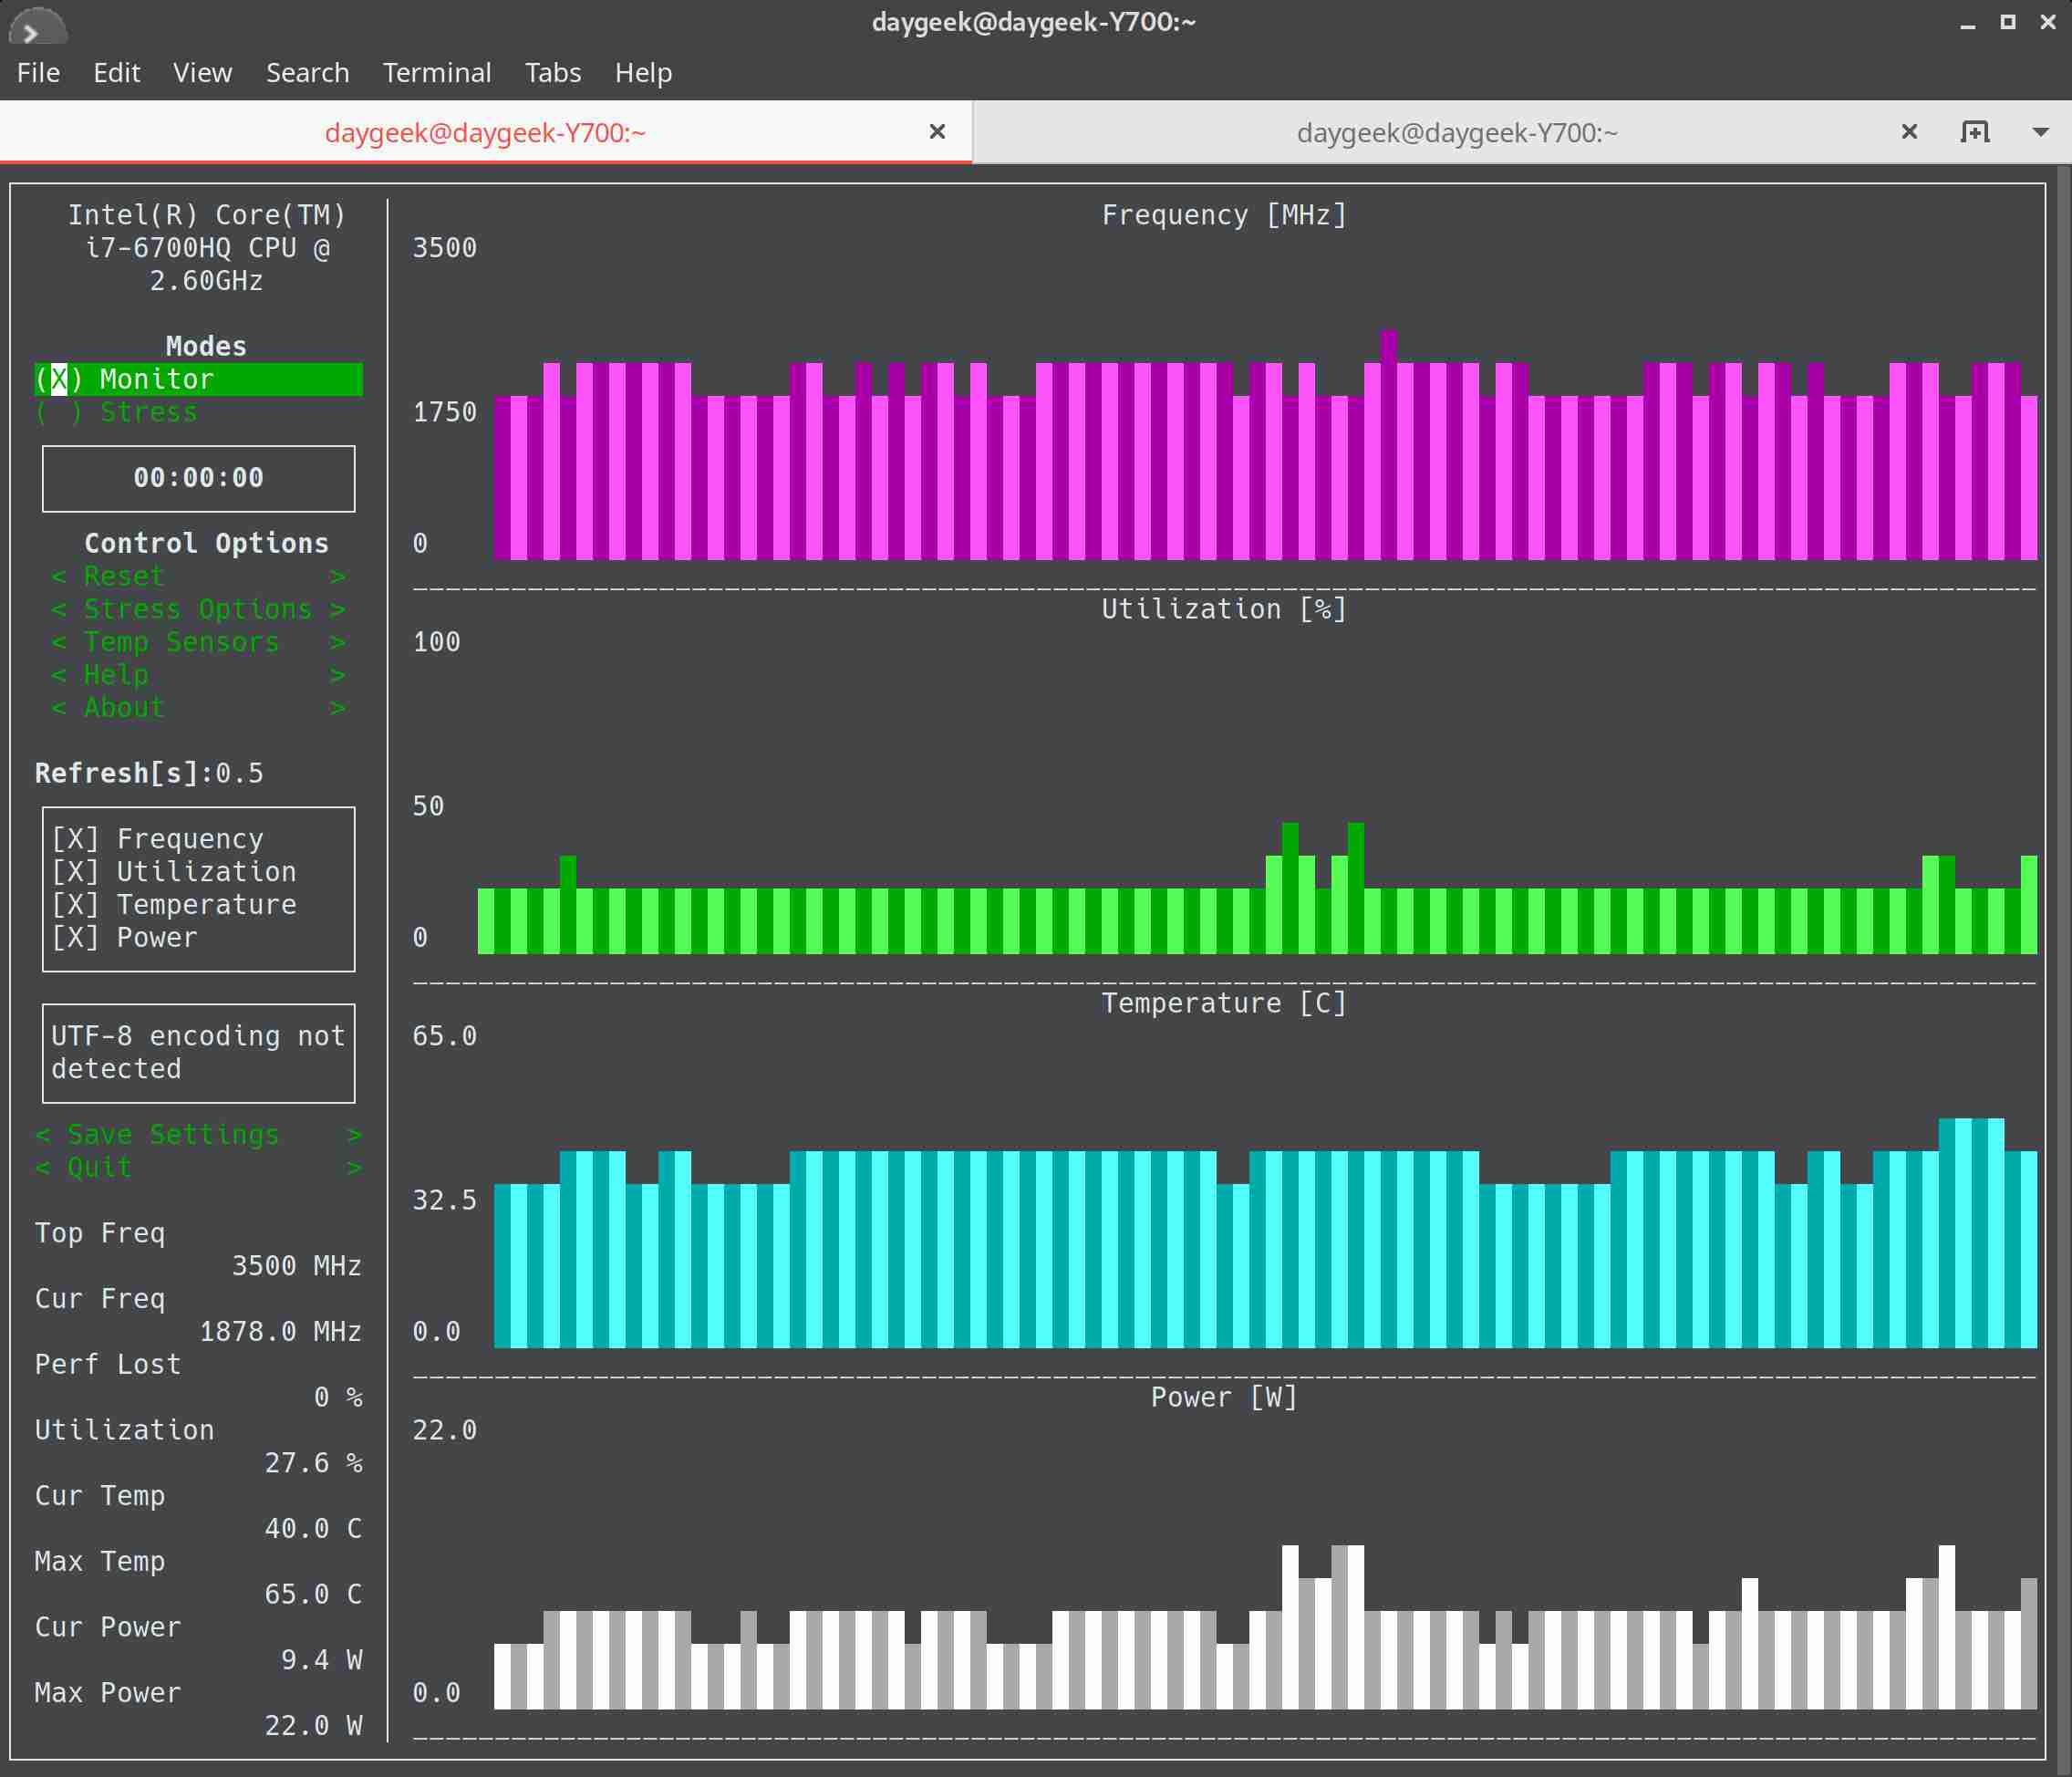
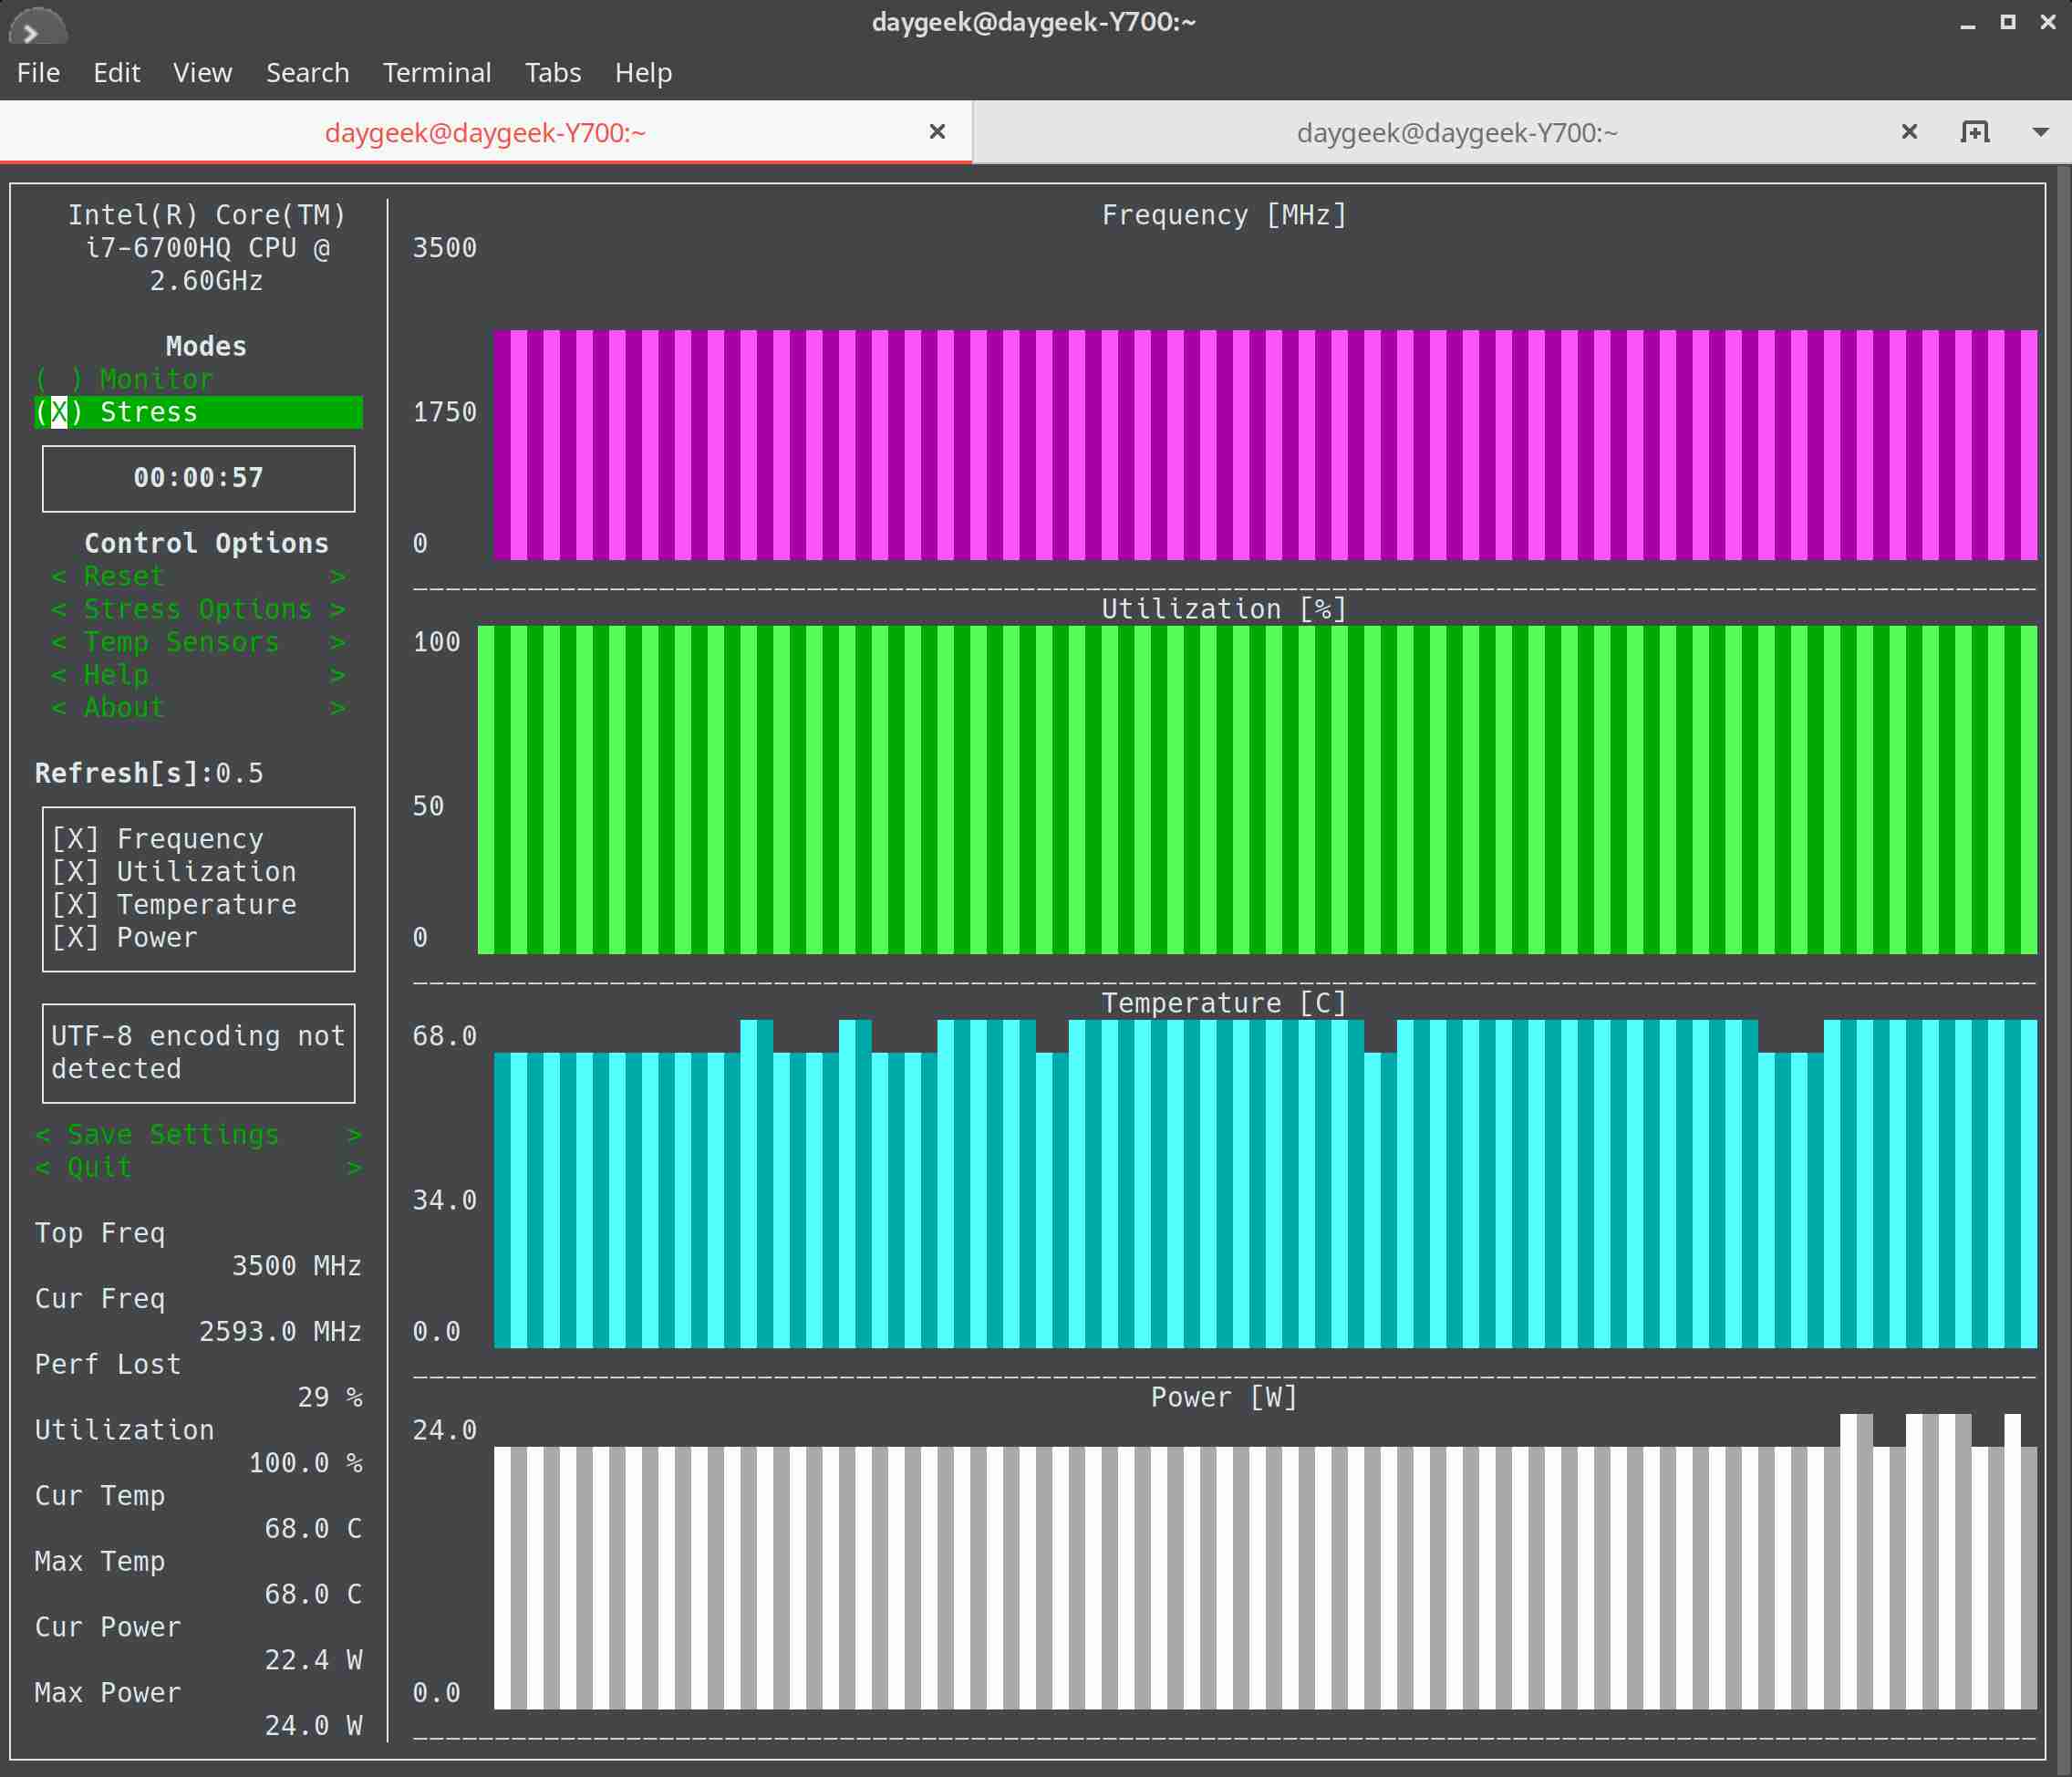
s-tui 是一个用于监控计算机的终端 UI。s-tui 可以在终端以图形方式监控 CPU 温度、频率、功率和使用率。此外,它还显示由发热量限制引起的性能下降,它需要很少的资源并且不需要 X 服务器。它是用 Python 编写的,需要 root 权限才能使用它。

s-tui 是一个独立的程序,可以开箱即用,并且不需要配置文件就可以使用其基本功能。

s-tui 使用 psutil 来探测你的一些硬件信息。如果不支持你的一些硬件,你可能看不到所有信息。

以 root 身份运行 s-tui 时,当压测所有 CPU 核心时,可以将 CPU 发挥到最大睿频频率。它在后台使用 Stress 压力测试工具,通过对系统施加某些类型的计算压力来检查其组件的温度是否超过其可接受的范围。只要计算机稳定并且其组件的温度不超过其可接受的范围,PC 超频就没问题。有几个程序可以通过压力测试得到系统的稳定性,从而评估超频水平。

如何在 Linux 中安装 s-tui

它是用 Python 写的,pip 是在 Linux 上安装 s-tui 的推荐方法。确保你在系统上安装了 python-pip 软件包。如果还没有,请使用以下命令进行安装。

对于 Debian/Ubuntu 用户,使用 apt 命令apt-get 命令 来安装 pip

$ sudo apt install python-pip stress

对于 Archlinux 用户,使用 pacman 命令 来安装 pip

$ sudo pacman -S python-pip stress

对于 Fedora 用户,使用 dnf 命令 来安装 pip

$ sudo dnf install python-pip stress

对于 CentOS/RHEL 用户,使用 yum 命令 来安装 pip

$ sudo yum install python-pip stress

对于 openSUSE 用户,使用 zypper 命令 来安装 pip

$ sudo zypper install python-pip stress

最后运行下面的 pip 命令 在 Linux 中安装 s-tui 工具。

对于 Python 2.x:

$ sudo pip install s-tui

对于Python 3.x:

$ sudo pip3 install s-tui

如何使用 s-tui

正如我在文章开头所说的那样。它需要 root 权限才能从系统获取所有信息。只需运行以下命令即可启动 s-tui。

$ sudo s-tui

默认情况下,它启用硬件监控并选择 “Stress” 选项以对系统执行压力测试。

要查看其他选项,请到帮助页面查看。

$ s-tui --help

via: https://www.2daygeek.com/s-tui-stress-terminal-ui-monitor-linux-cpu-temperature-frequency/

作者:Prakash Subramanian 选题:lujun9972 译者:geekpi 校对:wxy

本文由 LCTT 原创编译,Linux中国 荣誉推出

Rust 通常被称为 rust-lang。Rust 是一个由 Mozilla Research 赞助的通用的、多范式、现代的、跨平台和开源系统编程语言。

它旨在实现安全性、速度和并发性等目标。

Rust 在语法上与 C++ 相似,但它的设计者希望它在保持性能的同时提供更好的内存安全性。

Rust 目前在许多组织中使用,例如 Firefox、Chef、Dropbox、Oracle、GNOME 等。

如何在 Linux 中安装 Rust 语言?

我们可以通过多种方式安装 Rust,但以下是官方推荐的安装方式。

$ curl https://sh.rustup.rs -sSf | sh
info: downloading installer

Welcome to Rust!

This will download and install the official compiler for the Rust programming 
language, and its package manager, Cargo.

It will add the cargo, rustc, rustup and other commands to Cargo's bin 
directory, located at:

  /home/daygeek/.cargo/bin

This path will then be added to your PATH environment variable by modifying the
profile files located at:

  /home/daygeek/.profile
  /home/daygeek/.bash_profile

You can uninstall at any time with rustup self uninstall and these changes will
be reverted.

Current installation options:

   default host triple: x86_64-unknown-linux-gnu
     default toolchain: stable
  modify PATH variable: yes

1) Proceed with installation (default)
2) Customize installation
3) Cancel installation
>1

info: syncing channel updates for 'stable-x86_64-unknown-linux-gnu'
info: latest update on 2018-12-06, rust version 1.31.0 (abe02cefd 2018-12-04)
info: downloading component 'rustc'
 77.7 MiB /  77.7 MiB (100 %)   1.2 MiB/s ETA:   0 s                
info: downloading component 'rust-std'
 54.2 MiB /  54.2 MiB (100 %)   1.2 MiB/s ETA:   0 s                
info: downloading component 'cargo'
  4.7 MiB /   4.7 MiB (100 %)   1.2 MiB/s ETA:   0 s                
info: downloading component 'rust-docs'
  8.5 MiB /   8.5 MiB (100 %)   1.2 MiB/s ETA:   0 s                
info: installing component 'rustc'
info: installing component 'rust-std'
info: installing component 'cargo'
info: installing component 'rust-docs'
info: default toolchain set to 'stable'

  stable installed - rustc 1.31.0 (abe02cefd 2018-12-04)


Rust is installed now. Great!

To get started you need Cargo's bin directory ($HOME/.cargo/bin) in your PATH 
environment variable. Next time you log in this will be done automatically.

To configure your current shell run source $HOME/.cargo/env

运行以下命令配置当前 shell。

$ source $HOME/.cargo/env

运行以下命令验证已安装的 Rust 版本。

$ rustc --version
rustc 1.31.0 (abe02cefd 2018-12-04)

如何测试 Rust 编程语言?

安装 Rust 后,请按照以下步骤检查 Rust 语言是否正常工作。

$ mkdir ~/projects
$ cd ~/projects
$ mkdir hello_world
$ cd hello_world

创建一个文件并添加以下代码并保存。确保 Rust 文件始终以 .rs 扩展名结尾。

$ vi 2g.rs

fn main() {
 println!("Hello, It's 2DayGeek.com - Best Linux Practical Blog!");
}

运行以下命令编译 rust 代码。

$ rustc 2g.rs

上面的命令将在同一目录中创建一个可执行的 Rust 程序。

$ ls -lh
total 3.9M
-rwxr-xr-x 1 daygeek daygeek 3.9M Dec 14 11:09 2g
-rw-r--r-- 1 daygeek daygeek 86 Dec 14 11:09 2g.rs

运行 Rust 可执行文件得到输出。

$ ./2g
Hello, It's 2DayGeek.com - Best Linux Practical Blog!

好了!正常工作了。

将 Rust 更新到最新版本。

$ rustup update
info: syncing channel updates for 'stable-x86_64-unknown-linux-gnu'
info: checking for self-updates

  stable-x86_64-unknown-linux-gnu unchanged - rustc 1.31.0 (abe02cefd 2018-12-04)

运行以下命令从系统中删除 Rust 包。

$ rustup self uninstall

卸载 Rust 包后,删除 Rust 项目目录。

$ rm -fr ~/projects

via: https://www.2daygeek.com/how-to-install-rust-programming-language-in-linux/

作者:Prakash Subramanian 选题:lujun9972 译者:geekpi 校对:wxy

本文由 LCTT 原创编译,Linux中国 荣誉推出

Linux 管理员一天都不能离开搜索文件,因为这是他们的日常活动。了解一些搜索的东西是不错的,因为这能帮助你在命令行服务器中工作。这些命令记忆起来不复杂,因为它们使用的是标准语法。

可以通过四个 Linux 命令啦执行此操作,每个命令都有自己独特的功能。

方法 1:使用 find 命令在 Linux 中搜索文件和文件夹

find 命令被广泛使用,并且是在 Linux 中搜索文件和文件夹的著名命令。它搜索当前目录中的给定文件,并根据搜索条件递归遍历其子目录。

它允许用户根据大小、名称、所有者、组、类型、权限、日期和其他条件执行所有类型的文件搜索。

运行以下命令以在系统中查找给定文件。

# find / -iname "sshd_config"
/etc/ssh/sshd_config

运行以下命令以查找系统中的给定文件夹。要在 Linux 中搜索文件夹,我们需要使用 -type 参数。

# find / -type d -iname "ssh"
/usr/lib/ssh
/usr/lib/go/src/cmd/vendor/golang.org/x/crypto/ssh
/usr/lib/go/pkg/linux_amd64/cmd/vendor/golang.org/x/crypto/ssh
/etc/ssh

使用通配符搜索系统上的所有文件。我们将搜索系统中所有以 .config 为扩展名的文件。

# find / -name "*.config"
/usr/lib/mono/gac/avahi-sharp/1.0.0.0__4d116c78973743f5/avahi-sharp.dll.config
/usr/lib/mono/gac/avahi-ui-sharp/0.0.0.0__4d116c78973743f5/avahi-ui-sharp.dll.config
/usr/lib/python2.7/config/Setup.config
/usr/share/git/mw-to-git/t/test.config
/var/lib/lightdm/.config
/home/daygeek/.config
/root/.config
/etc/skel/.config

使用以下命令格式在系统中查找空文件和文件夹。

# find / -empty

使用以下命令组合查找 Linux 上包含特定文本的所有文件。

# find / -type f -exec grep "Port 22" '{}' \; -print
# find / -type f -print | xargs grep "Port 22"
# find / -type f | xargs grep 'Port 22'
# find / -type f -exec grep -H 'Port 22' {} \;

方法 2:使用 locate 命令在 Linux 中搜索文件和文件夹

locate 命令比 find 命令运行得更快,因为它使用 updatedb 数据库,而 find 命令在真实系统中搜索。

它使用数据库而不是搜索单个目录路径来获取给定文件。

locate 命令未在大多数发行版中预安装,因此,请使用你的包管理器进行安装。

数据库通过 cron 任务定期更新,但我们可以通过运行以下命令手动更新它。

$ sudo updatedb

只需运行以下命令即可列出给定的文件或文件夹。在 locate 命令中不需要指定特定选项来打印文件或文件夹。

在系统中搜索 ssh 文件夹。

# locate --basename '\ssh'
/etc/ssh
/usr/bin/ssh
/usr/lib/ssh
/usr/lib/go/pkg/linux_amd64/cmd/vendor/golang.org/x/crypto/ssh
/usr/lib/go/src/cmd/go/testdata/failssh/ssh
/usr/lib/go/src/cmd/vendor/golang.org/x/crypto/ssh

在系统中搜索 ssh_config 文件。

# locate --basename '\sshd_config'
/etc/ssh/sshd_config

方法 3:在 Linux 中搜索文件使用 which 命令

which 返回在终端输入命令时执行的可执行文件的完整路径。

当你想要为可执行文件创建桌面快捷方式或符号链接时,它非常有用。

which 命令搜索当前用户而不是所有用户的 $PATH 环境变量中列出的目录。我的意思是,当你登录自己的帐户时,你无法搜索 root 用户文件或目录。

运行以下命令以打印 vim 可执行文件的完整路径。

# which vi
/usr/bin/vi

或者,它允许用户一次执行多个文件搜索。

# which -a vi sudo
/usr/bin/vi
/bin/vi
/usr/bin/sudo
/bin/sudo

方法 4:使用 whereis 命令在 Linux 中搜索文件

whereis 命令用于搜索给定命令的二进制、源码和手册页文件。

# whereis vi
vi: /usr/bin/vi /usr/share/man/man1/vi.1p.gz /usr/share/man/man1/vi.1.gz

via: https://www.2daygeek.com/four-easy-ways-to-search-or-find-files-and-folders-in-linux/

作者:Prakash Subramanian 选题:lujun9972 译者:geekpi 校对:wxy

本文由 LCTT 原创编译,Linux中国 荣誉推出

如果你想了解 Linux,首先要做的是在你的系统上安装 Linux 系统。

它可以通过两种方式实现,使用 Virtualbox、VMWare 等虚拟化应用,或者在你的系统上安装 Linux。

如果你倾向于从 Windows 系统迁移到 Linux 系统或计划在备用机上安装 Linux 系统,那么你须为此创建可启动的 USB 盘。

我们已经写过许多在 Linux 上创建可启动 USB 盘 的文章,如 BootISOEtcherdd 命令,但我们从来没有机会写一篇文章关于在 Windows 中创建 Linux 可启动 USB 盘的文章。不管怎样,我们今天有机会做这件事了。

在本文中,我们将向你展示如何从 Windows 10 创建可启动的 Ubuntu USB 盘。

这些步骤也适用于其他 Linux,但你必须从下拉列表中选择相应的操作系统而不是 Ubuntu。

步骤 1:下载 Ubuntu ISO

访问 Ubuntu 发布 页面并下载最新版本。我想建议你下载最新的 LTS 版而不是普通的发布。

通过 MD5 或 SHA256 验证校验和,确保下载了正确的 ISO。输出值应与 Ubuntu 版本页面值匹配。

步骤 2:下载 Universal USB Installer

有许多程序可供使用,但我的首选是 Universal USB Installer,它使用起来非常简单。只需访问 Universal USB Installer 页面并下载该程序即可。

步骤3:创建可启动的 Ubuntu ISO

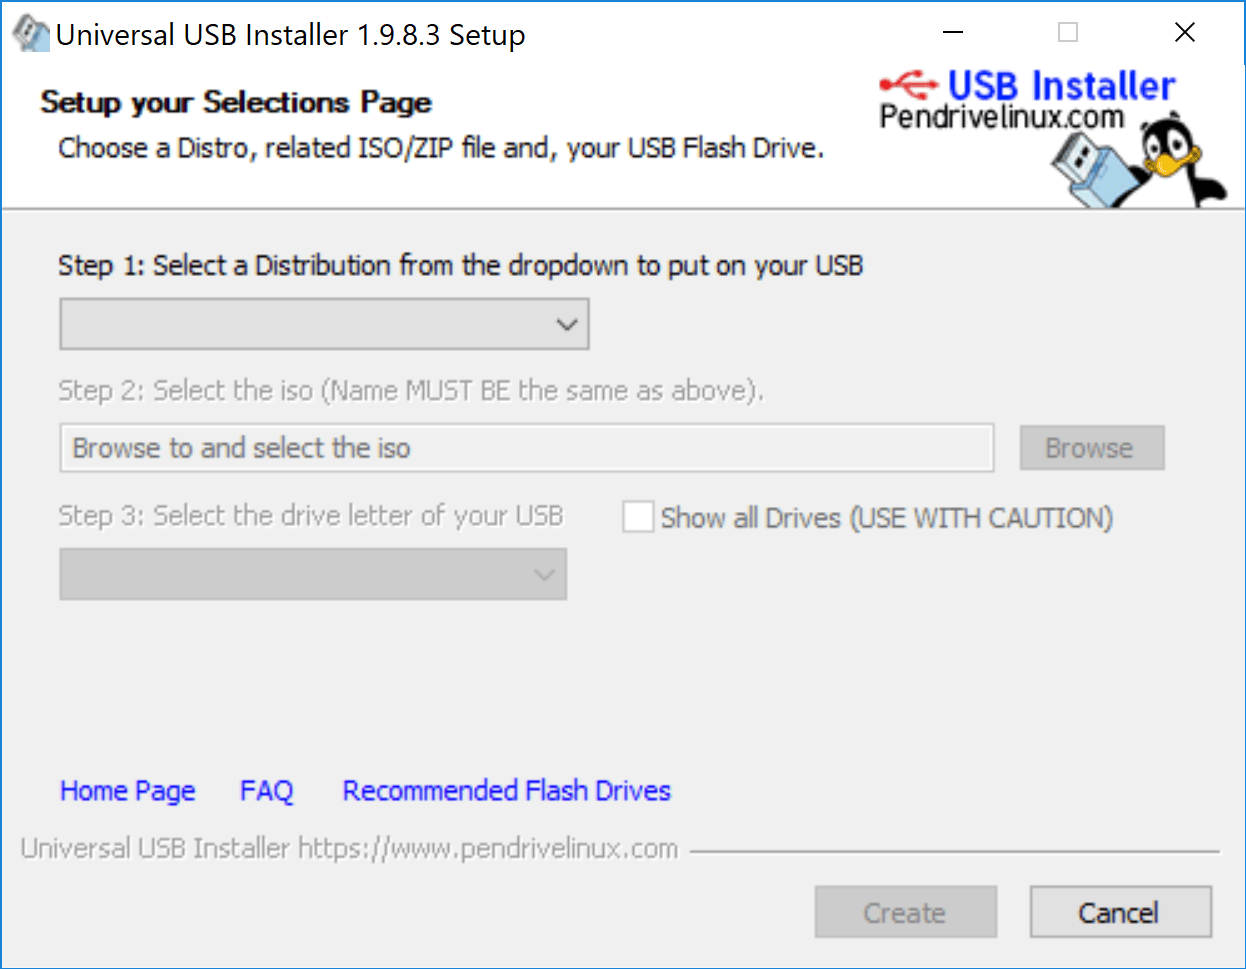
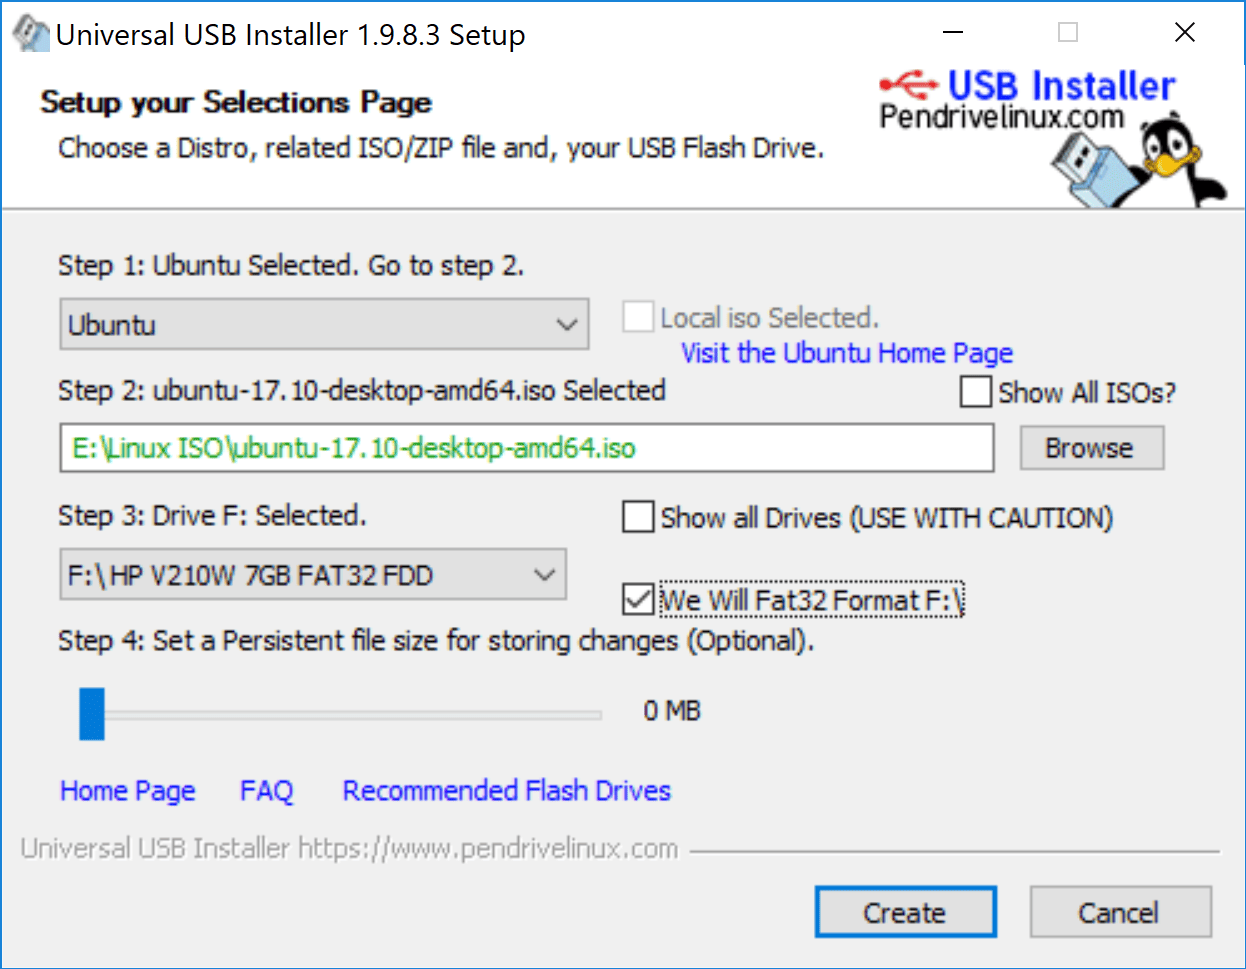
这个程序在使用上不复杂。首先连接 USB 盘,然后点击下载的 Universal USB Installer。启动后,你可以看到类似于我们的界面。

  • 步骤 1:选择 Ubuntu 系统。
  • 步骤 2:选择 Ubuntu ISO 下载位置。
  • 步骤 3:它默认选择的是 USB 盘,但是要验证一下,接着勾选格式化选项。

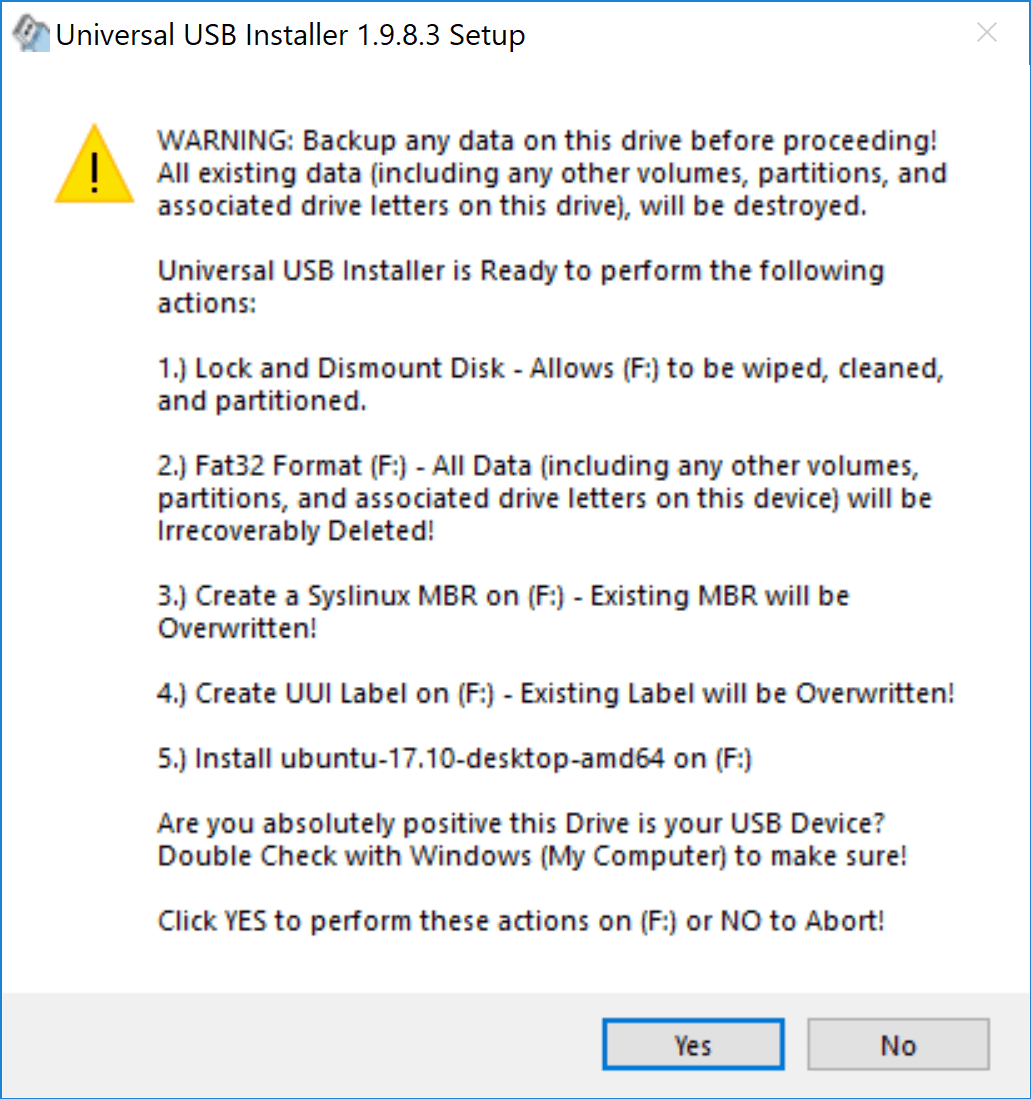
当你点击 “Create” 按钮时,它会弹出一个带有警告的窗口。不用担心,只需点击 “Yes” 继续进行此操作即可。

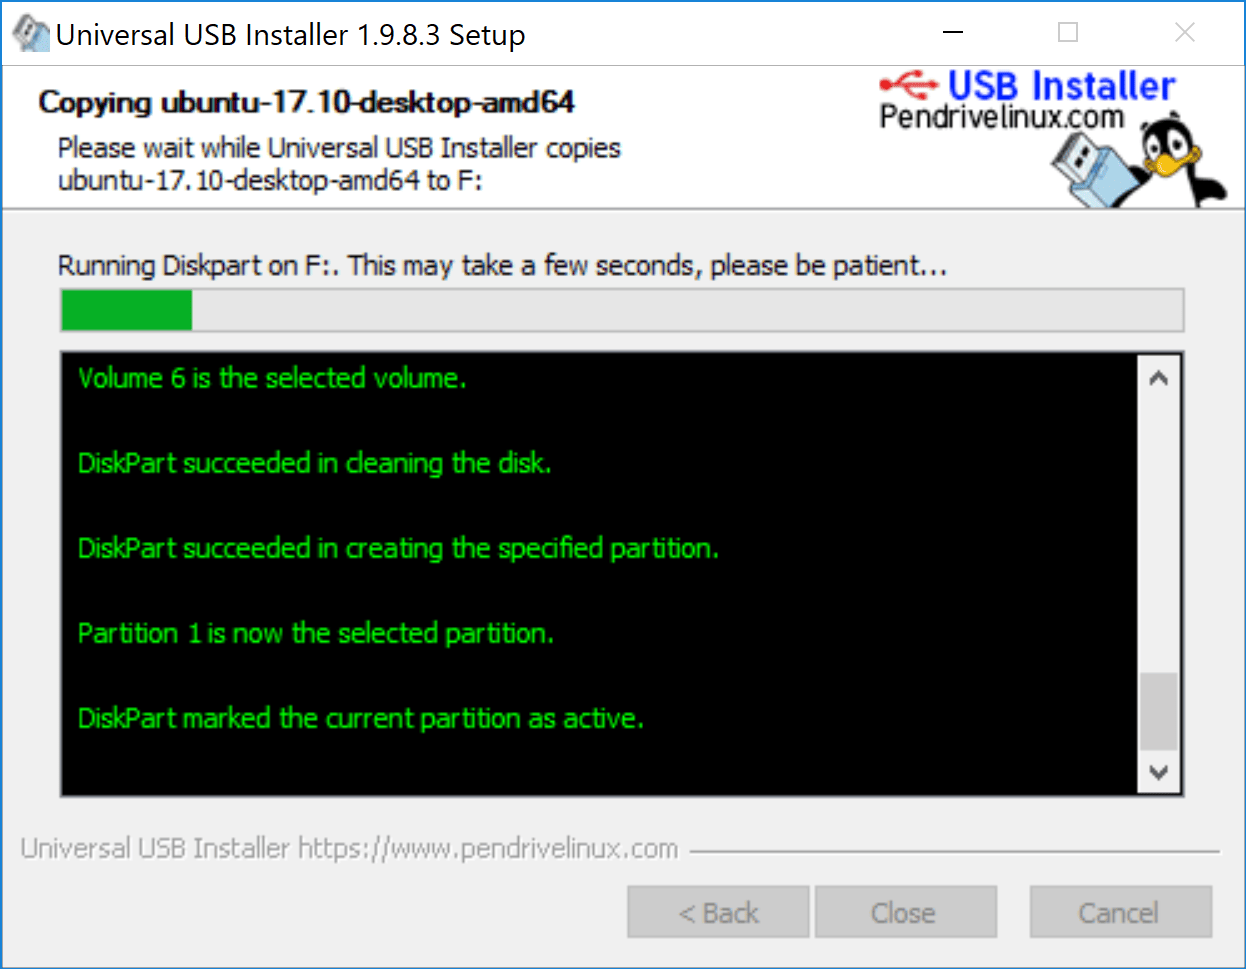
USB 盘分区正在进行中。

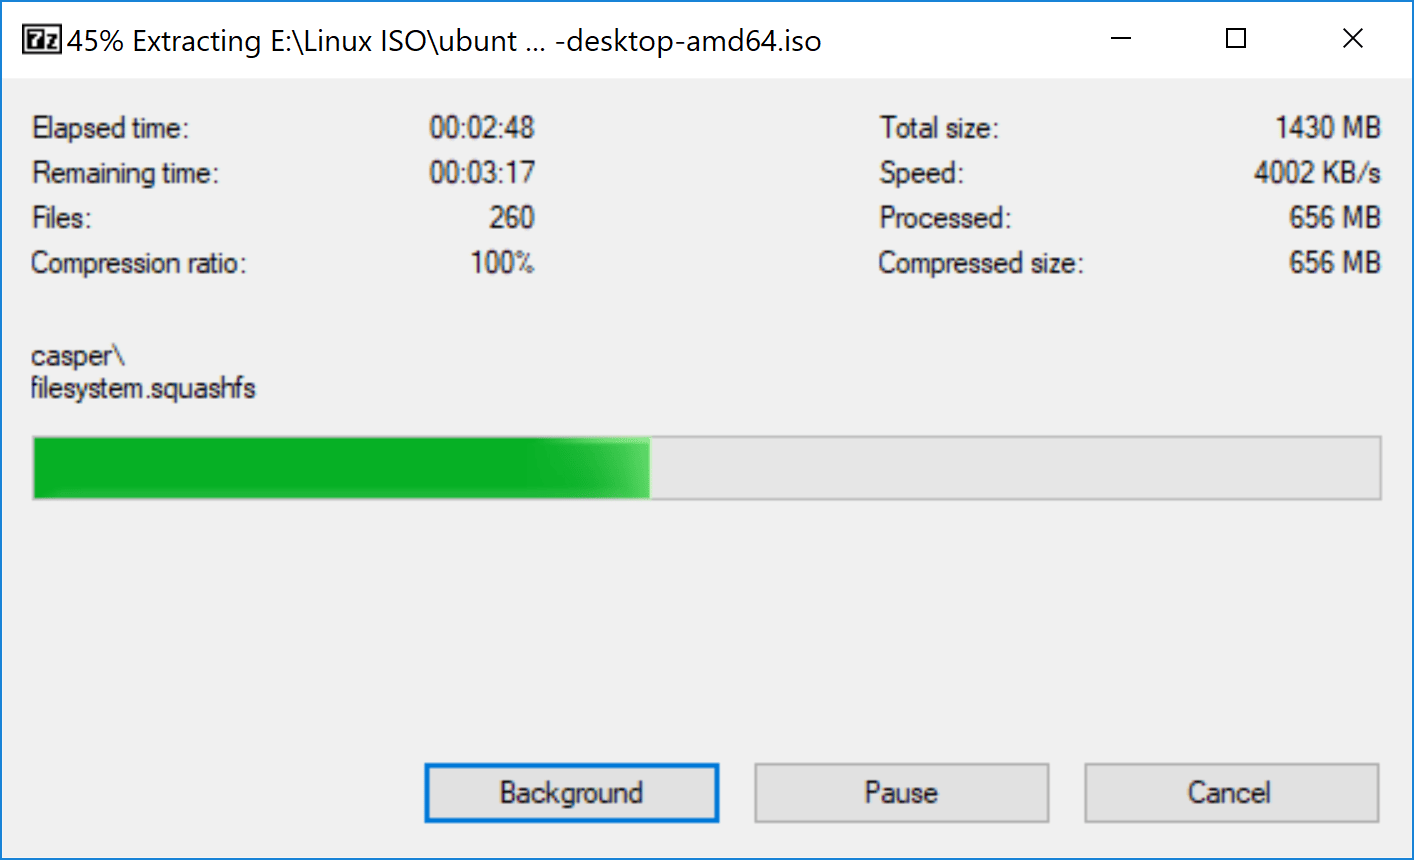
要等待一会儿才能完成。如你您想将它移至后台,你可以点击 “Background” 按钮。

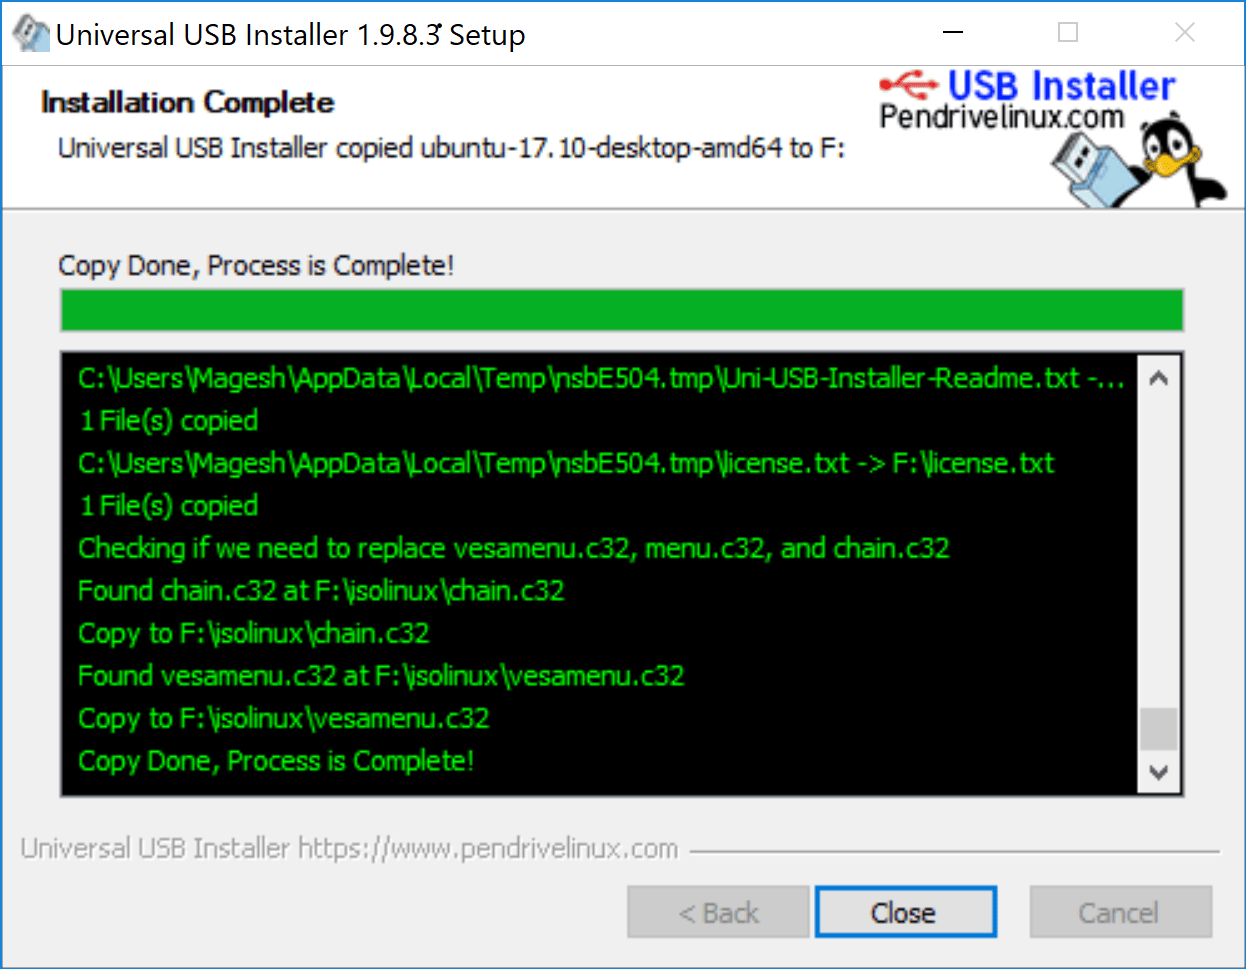
好了,完成了。

现在你可以进行安装 Ubuntu 系统了。但是,它也提供了一个 live 模式,如果你想在安装之前尝试,那么可以使用它。


via: https://www.2daygeek.com/create-a-bootable-live-usb-drive-from-windows-using-universal-usb-installer/

作者:Prakash Subramanian 选题:lujun9972 译者:geekpi 校对:wxy

本文由 LCTT 原创编译,Linux中国 荣誉推出

有时候你可能想知道安装的软件包来自于哪个仓库。这将帮助你在遇到包冲突问题时进行故障排除。因为第三方仓库拥有最新版本的软件包,所以有时候当你试图安装一些包的时候会出现兼容性的问题。在 Linux 上一切都是可能的,因为你可以安装一个即使在你的发行版系统上不能使用的包。你也可以安装一个最新版本的包,即使你的发行版系统仓库还没有这个版本,怎么做到的呢?这就是为什么出现了第三方仓库。它们允许用户从库中安装所有可用的包。

几乎所有的发行版系统都允许第三方软件库。一些发行版还会官方推荐一些不会取代基础仓库的第三方仓库,例如 CentOS 官方推荐安装 EPEL 库

下面是常用的仓库列表和它们的详细信息。

  • CentOS: EPELELRepo 等是 Centos 社区认证仓库
  • Fedora: RPMfusion 仓库 是经常被很多 Fedora 用户使用的仓库。
  • ArchLinux: ArchLinux 社区仓库包含了来自于 Arch 用户仓库的可信用户审核通过的软件包。
  • openSUSE: Packman 仓库 为 openSUSE 提供了各种附加的软件包,特别是但不限于那些在 openSUSE Build Service 应用黑名单上的与多媒体相关的应用和库。它是 openSUSE 软件包的最大外部软件库。
  • Ubuntu:个人软件包归档(PPA)是一种软件仓库。开发者们可以创建这种仓库来分发他们的软件。你可以在 PPA 导航页面找到相关信息。同时,你也可以启用 Cananical 合作伙伴软件仓库。

仓库是什么?

软件仓库是存储特定的应用程序的软件包的集中场所。

所有的 Linux 发行版都在维护他们自己的仓库,并允许用户在他们的机器上获取和安装包。

每个厂商都提供了各自的包管理工具来管理它们的仓库,例如搜索、安装、更新、升级、删除等等。

除了 RHEL 和 SUSE 以外大部分 Linux 发行版都是自由软件。要访问付费的仓库,你需要购买其订阅服务。

为什么我们需要启用第三方仓库?

在 Linux 里,并不建议从源代码安装包,因为这样做可能会在升级软件和系统的时候产生很多问题,这也是为什么我们建议从库中安装包而不是从源代码安装。

在 RHEL/CentOS 系统上我们如何得知安装的软件包来自哪个仓库?

这可以通过很多方法实现。我们会给你所有可能的选择,你可以选择一个对你来说最合适的。

方法-1:使用 yum 命令

RHEL 和 CentOS 系统使用 RPM 包,因此我们能够使用 Yum 包管理器 来获得信息。

YUM 即 “Yellodog Updater, Modified” 是适用于基于 RPM 的系统例如 RHEL 和 CentOS 的一个开源命令行前端包管理工具。

yum 是从发行版仓库和其他第三方库中获取、安装、删除、查询和管理 RPM 包的一个主要工具。

# yum info apachetop
Loaded plugins: fastestmirror
Loading mirror speeds from cached hostfile
 * epel: epel.mirror.constant.com
Installed Packages
Name        : apachetop
Arch        : x86_64
Version     : 0.15.6
Release     : 1.el7
Size        : 65 k
Repo        : installed
From repo   : epel
Summary     : A top-like display of Apache logs
URL         : https://github.com/tessus/apachetop
License     : BSD
Description : ApacheTop watches a logfile generated by Apache (in standard common or
            : combined logformat, although it doesn't (yet) make use of any of the extra
            : fields in combined) and generates human-parsable output in realtime.

apachetop 包来自 EPEL 仓库。

方法-2:使用 yumdb 命令

yumdb info 提供了类似于 yum info 的信息但是它又提供了包校验和数据、类型、用户信息(谁安装的软件包)。从 yum 3.2.26 开始,yum 已经开始在 rpmdatabase 之外存储额外的信息(user 表示软件是用户安装的,dep 表示它是作为依赖项引入的)。

# yumdb info lighttpd
Loaded plugins: fastestmirror
lighttpd-1.4.50-1.el7.x86_64
     checksum_data = a24d18102ed40148cfcc965310a516050ed437d728eeeefb23709486783a4d37
     checksum_type = sha256
     command_line = --enablerepo=epel install lighttpd apachetop aria2 atop axel
     from_repo = epel
     from_repo_revision = 1540756729
     from_repo_timestamp = 1540757483
     installed_by = 0
     origin_url = https://epel.mirror.constant.com/7/x86_64/Packages/l/lighttpd-1.4.50-1.el7.x86_64.rpm
     reason = user
     releasever = 7
     var_contentdir = centos
     var_infra = stock
     var_uuid = ce328b07-9c0a-4765-b2ad-59d96a257dc8

lighttpd 包来自 EPEL 仓库。

方法-3:使用 rpm 命令

RPM 命令 即 “Red Hat Package Manager” 是一个适用于基于 Red Hat 的系统(例如 RHEL、CentOS、Fedora、openSUSE & Mageia)的强大的命令行包管理工具。

这个工具允许你在你的 Linux 系统/服务器上安装、更新、移除、查询和验证软件。RPM 文件具有 .rpm 后缀名。RPM 包是用必需的库和依赖关系构建的,不会与系统上安装的其他包冲突。

# rpm -qi apachetop
Name        : apachetop
Version     : 0.15.6
Release     : 1.el7
Architecture: x86_64
Install Date: Mon 29 Oct 2018 06:47:49 AM EDT
Group       : Applications/Internet
Size        : 67020
License     : BSD
Signature   : RSA/SHA256, Mon 22 Jun 2015 09:30:26 AM EDT, Key ID 6a2faea2352c64e5
Source RPM  : apachetop-0.15.6-1.el7.src.rpm
Build Date  : Sat 20 Jun 2015 09:02:37 PM EDT
Build Host  : buildvm-22.phx2.fedoraproject.org
Relocations : (not relocatable)
Packager    : Fedora Project
Vendor      : Fedora Project
URL         : https://github.com/tessus/apachetop
Summary     : A top-like display of Apache logs
Description :
ApacheTop watches a logfile generated by Apache (in standard common or
combined logformat, although it doesn't (yet) make use of any of the extra
fields in combined) and generates human-parsable output in realtime.

apachetop 包来自 EPEL 仓库。

方法-4:使用 repoquery 命令

repoquery 是一个从 YUM 库查询信息的程序,类似于 rpm 查询。

# repoquery -i httpd

Name        : httpd
Version     : 2.4.6
Release     : 80.el7.centos.1
Architecture: x86_64
Size        : 9817285
Packager    : CentOS BuildSystem 
Group       : System Environment/Daemons
URL         : http://httpd.apache.org/
Repository  : updates
Summary     : Apache HTTP Server
Source      : httpd-2.4.6-80.el7.centos.1.src.rpm
Description :
The Apache HTTP Server is a powerful, efficient, and extensible
web server.

httpd 包来自 CentOS updates 仓库。

在 Fedora 系统上我们如何得知安装的包来自哪个仓库?

DNF 是 “Dandified yum” 的缩写。DNF 是使用 hawkey/libsolv 库作为后端的下一代 yum 包管理器(yum 的分支)。从 Fedora 18 开始 Aleš Kozumplík 开始开发 DNF,并最终在 Fedora 22 上得以应用/启用。

dnf 命令 用于在 Fedora 22 以及之后的系统上安装、更新、搜索和删除包。它会自动解决依赖并使安装包的过程变得顺畅,不会出现任何问题。

$ dnf info tilix
Last metadata expiration check: 27 days, 10:00:23 ago on Wed 04 Oct 2017 06:43:27 AM IST.
Installed Packages
Name         : tilix
Version      : 1.6.4
Release      : 1.fc26
Arch         : x86_64
Size         : 3.6 M
Source       : tilix-1.6.4-1.fc26.src.rpm
Repo         : @System
From repo    : updates
Summary      : Tiling terminal emulator
URL          : https://github.com/gnunn1/tilix
License      : MPLv2.0 and GPLv3+ and CC-BY-SA
Description  : Tilix is a tiling terminal emulator with the following features:
             : 
             :  - Layout terminals in any fashion by splitting them horizontally or vertically
             :  - Terminals can be re-arranged using drag and drop both within and between
             :    windows
             :  - Terminals can be detached into a new window via drag and drop
             :  - Input can be synchronized between terminals so commands typed in one
             :    terminal are replicated to the others
             :  - The grouping of terminals can be saved and loaded from disk
             :  - Terminals support custom titles
             :  - Color schemes are stored in files and custom color schemes can be created by
             :    simply creating a new file
             :  - Transparent background
             :  - Supports notifications when processes are completed out of view
             : 
             : The application was written using GTK 3 and an effort was made to conform to
             : GNOME Human Interface Guidelines (HIG).

tilix 包来自 Fedora updates 仓库。

在 openSUSE 系统上我们如何得知安装的包来自哪个仓库?

Zypper 是一个使用 libzypp 的命令行包管理器。Zypper 命令 提供了存储库访问、依赖处理、包安装等功能。

$ zypper info nano

Loading repository data...
Reading installed packages...


Information for package nano:
-----------------------------
Repository     : Main Repository (OSS)             
Name           : nano                               
Version        : 2.4.2-5.3                          
Arch           : x86_64                             
Vendor         : openSUSE                           
Installed Size : 1017.8 KiB                         
Installed      : No                                 
Status         : not installed                      
Source package : nano-2.4.2-5.3.src                 
Summary        : Pico editor clone with enhancements
Description    :                                    
    GNU nano is a small and friendly text editor. It aims to emulate
    the Pico text editor while also offering a few enhancements.

nano 包来自于 openSUSE Main 仓库(OSS)。

在 ArchLinux 系统上我们如何得知安装的包来自哪个仓库?

Pacman 命令 即包管理器工具(package manager utility ),是一个简单的用来安装、构建、删除和管理 Arch Linux 软件包的命令行工具。Pacman 使用 libalpm 作为后端来执行所有的操作。

# pacman -Ss chromium
extra/chromium 48.0.2564.116-1
    The open-source project behind Google Chrome, an attempt at creating a safer, faster, and more stable browser
extra/qt5-webengine 5.5.1-9 (qt qt5)
    Provides support for web applications using the Chromium browser project
community/chromium-bsu 0.9.15.1-2
    A fast paced top scrolling shooter
community/chromium-chromevox latest-1
    Causes the Chromium web browser to automatically install and update the ChromeVox screen reader extention. Note: This
    package does not contain the extension code.
community/fcitx-mozc 2.17.2313.102-1
    Fcitx Module of A Japanese Input Method for Chromium OS, Windows, Mac and Linux (the Open Source Edition of Google Japanese
    Input)

chromium 包来自 ArchLinux extra 仓库。

或者,我们可以使用以下选项获得关于包的详细信息。

# pacman -Si chromium
Repository      : extra
Name            : chromium
Version         : 48.0.2564.116-1
Description     : The open-source project behind Google Chrome, an attempt at creating a safer, faster, and more stable browser
Architecture    : x86_64
URL             : http://www.chromium.org/
Licenses        : BSD
Groups          : None
Provides        : None
Depends On      : gtk2  nss  alsa-lib  xdg-utils  bzip2  libevent  libxss  icu  libexif  libgcrypt  ttf-font  systemd  dbus
                  flac  snappy  speech-dispatcher  pciutils  libpulse  harfbuzz  libsecret  libvpx  perl  perl-file-basedir
                  desktop-file-utils  hicolor-icon-theme
Optional Deps   : kdebase-kdialog: needed for file dialogs in KDE
                  gnome-keyring: for storing passwords in GNOME keyring
                  kwallet: for storing passwords in KWallet
Conflicts With  : None
Replaces        : None
Download Size   : 44.42 MiB
Installed Size  : 172.44 MiB
Packager        : Evangelos Foutras 
Build Date      : Fri 19 Feb 2016 04:17:12 AM IST
Validated By    : MD5 Sum  SHA-256 Sum  Signature

chromium 包来自 ArchLinux extra 仓库。

在基于 Debian 的系统上我们如何得知安装的包来自哪个仓库?

在基于 Debian 的系统例如 Ubuntu、LinuxMint 上可以使用两种方法实现。

方法-1:使用 apt-cache 命令

apt-cache 命令 可以显示存储在 APT 内部数据库的很多信息。这些信息是一种缓存,因为它们是从列在 source.list 文件里的不同的源中获得的。这个过程发生在 apt 更新操作期间。

$ apt-cache policy python3
python3:
  Installed: 3.6.3-0ubuntu2
  Candidate: 3.6.3-0ubuntu3
  Version table:
     3.6.3-0ubuntu3 500
        500 http://in.archive.ubuntu.com/ubuntu artful-updates/main amd64 Packages
 *** 3.6.3-0ubuntu2 500
        500 http://in.archive.ubuntu.com/ubuntu artful/main amd64 Packages
        100 /var/lib/dpkg/status

python3 包来自 Ubuntu updates 仓库。

方法-2:使用 apt 命令

APT 命令 即 “Advanced Packaging Tool”,是 apt-get 命令的替代品,就像 DNF 是如何取代 YUM 一样。它是具有丰富功能的命令行工具并将所有的功能例如 apt-cacheapt-searchdpkgapt-cdromapt-configapt-ket 等包含在一个命令(APT)中,并且还有几个独特的功能。例如我们可以通过 APT 轻松安装 .dpkg 包,但我们不能使用 apt-get 命令安装,更多类似的功能都被包含进了 APT 命令。apt-get 因缺失了很多未被解决的特性而被 apt 取代。

$ apt -a show notepadqq
Package: notepadqq
Version: 1.3.2-1~artful1
Priority: optional
Section: editors
Maintainer: Daniele Di Sarli 
Installed-Size: 1,352 kB
Depends: notepadqq-common (= 1.3.2-1~artful1), coreutils (>= 8.20), libqt5svg5 (>= 5.2.1), libc6 (>= 2.14), libgcc1 (>= 1:3.0), libqt5core5a (>= 5.9.0~beta), libqt5gui5 (>= 5.7.0), libqt5network5 (>= 5.2.1), libqt5printsupport5 (>= 5.2.1), libqt5webkit5 (>= 5.6.0~rc), libqt5widgets5 (>= 5.2.1), libstdc++6 (>= 5.2)
Download-Size: 356 kB
APT-Sources: http://ppa.launchpad.net/notepadqq-team/notepadqq/ubuntu artful/main amd64 Packages
Description: Notepad++-like editor for Linux
 Text editor with support for multiple programming
 languages, multiple encodings and plugin support.

Package: notepadqq
Version: 1.2.0-1~artful1
Status: install ok installed
Priority: optional
Section: editors
Maintainer: Daniele Di Sarli 
Installed-Size: 1,352 kB
Depends: notepadqq-common (= 1.2.0-1~artful1), coreutils (>= 8.20), libqt5svg5 (>= 5.2.1), libc6 (>= 2.14), libgcc1 (>= 1:3.0), libqt5core5a (>= 5.9.0~beta), libqt5gui5 (>= 5.7.0), libqt5network5 (>= 5.2.1), libqt5printsupport5 (>= 5.2.1), libqt5webkit5 (>= 5.6.0~rc), libqt5widgets5 (>= 5.2.1), libstdc++6 (>= 5.2)
Homepage: http://notepadqq.altervista.org
Download-Size: unknown
APT-Manual-Installed: yes
APT-Sources: /var/lib/dpkg/status
Description: Notepad++-like editor for Linux
 Text editor with support for multiple programming
 languages, multiple encodings and plugin support.

notepadqq 包来自 Launchpad PPA。


via: https://www.2daygeek.com/how-do-we-find-out-the-installed-packages-came-from-which-repository/

作者:Prakash Subramanian 选题:lujun9972 译者:zianglei 校对:wxy

本文由 LCTT 原创编译,Linux中国 荣誉推出
对于 Linux 管理员来说这是一个重要(美妙)的话题,所以每个人都必须知道,并练习怎样才能更高效的使用它们。

在 Linux 中,无论何时当你安装任何带有服务和守护进程的包,系统默认会把这些服务的初始化及 systemd 脚本添加进去,不过此时它们并没有被启用。

我们需要手动的开启或者关闭那些服务。Linux 中有三个著名的且一直在被使用的初始化系统。

什么是初始化系统?

在以 Linux/Unix 为基础的操作系统上,init (初始化的简称) 是内核引导系统启动过程中第一个启动的进程。

init 的进程 id (pid)是 1,除非系统关机否则它将会一直在后台运行。

init 首先根据 /etc/inittab 文件决定 Linux 运行的级别,然后根据运行级别在后台启动所有其他进程和应用程序。

BIOS、MBR、GRUB 和内核程序在启动 init 之前就作为 Linux 的引导程序的一部分开始工作了。

下面是 Linux 中可以使用的运行级别(从 0~6 总共七个运行级别):

  • 0:关机
  • 1:单用户模式
  • 2:多用户模式(没有NFS)
  • 3:完全的多用户模式
  • 4:系统未使用
  • 5:图形界面模式
  • 6:重启

下面是 Linux 系统中最常用的三个初始化系统:

  • System V(Sys V)
  • Upstart
  • systemd

什么是 System V(Sys V)?

System V(Sys V)是类 Unix 系统第一个也是传统的初始化系统。init 是内核引导系统启动过程中第一支启动的程序,它是所有程序的父进程。

大部分 Linux 发行版最开始使用的是叫作 System V(Sys V)的传统的初始化系统。在过去的几年中,已经发布了好几个初始化系统以解决标准版本中的设计限制,例如:launchd、Service Management Facility、systemd 和 Upstart。

但是 systemd 已经被几个主要的 Linux 发行版所采用,以取代传统的 SysV 初始化系统。

什么是 Upstart?

Upstart 是一个基于事件的 /sbin/init 守护进程的替代品,它在系统启动过程中处理任务和服务的启动,在系统运行期间监视它们,在系统关机的时候关闭它们。

它最初是为 Ubuntu 而设计,但是它也能够完美的部署在其他所有 Linux系统中,用来代替古老的 System-V。

Upstart 被用于 Ubuntu 从 9.10 到 Ubuntu 14.10 和基于 RHEL 6 的系统,之后它被 systemd 取代。

什么是 systemd?

systemd 是一个新的初始化系统和系统管理器,它被用于所有主要的 Linux 发行版,以取代传统的 SysV 初始化系统。

systemd 兼容 SysV 和 LSB 初始化脚本。它可以直接替代 SysV 初始化系统。systemd 是被内核启动的第一个程序,它的 PID 是 1。

systemd 是所有程序的父进程,Fedora 15 是第一个用 systemd 取代 upstart 的发行版。systemctl 用于命令行,它是管理 systemd 的守护进程/服务的主要工具,例如:(开启、重启、关闭、启用、禁用、重载和状态)

systemd 使用 .service 文件而不是 bash 脚本(SysVinit 使用的)。systemd 将所有守护进程添加到 cgroups 中排序,你可以通过浏览 /cgroup/systemd 文件查看系统等级。

如何使用 chkconfig 命令启用或禁用引导服务?

chkconfig 实用程序是一个命令行工具,允许你在指定运行级别下启动所选服务,以及列出所有可用服务及其当前设置。

此外,它还允许我们从启动中启用或禁用服务。前提是你有超级管理员权限(root 或者 sudo)运行这个命令。

所有的服务脚本位于 /etc/rd.d/init.d文件中

如何列出运行级别中所有的服务

--list 参数会展示所有的服务及其当前状态(启用或禁用服务的运行级别):

# chkconfig --list
NetworkManager     0:off    1:off    2:on    3:on    4:on    5:on    6:off
abrt-ccpp          0:off    1:off    2:off    3:on    4:off    5:on    6:off
abrtd              0:off    1:off    2:off    3:on    4:off    5:on    6:off
acpid              0:off    1:off    2:on    3:on    4:on    5:on    6:off
atd                0:off    1:off    2:off    3:on    4:on    5:on    6:off
auditd             0:off    1:off    2:on    3:on    4:on    5:on    6:off
.
.

如何查看指定服务的状态

如果你想查看运行级别下某个服务的状态,你可以使用下面的格式匹配出需要的服务。

比如说我想查看运行级别中 auditd 服务的状态

# chkconfig --list| grep auditd
auditd             0:off    1:off    2:on    3:on    4:on    5:on    6:off

如何在指定运行级别中启用服务

使用 --level 参数启用指定运行级别下的某个服务,下面展示如何在运行级别 3 和运行级别 5 下启用 httpd 服务。

# chkconfig --level 35 httpd on

如何在指定运行级别下禁用服务

同样使用 --level 参数禁用指定运行级别下的服务,下面展示的是在运行级别 3 和运行级别 5 中禁用 httpd 服务。

# chkconfig --level 35 httpd off

如何将一个新服务添加到启动列表中

-–add 参数允许我们添加任何新的服务到启动列表中,默认情况下,新添加的服务会在运行级别 2、3、4、5 下自动开启。

# chkconfig --add nagios

如何从启动列表中删除服务

可以使用 --del 参数从启动列表中删除服务,下面展示的是如何从启动列表中删除 Nagios 服务。

# chkconfig --del nagios

如何使用 systemctl 命令启用或禁用开机自启服务?

systemctl 用于命令行,它是一个用来管理 systemd 的守护进程/服务的基础工具,例如:(开启、重启、关闭、启用、禁用、重载和状态)。

所有服务创建的 unit 文件位与 /etc/systemd/system/

如何列出全部的服务

使用下面的命令列出全部的服务(包括启用的和禁用的)。

# systemctl list-unit-files --type=service
UNIT FILE                                     STATE
arp-ethers.service                            disabled
auditd.service                                enabled
[email protected]                               enabled
blk-availability.service                      disabled
brandbot.service                              static
[email protected]                        static
chrony-wait.service                           disabled
chronyd.service                               enabled
cloud-config.service                          enabled
cloud-final.service                           enabled
cloud-init-local.service                      enabled
cloud-init.service                            enabled
console-getty.service                         disabled
console-shell.service                         disabled
[email protected]                      static
cpupower.service                              disabled
crond.service                                 enabled
.
.
150 unit files listed.

使用下面的格式通过正则表达式匹配出你想要查看的服务的当前状态。下面是使用 systemctl 命令查看 httpd 服务的状态。

# systemctl list-unit-files --type=service | grep httpd
httpd.service disabled

如何让指定的服务开机自启

使用下面格式的 systemctl 命令启用一个指定的服务。启用服务将会创建一个符号链接,如下可见:

# systemctl enable httpd
Created symlink from /etc/systemd/system/multi-user.target.wants/httpd.service to /usr/lib/systemd/system/httpd.service.

运行下列命令再次确认服务是否被启用。

# systemctl is-enabled httpd
enabled

如何禁用指定的服务

运行下面的命令禁用服务将会移除你启用服务时所创建的符号链接。

# systemctl disable httpd
Removed symlink /etc/systemd/system/multi-user.target.wants/httpd.service.

运行下面的命令再次确认服务是否被禁用。

# systemctl is-enabled httpd
disabled

如何查看系统当前的运行级别

使用 systemctl 命令确认你系统当前的运行级别,runlevel 命令仍然可在 systemd 下工作,不过,运行级别对于 systemd 来说是一个历史遗留的概念。所以我建议你全部使用 systemctl 命令。

我们当前处于运行级别 3, 它等同于下面显示的 multi-user.target

# systemctl list-units --type=target
UNIT                  LOAD   ACTIVE SUB    DESCRIPTION
basic.target          loaded active active Basic System
cloud-config.target   loaded active active Cloud-config availability
cryptsetup.target     loaded active active Local Encrypted Volumes
getty.target          loaded active active Login Prompts
local-fs-pre.target   loaded active active Local File Systems (Pre)
local-fs.target       loaded active active Local File Systems
multi-user.target     loaded active active Multi-User System
network-online.target loaded active active Network is Online
network-pre.target    loaded active active Network (Pre)
network.target        loaded active active Network
paths.target          loaded active active Paths
remote-fs.target      loaded active active Remote File Systems
slices.target         loaded active active Slices
sockets.target        loaded active active Sockets
swap.target           loaded active active Swap
sysinit.target        loaded active active System Initialization
timers.target         loaded active active Timers

via: https://www.2daygeek.com/how-to-enable-or-disable-services-on-boot-in-linux-using-chkconfig-and-systemctl-command/

作者:Prakash Subramanian 选题:lujun9972 译者:way-ww 校对:wxy

本文由 LCTT 原创编译,Linux中国 荣誉推出