MAGESH MARUTHAMUTHU 发布的文章

嗨,伙计们,今天我们再次带来一系列可以多方面帮助到你的复杂的命令。 通过操作命令,可以帮助您计数当前目录中的文件和目录、递归计数,统计特定用户创建的文件列表等。

在本教程中,我们将向您展示如何使用多个命令,并使用 lsegrepwcfind 命令执行一些高级操作。 下面的命令将可用在多个方面。

为了实验,我打算总共创建 7 个文件和 2 个文件夹(5 个常规文件和 2 个隐藏文件)。 下面的 tree 命令的输出清楚的展示了文件和文件夹列表。

# tree -a /opt
/opt
├── magi
│   └── 2g
│   ├── test5.txt
│   └── .test6.txt
├── test1.txt
├── test2.txt
├── test3.txt
├── .test4.txt
└── test.txt

2 directories, 7 files

示例-1

统计当前目录的文件(不包括隐藏文件)。 运行以下命令以确定当前目录中有多少个文件,并且不计算点文件(LCTT 译注:点文件即以“.” 开头的文件,它们在 Linux 默认是隐藏的)。

# ls -l . | egrep -c '^-'
4

细节:

  • ls : 列出目录内容
  • -l : 使用长列表格式
  • . : 列出有关文件的信息(默认为当前目录)
  • | : 将一个程序的输出发送到另一个程序进行进一步处理的控制操作符
  • egrep : 打印符合模式的行
  • -c : 通用输出控制
  • '^-' : 以“-”开头的行(ls -l 列出长列表时,行首的 “-” 代表普通文件)

示例-2

统计当前目录包含隐藏文件在内的文件。 包括当前目录中的点文件。

# ls -la . | egrep -c '^-'
5

示例-3

运行以下命令来计数当前目录的文件和文件夹。 它会计算所有的文件和目录。

# ls -l | wc -l
5

细节:

  • ls : 列出目录内容
  • -l : 使用长列表格式
  • | : 将一个程序的输出发送到另一个程序进行进一步处理的控制操作符
  • wc : 这是一个统计每个文件的换行符、单词和字节数的命令
  • -l : 输出换行符的数量

示例-4

统计当前目录包含隐藏文件和目录在内的文件和文件夹。

# ls -la | wc -l
8

示例-5

递归计算当前目录的文件,包括隐藏文件。

# find . -type f | wc -l
7

细节 :

  • find : 搜索目录结构中的文件
  • -type : 文件类型
  • f : 常规文件
  • wc : 这是一个统计每个文件的换行符、单词和字节数的命令
  • -l : 输出换行符的数量

示例-6

使用 tree 命令输出目录和文件数(不包括隐藏文件)。

# tree | tail -1
2 directories, 5 files

示例-7

使用包含隐藏文件的 tree 命令输出目录和文件计数。

# tree -a | tail -1
2 directories, 7 files

示例-8

运行下面的命令递归计算包含隐藏目录在内的目录数。

# find . -type d | wc -l
3

示例-9

根据文件扩展名计数文件数量。 这里我们要计算 .txt 文件。

# find . -name "*.txt" | wc -l
7

示例-10

组合使用 echo 命令和 wc 命令统计当前目录中的所有文件。 4 表示当前目录中的文件数量。

# echo *.* | wc
1       4      39

示例-11

组合使用 echo 命令和 wc 命令来统计当前目录中的所有目录。 第二个 1 表示当前目录中的目录数量。

# echo */ | wc
1       1       6

示例-12

组合使用 echo 命令和 wc 命令来统计当前目录中的所有文件和目录。 5 表示当前目录中的目录和文件的数量。

# echo * | wc
1 5 44

示例-13

统计系统(整个系统)中的文件数。

# find / -type f | wc -l
69769

示例-14

统计系统(整个系统)中的文件夹数。

# find / -type d | wc -l
8819

示例-15

运行以下命令来计算系统(整个系统)中的文件、文件夹、硬链接和符号链接数。

# find / -type d -exec echo dirs \; -o -type l -exec echo symlinks \; -o -type f -links +1 -exec echo hardlinks \; -o -type f -exec echo files \; | sort | uniq -c
   8779 dirs
  69343 files
     20 hardlinks
  11646 symlinks

via: https://www.2daygeek.com/how-to-count-the-number-of-files-and-folders-directories-in-linux/

作者:Magesh Maruthamuthu 译者:Flowsnow 校对:wxy

本文由 LCTT 原创编译,Linux中国 荣誉推出

Linux 管理员的一个重要任务是保护服务器免受非法攻击或访问。 默认情况下,Linux 系统带有配置良好的防火墙,比如iptables、Uncomplicated Firewall(UFW),ConfigServer Security Firewall(CSF)等,可以防止多种攻击。

任何连接到互联网的机器都是恶意攻击的潜在目标。 有一个名为 Fail2Ban 的工具可用来缓解服务器上的非法访问。

什么是 Fail2Ban?

Fail2Ban 是一款入侵防御软件,可以保护服务器免受暴力攻击。 它是用 Python 编程语言编写的。 Fail2Ban 基于auth 日志文件工作,默认情况下它会扫描所有 auth 日志文件,如 /var/log/auth.log/var/log/apache/access.log 等,并禁止带有恶意标志的IP,比如密码失败太多,寻找漏洞等等标志。

通常,Fail2Ban 用于更新防火墙规则,用于在指定的时间内拒绝 IP 地址。 它也会发送邮件通知。 Fail2Ban 为各种服务提供了许多过滤器,如 ssh、apache、nginx、squid、named、mysql、nagios 等。

Fail2Ban 能够降低错误认证尝试的速度,但是它不能消除弱认证带来的风险。 这只是服务器防止暴力攻击的安全手段之一。

如何在 Linux 中安装 Fail2Ban

Fail2Ban 已经与大部分 Linux 发行版打包在一起了,所以只需使用你的发行包版的包管理器来安装它。

对于 Debian / Ubuntu,使用 APT-GET 命令APT 命令安装。

$ sudo apt install fail2ban

对于 Fedora,使用 DNF 命令安装。

$ sudo dnf install fail2ban

对于 CentOS/RHEL,启用 EPEL 库RPMForge 库,使用 YUM 命令安装。

$ sudo yum install fail2ban

对于 Arch Linux,使用 Pacman 命令安装。

$ sudo pacman -S fail2ban

对于 openSUSE , 使用 Zypper命令安装。

$ sudo zypper in fail2ban

如何配置 Fail2Ban

默认情况下,Fail2Ban 将所有配置文件保存在 /etc/fail2ban/ 目录中。 主配置文件是 jail.conf,它包含一组预定义的过滤器。 所以,不要编辑该文件,这是不可取的,因为只要有新的更新,配置就会重置为默认值。

只需在同一目录下创建一个名为 jail.local 的新配置文件,并根据您的意愿进行修改。

# cp /etc/fail2ban/jail.conf /etc/fail2ban/jail.local

默认情况下,大多数选项都已经配置的很完美了,如果要启用对任何特定 IP 的访问,则可以将 IP 地址添加到 ignoreip 区域,对于多个 IP 的情况,用空格隔开 IP 地址。

配置文件中的 DEFAULT 部分包含 Fail2Ban 遵循的基本规则集,您可以根据自己的意愿调整任何参数。

# nano /etc/fail2ban/jail.local

[DEFAULT]
ignoreip = 127.0.0.1/8 192.168.1.100/24
bantime = 600
findtime = 600
maxretry = 3
destemail = [email protected]
  • ignoreip:本部分允许我们列出 IP 地址列表,Fail2Ban 不会禁止与列表中的地址匹配的主机
  • bantime:主机被禁止的秒数
  • findtime:如果在最近 findtime 秒期间已经发生了 maxretry 次重试,则主机会被禁止
  • maxretry:是主机被禁止之前的失败次数

如何配置服务

Fail2Ban 带有一组预定义的过滤器,用于各种服务,如 ssh、apache、nginx、squid、named、mysql、nagios 等。 我们不希望对配置文件进行任何更改,只需在服务区域中添加 enabled = true 这一行就可以启用任何服务。 禁用服务时将 true 改为 false 即可。

# SSH servers
[sshd]
enabled = true
port = ssh
logpath = %(sshd_log)s
backend = %(sshd_backend)s
  • enabled: 确定服务是打开还是关闭。
  • port:指明特定的服务。 如果使用默认端口,则服务名称可以放在这里。 如果使用非传统端口,则应该是端口号。
  • logpath:提供服务日志的位置
  • backend:指定用于获取文件修改的后端。

重启 Fail2Ban

进行更改后,重新启动 Fail2Ban 才能生效。

[For SysVinit Systems]
# service fail2ban restart

[For systemd Systems]
# systemctl restart fail2ban.service

验证 Fail2Ban iptables 规则

你可以使用下面的命令来确认是否在防火墙中成功添加了Fail2Ban iptables 规则。

# iptables -L
Chain INPUT (policy ACCEPT)
target prot opt source destination
f2b-apache-auth tcp -- anywhere anywhere multiport dports http,https
f2b-sshd tcp -- anywhere anywhere multiport dports 1234
ACCEPT tcp -- anywhere anywhere tcp dpt:1234

Chain FORWARD (policy ACCEPT)
target prot opt source destination

Chain OUTPUT (policy ACCEPT)
target prot opt source destination

Chain f2b-apache-auth (1 references)
target prot opt source destination
RETURN all -- anywhere anywhere

Chain f2b-sshd (1 references)
target prot opt source destination
RETURN all -- anywhere anywhere

如何测试 Fail2Ban

我做了一些失败的尝试来测试这个。 为了证实这一点,我要验证 /var/log/fail2ban.log 文件。

2017-11-05 14:43:22,901 fail2ban.server [7141]: INFO Changed logging target to /var/log/fail2ban.log for Fail2ban v0.9.6
2017-11-05 14:43:22,987 fail2ban.database [7141]: INFO Connected to fail2ban persistent database '/var/lib/fail2ban/fail2ban.sqlite3'
2017-11-05 14:43:22,996 fail2ban.database [7141]: WARNING New database created. Version '2'
2017-11-05 14:43:22,998 fail2ban.jail [7141]: INFO Creating new jail 'sshd'
2017-11-05 14:43:23,002 fail2ban.jail [7141]: INFO Jail 'sshd' uses poller {}
2017-11-05 14:43:23,019 fail2ban.jail [7141]: INFO Initiated 'polling' backend
2017-11-05 14:43:23,019 fail2ban.filter [7141]: INFO Set maxRetry = 5
2017-11-05 14:43:23,020 fail2ban.filter [7141]: INFO Set jail log file encoding to UTF-8
2017-11-05 14:43:23,020 fail2ban.filter [7141]: INFO Added logfile = /var/log/auth.log
2017-11-05 14:43:23,021 fail2ban.actions [7141]: INFO Set banTime = 600
2017-11-05 14:43:23,021 fail2ban.filter [7141]: INFO Set findtime = 600
2017-11-05 14:43:23,022 fail2ban.filter [7141]: INFO Set maxlines = 10
2017-11-05 14:43:23,070 fail2ban.server [7141]: INFO Jail sshd is not a JournalFilter instance
2017-11-05 14:43:23,081 fail2ban.jail [7141]: INFO Jail 'sshd' started
2017-11-05 14:43:23,763 fail2ban.filter [7141]: INFO [sshd] Found 103.5.134.167
2017-11-05 14:43:23,764 fail2ban.filter [7141]: INFO [sshd] Found 181.129.54.170
2017-11-05 14:43:23,765 fail2ban.filter [7141]: INFO [sshd] Found 181.129.54.170
2017-11-05 15:19:06,192 fail2ban.server [7141]: INFO Stopping all jails
2017-11-05 15:19:06,874 fail2ban.jail [7141]: INFO Jail 'sshd' stopped
2017-11-05 15:19:06,879 fail2ban.server [7141]: INFO Exiting Fail2ban
2017-11-05 15:19:07,123 fail2ban.server [8528]: INFO Changed logging target to /var/log/fail2ban.log for Fail2ban v0.9.6
2017-11-05 15:19:07,123 fail2ban.database [8528]: INFO Connected to fail2ban persistent database '/var/lib/fail2ban/fail2ban.sqlite3'
2017-11-05 15:19:07,126 fail2ban.jail [8528]: INFO Creating new jail 'sshd'
2017-11-05 15:19:07,129 fail2ban.jail [8528]: INFO Jail 'sshd' uses poller {}
2017-11-05 15:19:07,141 fail2ban.jail [8528]: INFO Initiated 'polling' backend
2017-11-05 15:19:07,142 fail2ban.actions [8528]: INFO Set banTime = 60
2017-11-05 15:19:07,142 fail2ban.filter [8528]: INFO Set findtime = 60
2017-11-05 15:19:07,142 fail2ban.filter [8528]: INFO Set jail log file encoding to UTF-8
2017-11-05 15:19:07,143 fail2ban.filter [8528]: INFO Set maxRetry = 3
2017-11-05 15:19:07,144 fail2ban.filter [8528]: INFO Added logfile = /var/log/auth.log
2017-11-05 15:19:07,144 fail2ban.filter [8528]: INFO Set maxlines = 10
2017-11-05 15:19:07,189 fail2ban.server [8528]: INFO Jail sshd is not a JournalFilter instance
2017-11-05 15:19:07,195 fail2ban.jail [8528]: INFO Jail 'sshd' started
2017-11-05 15:20:03,263 fail2ban.filter [8528]: INFO [sshd] Found 103.5.134.167
2017-11-05 15:20:05,267 fail2ban.filter [8528]: INFO [sshd] Found 103.5.134.167
2017-11-05 15:20:12,276 fail2ban.filter [8528]: INFO [sshd] Found 103.5.134.167
2017-11-05 15:20:12,380 fail2ban.actions [8528]: NOTICE [sshd] Ban 103.5.134.167
2017-11-05 15:21:12,659 fail2ban.actions [8528]: NOTICE [sshd] Unban 103.5.134.167

要查看启用的监狱列表,请运行以下命令。

# fail2ban-client status
Status
|- Number of jail:  2
`- Jail list:   apache-auth, sshd

通过运行以下命令来获取禁止的 IP 地址。

# fail2ban-client status ssh
Status for the jail: ssh
|- filter
| |- File list: /var/log/auth.log
| |- Currently failed: 1
| `- Total failed: 3
`- action
 |- Currently banned: 1
 | `- IP list: 192.168.1.115
 `- Total banned: 1

要从 Fail2Ban 中删除禁止的 IP 地址,请运行以下命令。

# fail2ban-client set ssh unbanip 192.168.1.115

via: https://www.2daygeek.com/how-to-install-setup-configure-fail2ban-on-linux/

作者:Magesh Maruthamuthu 译者:Flowsnow 校对:wxy

本文由 LCTT 原创编译,Linux中国 荣誉推出

当提到文件和目录的权限时,你的第一反应可能是“属主/群组/其它”权限。 这些权限可以通过 chmodchown 等命令来修改。

文件和目录都有属主 (文件所有者 )、群组 (所属组) 以及其它权限,这些权限构成一个集合。 然而这些权限集合有它的局限性,无法做到为不同的用户设置不同的权限。

Linux 对文件和目录有以下默认权限。

  • 文件 -> 644 -> -rw-r-r- (所有者有读写权限,组成员有只读权限, 其他人也只有读权限)
  • 目录 -> 755 -> drwxr-xr-x (所有者有读、写和执行权限,组成员有读和执行的权限,其他人也有读和执行的权限)

比如: 默认情况下,所有者可以访问和编辑他们自己主目录中的文件, 也可以访问相关同组人的文件,但他们不能修改这些文件,因为组成员没有写权限,而且让组成员有写权限也是不明智的。 基于同样的原因,他/她也不能修改其他人的文件。 然而在某些情况下,多个用户想要修改同一个文件, 那该怎么办呢?

假设有个名叫 magi 的用户,他想要修改 httpd.conf 文件怎么办呢? 这个文件是归 root 用户所有的,这样如何授权呢? 为了解决这种情况, 访问控制列表 Access Control List (ACL)诞生了。

什么是 ACL?

ACL 表示 访问控制列表 Access Control List (ACL),它为文件系统提供了附加的、更具有弹性的权限机制。 它被设计来为补充 UNIX 文件权限机制。 ACL 允许你赋予任何某用户/组访问某项资源的权限。 setfaclgetfacl 命令会帮助你管理 ACL 而不会有任何麻烦。

什么是 setfacl?

setfacl 用于设置文件和目录的 ACL。

什么 getfacl?

getfacl - 获取文件的 ACL 。对于每个文件, getfacl 都会显示文件名、文件所有者、所属组以及ACL。 如果目录有默认 ACL, getfacl 也会显示这个默认的 ACL。

如何确认是否启用了 ACL?

运行 tune2fs 命令来检查是否启用了 ACL。

# tune2fs -l /dev/sdb1 | grep options
Default mount options: (none)

上面的输出很明显第说明 /dev/sdb1 分区没有启用 ACL。

如果结果中没有列出 acl,则你需要在挂载选项中加上 acl。 为了让它永久生效, 修改 /etc/fstab/app 这一行成这样:

# more /etc/fstab

UUID=f304277d-1063-40a2-b9dc-8bcf30466a03 / ext4 defaults 1 1
/dev/sdb1        /app ext4 defaults,acl 1 1

或者,你也可以使用下面命令将其添加道文件系统的超级块中:

# tune2fs -o +acl /dev/sdb1

现在,通过运行以下命令来动态修改选项:

# mount -o remount,acl /app

再次运行 tune2fs 命令来看选项中是否有 acl 了:

# tune2fs -l /dev/sdb1 | grep options
Default mount options: acl

嗯,现在 /dev/sdb1 分区中有 ACL 选项了。

如何查看默认的 ACL 值

要查看文件和目录默认的 ACL 值,可以使用 getfacl 命令后面加上文件路径或者目录路径。 注意, 当你对非 ACL 文件/目录运行 getfacl 命令时, 则不会显示附加的 usermask 参数值。

# getfacl /etc/apache2/apache2.conf

# file: etc/apache2/apache2.conf
# owner: root
# group: root
user::rw-
group::r--
other::r--

如何为文件设置 ACL

以下面格式运行 setfacl 命令可以为指定文件设置 ACL。在下面的例子中,我们会给 magi 用户对 /etc/apache2/apache2.conf 文件 rwx 的权限。

# setfacl -m u:magi:rwx /etc/apache2/apache2.conf

仔细分析起来:

  • setfacl: 命令
  • -m: 修改文件的当前 ACL
  • u: 指明用户
  • magi: 用户名
  • rwx: 要设置的权限
  • /etc/apache2/apache2.conf: 文件名称

再查看一次新的 ACL 值:

# getfacl /etc/apache2/apache2.conf

# file: etc/apache2/apache2.conf
# owner: root
# group: root
user::rw-
user:magi:rwx
group::r--
mask::rwx
other::r--

注意: 若你发现文件或目录权限后面有一个加号(+),就表示设置了 ACL。

# ls -lh /etc/apache2/apache2.conf
-rw-rwxr--+ 1 root root 7.1K Sep 19 14:58 /etc/apache2/apache2.conf

如何为目录设置 ACL

以下面格式运行 setfacl 命令可以递归地为指定目录设置 ACL。在下面的例子中,我们会将 /etc/apache2/sites-available/ 目录中的 rwx 权限赋予 magi 用户。

# setfacl -Rm u:magi:rwx /etc/apache2/sites-available/

其中:

  • -R: 递归到子目录中

再次查看一下新的 ACL 值。

# getfacl /etc/apache2/sites-available/

# file: etc/apache2/sites-available/
# owner: root
# group: root
user::rwx
user:magi:rwx
group::r-x
mask::rwx
other::r-x

现在 /etc/apache2/sites-available/ 中的文件和目录都设置了 ACL。

# ls -lh /etc/apache2/sites-available/
total 20K
-rw-rwxr--+ 1 root root 1.4K Sep 19 14:56 000-default.conf
-rw-rwxr--+ 1 root root 6.2K Sep 19 14:56 default-ssl.conf
-rw-rwxr--+ 1 root root 1.4K Dec 8 02:57 mywebpage.com.conf
-rw-rwxr--+ 1 root root 1.4K Dec 7 19:07 testpage.com.conf

如何为组设置 ACL

以下面格式为指定文件运行 setfacl 命令。在下面的例子中,我们会给 appdev 组赋予 /etc/apache2/apache2.conf 文件的 rwx 权限。

# setfacl -m g:appdev:rwx /etc/apache2/apache2.conf

其中:

  • g: 指明一个组

对多个用户和组授权,只需要用 逗号 区分开,就像下面这样。

# setfacl -m u:magi:rwx,g:appdev:rwx /etc/apache2/apache2.conf

如何删除 ACL

以下面格式运行 setfacl 命令会删除文件对指定用户的 ACL。这只会删除用户权限而保留 mask 的值为只读。

# setfacl -x u:magi /etc/apache2/apache2.conf

其中:

  • -x: 从文件的 ACL 中删除

再次查看 ACL 值。在下面的输出中我们可以看到 mask 的值是读。

# getfacl /etc/apache2/apache2.conf

# file: etc/apache2/apache2.conf
# owner: root
# group: root
user::rw-
group::r--
mask::r--
other::r--

使用 -b 来删除文件中所有的 ACL。

# setfacl -b /etc/apache2/apache2.conf

其中:

  • -b: 删除所有的 ACL 条目

再次查看删掉后的 ACl 值就会发现所有的东西都不见了,包括 mask 的值也不见了。

# getfacl /etc/apache2/apache2.conf

# file: etc/apache2/apache2.conf
# owner: root
# group: root
user::rw-
group::r--
other::r--

如何备份并还原 ACL

下面命令可以备份和还原 ACL 的值。要制作备份, 需要进入对应的目录然后这样做(假设我们要备份 sites-available 目录中的 ACL 值)。

# cd /etc/apache2/sites-available/
# getfacl -R * > acl_backup_for_folder

还原的话,则运行下面命令:

# setfacl --restore=/etc/apache2/sites-available/acl_backup_for_folder

via: https://www.2daygeek.com/how-to-configure-access-control-lists-acls-setfacl-getfacl-linux/

作者:Magesh Maruthamuthu 译者:lujun9972 校对:wxy

本文由 LCTT 原创编译,Linux中国 荣誉推出

我们中的许多人经常查看 man 页面 来了解命令开关(选项),它会显示有关命令语法、说明、细节和可用的选项,但它没有任何实际的例子。因此,在组合成一个我们需要的完整命令时会遇到一些麻烦。

你确实遇到这个麻烦而想要一个更好的解决方案吗?我会建议你试一下 cheat

Cheat 是什么

cheat 允许你在命令行中创建和查看交互式的 速查表 cheatsheet 。它旨在帮助提醒 *nix 系统管理员他们经常使用但还没频繁到会记住的命令的选项。

如何安装 Cheat

cheat 是使用 python 开发的,所以可以用 pip 来在你的系统上安装 cheat

pip 是一个与 setuptools 捆绑在一起的 Python 模块,它是在 Linux 中安装 Python 包推荐的工具之一。

对于 Debian/Ubuntu 用户,请使用 apt-get 命令apt 命令来安装 pip

[对于 Python2]
$ sudo apt install python-pip python-setuptools
[对于 Python3]
$ sudo apt install python3-pip

RHEL/CentOS 官方仓库中没有 pip,因此使用 EPEL 仓库,并使用 YUM 命令安装 pip

$ sudo yum install python-pip python-devel python-setuptools

对于 Fedora 系统,使用 dnf 命令来安装 pip

[对于 Python2]
$ sudo dnf install python-pip
[对于 Python3]
$ sudo dnf install python3

对于基于 Arch Linux 的系统,请使用 Pacman 命令 来安装 pip

[对于 Python2]
$ sudo pacman -S python2-pip python-setuptools
[对于 Python3]
$ sudo pacman -S python-pip python3-setuptools

对于 openSUSE 系统,使用 Zypper 命令来安装 pip

[对于 Python2]
$ sudo pacman -S python-pip
[对于 Python3]
$ sudo pacman -S python3-pip

pip 来在你的系统上安装 cheat

$ sudo pip install cheat

如何使用 Cheat

运行 cheat,然后按相应的命令来查看速查表,作为例子,我们要来看下 tar 命令的例子。

$ cheat tar
# To extract an uncompressed archive:
tar -xvf /path/to/foo.tar

# To create an uncompressed archive:
tar -cvf /path/to/foo.tar /path/to/foo/

# To extract a .gz archive:
tar -xzvf /path/to/foo.tgz

# To create a .gz archive:
tar -czvf /path/to/foo.tgz /path/to/foo/

# To list the content of an .gz archive:
tar -ztvf /path/to/foo.tgz

# To extract a .bz2 archive:
tar -xjvf /path/to/foo.tgz

# To create a .bz2 archive:
tar -cjvf /path/to/foo.tgz /path/to/foo/

# To extract a .tar in specified Directory:
tar -xvf /path/to/foo.tar -C /path/to/destination/

# To list the content of an .bz2 archive:
tar -jtvf /path/to/foo.tgz

# To create a .gz archive and exclude all jpg,gif,... from the tgz
tar czvf /path/to/foo.tgz --exclude=\*.{jpg,gif,png,wmv,flv,tar.gz,zip} /path/to/foo/

# To use parallel (multi-threaded) implementation of compression algorithms:
tar -z ... -> tar -Ipigz ...
tar -j ... -> tar -Ipbzip2 ...
tar -J ... -> tar -Ipixz ...

运行下面的命令查看可用的速查表。

$ cheat -l

进入帮助页面获取更多详细信息。

$ cheat -h

via: https://www.2daygeek.com/cheat-a-collection-of-practical-linux-command-examples/

作者:Magesh Maruthamuthu 译者:geekpi 校对:wxy

本文由 LCTT 原创编译,Linux中国 荣誉推出

我对 CLI 应用非常感兴趣,因此热衷于使用并分享 CLI 应用。 我之所以更喜欢 CLI 很大原因是因为我在大多数的时候都使用的是字符界面(black screen),已经习惯了使用 CLI 应用而不是 GUI 应用。

我写过很多关于 CLI 应用的文章。 最近我发现了一些谷歌的 CLI 工具,像 “Google Translator”、“Google Calendar” 和 “Google Contacts”。 这里,我想在给大家分享一下。

今天我们要介绍的是 “Google Translator” 工具。 由于我的母语是泰米尔语,我在一天内用了很多次才理解了它的意义。

谷歌翻译为其它语系的人们所广泛使用。

什么是 Translate Shell

Translate Shell (之前叫做 Google Translate CLI) 是一款借助谷歌翻译(默认)、必应翻译、Yandex.Translate 以及 Apertium 来翻译的命令行翻译器。它让你可以在终端访问这些翻译引擎。 Translate Shell 在大多数 Linux 发行版中都能使用。

如何安装 Translate Shell

有三种方法安装 Translate Shell。

  • 下载自包含的可执行文件
  • 手工安装
  • 通过包管理器安装

方法 1 : 下载自包含的可执行文件

下载自包含的可执行文件放到 /usr/bin 目录中。

$ wget git.io/trans
$ chmod +x ./trans
$ sudo mv trans /usr/bin/

方法 2 : 手工安装

克隆 Translate Shell 的 GitHub 仓库然后手工编译。

$ git clone https://github.com/soimort/translate-shell && cd translate-shell
$ make
$ sudo make install

方法 3 : 通过包管理器

有些发行版的官方仓库中包含了 Translate Shell,可以通过包管理器来安装。

对于 Debian/Ubuntu, 使用 APT-GET 命令 或者 APT 命令来安装。

$ sudo apt-get install translate-shell

对于 Fedora, 使用 DNF 命令 来安装。

$ sudo dnf install translate-shell

对于基于 Arch Linux 的系统, 使用 Yaourt 命令Packer 明快 来从 AUR 仓库中安装。

$ yaourt -S translate-shell
or
$ packer -S translate-shell

如何使用 Translate Shell

安装好后,打开终端闭关输入下面命令。 谷歌翻译会自动探测源文本是哪种语言,并且在默认情况下将之翻译成你的 locale 所对应的语言。

$ trans [Words]

下面我将泰米尔语中的单词 “நன்றி” (Nanri) 翻译成英语。 这个单词的意思是感谢别人。

$ trans நன்றி
நன்றி
(Naṉṟi)

Thanks

Definitions of நன்றி
[ தமிழ் -> English ]

noun
    gratitude
        நன்றி
    thanks
        நன்றி

நன்றி
    Thanks

使用下面命令也能将英语翻译成泰米尔语。

$ trans :ta thanks
thanks
/THaNGks/

நன்றி
(Naṉṟi)

Definitions of thanks
[ English -> தமிழ் ]

noun
    நன்றி
        gratitude, thanks

thanks
    நன்றி

要将一个单词翻译到多个语种可以使用下面命令(本例中,我将单词翻译成泰米尔语以及印地语)。

$ trans :ta+hi thanks
thanks
/THaNGks/

நன்றி
(Naṉṟi)

Definitions of thanks
[ English -> தமிழ் ]

noun
    நன்றி
        gratitude, thanks

thanks
    நன்றி

thanks
/THaNGks/

धन्यवाद
(dhanyavaad)

Definitions of thanks
[ English -> हिन्दी ]

noun
    धन्यवाद
        thanks, thank, gratitude, thankfulness, felicitation

thanks
    धन्यवाद, शुक्रिया

使用下面命令可以将多个单词当成一个参数(句子)来进行翻译。(只需要把句子应用起来作为一个参数就行了)。

$ trans :ta "what is going on your life?"
what is going on your life?

உங்கள் வாழ்க்கையில் என்ன நடக்கிறது?
(Uṅkaḷ vāḻkkaiyil eṉṉa naṭakkiṟatu?)

Translations of what is going on your life?
[ English -> தமிழ் ]

what is going on your life?
    உங்கள் வாழ்க்கையில் என்ன நடக்கிறது?

下面命令单独地翻译各个单词。

$ trans :ta curios happy
curios

ஆர்வம்
(Ārvam)

Translations of curios
[ Română -> தமிழ் ]

curios
    ஆர்வம், அறிவாளிகள், ஆர்வமுள்ள, அறிய, ஆர்வமாக
happy
/ˈhapē/

சந்தோஷமாக
(Cantōṣamāka)

Definitions of happy
[ English -> தமிழ் ]

    மகிழ்ச்சியான
        happy, convivial, debonair, gay
    திருப்தி உடைய
        happy

adjective
    இன்பமான
        happy

happy
    சந்தோஷமாக, மகிழ்ச்சி, இனிய, சந்தோஷமா

简洁模式:默认情况下,Translate Shell 尽可能多的显示翻译信息。如果你希望只显示简要信息,只需要加上 -b选项。

$ trans -b :ta thanks
நன்றி

字典模式:加上 -d 可以把 Translate Shell 当成字典来用。

$ trans -d :en thanks
thanks
/THaNGks/

Synonyms
    noun
        - gratitude, appreciation, acknowledgment, recognition, credit

    exclamation
        - thank you, many thanks, thanks very much, thanks a lot, thank you kindly, much obliged, much appreciated, bless you, thanks a million

Examples
    - In short, thanks for everything that makes this city great this Thanksgiving.

    - many thanks

    - There were no thanks in the letter from him, just complaints and accusations.

    - It is a joyful celebration in which Bolivians give thanks for their freedom as a nation.

    - festivals were held to give thanks for the harvest

    - The collection, as usual, received a great response and thanks is extended to all who subscribed.

    - It would be easy to dwell on the animals that Tasmania has lost, but I prefer to give thanks for what remains.

    - thanks for being so helpful

    - It came back on about half an hour earlier than predicted, so I suppose I can give thanks for that.

    - Many thanks for the reply but as much as I tried to follow your advice, it's been a bad week.

    - To them and to those who have supported the office I extend my grateful thanks .

    - We can give thanks and words of appreciation to others for their kind deeds done to us.

    - Adam, thanks for taking time out of your very busy schedule to be with us tonight.

    - a letter of thanks

    - Thank you very much for wanting to go on reading, and thanks for your understanding.

    - Gerry has received a letter of thanks from the charity for his part in helping to raise this much needed cash.

    - So thanks for your reply to that guy who seemed to have a chip on his shoulder about it.

    - Suzanne, thanks for being so supportive with your comments on my blog.

    - She has never once acknowledged my thanks , or existence for that matter.

    - My grateful thanks go to the funders who made it possible for me to travel.

    - festivals were held to give thanks for the harvest

    - All you secretaries who made it this far into the article… thanks for your patience.

    - So, even though I don't think the photos are that good, thanks for the compliments!

    - And thanks for warning us that your secret service requires a motorcade of more than 35 cars.

    - Many thanks for your advice, which as you can see, I have passed on to our readers.

    - Tom Ryan was given a bottle of wine as a thanks for his active involvement in the twinning project.

    - Mr Hill insists he has received no recent complaints and has even been sent a letter of thanks from the forum.

    - Hundreds turned out to pay tribute to a beloved former headteacher at a memorial service to give thanks for her life.

    - Again, thanks for a well written and much deserved tribute to our good friend George.

    - I appreciate your doing so, and thanks also for the compliments about the photos!

See also
    Thanks!, thank, many thanks, thanks to, thanks to you, special thanks, give thanks, thousand thanks, Many thanks!, render thanks, heartfelt thanks, thanks to this

使用下面格式可以使用 Translate Shell 来翻译文件。

$ trans :ta file:///home/magi/gtrans.txt
உங்கள் வாழ்க்கையில் என்ன நடக்கிறது?

下面命令可以让 Translate Shell 进入交互模式。 在进入交互模式之前你需要明确指定源语言和目标语言。本例中,我将英文单词翻译成泰米尔语。

$ trans -shell en:ta thanks
Translate Shell
(:q to quit)
thanks
/THaNGks/

நன்றி
(Naṉṟi)

Definitions of thanks
[ English -> தமிழ் ]

noun
    நன்றி
        gratitude, thanks

thanks
    நன்றி

想知道语言代码,可以执行下面命令。

$ trans -R

或者

$ trans -T
┌───────────────────┬────────────────────┬────────────────────┐
│ Afrikaans      -   af │ Hindi          -   hi │ Punjabi        -   pa │
│ Albanian       -   sq │ Hmong          -  hmn │ Querétaro Otomi-  otq │
│ Amharic        -   am │ Hmong Daw      -  mww │ Romanian       -   ro │
│ Arabic         -   ar │ Hungarian      -   hu │ Russian        -   ru │
│ Armenian       -   hy │ Icelandic      -   is │ Samoan         -   sm │
│ Azerbaijani    -   az │ Igbo           -   ig │ Scots Gaelic   -   gd │
│ Basque         -   eu │ Indonesian     -   id │ Serbian (Cyr...-sr-Cyrl
│ Belarusian     -   be │ Irish          -   ga │ Serbian (Latin)-sr-Latn
│ Bengali        -   bn │ Italian        -   it │ Sesotho        -   st │
│ Bosnian        -   bs │ Japanese       -   ja │ Shona          -   sn │
│ Bulgarian      -   bg │ Javanese       -   jv │ Sindhi         -   sd │
│ Cantonese      -  yue │ Kannada        -   kn │ Sinhala        -   si │
│ Catalan        -   ca │ Kazakh         -   kk │ Slovak         -   sk │
│ Cebuano        -  ceb │ Khmer          -   km │ Slovenian      -   sl │
│ Chichewa       -   ny │ Klingon        -  tlh │ Somali         -   so │
│ Chinese Simp...- zh-CN│ Klingon (pIqaD)tlh-Qaak Spanish        -   es │
│ Chinese Trad...- zh-TW│ Korean         -   ko │ Sundanese      -   su │
│ Corsican       -   co │ Kurdish        -   ku │ Swahili        -   sw │
│ Croatian       -   hr │ Kyrgyz         -   ky │ Swedish        -   sv │
│ Czech          -   cs │ Lao            -   lo │ Tahitian       -   ty │
│ Danish         -   da │ Latin          -   la │ Tajik          -   tg │
│ Dutch          -   nl │ Latvian        -   lv │ Tamil          -   ta │
│ English        -   en │ Lithuanian     -   lt │ Tatar          -   tt │
│ Esperanto      -   eo │ Luxembourgish  -   lb │ Telugu         -   te │
│ Estonian       -   et │ Macedonian     -   mk │ Thai           -   th │
│ Fijian         -   fj │ Malagasy       -   mg │ Tongan         -   to │
│ Filipino       -   tl │ Malay          -   ms │ Turkish        -   tr │
│ Finnish        -   fi │ Malayalam      -   ml │ Udmurt         -  udm │
│ French         -   fr │ Maltese        -   mt │ Ukrainian      -   uk │
│ Frisian        -   fy │ Maori          -   mi │ Urdu           -   ur │
│ Galician       -   gl │ Marathi        -   mr │ Uzbek          -   uz │
│ Georgian       -   ka │ Mongolian      -   mn │ Vietnamese     -   vi │
│ German         -   de │ Myanmar        -   my │ Welsh          -   cy │
│ Greek          -   el │ Nepali         -   ne │ Xhosa          -   xh │
│ Gujarati       -   gu │ Norwegian      -   no │ Yiddish        -   yi │
│ Haitian Creole -   ht │ Pashto         -   ps │ Yoruba         -   yo │
│ Hausa          -   ha │ Persian        -   fa │ Yucatec Maya   -  yua │
│ Hawaiian       -  haw │ Polish         -   pl │ Zulu           -   zu │
│ Hebrew         -   he │ Portuguese     -   pt │                       │
└───────────────────┴────────────────────┴────────────────────┘

想了解更多选项的内容,可以查看其 man 手册。

$ man trans

via: https://www.2daygeek.com/translate-shell-a-tool-to-use-google-translate-from-command-line-in-linux/

作者:Magesh Maruthamuthu 译者:lujun9972 校对:wxy

本文由 LCTT 原创编译,Linux中国 荣誉推出

不久前,我们写过一篇关于 teleconsole 的介绍,该工具可用于快速分享终端给任何人(任何你信任的人)。今天我们要聊一聊另一款类似的应用,名叫 tmate

tmate 有什么用?它可以让你在需要帮助时向你的朋友们求助。

什么是 tmate?

tmate 的意思是 teammates,它是 tmux 的一个分支,并且使用相同的配置信息(例如快捷键配置,配色方案等)。它是一个终端多路复用器,同时具有即时分享终端的能力。它允许在单个屏幕中创建并操控多个终端,同时这些终端还能与其他同事分享。

你可以分离会话,让作业在后台运行,然后在想要查看状态时重新连接会话。tmate 提供了一个即时配对的方案,让你可以与一个或多个队友共享一个终端。

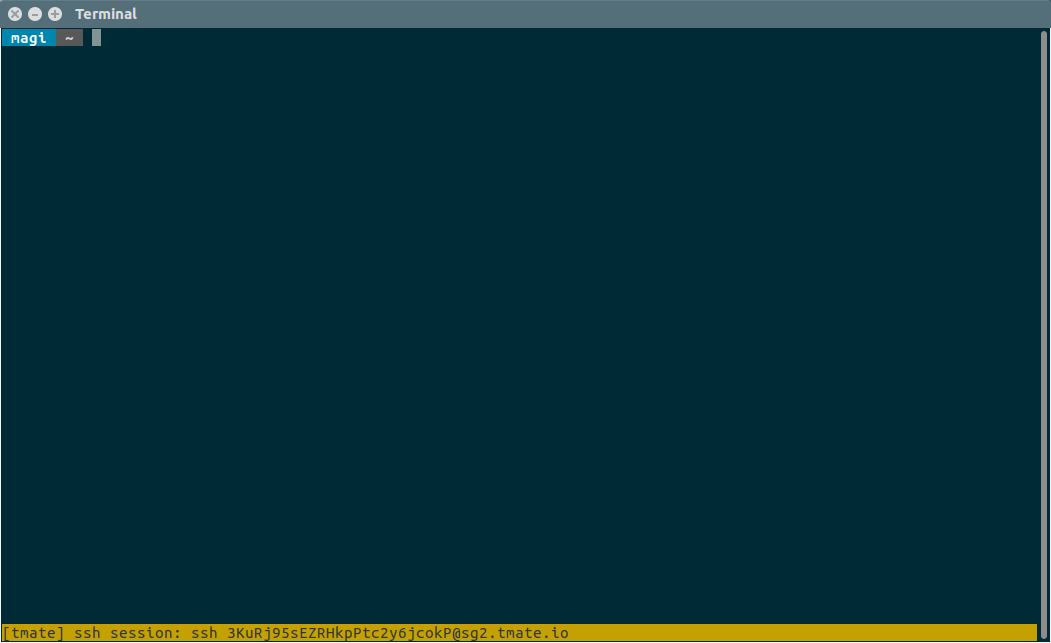
在屏幕的地步有一个状态栏,显示了当前会话的一些诸如 ssh 命令之类的共享信息。

tmate 是怎么工作的?

  • 运行 tmate 时,会通过 libssh 在后台创建一个连接到 tmate.io (由 tmate 开发者维护的后台服务器)的 ssh 连接。
  • tmate.io 服务器的 ssh 密钥通过 DH 交换进行校验。
  • 客户端通过本地 ssh 密钥进行认证。
  • 连接创建后,本地 tmux 服务器会生成一个 150 位(不可猜测的随机字符)会话令牌。
  • 队友能通过用户提供的 SSH 会话 ID 连接到 tmate.io。

使用 tmate 的必备条件

由于 tmate.io 服务器需要通过本地 ssh 密钥来认证客户机,因此其中一个必备条件就是生成 SSH 密钥 key。 记住,每个系统都要有自己的 SSH 密钥。

$ ssh-keygen -t rsa
Generating public/private rsa key pair.
Enter file in which to save the key (/home/magi/.ssh/id_rsa): 
Enter passphrase (empty for no passphrase): 
Enter same passphrase again: 
Your identification has been saved in /home/magi/.ssh/id_rsa.
Your public key has been saved in /home/magi/.ssh/id_rsa.pub.
The key fingerprint is:
SHA256:3ima5FuwKbWyyyNrlR/DeBucoyRfdOtlUmb5D214NC8 magi@magi-VirtualBox
The key's randomart image is:
+---[RSA 2048]----+
|                 |
|                 |
|           .     |
|      . . =   o  |
|     *ooS= . + o |
|  . =.@*o.o.+ E .|
|   =o==B++o  = . |
|  o.+*o+..    .  |
| ..o+o=.         |
+----[SHA256]-----+

如何安装 tmate

tmate 已经包含在某些发行版的官方仓库中,可以通过包管理器来安装。

对于 Debian/Ubuntu,可以使用 APT-GET 命令或者 APT 命令to 来安装。

$ sudo apt-get install software-properties-common
$ sudo add-apt-repository ppa:tmate.io/archive
$ sudo apt-get update
$ sudo apt-get install tmate

你也可以从官方仓库中安装 tmate。

$ sudo apt-get install tmate

对于 Fedora,使用 DNF 命令 来安装。

$ sudo dnf install tmate

对于基于 Arch Linux 的系统,使用 Yaourt 命令Packer 命令 来从 AUR 仓库中安装。

$ yaourt -S tmate

$ packer -S tmate

对于 openSUSE,使用 Zypper 命令 来安装。

$ sudo zypper in tmate

如何使用 tmate

成功安装后,打开终端然后输入下面命令,就会打开一个新的会话,在屏幕底部,你能看到 SSH 会话的 ID。

$ tmate

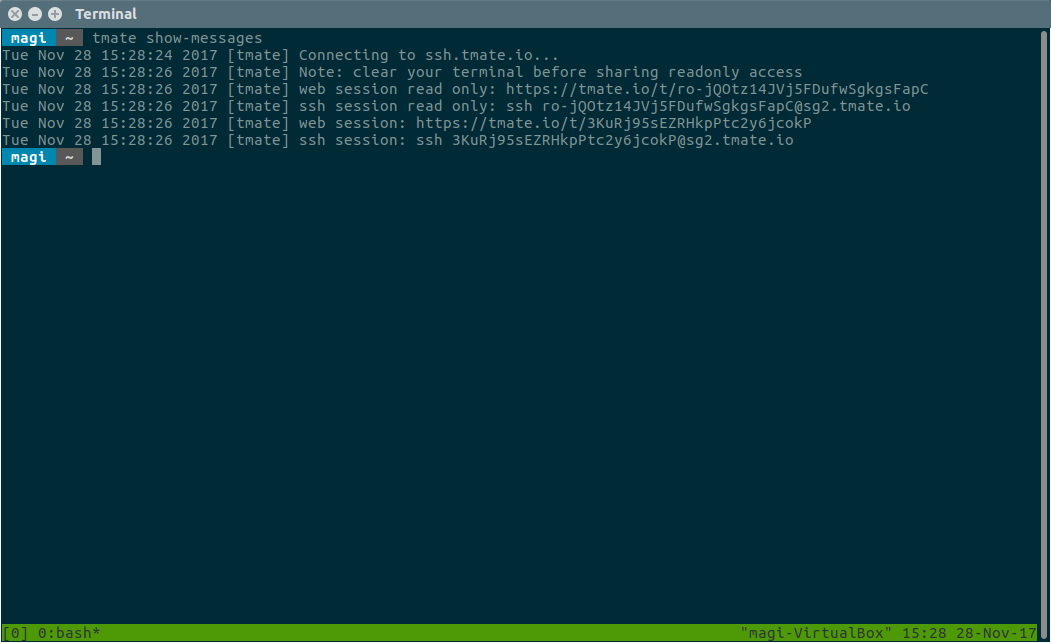
要注意的是,SSH 会话 ID 会在几秒后消失,不过不要紧,你可以通过下面命令获取到这些详细信息。

$ tmate show-messages

tmateshow-messages 命令会显示 tmate 的日志信息,其中包含了该 ssh 连接内容。

现在,分享你的 SSH 会话 ID 给你的朋友或同事从而允许他们观看终端会话。除了 SSH 会话 ID 以外,你也可以分享 web URL。

另外你还可以选择分享的是只读会话还是可读写会话。

如何通过 SSH 连接会话

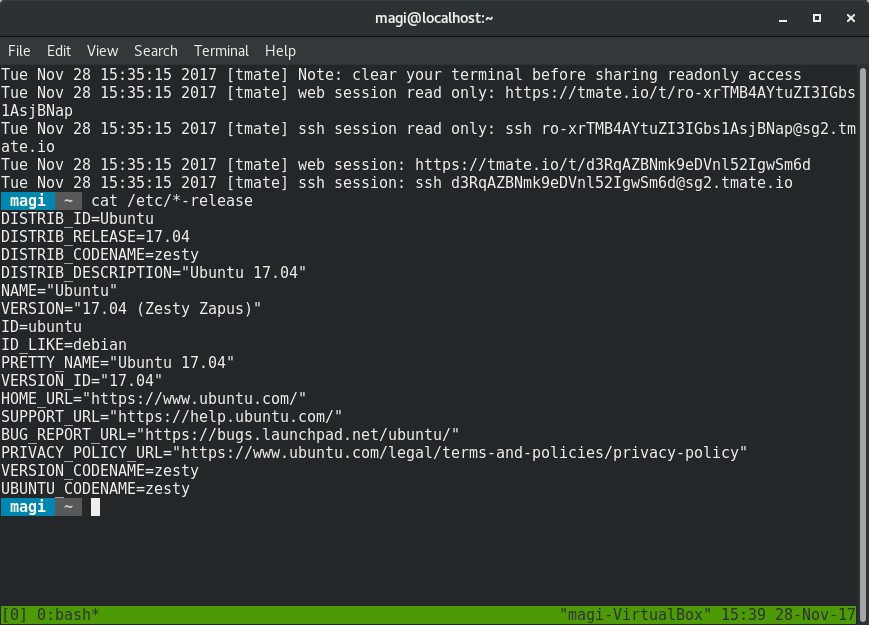
只需要在终端上运行你从朋友那得到的 SSH 终端 ID 就行了。类似下面这样。

$ ssh session: ssh [email protected]

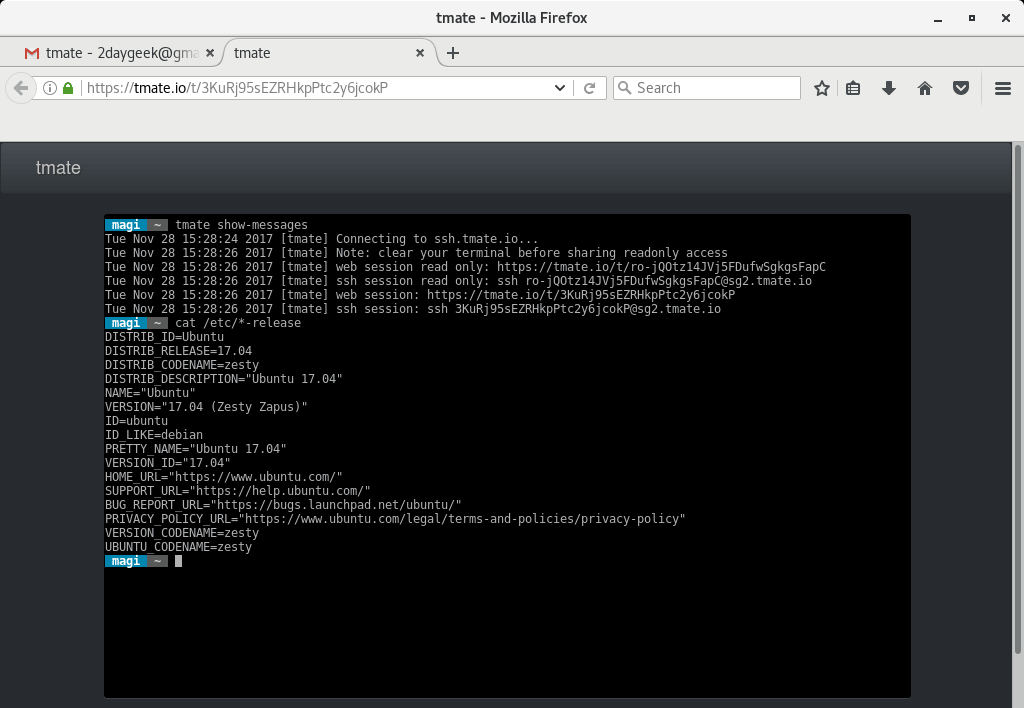
如何通过 Web URL 连接会话

打开浏览器然后访问朋友给你的 URL 就行了。像下面这样。

只需要输入 exit 就能退出会话了。

[Source System Output]
[exited]

[Remote System Output]
[server exited]
Connection to sg2.tmate.io closed by remote host。
Connection to sg2.tmate.io closed。

via: https://www.2daygeek.com/tmate-instantly-share-your-terminal-session-to-anyone-in-seconds/

作者:Magesh Maruthamuthu 译者:lujun9972 校对:wxy

本文由 LCTT 原创编译,Linux中国 荣誉推出