Remy van Elst 发布的文章

这是一篇快速指南,使用 OpenSSL 来生成 CA ( 证书授权中心 certificate authority )、 中级 CA intermediate CA 末端证书 end certificate 。包括 OCSP、CRL 和 CA 颁发者 Issuer 信息、具体颁发和失效日期。

我们将设置我们自己的 根 CA root CA ,然后使用根 CA 生成一个示例的中级 CA,并使用中级 CA 签发最终用户证书。

根 CA

为根 CA 创建一个目录,并进入:

mkdir -p ~/SSLCA/root/
cd ~/SSLCA/root/

生成根 CA 的 8192 位长的 RSA 密钥:

openssl genrsa -out rootca.key 8192

输出类似如下:

Generating RSA private key, 8192 bit long modulus
.........++
....................................................................................................................++
e is 65537 (0x10001)

如果你要用密码保护这个密钥,在命令行添加选项 -aes256

创建 SHA-256 自签名的根 CA 证书 ca.crt;你需要为你的根 CA 提供识别信息:

openssl req -sha256 -new -x509 -days 1826 -key rootca.key -out rootca.crt

输出类似如下:

You are about to be asked to enter information that will be incorporated
into your certificate request.
What you are about to enter is what is called a Distinguished Name or a DN.
There are quite a few fields but you can leave some blank
For some fields there will be a default value,
If you enter '.', the field will be left blank.
-----
Country Name (2 letter code) [AU]:CN
State or Province Name (full name) [Some-State]:Beijing
Locality Name (eg, city) []:Chaoyang dist.
Organization Name (eg, company) [Internet Widgits Pty Ltd]:Linux.CN
Organizational Unit Name (eg, section) []:Linux.CN CA
Common Name (e.g. server FQDN or YOUR name) []:Linux.CN Root CA
Email Address []:[email protected]

创建几个文件, 用于该 CA 存储其序列号:

touch certindex
echo 1000 > certserial
echo 1000 > crlnumber

创建 CA 的配置文件,该文件包含 CRL 和 OCSP 终端的存根。

# vim ca.conf
[ ca ]
default_ca = myca

[ crl_ext ]
issuerAltName=issuer:copy 
authorityKeyIdentifier=keyid:always

[ myca ]
dir = ./
new_certs_dir = $dir
unique_subject = no
certificate = $dir/rootca.crt
database = $dir/certindex
private_key = $dir/rootca.key
serial = $dir/certserial
default_days = 730
default_md = sha1
policy = myca_policy
x509_extensions = myca_extensions
crlnumber = $dir/crlnumber
default_crl_days = 730

[ myca_policy ]
commonName = supplied
stateOrProvinceName = supplied
countryName = optional
emailAddress = optional
organizationName = supplied
organizationalUnitName = optional

[ myca_extensions ]
basicConstraints = critical,CA:TRUE
keyUsage = critical,any
subjectKeyIdentifier = hash
authorityKeyIdentifier = keyid:always,issuer
keyUsage = digitalSignature,keyEncipherment,cRLSign,keyCertSign
extendedKeyUsage = serverAuth
crlDistributionPoints = @crl_section
subjectAltName  = @alt_names
authorityInfoAccess = @ocsp_section

[ v3_ca ]
basicConstraints = critical,CA:TRUE,pathlen:0
keyUsage = critical,any
subjectKeyIdentifier = hash
authorityKeyIdentifier = keyid:always,issuer
keyUsage = digitalSignature,keyEncipherment,cRLSign,keyCertSign
extendedKeyUsage = serverAuth
crlDistributionPoints = @crl_section
subjectAltName  = @alt_names
authorityInfoAccess = @ocsp_section

[ alt_names ]
DNS.0 = Linux.CN Root CA
DNS.1 = Linux.CN CA Root
  
[crl_section]
URI.0 = http://pki.linux.cn/rootca.crl
URI.1 = http://pki2.linux.cn/rootca.crl

[ ocsp_section ]
caIssuers;URI.0 = http://pki.linux.cn/rootca.crt
caIssuers;URI.1 = http://pki2.linux.cn/rootca.crt
OCSP;URI.0 = http://pki.linux.cn/ocsp/
OCSP;URI.1 = http://pki2.linux.cn/ocsp/

如果你要设置一个特定的证书起止时间,添加下述内容到 [myca]

# format: YYYYMMDDHHMMSS
default_enddate = 20191222035911
default_startdate = 20181222035911

创建1号中级 CA

生成中级 CA 的私钥

openssl genrsa -out intermediate1.key 4096

生成其 CSR:

openssl req -new -sha256 -key intermediate1.key -out intermediate1.csr

输出类似如下:

You are about to be asked to enter information that will be incorporated
into your certificate request.
What you are about to enter is what is called a Distinguished Name or a DN.
There are quite a few fields but you can leave some blank
For some fields there will be a default value,
If you enter '.', the field will be left blank.
-----
Country Name (2 letter code) [AU]:CN
State or Province Name (full name) [Some-State]:Beijing
Locality Name (eg, city) []:Chaoyang dist.
Organization Name (eg, company) [Internet Widgits Pty Ltd]:Linux.CN
Organizational Unit Name (eg, section) []:Linux.CN CA
Common Name (e.g. server FQDN or YOUR name) []:Linux.CN Intermediate CA
Email Address []:

Please enter the following 'extra' attributes
to be sent with your certificate request
A challenge password []:
An optional company name []:

请确保中级 CA 的主题名(CN,Common Name)和根 CA 的不同。

使用根 CA 为你创建的中级 CA 的 CSR 签名:

openssl ca -batch -config ca.conf -notext -in intermediate1.csr -out intermediate1.crt

输出类似如下:

Using configuration from ca.conf
Check that the request matches the signature
Signature ok
The Subject's Distinguished Name is as follows
countryName           :PRINTABLE:'CN'
stateOrProvinceName   :ASN.1 12:'Beijing'
localityName          :ASN.1 12:'chaoyang dist.'
organizationName      :ASN.1 12:'Linux.CN'
organizationalUnitName:ASN.1 12:'Linux.CN CA'
commonName            :ASN.1 12:'Linux.CN Intermediate CA'
Certificate is to be certified until Mar 30 15:07:43 2017 GMT (730 days)

Write out database with 1 new entries
Data Base Updated

生成 CRL (包括 PEM 和 DER 两种格式):

openssl ca -config ca.conf -gencrl -keyfile rootca.key -cert rootca.crt -out rootca.crl.pem

openssl crl -inform PEM -in rootca.crl.pem -outform DER -out rootca.crl

每次使用该 CA 签名证书后都需要生成 CRL。

如果需要的话,你可以 撤销 revoke 这个中级证书:

openssl ca -config ca.conf -revoke intermediate1.crt -keyfile rootca.key -cert rootca.crt

配置1号中级 CA

给该中级 CA 创建新目录,并进入:

mkdir ~/SSLCA/intermediate1/
cd ~/SSLCA/intermediate1/

从根 CA 那边复制这个中级 CA 的证书和私钥:

cp ../root/intermediate1.key ./
cp ../root/intermediate1.crt ./

创建索引文件:

touch certindex
echo 1000 > certserial
echo 1000 > crlnumber

创建一个新的 ca.conf

# vim ca.conf

[ ca ]
default_ca = myca

[ crl_ext ]
issuerAltName=issuer:copy 
authorityKeyIdentifier=keyid:always

[ myca ]
dir = ./
new_certs_dir = $dir
unique_subject = no
certificate = $dir/intermediate1.crt
database = $dir/certindex
private_key = $dir/intermediate1.key
serial = $dir/certserial
default_days = 365
default_md = sha1
policy = myca_policy
x509_extensions = myca_extensions
crlnumber = $dir/crlnumber
default_crl_days = 365

[ myca_policy ]
commonName = supplied
stateOrProvinceName = supplied
countryName = optional
emailAddress = optional
organizationName = supplied
organizationalUnitName = optional

[ myca_extensions ]
basicConstraints = critical,CA:FALSE
keyUsage = critical,any
subjectKeyIdentifier = hash
authorityKeyIdentifier = keyid:always,issuer
keyUsage = digitalSignature,keyEncipherment
extendedKeyUsage = serverAuth
crlDistributionPoints = @crl_section
subjectAltName  = @alt_names
authorityInfoAccess = @ocsp_section

[ alt_names ]
DNS.0 = Linux.CN Intermidiate CA 1
DNS.1 = Linux.CN CA Intermidiate 1

[ crl_section ]
URI.0 = http://pki.linux.cn/intermediate1.crl
URI.1 = http://pki2.linux.cn/intermediate1.crl

[ ocsp_section ]
caIssuers;URI.0 = http://pki.linux.cn/intermediate1.crt
caIssuers;URI.1 = http://pki2.linux.cn/intermediate1.crt
OCSP;URI.0 = http://pki.linux.cn/ocsp/
OCSP;URI.1 = http://pki2.linux.cn/ocsp/

修改 [alt_names] 小节为你所需的 替代主题名 Subject Alternative names 。如果不需要就删除引入它的 subjectAltName = @alt_names 行。

如果你需要指定起止时间,添加如下行到 [myca] 中。

# format: YYYYMMDDHHMMSS
default_enddate = 20191222035911
default_startdate = 20181222035911

生成一个空的 CRL (包括 PEM 和 DER 两种格式):

openssl ca -config ca.conf -gencrl -keyfile intermediate1.key -cert intermediate1.crt -out intermediate1.crl.pem

openssl crl -inform PEM -in intermediate1.crl.pem -outform DER -out intermediate1.crl

创建最终用户证书

我们使用新的中级 CA 来生成最终用户的证书。为每个你需要用此 CA 签名的最终用户证书重复这些步骤。

mkdir ~/enduser-certs
cd ~/enduser-certs

生成最终用户的私钥:

openssl genrsa -out enduser-example.com.key 4096

生成最终用户的 CSR:

openssl req -new -sha256 -key enduser-example.com.key -out enduser-example.com.csr

输出类似如下:

You are about to be asked to enter information that will be incorporated
into your certificate request.
What you are about to enter is what is called a Distinguished Name or a DN.
There are quite a few fields but you can leave some blank
For some fields there will be a default value,
If you enter '.', the field will be left blank.
-----
Country Name (2 letter code) [AU]:CN
State or Province Name (full name) [Some-State]:Shanghai
Locality Name (eg, city) []:Xuhui dist.
Organization Name (eg, company) [Internet Widgits Pty Ltd]:Example Inc
Organizational Unit Name (eg, section) []:IT Dept
Common Name (e.g. server FQDN or YOUR name) []:example.com
Email Address []:

Please enter the following 'extra' attributes
to be sent with your certificate request
A challenge password []:
An optional company name []:

用1号中级 CA 签名最终用户的证书:

cd ~/SSLCA/intermediate1
openssl ca -batch -config ca.conf -notext -in ~/enduser-certs/enduser-example.com.csr -out ~/enduser-certs/enduser-example.com.crt

输出类似如下:

Using configuration from ca.conf
Check that the request matches the signature
Signature ok
The Subject's Distinguished Name is as follows
countryName           :PRINTABLE:'CN'
stateOrProvinceName   :ASN.1 12:'Shanghai'
localityName          :ASN.1 12:'Xuhui dist.'
organizationName      :ASN.1 12:'Example Inc'
organizationalUnitName:ASN.1 12:'IT Dept'
commonName            :ASN.1 12:'example.com'
Certificate is to be certified until Mar 30 15:18:26 2016 GMT (365 days)

Write out database with 1 new entries
Data Base Updated

生成 CRL (包括 PEM 和 DER 两种格式):

cd ~/SSLCA/intermediate1/
openssl ca -config ca.conf -gencrl -keyfile intermediate1.key -cert intermediate1.crt -out intermediate1.crl.pem

openssl crl -inform PEM -in intermediate1.crl.pem -outform DER -out intermediate1.crl

每次使用该 CA 签名证书后都需要生成 CRL。

如果需要的话,你可以撤销revoke这个最终用户证书:

cd ~/SSLCA/intermediate1/  
openssl ca -config ca.conf -revoke ~/enduser-certs/enduser-example.com.crt -keyfile intermediate1.key -cert intermediate1.crt

输出类似如下:

Using configuration from ca.conf
Revoking Certificate 1000.
Data Base Updated

将根证书和中级证书连接起来创建证书链文件:

cat ../root/rootca.crt intermediate1.crt > ~/enduser-certs/enduser-example.com.chain

将这些文件发送给最终用户:

enduser-example.com.crt
enduser-example.com.key
enduser-example.com.chain

你也可以让最终用户提供他们中级的 CSR 文件,而只发回给他们 这个 .crt 文件。不要从服务器上删除它们,否则就不能撤销了。

校验证书

你可以通过如下命令使用证书链来验证最终用户证书:

cd ~/enduser-certs
openssl verify -CAfile enduser-example.com.chain enduser-example.com.crt 
enduser-example.com.crt: OK

你也可以用 CRL 来校验它。首先将 PEM CRL 连接到证书链文件:

cd ~/SSLCA/intermediate1
cat ../root/rootca.crt intermediate1.crt intermediate1.crl.pem > ~/enduser-certs/enduser-example.com.crl.chain

校验证书:

cd ~/enduser-certs
openssl verify -crl_check -CAfile enduser-example.com.crl.chain enduser-example.com.crt

如果该证书未撤销,输出如下:

enduser-example.com.crt: OK

如果撤销了,输出如下:

enduser-example.com.crt: CN = example.com, ST = Beijing, C = CN, O = Example Inc, OU = IT Dept
error 23 at 0 depth lookup:certificate revoked
这些是关于使用 OpenSSL 生成证书授权(CA)、中间证书授权和末端证书的速记随笔,内容包括 OCSP、CRL 和 CA 颁发者信息,以及指定颁发和有效期限等。

我们将建立我们自己的根 CA,我们将使用根 CA 来生成一个中间 CA 的例子,我们将使用中间 CA 来签署末端用户证书。

根 CA

创建根 CA 授权目录并切换到该目录:

mkdir ~/SSLCA/root/
cd ~/SSLCA/root/

为我们的根 CA 生成一个8192位长的 SHA-256 RSA 密钥:

openssl genrsa -aes256 -out rootca.key 8192

样例输出:

Generating RSA private key, 8192 bit long modulus
.........++
....................................................................................................................++
e is 65537 (0x10001)

如果你想要用密码保护该密钥,请添加 -aes256 选项。

创建自签名根 CA 证书 ca.crt;你需要为你的根 CA 提供一个身份:

openssl req -sha256 -new -x509 -days 1826 -key rootca.key -out rootca.crt

样例输出:

You are about to be asked to enter information that will be incorporated
into your certificate request.
What you are about to enter is what is called a Distinguished Name or a DN.
There are quite a few fields but you can leave some blank
For some fields there will be a default value,
If you enter '.', the field will be left blank.
-----
Country Name (2 letter code) [AU]:NL
State or Province Name (full name) [Some-State]:Zuid Holland
Locality Name (eg, city) []:Rotterdam
Organization Name (eg, company) [Internet Widgits Pty Ltd]:Sparkling Network
Organizational Unit Name (eg, section) []:Sparkling CA
Common Name (e.g. server FQDN or YOUR name) []:Sparkling Root CA
Email Address []:

创建一个存储 CA 序列的文件:

touch certindex
echo 1000 > certserial
echo 1000 > crlnumber

放置 CA 配置文件,该文件持有 CRL 和 OCSP 末端的存根。

# vim ca.conf
[ ca ]
default_ca = myca

[ crl_ext ]
issuerAltName=issuer:copy 
authorityKeyIdentifier=keyid:always

 [ myca ]
 dir = ./
 new_certs_dir = $dir
 unique_subject = no
 certificate = $dir/rootca.crt
 database = $dir/certindex
 private_key = $dir/rootca.key
 serial = $dir/certserial
 default_days = 730
 default_md = sha1
 policy = myca_policy
 x509_extensions = myca_extensions
 crlnumber = $dir/crlnumber
 default_crl_days = 730

 [ myca_policy ]
 commonName = supplied
 stateOrProvinceName = supplied
 countryName = optional
 emailAddress = optional
 organizationName = supplied
 organizationalUnitName = optional

 [ myca_extensions ]
 basicConstraints = critical,CA:TRUE
 keyUsage = critical,any
 subjectKeyIdentifier = hash
 authorityKeyIdentifier = keyid:always,issuer
 keyUsage = digitalSignature,keyEncipherment,cRLSign,keyCertSign
 extendedKeyUsage = serverAuth
 crlDistributionPoints = @crl_section
 subjectAltName  = @alt_names
 authorityInfoAccess = @ocsp_section

 [ v3_ca ]
 basicConstraints = critical,CA:TRUE,pathlen:0
 keyUsage = critical,any
 subjectKeyIdentifier = hash
 authorityKeyIdentifier = keyid:always,issuer
 keyUsage = digitalSignature,keyEncipherment,cRLSign,keyCertSign
 extendedKeyUsage = serverAuth
 crlDistributionPoints = @crl_section
 subjectAltName  = @alt_names
 authorityInfoAccess = @ocsp_section

 [alt_names]
 DNS.0 = Sparkling Intermidiate CA 1
 DNS.1 = Sparkling CA Intermidiate 1

 [crl_section]
 URI.0 = http://pki.sparklingca.com/SparklingRoot.crl
 URI.1 = http://pki.backup.com/SparklingRoot.crl

 [ocsp_section]
 caIssuers;URI.0 = http://pki.sparklingca.com/SparklingRoot.crt
 caIssuers;URI.1 = http://pki.backup.com/SparklingRoot.crt
 OCSP;URI.0 = http://pki.sparklingca.com/ocsp/
 OCSP;URI.1 = http://pki.backup.com/ocsp/

如果你需要设置某个特定的证书生效/过期日期,请添加以下内容到[myca]

# format: YYYYMMDDHHMMSS
default_enddate = 20191222035911
default_startdate = 20181222035911

创建中间 CA

生成中间 CA (名为 intermediate1)的私钥:

openssl genrsa -out intermediate1.key 4096

生成中间 CA 的 CSR:

openssl req -new -sha256 -key intermediate1.key -out intermediate1.csr

样例输出:

You are about to be asked to enter information that will be incorporated
into your certificate request.
What you are about to enter is what is called a Distinguished Name or a DN.
There are quite a few fields but you can leave some blank
For some fields there will be a default value,
If you enter '.', the field will be left blank.
-----
Country Name (2 letter code) [AU]:NL
State or Province Name (full name) [Some-State]:Zuid Holland
Locality Name (eg, city) []:Rotterdam
Organization Name (eg, company) [Internet Widgits Pty Ltd]:Sparkling Network
Organizational Unit Name (eg, section) []:Sparkling CA
Common Name (e.g. server FQDN or YOUR name) []:Sparkling Intermediate CA
Email Address []:

Please enter the following 'extra' attributes
to be sent with your certificate request
A challenge password []:
An optional company name []:

确保中间 CA 的主体(CN)和根 CA 不同。

用根 CA 签署中间 CA 的 CSR:

openssl ca -batch -config ca.conf -notext -in intermediate1.csr -out intermediate1.crt

样例输出:

Using configuration from ca.conf
Check that the request matches the signature
Signature ok
The Subject's Distinguished Name is as follows
countryName           :PRINTABLE:'NL'
stateOrProvinceName   :ASN.1 12:'Zuid Holland'
localityName          :ASN.1 12:'Rotterdam'
organizationName      :ASN.1 12:'Sparkling Network'
organizationalUnitName:ASN.1 12:'Sparkling CA'
commonName            :ASN.1 12:'Sparkling Intermediate CA'
Certificate is to be certified until Mar 30 15:07:43 2017 GMT (730 days)

Write out database with 1 new entries
Data Base Updated

生成 CRL(同时采用 PEM 和 DER 格式):

openssl ca -config ca.conf -gencrl -keyfile rootca.key -cert rootca.crt -out rootca.crl.pem

openssl crl -inform PEM -in rootca.crl.pem -outform DER -out rootca.crl

每次使用该 CA 签署证书后,请生成 CRL。

如果你需要撤销该中间证书:

openssl ca -config ca.conf -revoke intermediate1.crt -keyfile rootca.key -cert rootca.crt

配置中间 CA

为该中间 CA 创建一个新文件夹,然后进入该文件夹:

mkdir ~/SSLCA/intermediate1/
cd ~/SSLCA/intermediate1/

从根 CA 拷贝中间证书和密钥:

cp ~/SSLCA/root/intermediate1.key ./
cp ~/SSLCA/root/intermediate1.crt ./

创建索引文件:

touch certindex
echo 1000 > certserial
echo 1000 > crlnumber

创建一个新的 ca.conf 文件:

# vim ca.conf
[ ca ]
default_ca = myca

[ crl_ext ]
issuerAltName=issuer:copy 
authorityKeyIdentifier=keyid:always

 [ myca ]
 dir = ./
 new_certs_dir = $dir
 unique_subject = no
 certificate = $dir/intermediate1.crt
 database = $dir/certindex
 private_key = $dir/intermediate1.key
 serial = $dir/certserial
 default_days = 365
 default_md = sha1
 policy = myca_policy
 x509_extensions = myca_extensions
 crlnumber = $dir/crlnumber
 default_crl_days = 365

 [ myca_policy ]
 commonName = supplied
 stateOrProvinceName = supplied
 countryName = optional
 emailAddress = optional
 organizationName = supplied
 organizationalUnitName = optional

 [ myca_extensions ]
 basicConstraints = critical,CA:FALSE
 keyUsage = critical,any
 subjectKeyIdentifier = hash
 authorityKeyIdentifier = keyid:always,issuer
 keyUsage = digitalSignature,keyEncipherment
 extendedKeyUsage = serverAuth
 crlDistributionPoints = @crl_section
 subjectAltName  = @alt_names
 authorityInfoAccess = @ocsp_section

 [alt_names]
 DNS.0 = example.com
 DNS.1 = example.org

 [crl_section]
 URI.0 = http://pki.sparklingca.com/SparklingIntermidiate1.crl
 URI.1 = http://pki.backup.com/SparklingIntermidiate1.crl

 [ocsp_section]
 caIssuers;URI.0 = http://pki.sparklingca.com/SparklingIntermediate1.crt
 caIssuers;URI.1 = http://pki.backup.com/SparklingIntermediate1.crt
 OCSP;URI.0 = http://pki.sparklingca.com/ocsp/
 OCSP;URI.1 = http://pki.backup.com/ocsp/

修改 [alt_names] 部分,添加你需要的主体备选名。如果你不需要主体备选名,请移除该部分包括subjectAltName = @alt_names的行。

如果你需要设置一个指定的生效/到期日期,请添加以下内容到 [myca]

# format: YYYYMMDDHHMMSS
default_enddate = 20191222035911
default_startdate = 20181222035911

生成一个空白 CRL(同时以 PEM 和 DER 格式):

openssl ca -config ca.conf -gencrl -keyfile rootca.key -cert rootca.crt -out rootca.crl.pem

openssl crl -inform PEM -in rootca.crl.pem -outform DER -out rootca.crl

生成末端用户证书

我们使用这个新的中间 CA 来生成一个末端用户证书,请重复以下操作来使用该 CA 为每个用户签署。

mkdir enduser-certs

生成末端用户的私钥:

openssl genrsa -out enduser-certs/enduser-example.com.key 4096

生成末端用户的 CSR:

openssl req -new -sha256 -key enduser-certs/enduser-example.com.key -out enduser-certs/enduser-example.com.csr

样例输出:

You are about to be asked to enter information that will be incorporated
into your certificate request.
What you are about to enter is what is called a Distinguished Name or a DN.
There are quite a few fields but you can leave some blank
For some fields there will be a default value,
If you enter '.', the field will be left blank.
-----
Country Name (2 letter code) [AU]:NL
State or Province Name (full name) [Some-State]:Noord Holland
Locality Name (eg, city) []:Amsterdam
Organization Name (eg, company) [Internet Widgits Pty Ltd]:Example Inc
Organizational Unit Name (eg, section) []:IT Dept
Common Name (e.g. server FQDN or YOUR name) []:example.com
Email Address []:

Please enter the following 'extra' attributes
to be sent with your certificate request
A challenge password []:
An optional company name []:

使用中间 CA 签署末端用户的 CSR:

openssl ca -batch -config ca.conf -notext -in enduser-certs/enduser-example.com.csr -out enduser-certs/enduser-example.com.crt

样例输出:

Using configuration from ca.conf
Check that the request matches the signature
Signature ok
The Subject's Distinguished Name is as follows
countryName           :PRINTABLE:'NL'
stateOrProvinceName   :ASN.1 12:'Noord Holland'
localityName          :ASN.1 12:'Amsterdam'
organizationName      :ASN.1 12:'Example Inc'
organizationalUnitName:ASN.1 12:'IT Dept'
commonName            :ASN.1 12:'example.com'
Certificate is to be certified until Mar 30 15:18:26 2016 GMT (365 days)

Write out database with 1 new entries
Data Base Updated

生成 CRL(同时以 PEM 和 DER 格式):

openssl ca -config ca.conf -gencrl -keyfile intermediate1.key -cert intermediate1.crt -out intermediate1.crl.pem

openssl crl -inform PEM -in intermediate1.crl.pem -outform DER -out intermediate1.crl

每次你使用该 CA 签署证书后,都需要生成 CRL。

如果你需要撤销该末端用户证书:

openssl ca -config ca.conf -revoke enduser-certs/enduser-example.com.crt -keyfile intermediate1.key -cert intermediate1.crt

样例输出:

Using configuration from ca.conf
Revoking Certificate 1000.
Data Base Updated

通过连接根证书和中间证书来创建证书链文件。

cat ../root/rootca.crt intermediate1.crt > enduser-certs/enduser-example.com.chain

发送以下文件给末端用户:

enduser-example.com.crt
enduser-example.com.key
enduser-example.com.chain

你也可以让末端用户提供他们自己的 CSR,而只发送给他们这个 .crt 文件。不要把它从服务器删除,否则你就不能撤销了。

校验证书

你可以对证书链使用以下命令来验证末端用户证书:

openssl verify -CAfile enduser-certs/enduser-example.com.chain enduser-certs/enduser-example.com.crt 
enduser-certs/enduser-example.com.crt: OK

你也可以针对 CRL 来验证。首先,将 PEM 格式的 CRL 和证书链相连接:

cat ../root/rootca.crt intermediate1.crt intermediate1.crl.pem > enduser-certs/enduser-example.com.crl.chain

验证证书:

openssl verify -crl_check -CAfile enduser-certs/enduser-example.com.crl.chain enduser-certs/enduser-example.com.crt

没有撤销时的输出:

enduser-certs/enduser-example.com.crt: OK

撤销后的输出如下:

enduser-certs/enduser-example.com.crt: CN = example.com, ST = Noord Holland, C = NL, O = Example Inc, OU = IT Dept
error 23 at 0 depth lookup:certificate revoked

via: https://raymii.org/s/tutorials/OpenSSL_command_line_Root_and_Intermediate_CA_including_OCSP_CRL%20and_revocation.html

作者:Remy van Elst 译者:GOLinux 校对:wxy

本文由 LCTT 原创翻译,Linux中国 荣誉推出

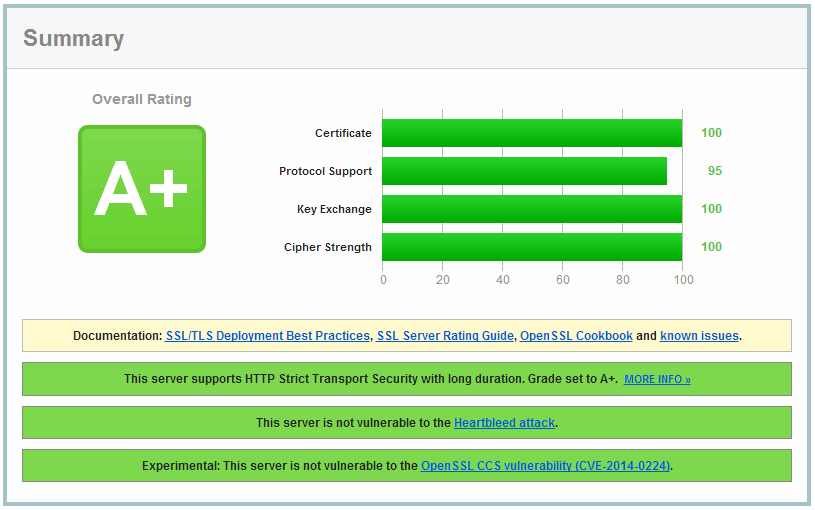
本文向你介绍如何在 nginx 服务器上设置健壮的 SSL 安全机制。我们通过禁用 SSL 压缩来降低 CRIME 攻击威胁;禁用协议上存在安全缺陷的 SSLv3 及更低版本,并设置更健壮的 加密套件 cipher suite 来尽可能启用 前向安全性 Forward Secrecy ;此外,我们还启用了 HSTS 和 HPKP。这样我们就拥有了一个健壮而可经受考验的 SSL 配置,并可以在 Qually Labs 的 SSL 测试中得到 A 级评分。

如果不求甚解的话,可以从 https://cipherli.st 上找到 nginx 、Apache 和 Lighttpd 的安全设置,复制粘帖即可。

本教程在 Digital Ocean 的 VPS 上测试通过。如果你喜欢这篇教程,想要支持作者的站点的话,购买 Digital Ocean 的 VPS 时请使用如下链接:https://www.digitalocean.com/?refcode=7435ae6b8212

本教程可以通过发布于 2014/1/21 的 SSL 实验室测试的严格要求(我之前就通过了测试,如果你按照本文操作就可以得到一个 A+ 评分)。

你可以从下列链接中找到这方面的进一步内容:

我们需要编辑 nginx 的配置,在 Ubuntu/Debian 上是 /etc/nginx/sited-enabled/yoursite.com,在 RHEL/CentOS 上是 /etc/nginx/conf.d/nginx.conf

本文中,我们需要编辑443端口(SSL)的 server 配置中的部分。在文末你可以看到完整的配置例子。

在编辑之前切记备份一下配置文件!

野兽攻击(BEAST)和 RC4

简单的说, 野兽攻击 BEAST 就是通过篡改一个加密算法的 密码块链 CBC,cipher block chaining 的模式,从而可以对部分编码流量悄悄解码。更多信息参照上面的链接。

针对 野兽攻击 BEAST ,较新的浏览器已经启用了客户端缓解方案。推荐方案是禁用 TLS 1.0 的所有加密算法,仅允许 RC4 算法。然而,针对 RC4 算法的攻击也越来越多 ,很多已经从理论上逐步发展为实际可行的攻击方式。此外,有理由相信 NSA 已经实现了他们所谓的“大突破”——攻破 RC4 。

禁用 RC4 会有几个后果。其一,当用户使用老旧的浏览器时,比如 Windows XP 上的 IE 会用 3DES 来替代 RC4。3DES 要比 RC4 更安全,但是它的计算成本更高,你的服务器就需要为这些用户付出更多的处理成本。其二,RC4 算法能减轻 野兽攻击 BEAST 的危害,如果禁用 RC4 会导致 TLS 1.0 用户会换到更容易受攻击的 AES-CBC 算法上(通常服务器端的对 野兽攻击 BEAST 的“修复方法”是让 RC4 优先于其它算法)。我认为 RC4 的风险要高于 野兽攻击 BEAST 的风险。事实上,有了客户端缓解方案(Chrome 和 Firefox 提供了缓解方案), 野兽攻击 BEAST 就不是什么大问题了。而 RC4 的风险却在增长:随着时间推移,对加密算法的破解会越来越多。

怪物攻击(FREAK)

怪物攻击 FREAK 是一种中间人攻击,它是由来自 INRIA、微软研究院和 IMDEA 的密码学家们所发现的。 怪物攻击 FREAK 的缩写来自“ RSA 出口密钥因子分解 Factoring RSA-EXPORT Keys

这个漏洞可上溯到上世纪九十年代,当时美国政府禁止出口加密软件,除非其使用编码密钥长度不超过512位的出口加密套件。

这造成了一些现在的 TLS 客户端存在一个缺陷,这些客户端包括: 苹果的 SecureTransport 、OpenSSL。这个缺陷会导致它们会接受出口降级 RSA 密钥,即便客户端并没有要求使用出口降级 RSA 密钥。这个缺陷带来的影响很讨厌:在客户端存在缺陷,且服务器支持出口降级 RSA 密钥时,会发生中间人攻击,从而导致连接的强度降低。

攻击分为两个组成部分:首先是服务器必须接受“ 出口降级 RSA 密钥 export grade RSA ”。

中间人攻击可以按如下流程:

  • 在客户端的 Hello 消息中,要求标准的 RSA 加密套件。
  • 中间人攻击者修改该消息为 ‘输出级 RSA 密钥’ export RSA
  • 服务器回应一个512位的输出级 RSA 密钥,并以其长期密钥签名。
  • 由于 OpenSSL/SecureTransport 的缺陷,客户端会接受这个弱密钥。
  • 攻击者根据 RSA 模数分解因子来恢复相应的 RSA 解密密钥。
  • 当客户端编码 ‘预主密码’ pre-master secret 给服务器时,攻击者现在就可以解码它并恢复 TLS 的 ‘主密码’ master secret
  • 从这里开始,攻击者就能看到了传输的明文并注入任何东西了。

本文所提供的加密套件不启用输出降级加密,请确认你的 OpenSSL 是最新的,也强烈建议你将客户端也升级到新的版本。

心血漏洞(Heartbleed)

心血漏洞 Heartbleed 是一个于2014年4月公布的 OpenSSL 加密库的漏洞,它是一个被广泛使用的传输层安全(TLS)协议的实现。无论是服务器端还是客户端在 TLS 中使用了有缺陷的 OpenSSL,都可以被利用该缺陷。由于它是因 DTLS 心跳扩展(RFC 6520)中的输入验证不正确(缺少了边界检查)而导致的,所以该漏洞根据“心跳”而命名。这个漏洞是一种缓存区超读漏洞,它可以读取到本不应该读取的数据。

哪个版本的 OpenSSL 受到 心血漏洞 Heartbleed 的影响?

各版本情况如下:

  • OpenSSL 1.0.1 直到 1.0.1f (包括)存在该缺陷
  • OpenSSL 1.0.1g 没有该缺陷
  • OpenSSL 1.0.0 分支没有该缺陷
  • OpenSSL 0.9.8 分支没有该缺陷

这个缺陷是2011年12月引入到 OpenSSL 中的,并随着 2012年3月14日 OpenSSL 发布的 1.0.1 而泛滥。2014年4月7日发布的 OpenSSL 1.0.1g 修复了该漏洞。

升级你的 OpenSSL 就可以避免该缺陷。

SSL 压缩(罪恶攻击 CRIME)

罪恶攻击 CRIME 使用 SSL 压缩来完成它的魔法,SSL 压缩在下述版本是默认关闭的: nginx 1.1.6及更高/1.0.9及更高(如果使用了 OpenSSL 1.0.0及更高), nginx 1.3.2及更高/1.2.2及更高(如果使用较旧版本的 OpenSSL)。

如果你使用一个早期版本的 nginx 或 OpenSSL,而且你的发行版没有向后移植该选项,那么你需要重新编译没有一个 ZLIB 支持的 OpenSSL。这会禁止 OpenSSL 使用 DEFLATE 压缩方式。如果你禁用了这个,你仍然可以使用常规的 HTML DEFLATE 压缩。

SSLv2 和 SSLv3

SSLv2 是不安全的,所以我们需要禁用它。我们也禁用 SSLv3,因为 TLS 1.0 在遭受到降级攻击时,会允许攻击者强制连接使用 SSLv3,从而禁用了 前向安全性 forward secrecy

如下编辑配置文件:

ssl_protocols TLSv1 TLSv1.1 TLSv1.2;

卷毛狗攻击(POODLE)和 TLS-FALLBACK-SCSV

SSLv3 会受到卷毛狗漏洞(POODLE)的攻击。这是禁用 SSLv3 的主要原因之一。

Google 提出了一个名为 TLS\_FALLBACK\_SCSV 的SSL/TLS 扩展,它用于防止强制 SSL 降级。如果你升级 到下述的 OpenSSL 版本会自动启用它。

  • OpenSSL 1.0.1 带有 TLS\_FALLBACK\_SCSV 1.0.1j 及更高。
  • OpenSSL 1.0.0 带有 TLS\_FALLBACK\_SCSV 1.0.0o 及更高。
  • OpenSSL 0.9.8 带有 TLS\_FALLBACK\_SCSV 0.9.8zc 及更高。

更多信息请参照 NGINX 文档

加密套件(cipher suite)

前向安全性 Forward Secrecy 用于在长期密钥被破解时确保会话密钥的完整性。 完备的前向安全性 PFS,Perfect Forward Secrecy 是指强制在每个/每次会话中推导新的密钥。

这就是说,泄露的私钥并不能用来解密(之前)记录下来的 SSL 通讯。

提供 完备的前向安全性 PFS,Perfect Forward Secrecy 功能的是那些使用了一种 Diffie-Hellman 密钥交换的短暂形式的加密套件。它们的缺点是系统开销较大,不过可以使用椭圆曲线的变体来改进。

以下两个加密套件是我推荐的,之后Mozilla 基金会也推荐了。

推荐的加密套件:

ssl_ciphers 'AES128+EECDH:AES128+EDH';

向后兼容的推荐的加密套件(IE6/WinXP):

ssl_ciphers "ECDHE-RSA-AES256-GCM-SHA384:ECDHE-RSA-AES128-GCM-SHA256:DHE-RSA-AES256-GCM-SHA384:DHE-RSA-AES128-GCM-SHA256:ECDHE-RSA-AES256-SHA384:ECDHE-RSA-AES128-SHA256:ECDHE-RSA-AES256-SHA:ECDHE-RSA-AES128-SHA:DHE-RSA-AES256-SHA256:DHE-RSA-AES128-SHA256:DHE-RSA-AES256-SHA:DHE-RSA-AES128-SHA:ECDHE-RSA-DES-CBC3-SHA:EDH-RSA-DES-CBC3-SHA:AES256-GCM-SHA384:AES128-GCM-SHA256:AES256-SHA256:AES128-SHA256:AES256-SHA:AES128-SHA:DES-CBC3-SHA:HIGH:!aNULL:!eNULL:!EXPORT:!DES:!MD5:!PSK:!RC4";

如果你的 OpenSSL 版本比较旧,不可用的加密算法会自动丢弃。应该一直使用上述的完整套件,让 OpenSSL 选择一个它所支持的。

加密套件的顺序是非常重要的,因为其决定了优先选择哪个算法。上述优先推荐的算法中提供了PFS(完备的前向安全性)。

较旧版本的 OpenSSL 也许不能支持这个算法的完整列表,AES-GCM 和一些 ECDHE 算法是相当新的,在 Ubuntu 和 RHEL 中所带的绝大多数 OpenSSL 版本中不支持。

优先顺序的逻辑

  • ECDHE+AESGCM 加密是首选的。它们是 TLS 1.2 加密算法,现在还没有广泛支持。当前还没有对它们的已知攻击。
  • PFS 加密套件好一些,首选 ECDHE,然后是 DHE。
  • AES 128 要好于 AES 256。有一个关于 AES256 带来的安全提升程度是否值回成本的讨论,结果是显而易见的。目前,AES128 要更值一些,因为它提供了不错的安全水准,确实很快,而且看起来对时序攻击更有抵抗力。
  • 在向后兼容的加密套件里面,AES 要优于 3DES。在 TLS 1.1及其以上,减轻了针对 AES 的 野兽攻击 BEAST 的威胁,而在 TLS 1.0上则难以实现该攻击。在非向后兼容的加密套件里面,不支持 3DES。
  • RC4 整个不支持了。3DES 用于向后兼容。参看 #RC4\_weaknesses 中的讨论。

强制丢弃的算法

  • aNULL 包含了非验证的 Diffie-Hellman 密钥交换,这会受到 中间人 MITM 攻击
  • eNULL 包含了无加密的算法(明文)
  • EXPORT 是老旧的弱加密算法,是被美国法律标示为可出口的
  • RC4 包含的加密算法使用了已弃用的 ARCFOUR 算法
  • DES 包含的加密算法使用了弃用的数据加密标准(DES)
  • SSLv2 包含了定义在旧版本 SSL 标准中的所有算法,现已弃用
  • MD5 包含了使用已弃用的 MD5 作为哈希算法的所有算法

更多设置

确保你也添加了如下行:

ssl_prefer_server_ciphers on;
ssl_session_cache shared:SSL:10m;

在一个 SSLv3 或 TLSv1 握手过程中选择一个加密算法时,一般使用客户端的首选算法。如果设置了上述配置,则会替代地使用服务器端的首选算法。

前向安全性和 Diffie Hellman Ephemeral (DHE)参数

前向安全性 Forward Secrecy 的概念很简单:客户端和服务器协商一个永不重用的密钥,并在会话结束时销毁它。服务器上的 RSA 私钥用于客户端和服务器之间的 Diffie-Hellman 密钥交换签名。从 Diffie-Hellman 握手中获取的预主密钥会用于之后的编码。因为预主密钥是特定于客户端和服务器之间建立的某个连接,并且只用在一个限定的时间内,所以称作 短暂模式 Ephemeral

使用了前向安全性,如果一个攻击者取得了一个服务器的私钥,他是不能解码之前的通讯信息的。这个私钥仅用于 Diffie Hellman 握手签名,并不会泄露预主密钥。Diffie Hellman 算法会确保预主密钥绝不会离开客户端和服务器,而且不能被中间人攻击所拦截。

所有版本的 nginx(如1.4.4)都依赖于 OpenSSL 给 Diffie-Hellman (DH)的输入参数。不幸的是,这意味着 Diffie-Hellman Ephemeral(DHE)将使用 OpenSSL 的默认设置,包括一个用于密钥交换的1024位密钥。因为我们正在使用2048位证书,DHE 客户端就会使用一个要比非 DHE 客户端更弱的密钥交换。

我们需要生成一个更强壮的 DHE 参数:

cd /etc/ssl/certs
openssl dhparam -out dhparam.pem 4096

然后告诉 nginx 将其用作 DHE 密钥交换:

ssl_dhparam /etc/ssl/certs/dhparam.pem;

OCSP 装订(Stapling)

当连接到一个服务器时,客户端应该使用 证书吊销列表 CRL,Certificate Revocation List 在线证书状态协议 OCSP,Online Certificate Status Protocol 记录来校验服务器证书的有效性。CRL 的问题是它已经增长的太大了,永远也下载不完了。

OCSP 更轻量级一些,因为我们每次只请求一条记录。但是副作用是当连接到一个服务器时必须对第三方 OCSP 响应器发起 OCSP 请求,这就增加了延迟和带来了潜在隐患。事实上,CA 所运营的 OCSP 响应器非常不可靠,浏览器如果不能及时收到答复,就会静默失败。攻击者通过 DoS 攻击一个 OCSP 响应器可以禁用其校验功能,这样就降低了安全性。

解决方法是允许服务器在 TLS 握手中发送缓存的 OCSP 记录,以绕开 OCSP 响应器。这个机制节省了客户端和 OCSP 响应器之间的通讯,称作 OCSP 装订。

客户端会在它的 CLIENT HELLO 中告知其支持 status\_request TLS 扩展,服务器仅在客户端请求它的时候才发送缓存的 OCSP 响应。

大多数服务器最多会缓存 OCSP 响应48小时。服务器会按照常规的间隔连接到 CA 的 OCSP 响应器来获取刷新的 OCSP 记录。OCSP 响应器的位置可以从签名的证书中的 授权信息访问 Authority Information Access 字段中获得。

HTTP 严格传输安全(HSTS)

如有可能,你应该启用 HTTP 严格传输安全(HSTS),它会引导浏览器和你的站点之间的通讯仅通过 HTTPS。

HTTP 公钥固定扩展(HPKP)

你也应该启用 HTTP 公钥固定扩展(HPKP)

公钥固定的意思是一个证书链必须包括一个白名单中的公钥。它确保仅有白名单中的 CA 才能够为某个域名签署证书,而不是你的浏览器中存储的任何 CA。

我已经写了一篇关于 HPKP 的背景理论及在 Apache、Lighttpd 和 NGINX 中配置例子的文章

配置范例

server {

  listen [::]:443 default_server;

  ssl on;
  ssl_certificate_key /etc/ssl/cert/raymii_org.pem;
  ssl_certificate /etc/ssl/cert/ca-bundle.pem;

  ssl_ciphers 'AES128+EECDH:AES128+EDH:!aNULL';

  ssl_protocols TLSv1 TLSv1.1 TLSv1.2;
  ssl_session_cache shared:SSL:10m;

  ssl_stapling on;
  ssl_stapling_verify on;
  resolver 8.8.4.4 8.8.8.8 valid=300s;
  resolver_timeout 10s;

  ssl_prefer_server_ciphers on;
  ssl_dhparam /etc/ssl/certs/dhparam.pem;

  add_header Strict-Transport-Security max-age=63072000;
  add_header X-Frame-Options DENY;
  add_header X-Content-Type-Options nosniff;

  root /var/www/;
  index index.html index.htm;
  server_name raymii.org;

}

结尾

如果你使用了上述配置,你需要重启 nginx:

# 首先检查配置文件是否正确
/etc/init.d/nginx configtest
# 然后重启
/etc/init.d/nginx restart

现在使用 SSL Labs 测试来看看你是否能得到一个漂亮的“A”。当然了,你也得到了一个安全的、强壮的、经得起考验的 SSL 配置!


via: https://raymii.org/s/tutorials/Strong_SSL_Security_On_nginx.html

作者:Remy van Elst 译者:wxy 校对:wxy

本文由 LCTT 原创翻译,Linux中国 荣誉推出

编者按:前段时间,Google 报告说 CNNIC 签发的一个中级 CA 签发了一个伪造的 Google 证书,从而导致 Google 和 Mozilla 在其产品中取消了对 CNNIC 后继签发的证书信任。

本文就来讲述一下,这种伪造证书是如何被 Google 发现的,其技术机制是什么?如何在网站服务器上实现伪造证书防御和报告机制。

公钥固定(Public Key Pinning)是指一个证书链中必须包含一个白名单中的公钥,也就是说只有被列入白名单的证书签发机构(CA)才能为某个域名*.example.com签发证书,而不是你的浏览器中所存储的任何 CA 都可以为之签发。本文讲述了这种机制的背景知识,并提供了 Apache、 Lighttpd 和 NGINX 上的配置范例。

HTTP 公钥固定扩展

用你使用的银行做个例子,它一直使用 CA 公司 A 为其签发证书。但是在当前的证书体系下,CA 公司 B、CA 公司 C 和 NSA 的 CA 都能给你的银行创建证书,而你的浏览器会毫无疑虑的接受它们,因为这些公司都是你所信任的根 CA。

如果你的银行实现了 HPKP 并固定了它们的第一个中级证书(来自 CA 公司 A),那么浏览器将不会接受来自CA 公司 B 和 CA 公司 C 的证书,即便它们也有一个有效的信任链。HPKP 也允许你的浏览器将这种违例行为报告给该银行,以便银行知道被伪造证书攻击了。

HTTP 公钥固定扩展是一个从2011年开始开发的针对 HTTP 用户代理(即浏览器)的公钥固定标准。它由 Google 发起,甚至在 Chrome 中实现的固定机制可以使用一个人工维护的网站公钥固定列表,这个列表包含了固定的几个网站的公钥签名。(LCTT 译注:Chrome 和 FireFox 32 及以后版本都支持公钥固定机制,并使用内置的人工维护的公钥固定列表数据,这些数据随着浏览器软件的更新而更新,主要包括几个大型站点。目前还只有 Chrome 38+ 支持通过 HTTP 响应头传递公钥固定信息。)

以下是 HPKP 的几个功能简述:

  • HPKP 是在 HTTP 层面设置的,使用 Public-Key-Pins (PKP)响应头。
  • 该规则的保留周期通过 max-age 参数设置,单位是秒。
  • PKP 响应头只能用于正确的安全加密通讯里面。
  • 如果出现了多个这样的响应头,则只处理第一个。
  • 固定机制可以使用includeSubDomains参数扩展到子域。
  • 当接收到一个新的 PKP 响应头时,它会覆盖之前存储的公钥固定和元数据。
  • 公钥固定是用哈希算法生成的,其实是一个“主题公钥信息(SKPI)”指纹。

本文首先会介绍一些 HPKP 工作的原理,接下来我们会展示给你如何得到需要的指纹并配置到 web 服务器中。

SPKI 指纹 - 理论

以下摘自 Adam Langley 的帖子,我们哈希的是一个公钥,而不是证书:

通常来说,对证书进行哈希是一个显而易见的解决方案,但是其实这是错的。不能这样做的原因是 CA 证书可以不断重新签发:同一个公钥、主题名可以对应多个证书,而这些证书有不同的延展或失效时间。浏览器从下至上地在证书池中构建证书链时,另外一个版本的证书可能就替代匹配了你原本所期望的证书。

举个例子,StartSSL 有两个根证书:一个是以 SHA1 签名的,另外是一个是 SHA256。如果你希望固定住 StartSSL 作为你的 CA,那么你该使用哪个证书呢?你也许可以使用这两个,但是如果我不告诉你,你怎么会知道还有一个根证书呢?

相反地,对公钥进行哈希则不会有这个问题:

浏览器假定子证书是固定不动的:它总是证书链的起点。子证书所携带的签名一定是一个有效的签名,它来自其父证书给这个证书专门签发的。这就是说,父证书的公钥相对于子证书来说是固定的。所以可推论公钥链是固定的。

唯一的问题是你不能固定到一个交叉认证的根证书上。举个例子,GoDaddy 的根证书是 Valicert 签名的,这是为了让那些不能识别 GoDaddy 根证书的老客户可以信任其证书。然而,你不能固定到 Valicert 上,因为新的客户在证书链上发现了 GoDaddy 证书就会停止上溯(LCTT 译注:所以就找不到固定信息了)。

此外,我们是对 SubjectPublicKeyInfo(SPKI)进行哈希而不是对公钥位串。SPKI 包括了公钥类型、公钥自身及其相关参数。这很重要,因为如果对公钥进行哈希就有可能导致发生曲解攻击。对于一个 Diffie-Hellman 公钥而言:如果仅对公钥进行哈希,而不是对完整的 SPKI,那么攻击者可以使用同样的公钥而让客户端将其解释为其它组。同样地,这样也有可能强制将一个 RSA 密钥当成 DSA 密钥解释等等。

固定在哪里

你应该固定在什么地方?固定你自己的公钥并不是一个最好的办法。你的密钥也许会改变或撤销。你也许会使用多个证书,经常轮换证书的话密钥就改变了。也许由于服务器被入侵而撤销证书。

最容易但是不是太安全的方法是固定第一个中级 CA 证书。该证书是签名在你的网站证书之上的,所以签发该证书的 CA 的公钥肯定是在证书链上的。

采用这种方法你可以从同一个 CA 更新你的证书而不用担心固定信息不对。如果该 CA 发行了一个不同的根证书,也许你会遇到一些问题,对此并没有太好的解决方案。不过你可以通过如下做法来减轻这种问题的影响:

  • 从一个不同的 CA 申请一个备用的证书,并固定该备份。

RFC 里面说你至少需要做两个固定。一个是当前连接所使用的证书链上的,另外一个是备份的。

另外的固定是对备份公钥的,它可以是来自另外一个给你签发证书的不同 CA 的 SKPI 指纹。

在这个问题上还有一种更安全的方法,就是事先创建好至少三个独立的公钥(使用 OpenSSL,参见此页 了解 Javascript OpenSSL 命令生成器),并将其中两个备份到一个安全的地方,离线存储、不要放到网上。

为这三个证书创建 SPKI 指纹并固定它们,然后仅使用第一个作为当前的证书。当需要时,你可以使用备份密钥之一。不过你需要让 CA 给你做签名来生成证书对,这可能需要几天,依你的 CA 的工作情况而定。

对于 HPKP 来说这没有问题,因为我们使用的是公钥的 SPKI 哈希,而不是证书。失效或不同的 CA 签名链并不影响。

如果你按照上述方法生成并安全存储了至少三个独立的密钥,并固定它们,也可以防止你的 CA 撤销你的网站证书并签发一个假证书时出现问题。

SPKI 指纹

可以使用如下的 OpenSSL 命令来生成 SPKI 指纹,它出现在 RFC 草案 中:

openssl x509 -noout -in certificate.pem -pubkey | \
openssl asn1parse -noout -inform pem -out public.key;
openssl dgst -sha256 -binary public.key | openssl enc -base64

结果:

klO23nT2ehFDXCfx3eHTDRESMz3asj1muO+4aIdjiuY=

上面输入的 certificate.pem 文件是本站(https://raymii.org)的证书链中第一个证书。(在写本文时, COMODO RSA Domain Validation Secure Server CA, 序列号 2B:2E:6E:EA:D9:75:36:6C:14:8A:6E:DB:A3:7C:8C:07 )。

你也需要同样对你的另外两个备份公钥生成指纹。

故障

在写本文时(2015/1),唯一支持 HPKP 的浏览器(chrome)有一个严重的问题:Chrome 并不能够区分 HSTS 和 HPKP 响应头中的 max-age 和 includeSubdomains 参数。也就是说,如果你的 HSTS 和 HPKP 设置了不同的 max-age 和 includeSubdomains 参数,它们会互相搞乱。关于这个故障的更多信息参见:https://code.google.com/p/chromium/issues/detail?id=444511。感谢 Scott Helme(https://scotthelme.co.uk)发现并告诉我这个 Chromium 项目的问题。

Web 服务器配置

下面你可以看到三个主流 Web 服务器的配置方法。这只是一个 HTTP 响应头,绝大多数 Web 服务器都可以设置它。它只需要设置到 HTTPS 网站上。

下面的例子固定到 COMODO RSA Domain Validation Secure Server CA 及备份的 Comodo PositiveSSL CA 上,30天失效期,包括所有的子域。

Apache

编辑你的 Apache 配置文件(如 /etc/apache2/sites-enabled/website.conf 或 /etc/apache2/httpd.conf),并添加下列行到你的 VirtualHost 中:

# 如需要,载入 headers 模块。
LoadModule headers_module modules/mod_headers.so

Header set Public-Key-Pins "pin-sha256=\"klO23nT2ehFDXCfx3eHTDRESMz3asj1muO+4aIdjiuY=\"; pin-sha256=\"633lt352PKRXbOwf4xSEa1M517scpD3l5f79xMD9r9Q=\"; max-age=2592000; includeSubDomains"

Lighttpd

Lighttpd 更简单一些,将下列行添加到你的 Lighttpd 配置文件(如 /etc/lighttpd/lighttpd.conf):

server.modules += ( "mod_setenv" )
$HTTP["scheme"] == "https" {
    setenv.add-response-header  = ( "Public-Key-Pins" => "pin-sha256=\"klO23nT2ehFDXCfx3eHTDRESMz3asj1muO+4aIdjiuY=\"; pin-sha256=\"633lt352PKRXbOwf4xSEa1M517scpD3l5f79xMD9r9Q=\"; max-age=2592000; includeSubDomains")
}

NGINX

NGINX 的配置更简短。添加以下行到你的 HTTPS 配置的 server 块中:

add_header Public-Key-Pins 'pin-sha256="klO23nT2ehFDXCfx3eHTDRESMz3asj1muO+4aIdjiuY="; pin-sha256="633lt352PKRXbOwf4xSEa1M517scpD3l5f79xMD9r9Q="; max-age=2592000; includeSubDomains';

报告功能

HPKP 报告功能允许浏览器报告任何违例给你。

如果你在响应头中添加了附加的 report-uri="http://example.org/hpkp-report" 参数,并用该 URI 处理接收到的数据的话,客户端会在发现违例时发送报告给你。这个报告是以 POST 方式发送到你指定的 report-uri 上,并以类似下面的 JSON 格式:

{
    "date-time": "2014-12-26T11:52:10Z",
    "hostname": "www.example.org",
    "port": 443,
    "effective-expiration-date": "2014-12-31T12:59:59",
    "include-subdomains": true,
    "served-certificate-chain": [
        "-----BEGINCERTIFICATE-----\nMIIAuyg[...]tqU0CkVDNx\n-----ENDCERTIFICATE-----"
    ],
    "validated-certificate-chain": [
        "-----BEGINCERTIFICATE-----\nEBDCCygAwIBA[...]PX4WecNx\n-----ENDCERTIFICATE-----"
    ],
    "known-pins": [
        "pin-sha256=\"dUezRu9zOECb901Md727xWltNsj0e6qzGk\"",
        "pin-sha256=\"E9CqVKB9+xZ9INDbd+2eRQozqbQ2yXLYc\""
    ]
}

非强制,只报告

HPKP 也可以设置为非强制的,可以使用 Public-Key-Pins-Report-Only 来只发送违例报告给你。

这样可以让你在网站不可访问或 HPKP 配置不正确时不固定,之后你可以将这个响应头改为 Public-Key-Pins 来强制固定。


via: https://raymii.org/s/articles/HTTP_Public_Key_Pinning_Extension_HPKP.html

作者:Remy van Elst 译者:wxy 校对:wxy

本文由 LCTT 原创翻译,Linux中国 荣誉推出

HTTP 严格传输安全(HSTS)是一种安全功能,web 服务器通过它来告诉浏览器仅用 HTTPS 来与之通讯,而不是使用 HTTP。本文会说明如何在 Apache2、Nginx 和 Lighttpd 上如何启用 HSTS。在主流的 web 服务器上测试通过: Nginx 1.1.19、 Lighttpd 1.4.28 和 Apache 2.2.22 ,环境为 Ubuntu 12.04、 Debian 6 & 7 和 CentOS 6,只需要调整部分参数就可以工作在其它的发行版上。

什么是 HTTP 严格传输安全?

引用自 Mozilla Developer Network

如果一个 web 服务器支持 HTTP 访问,并将其重定向到 HTTPS 访问的话,那么访问者在重定向前的初始会话是非加密的。举个例子,比如访问者输入 http://www.foo.com/ 或直接输入 foo.com 时。

这就给了中间人攻击的一个机会,重定向可能会被破坏,从而定向到一个恶意站点而不是应该访问的加密页面。

HTTP 严格传输安全(HSTS)功能使 Web 服务器告知浏览器绝不使用 HTTP 访问,在浏览器端自动将所有到该站点的 HTTP 访问替换为 HTTPS 访问。

以下引自维基百科

HSTS 可以用来抵御 SSL 剥离攻击。SSL 剥离攻击是中间人攻击的一种,由 Moxie Marlinspike 于2009年发明。他在当年的黑帽大会上发表的题为 “New Tricks For Defeating SSL In Practice” 的演讲中将这种攻击方式公开。SSL剥离的实施方法是阻止浏览器与服务器创建HTTPS连接。它的前提是用户很少直接在地址栏输入https://,用户总是通过点击链接或3xx重定向,从HTTP页面进入HTTPS页面。所以攻击者可以在用户访问HTTP页面时替换所有https://开头的链接为http://,达到阻止HTTPS的目的。

HSTS可以很大程度上解决SSL剥离攻击,因为只要浏览器曾经与服务器创建过一次安全连接,之后浏览器会强制使用HTTPS,即使链接被换成了HTTP。

另外,如果中间人使用自己的自签名证书来进行攻击,浏览器会给出警告,但是许多用户会忽略警告。HSTS解决了这一问题,一旦服务器发送了HSTS字段,用户将不再允许忽略警告。

场景举例:

当你通过一个无线路由器的免费 WiFi 访问你的网银时,很不幸的,这个免费 WiFi 也许就是由黑客的笔记本所提供的,他们会劫持你的原始请求,并将其重定向到克隆的网银站点,然后,你的所有的隐私数据都曝光在黑客眼下。

严格传输安全可以解决这个问题。如果你之前使用 HTTPS 访问过你的网银,而且网银的站点支持 HSTS,那么你的浏览器就知道应该只使用 HTTPS,无论你是否输入了 HTTPS。这样就防范了中间人劫持攻击。

注意,如果你之前没有使用 HTTPS 访问过该站点,那么 HSTS 是不奏效的。网站需要通过 HTTPS 协议告诉你的浏览器它支持 HSTS。

服务器开启 HSTS 的方法是,当客户端通过HTTPS发出请求时,在服务器返回的 HTTP 响应头中包含 Strict-Transport-Security 字段。非加密传输时设置的HSTS字段无效。

在 Apache2 中设置 HSTS

编辑你的 apache 配置文件(如 /etc/apache2/sites-enabled/website.conf/etc/apache2/httpd.conf ),并加以下行到你的 HTTPS VirtualHost:

# Optionally load the headers module:
LoadModule headers_module modules/mod_headers.so

<VirtualHost 67.89.123.45:443>
    Header always set Strict-Transport-Security "max-age=63072000; includeSubdomains; preload"
</VirtualHost>

现在你的 web 站点在每次访问时都会发送该请求头,失效时间是两年(秒数)。这个失效时间每次都会设置为两年后,所以,明天你访问时,它会设置为明天的两年后。

你只能在 HTTPS 虚拟机中设置这个头,而不能设置在 HTTP 虚拟机中。

要将你的访问者重定向到对应 HTTPS 站点,可使用如下设置:

<VirtualHost *:80>
  [...]
  ServerName example.com
  Redirect permanent / https://example.com/
</VirtualHost>

如果仅仅是做重定向的话,甚至不需要设置 DocumentRoot。

你也可以使用 mod\_rewrite 来做重定向,但是上述的方式更简单更安全。不过,mod\_rewrite 可以重定向页面到对应的 HTTPS 页面,而上述配置则只重定向到“/”:

<VirtualHost *:80>
  [...]
  <IfModule mod_rewrite.c>
    RewriteEngine On
    RewriteCond %{HTTPS} off
    RewriteRule (.*) https://%{HTTP_HOST}%{REQUEST_URI}
  </IfModule>
</VirtualHost>

不要忘记重启 Apache。

Lighttpd

对于 lighttpd 来说很简单,将下述配置增加到你的 Lighttpd 配置文件(例如:/etc/lighttpd/lighttpd.conf):

server.modules += ( "mod_setenv" )
$HTTP["scheme"] == "https" {
    setenv.add-response-header  = ( "Strict-Transport-Security" => "max-age=63072000; includeSubdomains; preload")
}

重启 Lighttpd。失效时间也是两年。

Nginx

Nginx 甚至更简单,将下述行添加到你的 HTTPS 配置的 server 块中:

add_header Strict-Transport-Security "max-age=63072000; includeSubdomains; preload";

不要忘记重启 Nginx。