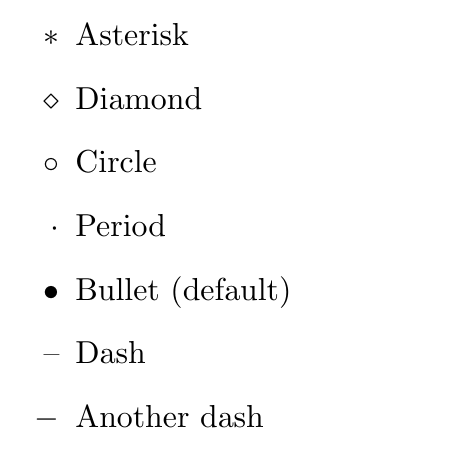
Earl Ramirez 发布的文章

系列 介绍了 LaTeX 中的基本格式。第 1 部分 介绍了列表。第 2 部分 阐述了表格。在第 3 部分中,你将了解 LaTeX 的另一个重要特性:细腻灵活的文档排版。本文介绍如何自定义页面布局、目录、标题部分和页面样式。

页面维度

当你第一次编写 LaTeX 文档时,你可能已经注意到默认边距比你想象的要大一些。页边距与指定的纸张类型有关,例如 A4、letter 和 documentclass(article、book、report) 等等。要修改页边距,有几个选项,最简单的选项之一是使用 fullpage 包。

该软件包设置页面的主体,可以使主体几乎占满整个页面。

—— FULLPAGE PACKAGE DOCUMENTATION

另一个选择是使用 geometry 包。在探索 geometry 包如何操纵页边距之前,请首先查看如下所示的页面尺寸。
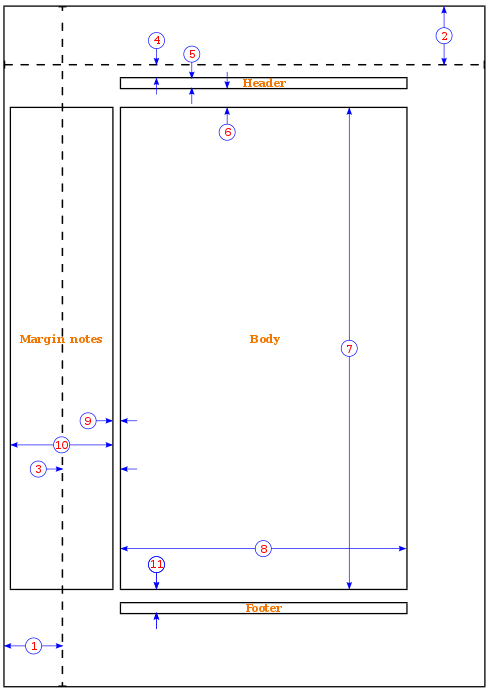
  1. 1 英寸 + \hoffset
  2. 1 英寸 + \voffset
  3. \oddsidemargin = 31pt
  4. \topmargin = 20pt
  5. \headheight = 12pt
  6. \headsep = 25pt
  7. \textheight = 592pt
  8. \textwidth = 390pt
  9. \marginparsep = 35pt
  10. \marginparwidth = 35pt
  11. \footskip = 30pt

要使用 geometry 包将边距设置为 1 英寸,请使用以下示例

\usepackage{geometry}
\geometry{a4paper, margin=1in}

除上述示例外,geometry 命令还可以修改纸张尺寸和方向。要更改纸张尺寸,请使用以下示例:

\usepackage[a4paper, total={7in, 8in}]{geometry}

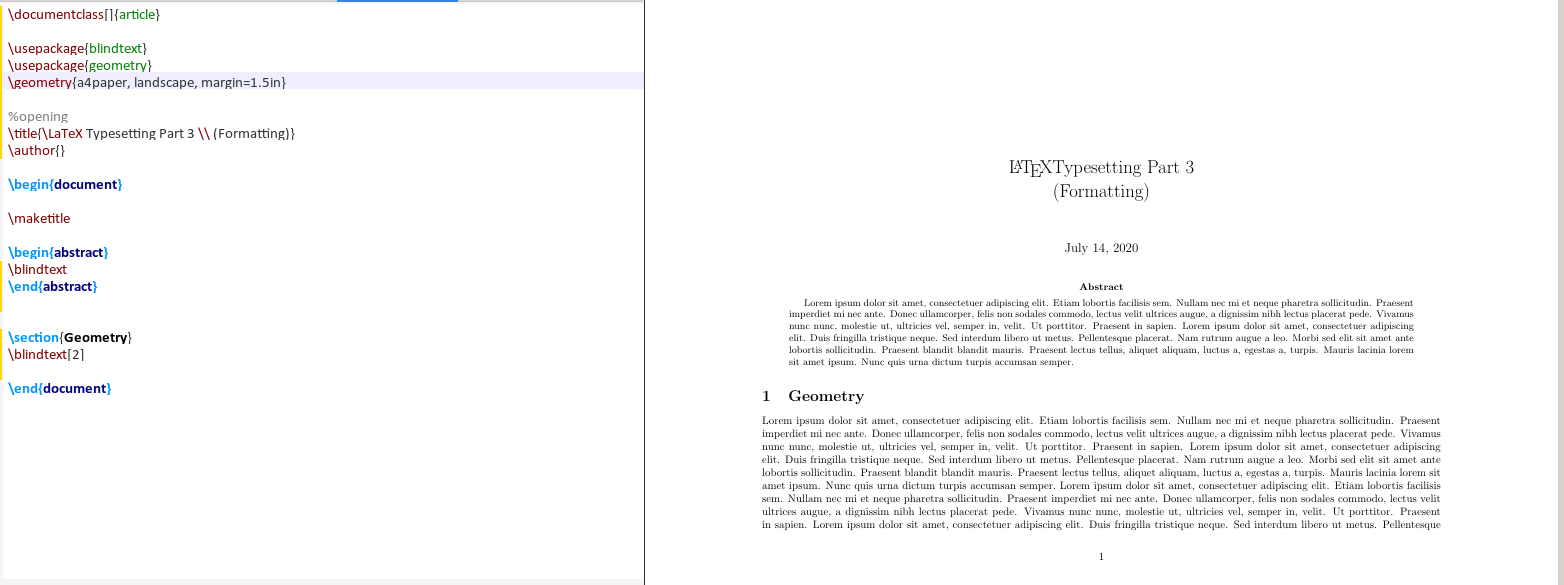
要更改页面方向,需要将横向(landscape)添加到 geometery 选项中,如下所示:

\usepackage{geometery}
\geometry{a4paper, landscape, margin=1.5in
目录

默认情况下,目录的标题为 “contents”。有时,你想将标题更改为 “Table of Content”,更改目录和章节第一节之间的垂直间距,或者只更改文本的颜色。

若要更改文本,请在导言区中添加以下行,用所需语言替换英语(english):

\usepackage[english]{babel}
\addto\captionsenglish{
\renewcommand{\contentsname}
{\bfseries{Table of Contents}}}

要操纵目录与图、小节和章节列表之间的虚拟间距,请使用 tocloft 软件包。本文中使用的两个选项是 cftbeforesecskipcftaftertoctitleskip

tocloft 包提供了控制目录、图表列表和表格列表的排版方法。

—— TOCLOFT PACKAGE DOUCMENTATION

\usepackage{tocloft}
\setlength\ctfbeforesecskip{2pt}
\setlength\cftaftertoctitleskip{30pt}

默认目录

定制目录

边框

在文档中使用包 hyperref 时,目录中的 LaTeX 章节列表和包含 \url 的引用都有边框,如下图所示。

要删除这些边框,请在导言区中包括以下内容,你将看到目录中没有任何边框。

\usepackage{hyperref}
\hypersetup{ pdfborder = {0 0 0}}

要修改标题部分的字体、样式或颜色,请使用程序包 titlesec。在本例中,你将更改节、子节和三级子节的字体大小、字体样式和字体颜色。首先,在导言区中增加以下内容。

\usepackage{titlesec}
\titleformat*{\section}{\Huge\bfseries\color{darkblue}}
\titleformat*{\subsection}{\huge\bfseries\color{darkblue}}
\titleformat*{\subsubsection}{\Large\bfseries\color{darkblue}}

仔细看看代码,\titleformat*{\section} 指定要使用的节的深度。上面的示例最多使用第三个深度。{\Huge\bfseries\color{darkblue}} 部分指定字体大小、字体样式和字体颜色。

页面样式

要自定义的页眉和页脚,请使用 fancyhdr。此示例使用此包修改页面样式、页眉和页脚。下面的代码简要描述了每个选项的作用。

\pagestyle{fancy} %for header to be on each page
\fancyhead[L]{} %keep left header blank
\fancyhead[C]{} %keep centre header blank
\fancyhead[R]{\leftmark} %add the section/chapter to the header right
\fancyfoot[L]{Static Content} %add static test to the left footer
\fancyfoot[C]{} %keep centre footer blank
\fancyfoot[R]{\thepage} %add the page number to the right footer
\setlength\voffset{-0.25in} %space between page border and header (1in + space)
\setlength\headheight{12pt} %height of the actual header.
\setlength\headsep{25pt} %separation between header and text.
\renewcommand{\headrulewidth}{2pt} % add header horizontal line
\renewcommand{\footrulewidth}{1pt} % add footer horizontal line

结果如下所示:

页眉

页脚

小贴士

集中导言区

如果要编写许多 TeX 文档,可以根据文档类别创建一个包含所有导言区的 .tex 文件并引用此文件。例如,我使用结构 .tex 如下所示。

$ cat article_structure.tex
\usepackage[english]{babel}
\addto\captionsenglish{
\renewcommand{\contentsname}
{\bfseries{\color{darkblue}Table of Contents}}
} % Relable the contents
%\usepackage[margin=0.5in]{geometry} % specifies the margin of the document
\usepackage[utf8]{inputenc}
\usepackage[T1]{fontenc}
\usepackage{graphicx} % allows you to add graphics to the document
\usepackage{hyperref} % permits redirection of URL from a PDF document
\usepackage{fullpage} % formate the content to utilise the full page
%\usepackage{a4wide}
\usepackage[export]{adjustbox} % to force image position
%\usepackage[section]{placeins} % to have multiple images in a figure
\usepackage{tabularx} % for wrapping text in a table
%\usepackage{rotating}
\usepackage{multirow}
\usepackage{subcaption} % to have multiple images in a figure
%\usepackage{smartdiagram} % initialise smart diagrams
\usepackage{enumitem} % to manage the spacing between lists and enumeration
\usepackage{fancyhdr} %, graphicx} %for header to be on each page
\pagestyle{fancy} %for header to be on each page
%\fancyhf{}
\fancyhead[L]{}
\fancyhead[C]{}
\fancyhead[R]{\leftmark}
\fancyfoot[L]{Static Content} %\includegraphics[width=0.02\textwidth]{virgin_voyages.png}}
\fancyfoot[C]{} % clear center
\fancyfoot[R]{\thepage}
\setlength\voffset{-0.25in} %Space between page border and header (1in + space)
\setlength\headheight{12pt} %Height of the actual header.
\setlength\headsep{25pt} %Separation between header and text.
\renewcommand{\headrulewidth}{2pt} % adds horizontal line
\renewcommand{\footrulewidth}{1pt} % add horizontal line (footer)
%\renewcommand{\oddsidemargin}{2pt} % adjuct the margin spacing
%\renewcommand{\pagenumbering}{roman} % change the numbering style
%\renewcommand{\hoffset}{20pt}
%\usepackage{color}
\usepackage[table]{xcolor}
\hypersetup{ pdfborder = {0 0 0}} % removes the red boarder from the table of content
%\usepackage{wasysym} %add checkbox
%\newcommand\insq[1]{%
% \Square\ #1\quad%
%} % specify the command to add checkbox
%\usepackage{xcolor}
%\usepackage{colortbl}
%\definecolor{Gray}{gray}{0.9} % create new colour
%\definecolor{LightCyan}{rgb}{0.88,1,1} % create new colour
%\usepackage[first=0,last=9]{lcg}
%\newcommand{\ra}{\rand0.\arabic{rand}}
%\newcolumntype{g}{>{\columncolor{LightCyan}}c} % create new column type g
%\usesmartdiagramlibrary{additions}
%\setcounter{figure}{0}
\setcounter{secnumdepth}{0} % sections are level 1
\usepackage{csquotes} % the proper was of using double quotes
%\usepackage{draftwatermark} % Enable watermark
%\SetWatermarkText{DRAFT} % Specify watermark text
%\SetWatermarkScale{5} % Toggle watermark size
\usepackage{listings} % add code blocks
\usepackage{titlesec} % Manipulate section/subsection
\titleformat{\section}{\Huge\bfseries\color{darkblue}} % update sections to bold with the colour blue \titleformat{\subsection}{\huge\bfseries\color{darkblue}} % update subsections to bold with the colour blue
\titleformat*{\subsubsection}{\Large\bfseries\color{darkblue}} % update subsubsections to bold with the colour blue
\usepackage[toc]{appendix} % Include appendix in TOC
\usepackage{xcolor}
\usepackage{tocloft} % For manipulating Table of Content virtical spacing
%\setlength\cftparskip{-2pt}
\setlength\cftbeforesecskip{2pt} %spacing between the sections
\setlength\cftaftertoctitleskip{30pt} % space between the first section and the text ``Table of Contents''
\definecolor{navyblue}{rgb}{0.0,0.0,0.5}
\definecolor{zaffre}{rgb}{0.0, 0.08, 0.66}
\definecolor{white}{rgb}{1.0, 1.0, 1.0}
\definecolor{darkblue}{rgb}{0.0, 0.2, 0.6}
\definecolor{darkgray}{rgb}{0.66, 0.66, 0.66}
\definecolor{lightgray}{rgb}{0.83, 0.83, 0.83}
%\pagenumbering{roman}

在你的文章中,请参考以下示例中所示的方法引用 structure.tex 文件:

\documentclass[a4paper,11pt]{article}
\input{/path_to_structure.tex}}
\begin{document}
......
\end{document}

添加水印

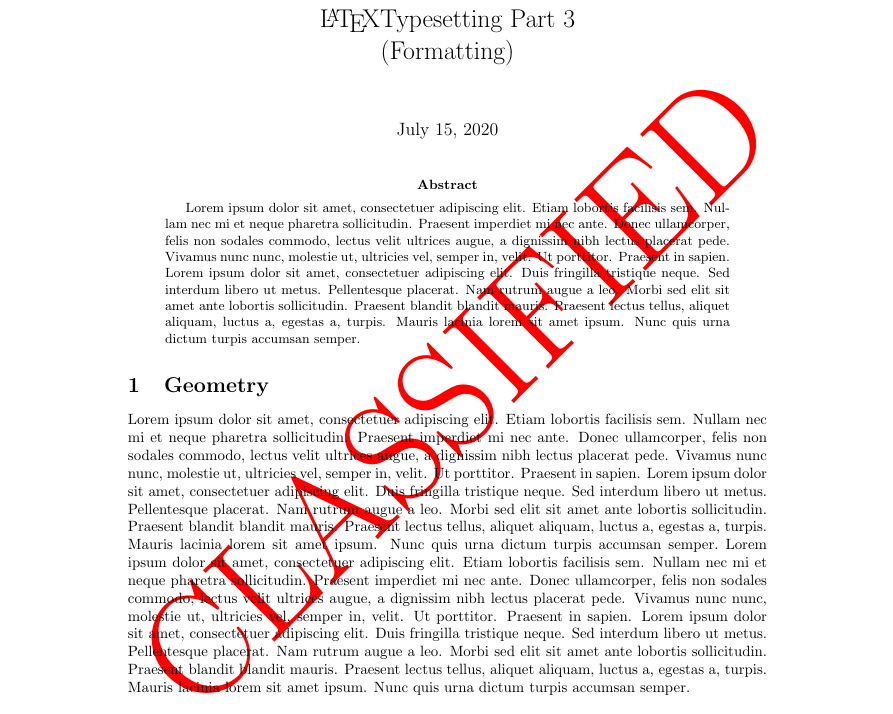
要在 LaTeX 文档中启用水印,请使用 draftwatermark 软件包。下面的代码段和图像演示了如何在文档中添加水印。默认情况下,水印颜色为灰色,可以将其修改为所需的颜色。

\usepackage{draftwatermark} 
\SetWatermarkText{\color{red}Classified} %add watermark text 
\SetWatermarkScale{4} %specify the size of the text
结论

在本系列中,你了解了 LaTeX 提供的一些基本但丰富的功能,这些功能可用于自定义文档以满足你的需要或将文档呈现给的受众。LaTeX 海洋中,还有许多软件包需要大家自行去探索。


via: https://fedoramagazine.org/latex-typesetting-part-3-formatting/

作者:Earl Ramirez 选题:Chao-zhi 译者:Chao-zhi 校对:wxy

本文由 LCTT 原创编译,Linux中国 荣誉推出

LaTeX 提供了许多工具来创建和定制表格,在本系列中,我们将使用 tabulartabularx 环境来创建和定制表。

基础表格

要创建表,只需指定环境 \begin{tabular}{列选项}

\begin{tabular}{c|c}
    Release &Codename \\ \hline
    Fedora Core 1 &Yarrow \\ 
    Fedora Core 2 &Tettnang \\ 
    Fedora Core 3 &Heidelberg \\ 
    Fedora Core 4 &Stentz \\ 
\end{tabular}

Basic Table

在上面的示例中,花括号中的 ”{c|c}” 表示文本在列中的位置。下表总结了位置参数及其说明。

参数位置
c将文本置于中间
l将文本左对齐
r将文本右对齐
p{宽度}文本对齐单元格顶部
m{宽度}文本对齐单元格中间
b{宽度}文本对齐单元格底部
m{宽度}b{宽度} 都要求在最前面指定数组包。

使用上面的例子,让我们来详细讲解使用的要点,并描述你将在本系列中看到的更多选项:

选项意义
&定义每个单元格,这个符号仅用于第二列
\\这将终止该行并开始一个新行
``指定表格中的垂直线(可选)
\hline指定表格中的水平线(可选)
*{数量}{格式}当你有许多列时,可以使用这个,并且是限制重复的有效方法
` `指定表格中垂直双线

定制表格

学会了这些选项,让我们使用这些选项创建一个表。

\begin{tabular}{*{3}{|l|}}
\hline
    \textbf{Version} &\textbf{Code name} &\textbf{Year released} \\
\hline
    Fedora 6 &Zod &2006 \\ \hline
    Fedora 7 &Moonshine &2007 \\ \hline
    Fedora 8 &Werewolf &2007 \\
\hline
\end{tabular}

Customise Table

管理长文本

如果列中有很多文本,那么它的格式就不好处理,看起来也不好看。

下面的示例显示了文本的格式长度,我们将在导言区中使用 blindtext,以便生成示例文本。

\begin{tabular}{|l|l|}\hline
    Summary &Description \\ \hline
    Test &\blindtext \\
\end{tabular}

Default Formatting

正如你所看到的,文本超出了页面宽度;但是,有几个选项可以克服这个问题。

  • 指定列宽,例如 m{5cm}
  • 利用 tablarx 环境,这需要在导言区中引用 tablarx 宏包。

使用列宽管理长文本

通过指定列宽,文本将被折行为如下示例所示的宽度。

\begin{tabular}{|l|m{14cm}|} \hline
    Summary &Description \\ \hline
    Test &\blindtext \\ \hline
\end{tabular}\vspace{3mm}

Column Width

使用 tabularx 管理长文本

在我们利用表格之前,我们需要在导言区中加上它。tabularx 方法见以下示例:\begin{tabularx}{宽度}{列选项}

\begin{tabularx}{\textwidth}{|l|X|} \hline
Summary & Tabularx Description\\ \hline
Text &\blindtext \\ \hline
\end{tabularx}

Tabularx

请注意,我们需要处理长文本的列在花括号中指定了大写 X

合并行合并列

有时需要合并行或列。本节描述了如何完成。要使用 multirowmulticolumn,请将 multirow 添加到导言区。

合并行

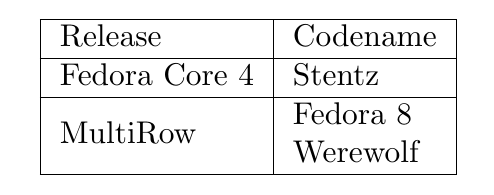
multirow 采用以下参数 \multirow{行的数量}{宽度}{文本},让我们看看下面的示例。

\begin{tabular}{|l|l|}\hline
    Release &Codename \\ \hline
    Fedora Core 4 &Stentz \\ \hline
    \multirow{2}{*}{MultiRow} &Fedora 8 \\ 
    &Werewolf \\ \hline
\end{tabular}

MultiRow

在上面的示例中,指定了两行,* 告诉 LaTeX 自动管理单元格的大小。

合并列

multicolumn 参数是 {multicolumn{列的数量}{单元格选项}{位置}{文本},下面的示例演示合并列。

\begin{tabular}{|l|l|l|}\hline
    Release &Codename &Date \\ \hline
    Fedora Core 4 &Stentz &2005 \\ \hline
    \multicolumn{3}{|c|}{Mulit-Column} \\ \hline
\end{tabular}

Multi-Column

使用颜色

可以为文本、单个单元格或整行指定颜色。此外,我们可以为每一行配置交替的颜色。

在给表添加颜色之前,我们需要在导言区引用 \usepackage[table]{xcolor}。我们还可以使用以下颜色参考 LaTeX Color 或在颜色前缀后面添加感叹号(从 0 到 100 的阴影)来定义颜色。例如,gray!30

\definecolor{darkblue}{rgb}{0.0, 0.0, 0.55}
\definecolor{darkgray}{rgb}{0.66, 0.66, 0.66}

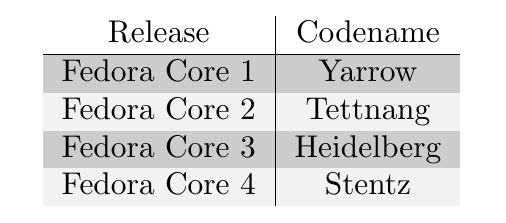
下面的示例演示了一个具有各种颜色的表,\rowcolors 采用以下选项 \rowcolors{起始行颜色}{偶数行颜色}{奇数行颜色}

\rowcolors{2}{darkgray}{gray!20}
\begin{tabular}{c|c}
    Release &Codename \\ \hline
    Fedora  Core 1 &Yarrow \\
    Fedora Core 2 &Tettnang \\
    Fedora Core 3 &Heidelberg \\
    Fedora Core 4 &Stentz \\
\end{tabular}

Alt colour table

除了上面的例子,\rowcolor 可以用来指定每一行的颜色,这个方法在有合并行时效果最好。以下示例显示将 \rowColors 与合并行一起使用的影响以及如何解决此问题。

Impact on multi-row

你可以看到,在合并行中,只有第一行能显示颜色。想要解决这个问题,需要这样做:

\begin{tabular}{|l|l|}\hline
    \rowcolor{darkblue}\textsc{\color{white}Release}  &\textsc{\color{white}Codename} \\ \hline
    \rowcolor{gray!10}Fedora Core 4 &Stentz \\ \hline
    \rowcolor{gray!40}&Fedora 8 \\ 
    \rowcolor{gray!40}\multirow{-2}{*}{Multi-Row} &Werewolf \\ \hline
\end{tabular}

Multi-row

让我们讲解一下为解决合并行替换颜色问题而实施的更改。

  • 第一行从合并行上方开始
  • 行数从 2 更改为 -2,这意味着从上面的行开始读取
  • \rowcolor 是为每一行指定的,更重要的是,多行必须具有相同的颜色,这样才能获得所需的结果。

关于颜色的最后一个注意事项是,要更改列的颜色,需要创建新的列类型并定义颜色。下面的示例说明了如何定义新的列颜色。

\newcolumntype{g}{>{\columncolor{darkblue}}l} 

我们把它分解一下:

  • \newcolumntype{g}:将字母 g 定义为新列
  • {>{\columncolor{darkblue}}l}:在这里我们选择我们想要的颜色,并且 l 告诉列左对齐,这可以用 cr 代替。
\begin{tabular}{g|l} 
    \textsc{Release}  &\textsc{Codename} \\ \hline
    Fedora Core 4 &Stentz \\ 
    &Fedora 8 \\ 
    \multirow{-2}{*}{Multi-Row} &Werewolf \\ 
\end{tabular}\

Column Colour

横向表

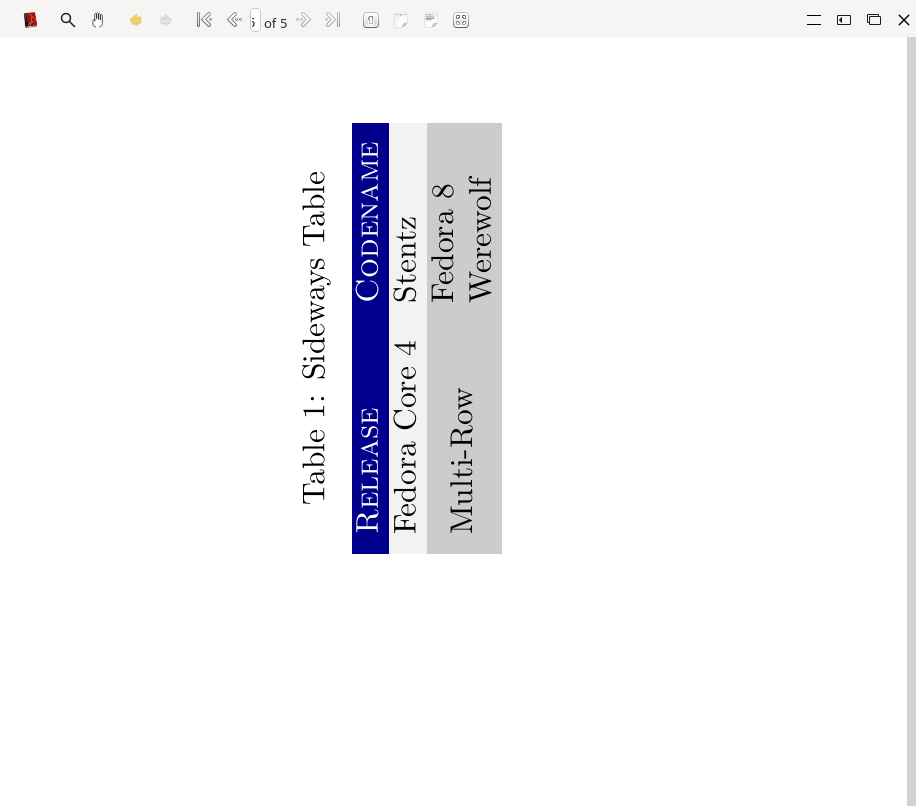
有时,你的表可能有许多列,纵向排列会很不好看。在导言区加入 rotating 包,你将能够创建一个横向表。下面的例子说明了这一点。

对于横向表,我们将使用 sidewaystable 环境并在其中添加表格环境,我们还指定了其他选项。

  • \centering 可以将表格放置在页面中心
  • \caption{} 为表命名
  • \label{} 这使我们能够引用文档中的表
\begin{sidewaystable}
\centering
\caption{Sideways Table}
\label{sidetable}
\begin{tabular}{ll}
    \rowcolor{darkblue}\textsc{\color{white}Release}  &\textsc{\color{white}Codename} \\ 
    \rowcolor{gray!10}Fedora Core 4 &Stentz \\ 
    \rowcolor{gray!40} &Fedora 8 \\ 
    \rowcolor{gray!40}\multirow{-2}{*}{Multi-Row} &Werewolf \\ 
\end{tabular}\vspace{3mm}
\end{sidewaystable}

Sideways Table

列表和表格

要将列表包含到表中,可以使用 tabularx,并将列表包含在指定的列中。另一个办法是使用表格格式,但必须指定列宽。

用 tabularx 处理列表

\begin{tabularx}{\textwidth}{|l|X|} \hline
    Fedora Version &Editions \\ \hline
    Fedora 32 &\begin{itemize}[noitemsep]
        \item CoreOS
        \item Silverblue
        \item IoT
    \end{itemize} \\ \hline
\end{tabularx}\vspace{3mm}

List in tabularx

用 tabular 处理列表

\begin{tabular}{|l|m{6cm}|}\hline
        Fedora Version &Editions \\\ \hline
    Fedora 32 &\begin{itemize}[noitemsep]
        \item CoreOS
        \item Silverblue
        \item IoT
    \end{itemize} \\\ \hline
\end{tabular}

List in tabular

总结

LaTeX 提供了许多使用 tablartablarx 自定义表的方法,你还可以在表环境 (\begin\table) 中添加 tablartablarx 来添加表的名称和定位表。

LaTeX 宏包

所需的宏包有如下这些:

\usepackage{fullpage}
\usepackage{blindtext}  % add demo text
\usepackage{array} % used for column positions
\usepackage{tabularx} % adds tabularx which is used for text wrapping
\usepackage{multirow} % multi-row and multi-colour support
\usepackage[table]{xcolor} % add colour to the columns 
\usepackage{rotating} % for landscape/sideways tables

额外的知识

这是一堂关于表的小课,有关表和 LaTex 的更多高级信息,请访问 LaTex Wiki


via: https://fedoramagazine.org/latex-typesetting-part-2-tables/

作者:Earl Ramirez 选题:lujun9972 译者:Chao-zhi 校对:wxy

本文由 LCTT 原创编译,Linux中国 荣誉推出

本系列基于前文《在 Fedora 上用 LaTex 和 TeXstudio 排版你的文档》和《LaTeX 基础》,本文即系列的第一部分,是关于 LaTeX 列表的。

列表类型

LaTeX 中的列表是封闭的环境,列表中的每个项目可以取一行文字到一个完整的段落。在 LaTeX 中有三种列表类型:

  • itemize 无序列表 unordered list / 项目符号列表 bullet list
  • enumerate 有序列表 ordered list
  • description 描述列表 descriptive list

创建列表

要创建一个列表,需要在每个项目前加上控制序列 \item,并在项目清单前后分别加上控制序列 \begin{<类型>}\end{<类型>}(将其中的<类型>` 替换为将要使用的列表类型),如下例:

itemize(无序列表)

\begin{itemize}
    \item Fedora
    \item Fedora Spin
    \item Fedora Silverblue
\end{itemize}

enumerate(有序列表)

\begin{enumerate}
    \item Fedora CoreOS
    \item Fedora Silverblue
    \item Fedora Spin
\end{enumerate}

description(描述列表)

\begin{description}
    \item[Fedora 6] Code name Zod
    \item[Fedora 8] Code name Werewolf
\end{description}

列表项目间距

可以通过在导言区加入 \usepackage{enumitem} 来自定义默认的间距,宏包 enumitem 启用了选项 noitemsep 和控制序列 \itemsep,可以在列表中使用它们,如下例所示:

使用选项 noitemsep

将选项 noitemsep 封闭在方括号内,并同下文所示放在控制序列 \begin 之后,该选项将移除默认的间距。

\begin{itemize}[noitemsep]
    \item Fedora
    \item Fedora Spin
    \item Fedora Silverblue
\end{itemize}

使用控制序列 \itemsep

控制序列 \itemsep 必须以一个数字作为后缀,用以表示列表项目之间应该有多少空间。

\begin{itemize} \itemsep0.75pt
    \item Fedora Silverblue
    \item Fedora CoreOS
\end{itemize}

嵌套列表

LaTeX 最多最多支持四层嵌套列表,如下例:

嵌套无序列表

\begin{itemize}[noitemsep]
    \item Fedora Versions
    \begin{itemize}
        \item Fedora 8
        \item Fedora 9
        \begin{itemize}
            \item Werewolf
            \item Sulphur
            \begin{itemize}
                \item 2007-05-31
                \item 2008-05-13
            \end{itemize}
        \end{itemize}
    \end{itemize}
    \item Fedora Spin
    \item Fedora Silverblue
\end{itemize}

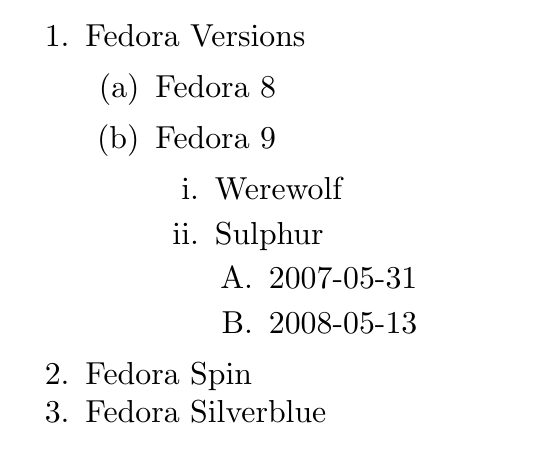
嵌套有序列表

\begin{enumerate}[noitemsep]
    \item Fedora Versions
    \begin{enumerate}
        \item Fedora 8
        \item Fedora 9
        \begin{enumerate}
            \item Werewolf
            \item Sulphur
            \begin{enumerate}
                \item 2007-05-31
                \item 2008-05-13
            \end{enumerate}
        \end{enumerate}
    \end{enumerate}
    \item Fedora Spin
    \item Fedora Silverblue
\end{enumerate}

每种列表类型的列表样式名称

enumerate(有序列表)itemize(无序列表)
\alph* (小写字母)$\bullet$ (●)
\Alph* (大写字母)$\cdot$ (•)
\arabic* (阿拉伯数字)$\diamond$ (◇)
\roman* (小写罗马数字)$\ast$ (✲)
\Roman* (大写罗马数字)$\circ$ (○)
$-$ (-)

按嵌套深度划分的默认样式

嵌套深度enumerate(有序列表)itemize(无序列表)
1阿拉伯数字(●)
2小写字母(-)
3小写罗马数字(✲)
4大写字母(•)

设置列表样式

下面的例子列举了无序列表的不同样式。

% 无序列表样式
\begin{itemize}
    \item[$\ast$] Asterisk
    \item[$\diamond$] Diamond
    \item[$\circ$] Circle
    \item[$\cdot$] Period
    \item[$\bullet$] Bullet (default)
    \item[--] Dash
    \item[$-$] Another dash
\end{itemize}

有三种设置列表样式的方式,下面将按照优先级从高到低的顺序分别举例。

方式一:为各项目单独设置

将需要的样式名称封闭在方括号内,并放在控制序列 \item 之后,如下例:

% 方式一
\begin{itemize}
    \item[$\ast$] Asterisk
    \item[$\diamond$] Diamond
    \item[$\circ$] Circle
    \item[$\cdot$] period
    \item[$\bullet$] Bullet (default)
    \item[--] Dash
    \item[$-$] Another dash
\end{itemize}

方式二:为整个列表设置

将需要的样式名称以 label= 前缀并封闭在方括号内,放在控制序列 \begin 之后,如下例:

% 方式二
\begin{enumerate}[label=\Alph*.]
    \item Fedora 32
    \item Fedora 31
    \item Fedora 30
\end{enumerate}

方式三:为整个文档设置

该方式将改变整个文档的默认样式。使用 \renewcommand 来设置项目标签的值,下例分别为四个嵌套深度的项目标签设置了不同的样式。

% 方式三
\renewcommand{\labelitemi}{$\ast$}
\renewcommand{\labelitemii}{$\diamond$}
\renewcommand{\labelitemiii}{$\bullet$}
\renewcommand{\labelitemiv}{$-$}

总结

LaTeX 支持三种列表,而每种列表的风格和间距都是可以自定义的。在以后的文章中,我们将解释更多的 LaTeX 元素。

关于 LaTeX 列表的延伸阅读可以在这里找到:LaTeX List Structures


via: https://fedoramagazine.org/latex-typesetting-part-1/

作者:Earl Ramirez 选题:lujun9972 译者:rakino 校对:wxy

本文由 LCTT 原创编译,Linux中国 荣誉推出