skytech 发布的文章

作为系统管理员,你计划在 Linux 上使用 OpenSSH,完成日常工作的自动化,比如文件传输、备份数据库转储文件到另一台服务器等。为实现该目标,你需要从主机 A 能自动登录到主机 B。自动登录也就是说,要在 shell 脚本中使用ssh,而无需要输入任何密码。

本文会告诉你怎样在 CentOS/RHEL 上设置 SSH 免密码登录。自动登录配置好以后,你可以通过它使用 SSH (Secure Shell)和安全复制 (SCP)来移动文件。

SSH 是开源的,是用于远程登录的最为可靠的网络协议。系统管理员用它来执行命令,以及通过 SCP 协议在网络上向另一台电脑传输文件。

通过配置 SSH 免密码登录,你可以享受到如下的便利:

  • 用脚本实现日常工作的自动化。
  • 增强 Linux 服务器的安全性。这是防范虚拟专用服务器(VPS)遭受暴力破解攻击的一个推荐的方法,SSH 密钥单凭暴力破解是几乎不可攻破的。

什么是 ssh-keygen

ssh-keygen 是一个用来生成、创建和管理 SSH 认证用的公私钥的工具。通过 ssh-keygen 命令,用户可以创建支持SSH1 和 SSH2 两个协议的密钥。ssh-keygen 为 SSH1 协议创建 RSA 密钥,SSH2 则可以是 RSA 或 DSA。

什么是 ssh-copy-id

ssh-copy-id 是用来将本地公钥拷贝到远程的 authorized\_keys 文件的脚本命令,它还会将身份标识文件追加到远程机器的 ~/.ssh/authorized\_keys 文件中,并给远程主机的用户主目录适当的的权限。

SSH 密钥

SSH 密钥为登录 Linux 服务器提供了更好且安全的机制。运行 ssh-keygen 后,将会生成公私密钥对。你可以将公钥放置到任意服务器,从持有私钥的客户端连接到服务器的时,会用它来解锁。两者匹配时,系统无需密码就能解除锁定。

在 CentOS 和 RHEL 上设置免密码登录 SSH

以下步骤在 CentOS 5/6/7、RHEL 5/6/7 和 Oracle Linux 6/7 上测试通过。

节点1 : 192.168.0.9 节点2 : 192.168.l.10

步骤1 :

测试节点1到节点2的连接和访问:

[root@node1 ~]# ssh [email protected]
The authenticity of host '192.168.0.10 (192.168.0.10)' can't be established.
RSA key fingerprint is 6d:8f:63:9b:3b:63:e1:72:b3:06:a4:e4:f4:37:21:42.
Are you sure you want to continue connecting (yes/no)? yes
Warning: Permanently added '192.168.0.10' (RSA) to the list of known hosts.
[email protected]'s password:
Last login: Thu Dec 10 22:04:55 2015 from 192.168.0.1
[root@node2 ~]#

步骤二:

使用 ssh-key-gen 命令生成公钥和私钥,这里要注意的是可以对私钥进行加密保护以增强安全性。

[root@node1 ~]# ssh-keygen
Generating public/private rsa key pair.
Enter file in which to save the key (/root/.ssh/id_rsa):
Enter passphrase (empty for no passphrase):
Enter same passphrase again:
Your identification has been saved in /root/.ssh/id_rsa.
Your public key has been saved in /root/.ssh/id_rsa.pub.
The key fingerprint is:
b4:51:7e:1e:52:61:cd:fb:b2:98:4b:ad:a1:8b:31:6d [email protected]
The key's randomart image is:
+--[ RSA 2048]----+
|          . ++   |
|         o o  o  |
|        o o o  . |
|       . o + ..  |
|        S   .  . |
|         .   .. .|
|        o E oo.o |
|         = ooo.  |
|        . o.o.   |
+-----------------+

步骤三:

用 ssh-copy-id 命令将公钥复制或上传到远程主机,并将身份标识文件追加到节点2的 ~/.ssh/authorized\_keys 中:

[root@node1 ~]# ssh-copy-id -i ~/.ssh/id_rsa.pub 192.168.0.10
[email protected]'s password:
Now try logging into the machine, with "ssh '192.168.0.10'", and check in:

.ssh/authorized_keys

to make sure we haven't added extra keys that you weren't expecting.

步骤四:

验证免密码 SSH 登录节点2:

[root@node1 ~]# ssh [email protected]
Last login: Sun Dec 13 14:03:20 2015 from www.ehowstuff.local

我希望这篇文章能帮助到你,为你提供 SSH 免密码登录 CentOS / RHEL 的基本认知和快速指南。


原载: http://www.ehowstuff.com/ssh-login-without-password-centos/

作者:skytech 译者:fw8899 校对:wxy

本文由 LCTT 原创编译,Linux中国 荣誉推出

fail2ban 是一款用于保护你的服务器免于暴力攻击的入侵保护软件。fail2ban 用 python 写成,并广泛用于很多服务器上。fail2ban 会扫描日志文件和 IP 黑名单来显示恶意软件、过多的密码失败尝试、web 服务器利用、wordpress 插件攻击和其他漏洞。如果你已经安装并使用了 fail2ban 来保护你的 web 服务器,你也许会想知道如何在 CentOS 6、CentOS 7、RHEL 6、RHEL 7 和 Oracle Linux 6/7 中找到被 fail2ban 阻止的 IP,或者你想将 ip 从 fail2ban 监狱中移除。

如何列出被禁止的 IP

要查看所有被禁止的 ip 地址,运行下面的命令:

# iptables -L
Chain INPUT (policy ACCEPT)
target     prot opt source               destination
f2b-AccessForbidden  tcp  --  anywhere             anywhere            tcp dpt:http
f2b-WPLogin  tcp  --  anywhere             anywhere            tcp dpt:http
f2b-ConnLimit  tcp  --  anywhere             anywhere            tcp dpt:http
f2b-ReqLimit  tcp  --  anywhere             anywhere            tcp dpt:http
f2b-NoAuthFailures  tcp  --  anywhere             anywhere            tcp dpt:http
f2b-SSH    tcp  --  anywhere             anywhere            tcp dpt:ssh
f2b-php-url-open  tcp  --  anywhere             anywhere            tcp dpt:http
f2b-nginx-http-auth  tcp  --  anywhere             anywhere            multiport dports http,https
ACCEPT     all  --  anywhere             anywhere            state RELATED,ESTABLISHED
ACCEPT     icmp --  anywhere             anywhere
ACCEPT     all  --  anywhere             anywhere
ACCEPT     tcp  --  anywhere             anywhere            tcp dpt:EtherNet/IP-1
ACCEPT     tcp  --  anywhere             anywhere            tcp dpt:http
REJECT     all  --  anywhere             anywhere            reject-with icmp-host-prohibited

Chain FORWARD (policy ACCEPT)
target     prot opt source               destination
REJECT     all  --  anywhere             anywhere            reject-with icmp-host-prohibited

Chain OUTPUT (policy ACCEPT)
target     prot opt source               destination


Chain f2b-NoAuthFailures (1 references)
target     prot opt source               destination
REJECT     all  --  64.68.50.128         anywhere            reject-with icmp-port-unreachable
REJECT     all  --  104.194.26.205       anywhere            reject-with icmp-port-unreachable
RETURN     all  --  anywhere             anywhere

如何从 Fail2ban 中移除 IP

# iptables -D f2b-NoAuthFailures -s banned_ip -j REJECT

我希望这篇教程可以给你在 CentOS 6、CentOS 7、RHEL 6、RHEL 7 和 Oracle Linux 6/7 中移除被禁止的 ip 一些指导。


via: http://www.ehowstuff.com/how-to-remove-banned-ip-from-fail2ban-on-centos/

作者:skytech 译者:geekpi 校对:wxy

本文由 LCTT 原创编译,Linux中国 荣誉推出

虚拟私有服务器 (VPS)上启用 SSH 服务使得该服务器暴露到互联网中,为黑客攻击提供了机会,尤其是当 VPS 还允许root 直接访问时。VPS 应该为每次 SSH 登录成功尝试配置一个自动的 email 警告。 VPS 服务器的所有者会得到各种 SSH 服务器访问日志的通知,例如登录者、登录时间以及来源 IP 地址等信息。这是一个对于服务器拥有者来说,保护服务器避免未知登录尝试的重要安全关注点。这是因为如果黑客使用暴力破解方式通过 SSH 来登录到你的 VPS 的话,后果很严重。在本文中,我会解释如何在 CentOS 6、 CentOS 7、 RHEL 6 和 RHEL 7上为所有的 SSH 用户登录设置一个 email 警告。

  1. 使用root用户登录到你的服务器;
  2. 在全局源定义处配置警告(/etc/bashrc),这样就会对 root 用户以及普通用户都生效:
[root@vps ~]# vi /etc/bashrc

将下面的内容加入到上述文件的尾部。

echo 'ALERT - Root Shell Access (vps.ehowstuff.com) on:' `date` `who` | mail -s "Alert: Root Access from `who | cut -d'(' -f2 | cut -d')' -f1`" [email protected]
  1. 你也可以选择性地让警告只对 root 用户生效:
[root@vps ~]# vi .bashrc

将下面的内容添加到/root/.bashrc的尾部:

echo 'ALERT - Root Shell Access (vps.ehowstuff.com) on:' `date` `who` | mail -s "Alert: Root Access from `who | cut -d'(' -f2 | cut -d')' -f1`" [email protected]

整个配置文件样例:

# .bashrc

# User specific aliases and functions

alias rm='rm -i'
alias cp='cp -i'
alias mv='mv -i'

# Source global definitions
if [ -f /etc/bashrc ]; then
        . /etc/bashrc
fi
echo 'ALERT - Root Shell Access (vps.ehowstuff.com) on:' `date` `who` | mail -s "Alert: Root Access from `who | cut -d'(' -f2 | cut -d')' -f1`" [email protected]
  1. 你也可以选择性地让警告只对特定的普通用户生效(例如 skytech):
[root@vps ~]# vi /home/skytech/.bashrc

将下面的内容加入到/home/skytech/.bashrc文件尾部:

echo 'ALERT - Root Shell Access (vps.ehowstuff.com) on:' `date` `who` | mail -s "Alert: Root Access from `who | cut -d'(' -f2 | cut -d')' -f1`" [email protected]

via: http://www.ehowstuff.com/how-to-get-email-alerts-for-ssh-login-on-linux-server/

作者:skytech 译者:theo-l 校对:wxy

本文由 LCTT 原创翻译,Linux中国 荣誉推出

通常,大多数默认设置安装的web服务器存在信息泄露,这其中之一就是PHP。PHP 是如今流行的服务端html嵌入式语言(之一?)。在如今这个充满挑战的时代,有许多攻击者会尝试发现你服务端的漏洞。因此,我会简单描述如何在Linux服务器中隐藏PHP信息。

默认上expose\_php默认是开的。关闭“expose\_php”参数可以使php隐藏它的版本信息。

[root@centos66 ~]# vi /etc/php.ini

在你的php.ini, 定位到含有expose\_php的那行把On设成Off:

expose_php = Off

在此之前,web服务器头看上去就像这样:

[root@centos66 ~]# curl -I http://www.ehowstuff.com/

HTTP/1.1 200 OK
Server: nginx
Content-Type: text/html; charset=UTF-8
Vary: Accept-Encoding
X-Powered-By: PHP/5.3.3
X-Pingback: http://www.ehowstuff.com/xmlrpc.php
Date: Wed, 11 Feb 2015 14:10:43 GMT
X-Page-Speed: 1.9.32.2-4321
Cache-Control: max-age=0, no-cache

更改并重启 Web 服务后,php就不会在web服务头中显示版本了:

HTTP/1.1 200 OK
Server: nginx
Date: Wed, 11 Feb 2015 15:38:14 GMT
Content-Type: text/html; charset=UTF-8
Vary: Accept-Encoding
X-Pingback: http://www.ehowstuff.com/xmlrpc.php
Date: Wed, 11 Feb 2015 14:10:43 GMT
X-Page-Speed: 1.9.32.2-4321
Cache-Control: max-age=0, no-cache

LCTT译注:除了 PHP 的版本之外,Web 服务器也会默认泄露版本号。如果使用 Apache 服务器,请参照此文章关闭Apache 版本显示;如果使用 Nginx 服务器,请在 http 段内加入server_tokens off; 配置。以上修改请记得重启相关服务。


via: http://www.ehowstuff.com/how-to-hide-php-version-in-linux/

作者:skytech 译者:geekpi 校对:wxy

本文由 LCTT 原创翻译,Linux中国 荣誉推出

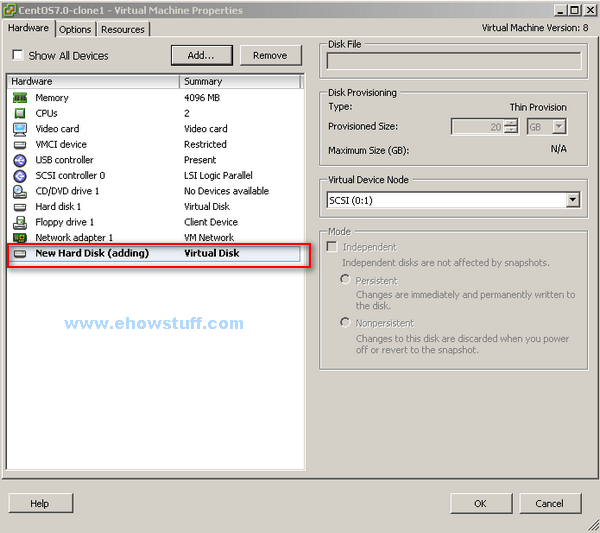
通常在你在虚拟机中添加一块新硬盘时,你可能会看到新硬盘没有自动加载。这是因为连接到硬盘的SCSI总线需要重新扫描来使得新硬盘可见。这里有一个简单的命令来重新扫描SCSI总线和SCSI设备。下面这几步在CentOS 7 和RHEL 7 中测试过。

  1. 在ESXi或者vCenter中添加一块新的20G硬盘:

  1. 显示当前磁盘分区:
[root@centos7 ~]# fdisk -l

Disk /dev/sda: 32.2 GB, 32212254720 bytes, 62914560 sectors
Units = sectors of 1 * 512 = 512 bytes
Sector size (logical/physical): 512 bytes / 512 bytes
I/O size (minimum/optimal): 512 bytes / 512 bytes
Disk label type: dos
Disk identifier: 0x0006b96a

   Device Boot      Start         End      Blocks   Id  System
/dev/sda1   *        2048     1026047      512000   83  Linux
/dev/sda2         1026048    62914559    30944256   8e  Linux LVM

Disk /dev/mapper/centos-swap: 2147 MB, 2147483648 bytes, 4194304 sectors
Units = sectors of 1 * 512 = 512 bytes
Sector size (logical/physical): 512 bytes / 512 bytes
I/O size (minimum/optimal): 512 bytes / 512 bytes

Disk /dev/mapper/centos-root: 29.5 GB, 29536288768 bytes, 57688064 sectors
Units = sectors of 1 * 512 = 512 bytes
Sector size (logical/physical): 512 bytes / 512 bytes
I/O size (minimum/optimal): 512 bytes / 512 bytes
  1. 确定主机总线号
[root@centos7 ~]# ls /sys/class/scsi_host/
host0  host1  host2
  1. 重新扫描SCSI总线来添加设备
[root@centos7 ~]# echo "- - -" > /sys/class/scsi_host/host0/scan
[root@centos7 ~]# echo "- - -" > /sys/class/scsi_host/host1/scan
[root@centos7 ~]# echo "- - -" > /sys/class/scsi_host/host2/scan
  1. 验证磁盘和分区并确保20GB硬盘已经添加了。在本例中,出现了下面这行 “Disk /dev/sdb: 21.5 GB, 21474836480 bytes, 41943040 sectors” 并且可以确认没有重启服务器就添加了新盘:
[root@centos7 ~]# fdisk -l

Disk /dev/sda: 32.2 GB, 32212254720 bytes, 62914560 sectors
Units = sectors of 1 * 512 = 512 bytes
Sector size (logical/physical): 512 bytes / 512 bytes
I/O size (minimum/optimal): 512 bytes / 512 bytes
Disk label type: dos
Disk identifier: 0x0006b96a

   Device Boot      Start         End      Blocks   Id  System
/dev/sda1   *        2048     1026047      512000   83  Linux
/dev/sda2         1026048    62914559    30944256   8e  Linux LVM

Disk /dev/mapper/centos-swap: 2147 MB, 2147483648 bytes, 4194304 sectors
Units = sectors of 1 * 512 = 512 bytes
Sector size (logical/physical): 512 bytes / 512 bytes
I/O size (minimum/optimal): 512 bytes / 512 bytes

Disk /dev/mapper/centos-root: 29.5 GB, 29536288768 bytes, 57688064 sectors
Units = sectors of 1 * 512 = 512 bytes
Sector size (logical/physical): 512 bytes / 512 bytes
I/O size (minimum/optimal): 512 bytes / 512 bytes

Disk /dev/sdb: 21.5 GB, 21474836480 bytes, 41943040 sectors
Units = sectors of 1 * 512 = 512 bytes
Sector size (logical/physical): 512 bytes / 512 bytes
I/O size (minimum/optimal): 512 bytes / 512 bytes

via: http://www.ehowstuff.com/how-to-add-a-new-hard-disk-without-rebooting-on-centos-7-rhel-7/

作者:skytech 译者:geekpi 校对:wxy

本文由 LCTT 原创翻译,Linux中国 荣誉推出

4 个 lvcreate 常用命令举例

逻辑卷管理(LVM)是广泛使用的技术,并拥有极其灵活磁盘管理方案。主要包含3个基础命令:

  1. 创建物理卷使用pvcreate
  2. 创建卷组并给卷组增加分区vgcreate
  3. 创建新的逻辑卷使用lvcreate

下列例子主要讲述在已经存在的卷组上使用lvcreate创建逻辑卷。lvcreate命令可以在卷组的可用物理扩展池中分配逻辑扩展。通常,逻辑卷可以随意使用底层逻辑卷上的任意空间。修改逻辑卷将释放或重新分配物理卷的空间。这些例子已经在CentOS 5, CentOS 6, CentOS 7, RHEL 5, RHEl 6 和 RHEL 7 版本中测试通过。

4个lvcreate命令例子

  1. 在名为vg\_newlvm的卷组中创建15G大小的逻辑卷:
[root@centos7 ~]# lvcreate -L 15G vg_newlvm
  1. 在名为vgnewlvm的卷组中创建大小为2500MB的逻辑卷,并命名为centos7newvol,这样就创建了块设备/dev/vgnewlvm/centos7newvol:
[root@centos7 ~]# lvcreate -L 2500 -n centos7_newvol vg_newlvm
  1. 可以使用lvcreate命令的参数-l来指定逻辑卷扩展的大小。也可以使用这个参数以卷组的大小百分比来扩展逻辑卷。这下列的命令创建了centos7newvol卷组的50%大小的逻辑卷vgnewlvm:
[root@centos7 ~]# lvcreate -l 50%VG -n centos7_newvol vg_newlvm
  1. 使用卷组剩下的所有空间创建逻辑卷
[root@centos7 ~]# lvcreate --name centos7newvol -l 100%FREE vgnewlvm

更多帮助,使用lvcreate命令--help选项来查看:

[root@centos7 ~]# lvcreate --help

  lvcreate: Create a logical volume(创建逻辑卷)

lvcreate
        [-A|--autobackup {y|n}](自动备份)
        [-a|--activate [a|e|l]{y|n}]
        [--addtag Tag](增加标签)
        [--alloc AllocationPolicy](分配策略)
        [--cachemode CacheMode](Cache模式)
        [-C|--contiguous {y|n}]
        [-d|--debug]
        [-h|-?|--help]
        [--ignoremonitoring](忽略监控)
        [--monitor {y|n}](监控)
        [-i|--stripes Stripes [-I|--stripesize StripeSize]]
        [-k|--setactivationskip {y|n}]
        [-K|--ignoreactivationskip]
        {-l|--extents LogicalExtentsNumber[%{VG|PVS|FREE}] |(逻辑扩展数)
         -L|--size LogicalVolumeSize[bBsSkKmMgGtTpPeE]}(逻辑卷大小)
        [-M|--persistent {y|n}] [--major major] [--minor minor]
        [-m|--mirrors Mirrors [--nosync] [{--mirrorlog {disk|core|mirrored}|--corelog}]](镜像)
        [-n|--name LogicalVolumeName](逻辑卷名字)
        [--noudevsync]
        [-p|--permission {r|rw}]
        [--[raid]minrecoveryrate Rate]
        [--[raid]maxrecoveryrate Rate]
        [-r|--readahead ReadAheadSectors|auto|none](读取头扇区)
        [-R|--regionsize MirrorLogRegionSize](镜像逻辑区域尺寸)
        [-T|--thin  [-c|--chunksize  ChunkSize](块大小)
          [--discards {ignore|nopassdown|passdown}]
          [--poolmetadatasize MetadataSize[bBsSkKmMgG]]]
          [--poolmetadataspare {y|n}]
        [--thinpool ThinPoolLogicalVolume{Name|Path}] (精简池逻辑卷)
        [-t|--test]
        [--type VolumeType](卷类型)
        [-v|--verbose]
        [-W|--wipesignatures {y|n}]
        [-Z|--zero {y|n}]
        [--version]
        VolumeGroupName [PhysicalVolumePath...]

via: http://www.ehowstuff.com/4-lvcreate-command-examples-on-linux/

作者:skytech 译者:Vic020 校对:wxy

本文由 LCTT 原创翻译,Linux中国 荣誉推出