标签 apt 下的文章

如果你正在管理Debian或者Ubuntu服务器,你也许会经常使用dpkg 或者 apt-get命令。这两个命令用来安装、卸载和更新包。

在本篇中,让我们看下如何在基于DEB的系统下检查是否安装了一个包。

要检查特定的包,比如firefox是否安装了,使用这个命令:

dpkg -s firefox

示例输出:

 Package: firefox
 Status: install ok installed
 Priority: optional
 Section: web
 Installed-Size: 93339
 Maintainer: Ubuntu Mozilla Team <[email protected]>
 Architecture: amd64
 Version: 35.0+build3-0ubuntu0.14.04.2
 Replaces: kubuntu-firefox-installer
 Provides: gnome-www-browser, iceweasel, www-browser
 Depends: lsb-release, libasound2 (>= 1.0.16), libatk1.0-0 (>= 1.12.4), libc6 (>= 2.17), libcairo2 (>= 1.2.4), libdbus-1-3 (>= 1.0.2), libdbus-glib-1-2 (>= 0.78), libfontconfig1 (>= 2.9.0), libfreetype6 (>= 2.2.1), libgcc1 (>= 1:4.1.1), libgdk-pixbuf2.0-0 (>= 2.22.0), libglib2.0-0 (>= 2.37.3), libgtk2.0-0 (>= 2.24.0), libpango-1.0-0 (>= 1.22.0), libpangocairo-1.0-0 (>= 1.14.0), libstartup-notification0 (>= 0.8), libstdc++6 (>= 4.6), libx11-6, libxcomposite1 (>= 1:0.3-1), libxdamage1 (>= 1:1.1), libxext6, libxfixes3, libxrender1, libxt6
 Recommends: xul-ext-ubufox, libcanberra0, libdbusmenu-glib4, libdbusmenu-gtk4
 Suggests: ttf-lyx
 Conffiles:
 /etc/firefox/syspref.js 09e457e65435a1a043521f2bd19cd2a1
 /etc/apport/blacklist.d/firefox ee63264f847e671832d42255912ce144
 /etc/apport/native-origins.d/firefox 7c26b75c7c2b715c89cc6d85338252a4
 /etc/apparmor.d/usr.bin.firefox f54f7a43361c7ecfa3874abca2f292cf
 Description: Safe and easy web browser from Mozilla
 Firefox delivers safe, easy web browsing. A familiar user interface,
 enhanced security features including protection from online identity theft,
 and integrated search let you get the most out of the web.
 Xul-Appid: {ec8030f7-c20a-464f-9b0e-13a3a9e97384}

如上所见,firefox已经安装了。

同样,你可以使用dpkg-query 命令。这个命令会有一个更好的输出,当然,你可以用通配符。

dpkg-query -l firefox

示例输出:

Desired=Unknown/Install/Remove/Purge/Hold
| Status=Not/Inst/Conf-files/Unpacked/halF-conf/Half-inst/trig-aWait/Trig-pend
|/ Err?=(none)/Reinst-required (Status,Err: uppercase=bad)
||/ Name                                 Version                 Architecture            Description
+++-====================================-=======================-=======================-=============================================================================
ii  firefox                              35.0+build3-0ubuntu0.14 amd64                   Safe and easy web browser from Mozilla

要列出你系统中安装的所有包,输入下面的命令:

dpkg --get-selections

示例输出:

abiword                        install
abiword-common                    install
accountsservice                    install
acl                        install
adduser                        install
alsa-base                    install
alsa-utils                    install
anacron                        install
app-install-data                install
apparmor                    install
.
.
.
zeitgeist                    install
zeitgeist-core                    install
zeitgeist-datahub                install
zenity                        install
zenity-common                    install
zip                        install
zlib1g:amd64                    install
zlib1g:i386                    install

上面的输出可能会非常长,这依赖于你的系统已安装的包。

你同样可以通过grep来过滤割到更精确的包。比如,我想要使用dpkg命令查看系统中安装的gcc包:

dpkg --get-selections | grep gcc

示例输出:

gcc                        install
gcc-4.8                        install
gcc-4.8-base:amd64                install
gcc-4.8-base:i386                install
gcc-4.9-base:amd64                install
gcc-4.9-base:i386                install
libgcc-4.8-dev:amd64                install
libgcc1:amd64                    install
libgcc1:i386                    install

此外,你可以使用“-L”参数来找出包中文件的位置。

dpkg -L gcc-4.8

示例输出:

/.
/usr
/usr/share
/usr/share/doc
/usr/share/doc/gcc-4.8-base
/usr/share/doc/gcc-4.8-base/README.Bugs
/usr/share/doc/gcc-4.8-base/NEWS.html
/usr/share/doc/gcc-4.8-base/quadmath
/usr/share/doc/gcc-4.8-base/quadmath/changelog.gz
/usr/share/doc/gcc-4.8-base/gcc
.
.
.
/usr/bin/x86_64-linux-gnu-gcc-4.8
/usr/bin/x86_64-linux-gnu-gcc-ar-4.8
/usr/bin/x86_64-linux-gnu-gcov-4.8

就是这样了。希望这篇对你有用。

美好的一天!


via: http://www.unixmen.com/linux-basics-check-package-installed-not-ubuntu/

作者:SK 译者:geekpi 校对:wxy

本文由 LCTT 原创翻译,Linux中国 荣誉推出

apt-get和apt-cache是Ubuntu Linux中的命令行下的包管理工具。 apt-get的GUI版本是Synaptic包管理器。本篇中我们会展示apt-get和apt-cache命令的15个不同例子。

示例:1 列出所有可用包

linuxtechi@localhost:~$ apt-cache pkgnames
account-plugin-yahoojp
ceph-fuse
dvd+rw-tools
e3
gnome-commander-data
grub-gfxpayload-lists
gweled
.......................................

示例:2 用关键字搜索包

这个命令在你不确定包名时很有用,只要在apt-cache(LCTT 译注:这里原文是apt-get,应为笔误)后面输入与包相关的关键字即可。

linuxtechi@localhost:~$ apt-cache search "web server"
apache2 - Apache HTTP Server
apache2-bin - Apache HTTP Server (binary files and modules)
apache2-data - Apache HTTP Server (common files)
apache2-dbg - Apache debugging symbols
apache2-dev - Apache HTTP Server (development headers)
apache2-doc - Apache HTTP Server (on-site documentation)
apache2-utils - Apache HTTP Server (utility programs for web servers)
......................................................................

注意: 如果你安装了“apt-file”包,我们就可以像下面那样用配置文件搜索包。

linuxtechi@localhost:~$ apt-file search nagios.cfg
ganglia-nagios-bridge: /usr/share/doc/ganglia-nagios-bridge/nagios.cfg
nagios3-common: /etc/nagios3/nagios.cfg
nagios3-common: /usr/share/doc/nagios3-common/examples/nagios.cfg.gz
pnp4nagios-bin: /etc/pnp4nagios/nagios.cfg
pnp4nagios-bin: /usr/share/doc/pnp4nagios/examples/nagios.cfg

示例:3 显示特定包的基本信息

linuxtechi@localhost:~$ apt-cache show postfix
Package: postfix
Priority: optional
Section: mail
Installed-Size: 3524
Maintainer: LaMont Jones <[email protected]>
Architecture: amd64
Version: 2.11.1-1
Replaces: mail-transport-agent
Provides: default-mta, mail-transport-agent
.....................................................

示例:4 列出包的依赖

linuxtechi@localhost:~$ apt-cache depends postfix
postfix
 Depends: libc6
 Depends: libdb5.3
 Depends: libsasl2-2
 Depends: libsqlite3-0
 Depends: libssl1.0.0
 |Depends: debconf
 Depends: <debconf-2.0>
 cdebconf
 debconf
 Depends: netbase
 Depends: adduser
 Depends: dpkg
............................................

示例:5 使用apt-cache显示缓存统计

linuxtechi@localhost:~$ apt-cache stats 
Total package names: 60877 (1,218 k)
Total package structures: 102824 (5,758 k)
 Normal packages: 71285
 Pure virtual packages: 1102
 Single virtual packages: 9151
 Mixed virtual packages: 1827
 Missing: 19459
Total distinct versions: 74913 (5,394 k)
Total distinct descriptions: 93792 (2,251 k)
Total dependencies: 573443 (16.1 M)
Total ver/file relations: 78007 (1,872 k)
Total Desc/File relations: 93792 (2,251 k)
Total Provides mappings: 16583 (332 k)
Total globbed strings: 171 (2,263 )
Total dependency version space: 2,665 k
Total slack space: 37.3 k
Total space accounted for: 29.5 M

示例:6 使用 “apt-get update” 更新仓库

使用命令“apt-get update”, 我们可以重新从源仓库中同步文件索引。包的索引从“/etc/apt/sources.list”中检索。

linuxtechi@localhost:~$ sudo apt-get update
 Ign http://extras.ubuntu.com utopic InRelease
 Hit http://extras.ubuntu.com utopic Release.gpg
 Hit http://extras.ubuntu.com utopic Release
 Hit http://extras.ubuntu.com utopic/main Sources
 Hit http://extras.ubuntu.com utopic/main amd64 Packages
 Hit http://extras.ubuntu.com utopic/main i386 Packages
 Ign http://in.archive.ubuntu.com utopic InRelease
 Ign http://in.archive.ubuntu.com utopic-updates InRelease
 Ign http://in.archive.ubuntu.com utopic-backports InRelease
 ................................................................

示例:7 使用apt-get安装包

linuxtechi@localhost:~$ sudo apt-get install icinga

上面的命令会安装叫“icinga”的包。

示例:8 升级所有已安装的包

linuxtechi@localhost:~$ sudo apt-get upgrade

示例:9 更新特定的包

在apt-get命令中的“install”选项后面接上“-only-upgrade”用来更新一个特定的包,如下所示:

linuxtechi@localhost:~$ sudo apt-get install filezilla --only-upgrade

示例:10 使用apt-get卸载包

linuxtechi@localhost:~$ sudo apt-get remove skype

上面的命令只会删除skype包,如果你想要删除它的配置文件,在apt-get命令中使用“purge”选项。如下所示:

linuxtechi@localhost:~$ sudo apt-get purge skype

我们可以结合使用上面的两个命令:

linuxtechi@localhost:~$ sudo apt-get remove --purge skype

示例:11 在当前的目录中下载包

linuxtechi@localhost:~$ sudo apt-get download icinga
Get:1 http://in.archive.ubuntu.com/ubuntu/ utopic/universe icinga amd64 1.11.6-1build1 [1,474 B]
Fetched 1,474 B in 1s (1,363 B/s)

上面的目录会把icinga包下载到你的当前工作目录。

示例:12 清理本地包占用的磁盘空间

linuxtechi@localhost:~$ sudo apt-get clean

上面的命令会清空apt-get所下载的包占用的磁盘空间。

我们也可以使用“autoclean”选项来代替“clean”,两者之间主要的区别是autoclean清理不再使用且没用的下载。

linuxtechi@localhost:~$ sudo apt-get autoclean
Reading package lists... Done
Building dependency tree
Reading state information... Done

示例:13 使用“autoremove”删除包

当在apt-get命令中使用“autoremove”时,它会删除为了满足依赖而安装且现在没用的包。

linuxtechi@localhost:~$ sudo apt-get autoremove icinga

示例:14 显示包的更新日志

linuxtechi@localhost:~$ sudo apt-get changelog apache2
Get:1 Changelog for apache2 (http://changelogs.ubuntu.com/changelogs/pool/main/a/apache2/apache2_2.4.10-1ubuntu1/changelog) [195 kB]
Fetched 195 kB in 3s (60.9 kB/s)

上面的命令会下载apache2的更新日志,并在你屏幕上分页显示。

示例:15 使用 “check” 选项显示损坏的依赖关系

linuxtechi@localhost:~$ sudo apt-get check
Reading package lists... Done
Building dependency tree
Reading state information... Done

via: http://www.linuxtechi.com/ubuntu-apt-get-apt-cache-commands-examples/

作者:Pradeep Kumar 译者:geekpi 校对:wxy

本文由 LCTT 原创翻译,Linux中国 荣誉推出

今天,我们将向你展示如何在你的 Ubuntu 个人电脑或 Ubuntu 服务器中,直接通过 Ubuntu 官方软件仓库来配置本地软件仓库。在你的电脑中创建一个本地软件仓库有着许多的好处。假如你有许多电脑需要安装软件 、安全升级和修复补丁,那么配置一个本地软件仓库是一个做这些事情的高效方法。因为,所有需要安装的软件包都可以通过快速的局域网连接从你的本地服务器中下载,这样可以节省你的网络带宽,降低互联网接入的年度开支 ...

你可以使用多种工具在你的本地个人电脑或服务器中配置一个 Ubuntu 的本地软件仓库,但在本教程中,我们将为你介绍 APT-Mirror。这里,我们将把默认的镜像包镜像到我们本地的服务器或个人电脑中,并且在你的本地或外置硬盘中,我们至少需要 120 GB 或更多的可用空间才行。 我们可以通过配置一个 HTTPFTP 服务器来与本地系统客户端共享这个软件仓库。

我们需要安装 Apache 网络服务器和 APT-Mirror 来使得我们的工作得以开始。下面是配置一个可工作的本地软件仓库的步骤:

1. 安装需要的软件包

我们需要从 Ubuntu 的公共软件包仓库中取得所有的软件包,然后在我们本地的 Ubuntu 服务器硬盘中保存它们。

首先我们安装一个Web 服务器来承载我们的本地软件仓库。这里我们将安装 Apache Web 服务器,但你可以安装任何你中意的 Web 服务器。对于 http 协议,Web 服务器是必须的。假如你需要配置 ftp 协议 及 rsync 协议,你还可以再分别额外安装 FTP 服务器,如 proftpd, vsftpd 等等 和 Rsync 。

$ sudo apt-get install apache2

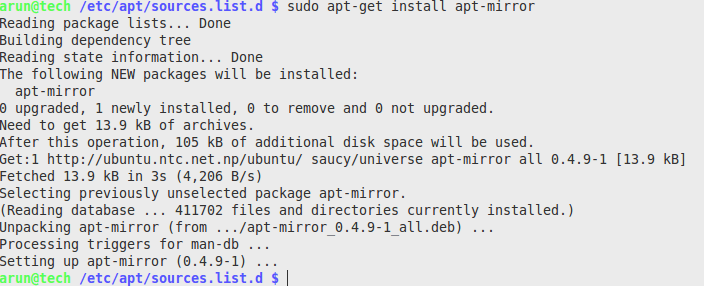
然后我们需要安装 apt-mirror:

$ sudo apt-get install apt-mirror

apt-mirror-installation

注: 正如我先前提到的,我们需要至少 120 GB 的可用空间来使得所有的软件包被镜像或下载。

2. 配置 APT-Mirror

现在,在你的硬盘上创建一个目录来保存所有的软件包。例如,我们创建一个名为 /linoxide的目录,我们将在这个目录中保存所有的软件包:

 $ sudo mkdir /linoxide

现在,打开文件 /etc/apt/mirror.list :

 $ sudo nano /etc/apt/mirror.list

复制下面的命令行配置到 mirror.list文件中并按照你的需求进行修改:

############# config ##################
#
set base_path    /linoxide
#
# set mirror_path  $base_path/mirror
# set skel_path    $base_path/skel
# set var_path     $base_path/var
# set cleanscript $var_path/clean.sh
# set defaultarch  <running host architecture>
# set postmirror_script $var_path/postmirror.sh
# set run_postmirror 0
set nthreads     20
set _tilde 0
#
############# end config ##############

deb http://archive.ubuntu.com/ubuntu trusty main restricted universe multiverse
deb http://archive.ubuntu.com/ubuntu trusty-security main restricted universe multiverse
deb http://archive.ubuntu.com/ubuntu trusty-updates main restricted universe multiverse
#deb http://archive.ubuntu.com/ubuntu trusty-proposed main restricted universe multiverse
#deb http://archive.ubuntu.com/ubuntu trusty-backports main restricted universe multiverse

deb-src http://archive.ubuntu.com/ubuntu trusty main restricted universe multiverse
deb-src http://archive.ubuntu.com/ubuntu trusty-security main restricted universe multiverse
deb-src http://archive.ubuntu.com/ubuntu trusty-updates main restricted universe multiverse
#deb-src http://archive.ubuntu.com/ubuntu trusty-proposed main restricted universe multiverse
#deb-src http://archive.ubuntu.com/ubuntu trusty-backports main restricted universe multiverse

clean http://archive.ubuntu.com/ubuntu

注: 你可以将上面的官方镜像服务器网址更改为离你最近的服务器的网址,可以通过访问 Ubuntu Mirror Server来找到这些服务器地址。假如你并不太在意镜像完成的时间,你可以沿用默认的官方镜像服务器网址。

这里,我们将要镜像最新和最大的 Ubuntu LTS 发行版 --- 即 Ubuntu 14.04 LTS (Trusty Tahr) --- 的软件包仓库,所以在上面的配置中发行版本号为 trusty 。假如我们需要镜像 Saucy 或其他的 Ubuntu 发行版本,请修改上面的 trusy 为相应的代号。

现在,我们必须运行 apt-mirror 来下载或镜像官方仓库中的所有软件包。

sudo apt-mirror

从 Ubuntu 服务器中下载所有的软件包所花费的时间取决于你和镜像服务器之间的网络连接速率和性能。这里我中断了下载,因为我已经下载好了 ...

downloading-packages

3.配置网络服务器

为了使得其他的电脑能够访问这个软件仓库,你需要一个Web服务器。你也可以通过 ftp 来完成这件事,但我选择使用一个Web服务器因为在上面的步骤 1 中我提及到使用Web服务器。因此,我们现在要对 Apache 服务器进行配置:

我们将为我们本地的软件仓库目录 建立一个到 Apache 托管目录 --- 即 /var/www/ubuntu --- 的符号链接。

$ sudo ln -s /linoxide /var/www/ubuntu
$ sudo service apache2 start

上面的命令将允许我们从本地主机(localhost) --- 即 http://127.0.0.1(默认情况下)) --- 浏览我们的镜像软件仓库。

4. 配置客户端

最后,我们需要在其他的电脑中添加软件源,来使得它们可以从我们的电脑中取得软件包或软件仓库。为达到此目的,我们需要编辑 /etc/apt/sources.list 文件并添加下面的命令:

$ sudo nano /etc/apt/sources.list

添加下面的一行到/etc/apt/sources.list中并保存。

deb http://192.168.0.100/ubuntu/ trusty main restricted universe

注: 这里的 192.168.0.100 是我们的服务器电脑的局域网 IP 地址,你需要替换为你的服务器电脑的局域网 IP 地址

$ sudo apt-get update

最终,我们完成了任务。现在,你可以使用sudo apt-get install packagename 命令来从你的本地 Ubuntu 软件仓库中安装所需的软件包,这将会是高速的且消耗很少的带宽。


via: http://linoxide.com/ubuntu-how-to/setup-local-repository-ubuntu/

作者:Arun Pyasi 译者:FSSlc 校对:wxy

本文由 LCTT 原创翻译,Linux中国 荣誉推出

问题: 前段时间,我的Ubuntu增加了一个第三方的PPA仓库,如何才能移除这个PPA仓库呢?

个人软件包档案(PPA)是Ubuntu独有的解决方案,允许独立开发者和贡献者构建、贡献任何定制的软件包来作为通过启动面板的第三方APT仓库。如果你是Ubuntu用户,有可能你已经增加一些流行的第三方PPA仓库到你的Ubuntu系统。如果你需要删除掉已经预先配置好的PPA仓库,下面将教你怎么做。

假如你想增加一个叫“ppa:webapps/preview”第三方PPA仓库到你的系统中,如下:

$ sudo add-apt-repository ppa:webapps/preview

如果你想要 单独地删除某个PPA仓库,运行下面的命令:

 $ sudo add-apt-repository --remove ppa:someppa/ppa 

注意,上述命令不会同时删除任何已经安装或更新的软件包。

如果你想要 完整的删除一个PPA仓库并包括来自这个PPA安装或更新过的软件包,你需要ppa-purge命令。

首先要安装ppa-purge软件包:

$ sudo apt-get install ppa-purge 

然后使用如下命令删除PPA仓库和与之相关的软件包:

$ sudo ppa-purge ppa:webapps/preview 

特别滴,在发行版更新后,当你分辨和清除已损坏的PPA仓库时这个方法特别有用!


via: http://ask.xmodulo.com/how-to-remove-ppa-repository-from-command-line-on-ubuntu.html

译者:Vic\_\_\_ 校对:wxy

本文由 LCTT 原创翻译,Linux中国 荣誉推出