分类 技术 下的文章

探索 os.fspath 和其他两个未被充分利用但仍然有用的 Python 特性。

 title=

这是 Python 3.x 首发特性系列文章中的第七篇。Python 3.6 首次发布于 2016 年,尽管它已经发布了一段时间,但它引入的许多特性都没有得到充分利用,而且相当酷。下面是其中的三个。

分隔数字常数

快回答哪个更大,10000000 还是 200000?你在看代码时能正确回答吗?根据当地的习惯,在写作中,你会用 10,000,000 或 10.000.000 来表示第一个数字。问题是,Python 使用逗号和句号是用于其他地方。

幸运的是,从 Python 3.6 开始,你可以使用下划线来分隔数字。这在代码中和使用字符串的 int() 转换器时都可以使用:

import math
math.log(10_000_000) / math.log(10)
    7.0
math.log(int("10_000_000")) / math.log(10)
    7.0

Tau 是对的

45 度角用弧度表示是多少?一个正确的答案是 π/4,但这有点难记。记住 45 度角是一个八分之一的转角要容易得多。正如 Tau Manifesto 所解释的,,称为 Τ,是一个更自然的常数。

在 Python 3.6 及以后的版本中,你的数学代码可以使用更直观的常数:

print("Tan of an eighth turn should be 1, got", round(math.tan(math.tau/8), 2))
print("Cos of an sixth turn should be 1/2, got", round(math.cos(math.tau/6), 2))
print("Sin of a quarter turn should be 1, go", round(math.sin(math.tau/4), 2))
    Tan of an eighth turn should be 1, got 1.0
    Cos of an sixth turn should be 1/2, got 0.5
    Sin of a quarter turn should be 1, go 1.0

os.fspath

从 Python 3.6 开始,有一个神奇的方法表示“转换为文件系统路径”。当给定一个 strbytes 时,它返回输入。

对于所有类型的对象,它寻找 __fspath__ 方法并调用它。这允许传递的对象是“带有元数据的文件名”。

open()stat 这样的普通函数仍然能够使用它们,只要 __fspath__ 返回正确的东西。

例如,这里有一个函数将一些数据写入一个文件,然后检查其大小。它还将文件名记录到标准输出,以便追踪:

def write_and_test(filename):
    print("writing into", filename)
    with open(filename, "w") as fpout:
        fpout.write("hello")
    print("size of", filename, "is", os.path.getsize(filename))

你可以用你期望的方式来调用它,用一个字符串作为文件名:

write_and_test("plain.txt")
    writing into plain.txt
    size of plain.txt is 5

然而,可以定义一个新的类,为文件名的字符串表示法添加信息。这样可以使日志记录更加详细,而不改变原来的功能:

class DocumentedFileName:
    def __init__(self, fname, why):
        self.fname = fname
        self.why = why
    def __fspath__(self):
        return self.fname
    def __repr__(self):
        return f"DocumentedFileName(fname={self.fname!r}, why={self.why!r})"

DocumentedFileName 实例作为输入运行该函数,允许 openos.getsize 函数继续工作,同时增强日志:

write_and_test(DocumentedFileName("documented.txt", "because it's fun"))
    writing into DocumentedFileName(fname='documented.txt', why="because it's fun")
    size of DocumentedFileName(fname='documented.txt', why="because it's fun") is 5

欢迎来到 2016 年

Python 3.6 是在五年前发布的,但是在这个版本中首次出现的一些特性非常酷,而且没有得到充分利用。如果你还没使用,那么将他们添加到你的工具箱中。


via: https://opensource.com/article/21/5/python-36-features

作者:Moshe Zadka 选题:lujun9972 译者:geekpi 校对:wxy

本文由 LCTT 原创编译,Linux中国 荣誉推出

虽然 systemd 并非真正的故障定位工具,但其输出中的信息为解决问题指明了方向。

 title=

没有人会认为 systemd 是一个故障定位工具,但当我的 web 服务器遇到问题时,我对 systemd 和它的一些功能的不断了解帮助我找到并规避了问题。

我遇到的问题是这样,我的服务器 yorktown 为我的家庭办公网络提供名称服务 、DHCP、NTP、HTTPD 和 SendMail 邮件服务,它在正常启动时未能启动 Apache HTTPD 守护程序。在我意识到它没有运行之后,我不得不手动启动它。这个问题已经持续了一段时间,我最近才开始尝试去解决它。

你们中的一些人会说,systemd 本身就是这个问题的原因,根据我现在了解的情况,我同意你们的看法。然而,我在使用 SystemV 时也遇到了类似的问题。(在本系列文章的 第一篇 中,我探讨了围绕 systemd 作为旧有 SystemV 启动程序和启动脚本的替代品所产生的争议。如果你有兴趣了解更多关于 systemd 的信息,也可以阅读 第二篇第三篇 文章。)没有完美的软件,systemd 和 SystemV 也不例外,但 systemd 为解决问题提供的信息远远多于 SystemV。

确定问题所在

找到这个问题根源的第一步是确定 httpd 服务的状态:

[root@yorktown ~]# systemctl status httpd
● httpd.service - The Apache HTTP Server
   Loaded: loaded (/usr/lib/systemd/system/httpd.service; enabled; vendor preset: disabled)
   Active: failed (Result: exit-code) since Thu 2020-04-16 11:54:37 EDT; 15min ago
     Docs: man:httpd.service(8)
  Process: 1101 ExecStart=/usr/sbin/httpd $OPTIONS -DFOREGROUND (code=exited, status=1/FAILURE)
 Main PID: 1101 (code=exited, status=1/FAILURE)
   Status: "Reading configuration..."
      CPU: 60ms

Apr 16 11:54:35 yorktown.both.org systemd[1]: Starting The Apache HTTP Server...
Apr 16 11:54:37 yorktown.both.org httpd[1101]: (99)Cannot assign requested address: AH00072: make_sock: could not bind to address 192.168.0.52:80
Apr 16 11:54:37 yorktown.both.org httpd[1101]: no listening sockets available, shutting down
Apr 16 11:54:37 yorktown.both.org httpd[1101]: AH00015: Unable to open logs
Apr 16 11:54:37 yorktown.both.org systemd[1]: httpd.service: Main process exited, code=exited, status=1/FAILURE
Apr 16 11:54:37 yorktown.both.org systemd[1]: httpd.service: Failed with result 'exit-code'.
Apr 16 11:54:37 yorktown.both.org systemd[1]: Failed to start The Apache HTTP Server.
[root@yorktown ~]#

这种状态信息是 systemd 的功能之一,我觉得比 SystemV 提供的任何功能都要有用。这里的大量有用信息使我很容易得出逻辑性的结论,让我找到正确的方向。我从旧的 chkconfig 命令中得到的是服务是否在运行,以及如果它在运行的话,进程 ID(PID)是多少。这可没多大帮助。

该状态报告中的关键条目显示,HTTPD 不能与 IP 地址绑定,这意味着它不能接受传入的请求。这表明网络启动速度不够快,因为 IP 地址还没有设置好,所以 HTTPD 服务还没有准备好与 IP 地址绑定。这是不应该发生的,所以我查看了我的网络服务的 systemd 启动配置文件;在正确的 afterrequires 语句下,所有这些似乎都没问题。下面是我服务器上的 /lib/systemd/system/httpd.service 文件:

# Modifying this file in-place is not recommended, because changes 
# will be overwritten during package upgrades.  To customize the 
# behaviour, run "systemctl edit httpd" to create an override unit.

# For example, to pass additional options (such as -D definitions) to 
# the httpd binary at startup, create an override unit (as is done by                             
# systemctl edit) and enter the following:                                           

#    [Service]
#    Environment=OPTIONS=-DMY_DEFINE             

[Unit]                                               
Description=The Apache HTTP Server
Wants=httpd-init.service
After=network.target remote-fs.target nss-lookup.target httpd-init.service
Documentation=man:httpd.service(8)

[Service]
Type=notify
Environment=LANG=C

ExecStart=/usr/sbin/httpd $OPTIONS -DFOREGROUND
ExecReload=/usr/sbin/httpd $OPTIONS -k graceful
# Send SIGWINCH for graceful stop
KillSignal=SIGWINCH
KillMode=mixed
PrivateTmp=true

[Install]
WantedBy=multi-user.target

httpd.service 单元文件明确规定,它应该在 network.targethttpd-init.service(以及其他)之后加载。我试着用 systemctl list-units 命令找到所有这些服务,并在结果数据流中搜索它们。所有这些服务都存在,应该可以确保在设置网络 IP 地址之前,httpd 服务没有加载。

第一个解决方案

在互联网上搜索了一下,证实其他人在 httpd 和其他服务也遇到了类似的问题。这似乎是由于其中一个所需的服务向 systemd 表示它已经完成了启动,但实际上它却启动了一个尚未完成的子进程。通过更多搜索,我想到了一个规避方法。

我搞不清楚为什么花了这么久才把 IP 地址分配给网卡。所以我想,如果我可以将 HTTPD 服务的启动推迟合理的一段时间,那么 IP 地址就会在那个时候分配。

幸运的是,上面的 /lib/systemd/system/httpd.service 文件提供了一些方向。虽然它说不要修改它,但是它还是指出了如何操作:使用 systemctl edit httpd 命令,它会自动创建一个新文件(/etc/systemd/system/httpd.service.d/override.conf)并打开 GNU Nano 编辑器(如果你对 Nano 不熟悉,一定要看一下 Nano 界面底部的提示)。

在新文件中加入以下代码并保存:

[root@yorktown ~]# cd /etc/systemd/system/httpd.service.d/
[root@yorktown httpd.service.d]# ll
total 4
-rw-r--r-- 1 root root 243 Apr 16 11:43 override.conf
[root@yorktown httpd.service.d]# cat override.conf
# Trying to delay the startup of httpd so that the network is
# fully up and running so that httpd can bind to the correct
# IP address
#
# By David Both, 2020-04-16

[Service]
ExecStartPre=/bin/sleep 30

这个覆盖文件的 [Service] 段有一行代码,将 HTTPD 服务的启动时间推迟了 30 秒。下面的状态命令显示了等待时间里的服务状态:

[root@yorktown ~]# systemctl status httpd
● httpd.service - The Apache HTTP Server
   Loaded: loaded (/usr/lib/systemd/system/httpd.service; enabled; vendor preset: disabled)
  Drop-In: /etc/systemd/system/httpd.service.d
           └─override.conf
           /usr/lib/systemd/system/httpd.service.d
           └─php-fpm.conf
   Active: activating (start-pre) since Thu 2020-04-16 12:14:29 EDT; 28s ago
     Docs: man:httpd.service(8)
Cntrl PID: 1102 (sleep)
    Tasks: 1 (limit: 38363)
   Memory: 260.0K
      CPU: 2ms
   CGroup: /system.slice/httpd.service
           └─1102 /bin/sleep 30

Apr 16 12:14:29 yorktown.both.org systemd[1]: Starting The Apache HTTP Server...
Apr 16 12:15:01 yorktown.both.org systemd[1]: Started The Apache HTTP Server.
[root@yorktown ~]#

这个命令显示了 30 秒延迟过后 HTTPD 服务的状态。该服务已经启动并正常运行。

[root@yorktown ~]# systemctl status httpd
● httpd.service - The Apache HTTP Server
   Loaded: loaded (/usr/lib/systemd/system/httpd.service; enabled; vendor preset: disabled)
  Drop-In: /etc/systemd/system/httpd.service.d
           └─override.conf
           /usr/lib/systemd/system/httpd.service.d
           └─php-fpm.conf
   Active: active (running) since Thu 2020-04-16 12:15:01 EDT; 1min 18s ago
     Docs: man:httpd.service(8)
  Process: 1102 ExecStartPre=/bin/sleep 30 (code=exited, status=0/SUCCESS)
 Main PID: 1567 (httpd)
   Status: "Total requests: 0; Idle/Busy workers 100/0;Requests/sec: 0; Bytes served/sec:   0 B/sec"
    Tasks: 213 (limit: 38363)
   Memory: 21.8M
      CPU: 82ms
   CGroup: /system.slice/httpd.service
           ├─1567 /usr/sbin/httpd -DFOREGROUND
           ├─1569 /usr/sbin/httpd -DFOREGROUND
           ├─1570 /usr/sbin/httpd -DFOREGROUND
           ├─1571 /usr/sbin/httpd -DFOREGROUND
           └─1572 /usr/sbin/httpd -DFOREGROUND

Apr 16 12:14:29 yorktown.both.org systemd[1]: Starting The Apache HTTP Server...
Apr 16 12:15:01 yorktown.both.org systemd[1]: Started The Apache HTTP Server.

我本来可以实验下更短的延迟时间是否也能奏效,但是我的系统并不用那么严格,所以我觉得不这样做。目前系统的工作状态很可靠,所以我很高兴。

因为我收集了所有这些信息,我将其作为 Bug1825554 报告给红帽 Bugzilla。我相信报告 Bug 比抱怨 Bug 更有有用。

更好的解决方案

把这个问题作为 bug 上报几天后,我收到了回复,表示 systemd 只是一个管理工具,如果 httpd 需要在满足某些要求之后被拉起,需要在单元文件中表达出来。这个回复指引我去查阅 httpd.service 的手册页。我希望我能早点发现这个,因为它是比我自己想出的更优秀的解决方案。这种方案明确的针对了前置目标单元,而不仅仅是随机延迟。

来自 httpd.service 手册页:

在启动时开启服务

httpd.servicehttpd.socket 单元默认是 禁用 的。为了在启动阶段开启 httpd 服务,执行:systemctl enable httpd.service。在默认配置中,httpd 守护进程会接受任何配置好的 IPv4 或 IPv6 地址的 80 口上的连接(如果安装了 mod\_ssl,就会接受 443 端口上的 TLS 连接)。

如果 httpd 被配置成依赖任一特定的 IP 地址(比如使用 Listen 指令),该地址可能只在启动阶段可用,又或者 httpd 依赖其他服务(比如数据库守护进程),那么必须配置该服务,以确保正确的启动顺序。

例如,为了确保 httpd 在所有配置的网络接口配置完成之后再运行,可以创建一个带有以下代码段的 drop-in 文件(如上述):

[Unit]
After=network-online.target
Wants=network-online.target

我仍然觉得这是个 bug,因为在 httpd.conf 配置文件中使用 Listen 指令是很常见的,至少在我的经验中。我一直在使用 Listen 指令,即使在只有一个 IP 地址的主机上,在多个网卡和 IP 地址的机器上这显然也是有必要的。在 /usr/lib/systemd/system/httpd.service 默认配置文件中加入上述几行,对不使用 Listen 指令的不会造成问题,对使用 Listen 指令的则会规避这个问题。

同时,我将使用建议的方法。

下一步

本文描述了一个我在服务器上启动 Apache HTTPD 服务时遇到的一个问题。它指引你了解我在解决这个问题上的思路,并说明了我是如何使用 systemd 来协助解决问题。我也介绍了我用 systemd 实现的规避方法,以及我按照我的 bug 报告得到的更好的解决方案。

如我在开头处提到的那样,这有很大可能是一个 systemd 的问题,特别是 httpd 启动的配置问题。尽管如此,systemd 还是提供了工具让我找到了问题的可能来源,并制定和实现了规避方案。两种方案都没有真正令我满意地解决问题。目前,这个问题根源依旧存在,必须要解决。如果只是在 /usr/lib/systemd/system/httpd.service 文件中添加推荐的代码,那对我来说是可行的。

在这个过程中我发现了一件事,我需要了解更多关于定义服务启动顺序的知识。我会在下一篇文章中探索这个领域,即本系列的第五篇。

资源

网上有大量的关于 systemd 的参考资料,但是大部分都有点简略、晦涩甚至有误导性。除了本文中提到的资料,下列的网页提供了跟多可靠且详细的 systemd 入门信息。

  • Fedora 项目有一篇切实好用的 systemd 入门,它囊括了几乎所有你需要知道的关于如何使用 systemd 配置、管理和维护 Fedora 计算机的信息。
  • Fedora 项目也有一个不错的 备忘录,交叉引用了过去 SystemV 命令和 systemd 命令做对比。
  • 关于 systemd 的技术细节和创建这个项目的原因,请查看 Freedesktop.org 上的 systemd 描述
  • Linux.com 的“更多 systemd 的乐趣”栏目提供了更多高级的 systemd 信息和技巧

此外,还有一系列深度的技术文章,是由 systemd 的设计者和主要开发者 Lennart Poettering 为 Linux 系统管理员撰写的。这些文章写于 2010 年 4 月至 2011 年 9 月间,但它们现在和当时一样具有现实意义。关于 systemd 及其生态的许多其他好文章都是基于这些文章:


via: https://opensource.com/article/20/5/systemd-troubleshooting-tool

作者:David Both 选题:lujun9972 译者:tt67wq 校对:wxy

本文由 LCTT 原创编译,Linux中国 荣誉推出

有一天,我试图在一个新的 Ubuntu 系统上编译一个程序,当我试图使用 make 命令时,它向我抛出一个错误:

The program 'make' is currently not installed. You can install it by typing:
sudo apt install make

这表明 make 命令还没有安装。你可以用这些命令在 Ubuntu 上逐步安装 make

sudo apt update
sudo apt install make

第一个命令是更新本地的软件包缓存。如果是一个新安装的 Ubuntu 系统,这是很有必要的。有了刷新的软件包缓存,你的系统就会知道应该从哪个仓库下载 make 包。

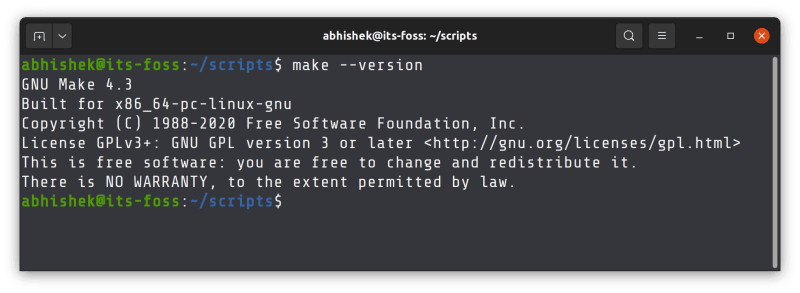
并验证 make 是否已经正确安装:

make --version

Checking make version

在 Ubuntu 上安装 make 的更好方法

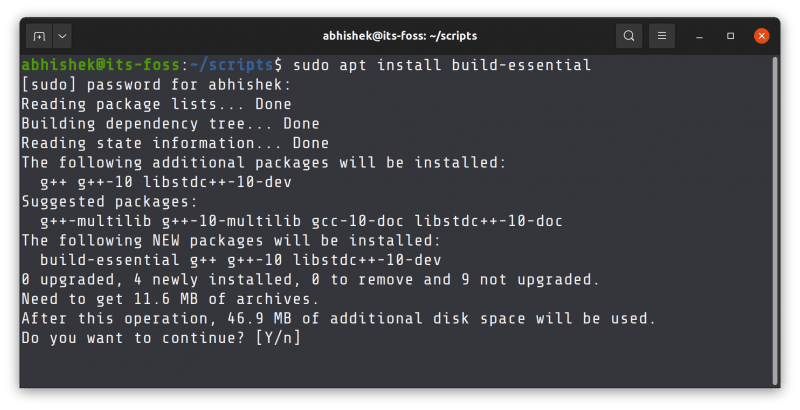
安装 make 命令的一个更好的方法是使用 build-essential 包。这个包包含 makegccg++ 和其他一些编译器和开发工具。

sudo apt install build-essential

Installing Build Essential package

安装了这个 build-essential 包后,你就可以在 Linux 中轻松地运行 C/C++ 程序

如果 make 已经安装了,但它没有工作怎么办?

在一些罕见的情况下,可能会发生 make 已经安装了,但却无法工作的情况。

其原因是 make 命令不在 $PATH 变量中。你可以用这个命令重新安装 make

sudo apt install --reinstall make

如果这不起作用,你可以尝试 手动添加二进制文件到你的 PATH 中,但这应该不需要手动。

我希望这个快速提示能帮助你。仍然有问题或对相关主题有疑问?请随时在评论区留言。


via: https://itsfoss.com/make-command-not-found-ubuntu/

作者:Abhishek Prakash 选题:lujun9972 译者:geekpi 校对:wxy

本文由 LCTT 原创编译,Linux中国 荣誉推出

探索一些未被充分利用但仍然有用的 Python 特性。

 title=

这是 Python 3.x 首发特性系列文章的第六篇。Python 3.5 在 2015 年首次发布,尽管它已经发布了很长时间,但它引入的许多特性都没有被充分利用,而且相当酷。下面是其中的三个。

@ 操作符

@ 操作符在 Python 中是独一无二的,因为在标准库中没有任何对象可以实现它!它是为了在有矩阵的数学包中使用而添加的。

矩阵有两个乘法的概念。元素积是用 * 运算符完成的。但是矩阵组合(也被认为是乘法)需要自己的符号。它是用 @ 完成的。

例如,将一个“八转”矩阵(将轴旋转 45 度)与自身合成,就会产生一个四转矩阵。

import numpy

hrt2 = 2**0.5 / 2
eighth_turn = numpy.array([
    [hrt2, hrt2],
    [-hrt2, hrt2]
])
eighth_turn @ eighth_turn
    array([[ 4.26642159e-17,  1.00000000e+00],
           [-1.00000000e+00, -4.26642159e-17]])

浮点数是不精确的,这比较难以看出。从结果中减去四转矩阵,将其平方相加,然后取其平方根,这样就比较容易检查。

这是新运算符的一个优点:特别是在复杂的公式中,代码看起来更像基础数学:

almost_zero = ((eighth_turn @ eighth_turn) - numpy.array([[0, 1], [-1, 0]]))**2
round(numpy.sum(almost_zero) ** 0.5, 10)
    0.0

参数中的多个关键词字典

Python 3.5 使得调用具有多个关键字-参数字典的函数成为可能。这意味着多个默认值的源可以与更清晰的代码”互操作“。

例如,这里有个可笑的关键字参数的函数:

def show_status(
    *,
    the_good=None,
    the_bad=None,
    the_ugly=None,
    fistful=None,
    dollars=None,
    more=None
):
    if the_good:
        print("Good", the_good)
    if the_bad:
        print("Bad", the_bad)
    if the_ugly:
        print("Ugly", the_ugly)
    if fistful:
        print("Fist", fistful)
    if dollars:
        print("Dollars", dollars)
    if more:
        print("More", more)

当你在应用中调用这个函数时,有些参数是硬编码的:

defaults = dict(
    the_good="You dig",
    the_bad="I have to have respect",
    the_ugly="Shoot, don't talk",
)

从配置文件中读取更多参数:

import json

others = json.loads("""
{
"fistful": "Get three coffins ready",
"dollars": "Remember me?",
"more": "It's a small world"
}
""")

你可以从两个源一起调用这个函数,而不必构建一个中间字典:

show_status(**defaults, **others)
    Good You dig
    Bad I have to have respect
    Ugly Shoot, don't talk
    Fist Get three coffins ready
    Dollars Remember me?
    More It's a small world

os.scandir

os.scandir 函数是一种新的方法来遍历目录内容。它返回一个生成器,产生关于每个对象的丰富数据。例如,这里有一种打印目录清单的方法,在目录的末尾跟着 /

for entry in os.scandir(".git"):
    print(entry.name + ("/" if entry.is_dir() else ""))
    refs/
    HEAD
    logs/
    index
    branches/
    config
    objects/
    description
    COMMIT_EDITMSG
    info/
    hooks/

欢迎来到 2015 年

Python 3.5 在六年前就已经发布了,但是在这个版本中首次出现的一些特性非常酷,而且没有得到充分利用。如果你还没使用,那么将他们添加到你的工具箱中。


via: https://opensource.com/article/21/5/python-35-features

作者:Moshe Zadka 选题:lujun9972 译者:geekpi 校对:wxy

本文由 LCTT 原创编译,Linux中国 荣誉推出

了解如何创建 Flutter 应用的界面以及如何在它们之间进行数据传递。

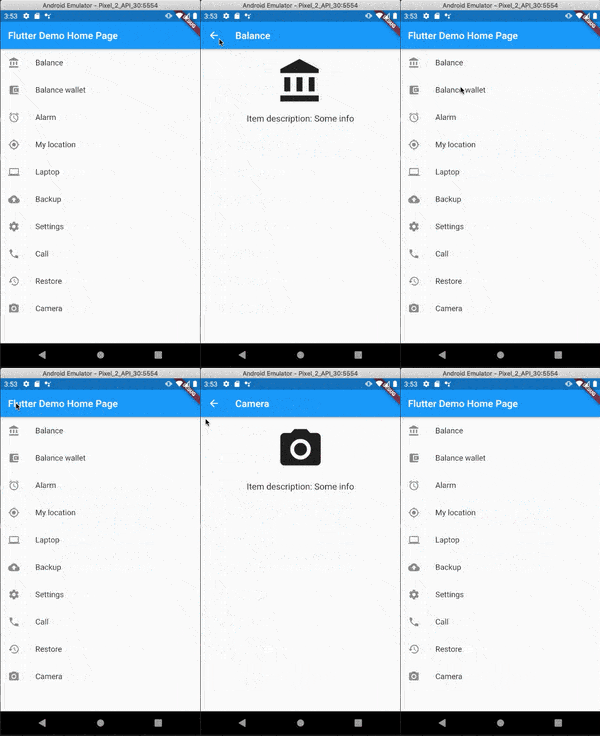
Flutter 是一个流行的开源工具包,它可用于构建跨平台的应用。在文章《用 Flutter 创建移动应用》中,我已经向大家展示了如何在 Linux 中安装 Flutter 并创建你的第一个应用。而这篇文章,我将向你展示如何在你的应用中添加一个列表,点击每一个列表项可以打开一个新的界面。这是移动应用的一种常见设计方法,你可能以前见过的,下面有一个截图,能帮助你对它有一个更直观的了解:
 title=

Flutter 使用 Dart 语言。在下面的一些代码片段中,你会看到以斜杠开头的语句。两个斜杠(//)是指代码注释,用于解释某些代码片段。三个斜杠(///)则表示的是 Dart 的文档注释,用于解释 Dart 类和类的属性,以及其他的一些有用的信息。

查看Flutter应用的主要部分

Flutter 应用的典型入口点是 main() 函数,我们通常可以在文件 lib/main.dart 中找到它:

void main() {
 runApp(MyApp());
}

应用启动时,main() 会被调用,然后执行 MyApp()MyApp 是一个无状态微件(StatelessWidget),它包含了MaterialApp() 微件中所有必要的应用设置(应用的主题、要打开的初始页面等):

class MyApp extends StatelessWidget {
 @override
 Widget build(BuildContext context) {
   return MaterialApp(
     title: 'Flutter Demo',
     theme: ThemeData(
       primarySwatch: Colors.blue,
       visualDensity: VisualDensity.adaptivePlatformDensity,
     ),
     home: MyHomePage(title: 'Flutter Demo Home Page'),
   );
 }
}

生成的 MyHomePage() 是应用的初始页面,是一个有状态的微件,它包含包含可以传递给微件构造函数参数的变量(从上面的代码看,我们传了一个 title 变量给初始页面的构造函数):

class MyHomePage extends StatefulWidget {
  MyHomePage({Key key, this.title}) : super(key: key);

  final String title;

  @override
  _MyHomePageState createState() => _MyHomePageState();
}

有状态微件(StatefulWidget)表示这个微件可以拥有自己的状态:_MyHomePageState。调用 _MyHomePageState 中的 setState() 方法,可以重新构建用户界面:

class _MyHomePageState extends State<MyHomePage> {
 int _counter = 0; // Number of taps on + button.

 void _incrementCounter() { // Increase number of taps and update UI by calling setState().
   setState(() {
     _counter++;
   });
 }
 ...
}

不管是有状态的,还是无状态的微件,它们都有一个 build() 方法,该方法负责微件的 UI 外观。

@override
Widget build(BuildContext context) {
 return Scaffold( // Page widget.
   appBar: AppBar( // Page app bar with title and back button if user can return to previous screen.
     title: Text(widget.title), // Text to display page title.
   ),
   body: Center( // Widget to center child widget.
     child: Column( // Display children widgets in column.
       mainAxisAlignment: MainAxisAlignment.center,
       children: <Widget>[
         Text( // Static text.
           'You have pushed the button this many times:',
         ),
         Text( // Text with our taps number.
           '$_counter', // $ sign allows us to use variables inside a string.
           style: Theme.of(context).textTheme.headline4,// Style of the text, “Theme.of(context)” takes our context and allows us to access our global app theme.
         ),
       ],
     ),
   ),
        // Floating action button to increment _counter number.
   floatingActionButton: FloatingActionButton(
     onPressed: _incrementCounter,
     tooltip: 'Increment',
     child: Icon(Icons.add),
   ),
 );
}

修改你的应用

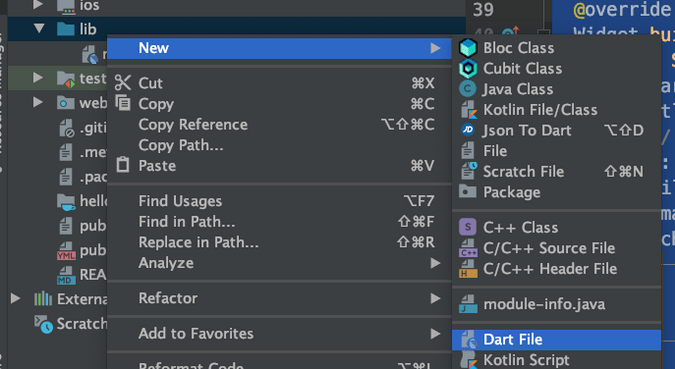
一个好的做法是,把 main() 方法和其他页面的代码分开放到不同的文件中。要想将它们分开,你需要右击 lib 目录,然后选择 “New > Dart File” 来创建一个 .dart 文件:
 title=

将新建的文件命名为 items_list_page

切换回到 main.dart 文件,将 MyHomePage_MyHomePageState 中的代码,剪切并粘贴到我们新建的文件。然后将光标放到 StatefulWidget 上(下面红色的下划线处), 按 Alt+Enter 后出现下拉列表,然后选择 package:flutter/material.dart

 title=

经过上面的操作我们将 flutter/material.dart 包添加到了 main.dart 文件中,这样我们就可以使用 Flutter 提供的默认的 material 主题微件。

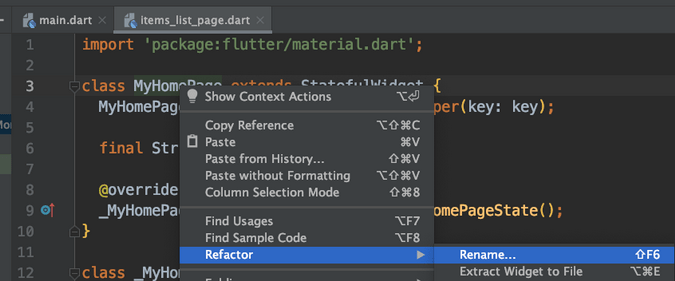
然后, 在类名 MyHomePage 右击,“Refactor > Rename...”将其重命名为 ItemsListPage

 title=

Flutter 识别到你重命名了 StatefulWidget 类,它会自动将它的 State 类也跟着重命名:
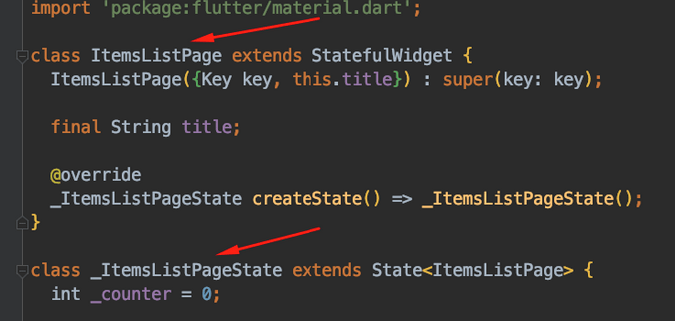
 title=

回到 main.dart 文件,将文件名 MyHomePage 改为 ItemsListPage。 一旦你开始输入, 你的 Flutter 集成开发环境(可能是 IntelliJ IDEA 社区版、Android Studio 和 VS Code 或 VSCodium),会给出自动代码补完的建议。

 title=

按回车键即可完成输入,缺失的导入语句会被自动添加到文件的顶部。

 title=

到此,你已经完成了初始设置。现在你需要在 lib 目录创建一个新的 .dart 文件,命名为 item_model。(注意,类命是大写驼峰命名,一般的文件名是下划线分割的命名。)然后粘贴下面的代码到新的文件中:

/// Class that stores list item info:
/// [id] - unique identifier, number.
/// [icon] - icon to display in UI.
/// [title] - text title of the item.
/// [description] - text description of the item.
class ItemModel {
 // class constructor
 ItemModel(this.id, this.icon, this.title, this.description);

 // class fields
 final int id;
 final IconData icon;
 final String title;
 final String description;
}

回到 items_list_page.dart 文件,将已有的 _ItemsListPageState 代码替换为下面的代码:

class _ItemsListPageState extends State<ItemsListPage> {

// Hard-coded list of [ItemModel] to be displayed on our page.
 final List<ItemModel> _items = [
   ItemModel(0, Icons.account_balance, 'Balance', 'Some info'),
   ItemModel(1, Icons.account_balance_wallet, 'Balance wallet', 'Some info'),
   ItemModel(2, Icons.alarm, 'Alarm', 'Some info'),
   ItemModel(3, Icons.my_location, 'My location', 'Some info'),
   ItemModel(4, Icons.laptop, 'Laptop', 'Some info'),
   ItemModel(5, Icons.backup, 'Backup', 'Some info'),
   ItemModel(6, Icons.settings, 'Settings', 'Some info'),
   ItemModel(7, Icons.call, 'Call', 'Some info'),
   ItemModel(8, Icons.restore, 'Restore', 'Some info'),
   ItemModel(9, Icons.camera_alt, 'Camera', 'Some info'),
 ];

 @override
 Widget build(BuildContext context) {
   return Scaffold(
       appBar: AppBar(
         title: Text(widget.title),
       ),
       body: ListView.builder( // Widget which creates [ItemWidget] in scrollable list.
         itemCount: _items.length, // Number of widget to be created.
         itemBuilder: (context, itemIndex) => // Builder function for every item with index.
             ItemWidget(_items[itemIndex], () {
           _onItemTap(context, itemIndex);
         }),
       ));
 }

 // Method which uses BuildContext to push (open) new MaterialPageRoute (representation of the screen in Flutter navigation model) with ItemDetailsPage (StateFullWidget with UI for page) in builder.
 _onItemTap(BuildContext context, int itemIndex) {
   Navigator.of(context).push(MaterialPageRoute(
       builder: (context) => ItemDetailsPage(_items[itemIndex])));
 }
}


// StatelessWidget with UI for our ItemModel-s in ListView.
class ItemWidget extends StatelessWidget {
 const ItemWidget(this.model, this.onItemTap, {Key key}) : super(key: key);

 final ItemModel model;
 final Function onItemTap;

 @override
 Widget build(BuildContext context) {
   return InkWell( // Enables taps for child and add ripple effect when child widget is long pressed.
     onTap: onItemTap,
     child: ListTile( // Useful standard widget for displaying something in ListView.
       leading: Icon(model.icon),
       title: Text(model.title),
     ),
   );
 }
}

为了提高代码的可读性,可以考虑将 ItemWidget 作为一个单独的文件放到 lib 目录中。

现在唯一缺少的是 ItemDetailsPage 类。在 lib 目录中我们创建一个新文件并命名为 item_details_page。然后将下面的代码拷贝进去:

import 'package:flutter/material.dart';

import 'item_model.dart';

/// Widget for displaying detailed info of [ItemModel]
class ItemDetailsPage extends StatefulWidget {
 final ItemModel model;

 const ItemDetailsPage(this.model, {Key key}) : super(key: key);

 @override
 _ItemDetailsPageState createState() => _ItemDetailsPageState();
}

class _ItemDetailsPageState extends State<ItemDetailsPage> {
 @override
 Widget build(BuildContext context) {
   return Scaffold(
     appBar: AppBar(
       title: Text(widget.model.title),
     ),
     body: Center(
       child: Column(
         children: [
           const SizedBox(height: 16),
           Icon(
             widget.model.icon,
             size: 100,
           ),
           const SizedBox(height: 16),
           Text(
             'Item description: ${widget.model.description}',
             style: TextStyle(fontSize: 18),
           )
         ],
       ),
     ),
   );
 }
}

上面的代码几乎没什么新东西,不过要注意的是 _ItemDetailsPageState 里使用了 widget.item.title 这样的语句,它让我们可以从有状态类中引用到其对应的微件(StatefulWidget)。

添加一些动画

现在让我们来添加一些基础的动画:

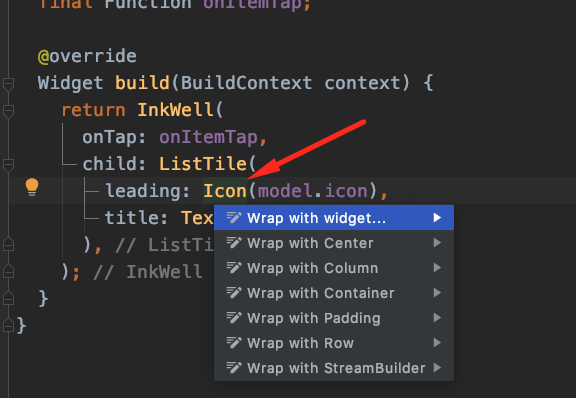
  1. 找到 ItemWidget 代码块(或者文件)
  2. 将光标放到 build() 方法中的 Icon() 微件上
  3. Alt+Enter,然后选择“Wrap with widget...”

 title=

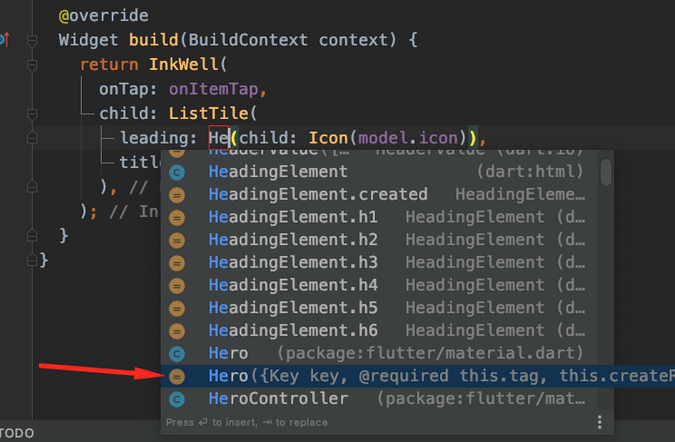
输入 Hero,然后从建议的下拉列表中选择 Hero((Key key, @required this, tag, this.create))

 title=

下一步, 给 Hero 微件添加 tag 属性 tag: model.id

 title=

最后我们在 item_details_page.dart 文件中做相同的修改:
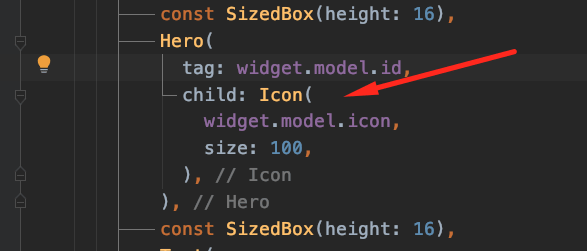
 title=

前面的步骤,其实我们是用 Hero() 微件对 Icon() 微件进行了封装。还记得吗?前面我们定义 ItemModel 类时,定义了一个 id field,但没有在任何地方使用到。因为 Hero 微件会为其每个子微件添加一个唯一的标签。当 Hero 检测到不同页面(MaterialPageRoute)中存在相同标签的 Hero 时,它会自动在这些不同的页面中应用过渡动画。

可以在安卓模拟器或物理设备上运行我们的应用来测试这个动画。当你打开或者关闭列表项的详情页时,你会看到一个漂亮的图标动画:

 title=

收尾

这篇教程,让你学到了:

  • 一些符合标准的,且能用于自动创建应用的组件。
  • 如何添加多个页面以及在页面间传递数据。
  • 如何给多个页面添加简单的动画。

如果你想了解更多,查看 Flutter 的 文档(有一些视频和样例项目的链接,还有一些创建 Flutter 应用的“秘方”)与 源码,源码的开源许可证是 BSD 3。


via: https://opensource.com/article/20/11/flutter-lists-mobile-app

作者:Vitaly Kuprenko 选题:lujun9972 译者:ywxgod 校对:wxy

本文由 LCTT 原创编译,Linux中国 荣誉推出

另外探索一些未被充分利用但仍然有用的 Python 特性。

 title=

这是 Python 3.x 首发特性系列文章的第五篇。Python 3.4 在 2014 年首次发布,尽管它已经发布了很长时间,但它引入的许多特性都没有被充分利用,而且相当酷。下面是其中的三个。

枚举

我最喜欢的逻辑谜题之一是自我描述的 史上最难的逻辑谜题。在其中,它谈到了三个“神”,他们被称为 A、B 和 C,他们的身份是真、假和随机,按一定顺序排列。你可以问他们问题,但他们只用神的语言回答,其中 “da” 和 “ja” 表示 “是” 和 “不是”,但你不知道哪个是哪个。

如果你决定使用 Python 来解决这个问题,你将如何表示神的名字和身份以及神的语言中的词语?传统的答案是使用字符串。然而,字符串的拼写错误可能会带来灾难性的后果。

如果在解题的关键部分,你用字符串 “jaa” 而不是 “ja” 进行比较,你就会得到一个错误的答案。虽然谜题没有说明风险是什么,但这可能是最好的避免方式。

enum 模块让你能够以一种可调试但安全的方式来定义这些东西:

import enum

@enum.unique
class Name(enum.Enum):
    A = enum.auto()
    B = enum.auto()
    C = enum.auto()
   
@enum.unique
class Identity(enum.Enum):
    RANDOM = enum.auto()
    TRUE = enum.auto()
    FALSE = enum.auto()

       
@enum.unique
class Language(enum.Enum):
    ja = enum.auto()
    da = enum.auto()

枚举的一个好处是,在调试日志或异常中,枚举的呈现方式是有帮助的:

name = Name.A
identity = Identity.RANDOM
answer = Language.da
print("I suspect", name, "is", identity, "because they answered", answer)
    I suspect Name.A is Identity.RANDOM because they answered Language.da

functools.singledispatch

在开发游戏的“基础设施”层时,你想通用地处理各种游戏对象,但仍然允许这些对象自定义动作。为了使这个例子更容易解释,假设这是一个基于文本的游戏。当你使用一个对象时,大多数情况下,它只会打印 You are using <x>。但是使用一把特殊的剑可能需要随机滚动,否则会失败。

当你获得一个物品时,它通常会被添加到库存中。然而,一块特别重的石头会砸碎一个随机物品。如果发生这种情况,库存中会失去该物体。

处理这个问题的一个方法是在物品上设置 useacquire 方法。随着游戏复杂性的增加,这些方法会越来越多,使游戏对象变得难以编写。

相反,functools.singledispatch 允许你以安全和尊重命名空间的方式追溯性地添加方法。

你可以定义没有行为的类:

class Torch:
    name="torch"

class Sword:
    name="sword"

class Rock:
    name="rock"
import functools

@functools.singledispatch
def use(x):
    print("You use", x.name)

@functools.singledispatch
def acquire(x, inventory):
    inventory.add(x)

对于火炬来说,这些通用的实现已经足够了:

inventory = set()

def deploy(thing):
    acquire(thing, inventory)
    use(thing)
    print("You have", [item.name for item in inventory])

deploy(Torch())
    You use torch
    You have ['torch']

然而,剑和石头需要一些专门的功能:

import random

@use.register(Sword)
def use_sword(sword):
    print("You try to use", sword.name)
    if random.random() < 0.9:
        print("You succeed")
    else:
        print("You fail")

deploy(sword)
    You try to use sword
    You succeed
    You have ['sword', 'torch']
import random

@acquire.register(Rock)
def acquire_rock(rock, inventory):
    to_remove = random.choice(list(inventory))
    inventory.remove(to_remove)
    inventory.add(rock)

deploy(Rock())
    You use rock
    You have ['sword', 'rock']

岩石可能压碎了火炬,但你的代码更容易阅读。

pathlib

从一开始,Python 中文件路径的接口就是“智能字符串操作”。现在,通过 pathlib,Python 有了一种面向对象的方法来操作路径。

import pathlib
gitconfig = pathlib.Path.home() / ".gitconfig"
text = gitconfig.read_text().splitlines()

诚然,用 / 作为操作符来生成路径名有点俗气,但在实践中却不错。像 .read_text() 这样的方法允许你从小文件中获取文本,而不需要手动打开和关闭文件句柄。

这使你可以集中精力处理重要的事情:

for line in text:
    if not line.strip().startswith("name"):
        continue
    print(line.split("=")[1])
     Moshe Zadka

欢迎来到 2014 年

Python 3.4 大约在七年前就发布了,但是在这个版本中首次出现的一些功能非常酷,而且没有得到充分利用。如果你还没使用,那么将他们添加到你的工具箱中。


via: https://opensource.com/article/21/5/python-34-features

作者:Moshe Zadka 选题:lujun9972 译者:geekpi 校对:wxy

本文由 LCTT 原创编译,Linux中国 荣誉推出