Kerneltalks 发布的文章

了解如何在 RHEL 中使用订阅管理器来启用软件仓库。 这篇文章还包括了将系统注册到 Red Hat 的步骤、添加订阅和发生错误时的解决方案。

Enable repository using subscription-manager

在本文中,我们将逐步介绍如何在刚安装的 RHEL 服务器中启用 Red Hat 软件仓库。

可以利用 subscription-manager 命令启用软件仓库,如下所示:

root@kerneltalks # subscription-manager repos --enable rhel-6-server-rhv-4-agent-beta-debug-rpms
Error: 'rhel-6-server-rhv-4-agent-beta-debug-rpms' does not match a valid repository ID. Use "subscription-manager repos --list" to see valid repositories.

当您的订阅没有配置好时,您会看到上述错误。让我们一步一步地通过 subscription-manager 来启用软件仓库。

步骤 1:使用 Red Hat 注册您的系统

这里假设您已经安装了新系统并且尚未在 Red Hat 上注册。如果您已经注册了该系统,那么您可以忽略此步骤。

您可以使用下面的命令来检查您的系统是否已在 Red Hat 注册了该订阅:

# subscription-manager version
server type: This system is currently not registered.
subscription management server: Unknown
subscription management rules: Unknown
subscription-manager: 1.18.10-1.el6
python-rhsm: 1.18.6-1.el6

在这里输出的第一行中,您可以看到该系统未注册。那么,让我们开始注册系统。您需要在 subscription-manager 命令中使用 register 选项。在这一步需要使用您的 Red Hat 帐户凭证。

root@kerneltalks # subscription-manager register
Registering to: subscription.rhsm.redhat.com:443/subscription
Username: [email protected]
Password:
Network error, unable to connect to server. Please see /var/log/rhsm/rhsm.log for more information.

如果您遇到上述错误,那么表明您的服务器无法连接到 RedHat。检查您的网络连接,或者您能解决网站名称解析的问题。有时候,即使你能够 ping 通订阅服务器,你也会看到这个错误。这可能是因为您的环境中有代理服务器。在这种情况下,您需要将其详细信息添加到文件 /etc/rhsm/rhsm.conf 中。以下详细的代理信息应根据你的环境填充:

# an http proxy server to use
 proxy_hostname =

# port for http proxy server
 proxy_port =

# user name for authenticating to an http proxy, if needed
 proxy_user =

# password for basic http proxy auth, if needed
 proxy_password =

一旦你完成了这些,通过使用下面的命令重新检查 subscription-manager 是否获得了新的代理信息:

root@kerneltalks # subscription-manager config
[server]
 hostname = [subscription.rhsm.redhat.com]
 insecure = [0]
 port = [443]
 prefix = [/subscription]
 proxy_hostname = [kerneltalksproxy.abc.com]
 proxy_password = [asdf]
 proxy_port = [3456]
 proxy_user = [user2]
 server_timeout = [180]
 ssl_verify_depth = [3]

[rhsm]
 baseurl = [https://cdn.redhat.com]
 ca_cert_dir = [/etc/rhsm/ca/]
 consumercertdir = [/etc/pki/consumer]
 entitlementcertdir = [/etc/pki/entitlement]
 full_refresh_on_yum = [0]
 manage_repos = [1]
 pluginconfdir = [/etc/rhsm/pluginconf.d]
 plugindir = [/usr/share/rhsm-plugins]
 productcertdir = [/etc/pki/product]
 repo_ca_cert = /etc/rhsm/ca/redhat-uep.pem
 report_package_profile = [1]

[rhsmcertd]
 autoattachinterval = [1440]
 certcheckinterval = [240]

[logging]
 default_log_level = [INFO]

[] - Default value in use

现在,请尝试重新注册您的系统。

root@kerneltalks # subscription-manager register
Registering to: subscription.rhsm.redhat.com:443/subscription
Username: [email protected]
Password:
You must first accept Red Hat's Terms and conditions. Please visit https://www.redhat.com/wapps/tnc/termsack?event[]=signIn . You may have to log out of and back into the Customer Portal in order to see the terms.

如果您是第一次将服务器添加到 Red Hat 帐户,您将看到上述错误。转到该 URL并接受条款。回到终端,然后再试一次。

oot@kerneltalks # subscription-manager register
Registering to: subscription.rhsm.redhat.com:443/subscription
Username: [email protected]
Password:
The system has been registered with ID: xxxxb2-xxxx-xxxx-xxxx-xx8e199xxx

Bingo!系统现在已在 Red Hat 上注册。你可以再次用 version 选项来验证它。

#subscription-managerversionservertype:RedHatSubscriptionManagementsubscriptionmanagementserver:2.0.43-1subscriptionmanagementrules:5.26subscription-manager:1.18.10-1.el6python-rhsm:1.18.6-1.el6" decode="true"  ]root@kerneltalks # subscription-manager version
server type: Red Hat Subscription Management
subscription management server: 2.0.43-1
subscription management rules: 5.26
subscription-manager: 1.18.10-1.el6
python-rhsm: 1.18.6-1.el6

步骤 2:将订阅添加到您的服务器

首先尝试列出软件仓库。您将无法列出任何内容,因为我们尚未在我们的服务器中添加任何订阅。

root@kerneltalks # subscription-manager repos --list
This system has no repositories available through subscriptions.

正如您所看到 subscription-manager 找不到任何软件仓库,您需要将订阅添加到您的服务器上。一旦订阅被添加,subscription-manager 将能够列出下列的软件仓库。

要添加订阅,请先使用以下命令检查服务器的所有可用订阅:

root@kerneltalks # subscription-manager list --available
+-------------------------------------------+
Available Subscriptions
+-------------------------------------------+
Subscription Name: Red Hat Enterprise Linux for Virtual Datacenters, Standard
Provides: Red Hat Beta
Red Hat Software Collections (for RHEL Server)
Red Hat Enterprise Linux Atomic Host Beta
Oracle Java (for RHEL Server)
Red Hat Enterprise Linux Server
dotNET on RHEL (for RHEL Server)
Red Hat Enterprise Linux Atomic Host
Red Hat Software Collections Beta (for RHEL Server)
Red Hat Developer Tools Beta (for RHEL Server)
Red Hat Developer Toolset (for RHEL Server)
Red Hat Developer Tools (for RHEL Server)
SKU: RH00050
Contract: xxxxxxxx
Pool ID: 8a85f98c6011059f0160110a2ae6000f
Provides Management: Yes
Available: Unlimited
Suggested: 0
Service Level: Standard
Service Type: L1-L3
Subscription Type: Stackable (Temporary)
Ends: 12/01/2018
System Type: Virtual

您将获得可用于您的服务器的此类订阅的软件仓库列表。您需要阅读它提供的内容并记下对您有用或需要的订阅的 Pool ID

现在,使用 pool ID 将订阅添加到您的服务器。

# subscription-manager attach --pool=8a85f98c6011059f0160110a2ae6000f
Successfully attached a subscription for: Red Hat Enterprise Linux for Virtual Datacenters, Standard

如果您不确定选择哪一个,则可以使用下面的命令自动地添加最适合您的服务器的订阅:

root@kerneltalks # subscription-manager attach --auto
Installed Product Current Status:
Product Name: Red Hat Enterprise Linux Server
Status: Subscribed

接下来是最后一步启用软件仓库。

步骤 3:启用软件仓库

现在您将能够启用软件仓库,该软件仓库在您的附加订阅下可用。

root@kerneltalks # subscription-manager repos --enable rhel-6-server-rhv-4-agent-beta-debug-rpms
Repository 'rhel-6-server-rhv-4-agent-beta-debug-rpms' is enabled for this system.

到这里,您已经完成了。您可以用 yum 命令列出软件仓库并确认。


via: https://kerneltalks.com/howto/how-to-enable-repository-using-subscription-manager-in-rhel/

作者:kerneltalks 译者:S9mtAt 校对:wxy

本文由 LCTT 原创编译,Linux中国 荣誉推出

了解如何解决 Linux 平台上的 mount.nfs: Stale file handle 错误。这个 NFS 错误可以在客户端或者服务端解决。

当你在你的环境中使用网络文件系统时,你一定不时看到 mount.nfs:Stale file handle 错误。此错误表示 NFS 共享无法挂载,因为自上次配置后有些东西已经更改。

无论是你重启 NFS 服务器或某些 NFS 进程未在客户端或服务器上运行,或者共享未在服务器上正确输出,这些都可能是导致这个错误的原因。此外,当这个错误发生在先前挂载的 NFS 共享上时,它会令人不快。因为这意味着配置部分是正确的,因为是以前挂载的。在这种情况下,可以尝试下面的命令:

确保 NFS 服务在客户端和服务器上运行良好。

#  service nfs status
rpc.svcgssd is stopped
rpc.mountd (pid 11993) is running...
nfsd (pid 12009 12008 12007 12006 12005 12004 12003 12002) is running...
rpc.rquotad (pid 11988) is running...

如果 NFS 共享目前挂载在客户端上,则强制卸载它并尝试在 NFS 客户端上重新挂载它。通过 df 命令检查它是否正确挂载,并更改其中的目录。

# umount -f /mydata_nfs

# mount -t nfs server:/nfs_share /mydata_nfs

#df -k
------ output clipped -----
server:/nfs_share 41943040  892928  41050112   3% /mydata_nfs

在上面的挂载命令中,服务器可以是 NFS 服务器的 IP 或主机名

如果你在强制取消挂载时遇到像下面错误:

# umount -f /mydata_nfs
umount2: Device or resource busy
umount: /mydata_nfs: device is busy
umount2: Device or resource busy
umount: /mydata_nfs: device is busy

然后你可以用 lsof 命令来检查哪个进程或用户正在使用该挂载点,如下所示:

# lsof |grep mydata_nfs
lsof: WARNING: can't stat() nfs file system /mydata_nfs
      Output information may be incomplete.
su         3327      root  cwd   unknown                                                   /mydata_nfs/dir (stat: Stale NFS file handle)
bash       3484      grid  cwd   unknown                                                   /mydata_nfs/MYDB (stat: Stale NFS file handle)
bash      20092  oracle11  cwd   unknown                                                   /mydata_nfs/MPRP (stat: Stale NFS file handle)
bash      25040  oracle11  cwd   unknown                                                   /mydata_nfs/MUYR (stat: Stale NFS file handle)

如果你在上面的示例中看到共有 4 个 PID 正在使用该挂载点上的某些文件。尝试杀死它们以释放挂载点。完成后,你将能够正确卸载它。

有时 mount 命令会有相同的错误。接着使用下面的命令在客户端重启 NFS 服务后挂载。

#  service nfs restart
Shutting down NFS daemon:                                  [  OK  ]
Shutting down NFS mountd:                                  [  OK  ]
Shutting down NFS quotas:                                  [  OK  ]
Shutting down RPC idmapd:                                  [  OK  ]
Starting NFS services:                                     [  OK  ]
Starting NFS quotas:                                       [  OK  ]
Starting NFS mountd:                                       [  OK  ]
Starting NFS daemon:                                       [  OK  ]

另请阅读:如何在 HPUX 中逐步重启 NFS

即使这没有解决你的问题,最后一步是在 NFS 服务器上重启服务。警告!这将断开从该 NFS 服务器输出的所有 NFS 共享。所有客户端将看到挂载点断开。这一步将 99% 解决你的问题。如果没有,请务必检查 NFS 配置,提供你修改的配置并发布你启动时看到的错误。

上面文章中的输出来自 RHEL6.3 服务器。请将你的评论发送给我们。


via: https://kerneltalks.com/troubleshooting/resolve-mount-nfs-stale-file-handle-error/

作者:KernelTalks 译者:geekpi 校对:wxy

本文由 LCTT 原创编译,Linux中国 荣誉推出

了解如何在 Linux 中创建登录导语,来向要登录或登录后的用户显示不同的警告或消息。

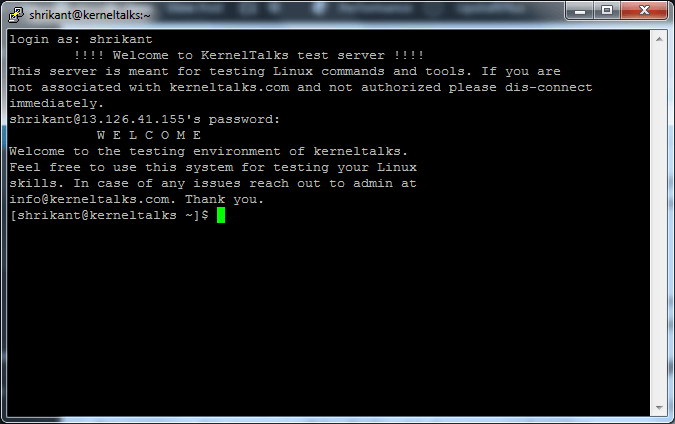
无论何时登录公司的某些生产系统,你都会看到一些登录消息、警告或关于你将登录或已登录的服务器的信息,如下所示。这些是 登录导语 login banner

Login welcome messages in Linux

在本文中,我们将引导你配置它们。

你可以配置两种类型的导语。

  1. 用户登录前显示的导语信息(在你选择的文件中配置,例如 /etc/login.warn
  2. 用户成功登录后显示的导语信息(在 /etc/motd 中配置)

如何在用户登录前连接系统时显示消息

当用户连接到服务器并且在登录之前,这个消息将被显示给他。意味着当他输入用户名时,该消息将在密码提示之前显示。

你可以使用任何文件名并在其中输入信息。在这里我们使用 /etc/login.warn 并且把我们的消息放在里面。

# cat /etc/login.warn
        !!!! Welcome to KernelTalks test server !!!!
This server is meant for testing Linux commands and tools. If you are
not associated with kerneltalks.com and not authorized please dis-connect
immediately.

现在,需要将此文件和路径告诉 sshd 守护进程,以便它可以为每个用户登录请求获取此标语。对于此,打开 /etc/sshd/sshd_config 文件并搜索 #Banner none

这里你需要编辑该配置文件,并写下你的文件名并删除注释标记(#)。它应该看起来像:Banner /etc/login.warn

保存文件并重启 sshd 守护进程。为避免断开现有的连接用户,请使用 HUP 信号重启 sshd。

root@kerneltalks # ps -ef | grep -i sshd
root     14255     1  0 18:42 ?        00:00:00 /usr/sbin/sshd -D
root     19074 14255  0 18:46 ?        00:00:00 sshd: ec2-user [priv]
root     19177 19127  0 18:54 pts/0    00:00:00 grep -i sshd

root@kerneltalks # kill -HUP 14255

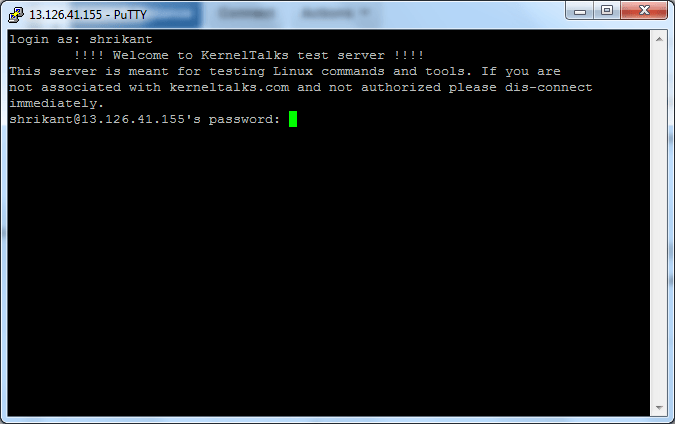
就是这样了!打开新的会话并尝试登录。你将看待你在上述步骤中配置的消息。

Login banner in Linux

你可以在用户输入密码登录系统之前看到此消息。

如何在用户登录后显示消息

消息用户在成功登录系统后看到的 当天消息 Message Of The Day (MOTD)由 /etc/motd 控制。编辑这个文件并输入当成功登录后欢迎用户的消息。

root@kerneltalks # cat /etc/motd
           W E L C O M E
Welcome to the testing environment of kerneltalks.
Feel free to use this system for testing your Linux
skills. In case of any issues reach out to admin at
[email protected]. Thank you.

你不需要重启 sshd 守护进程来使更改生效。只要保存该文件,sshd 守护进程就会下一次登录请求时读取和显示。

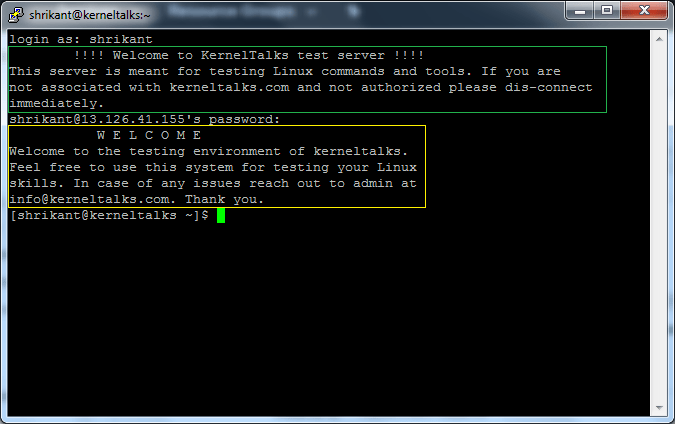
motd in linux

你可以在上面的截图中看到:黄色框是由 /etc/motd 控制的 MOTD,绿色框就是我们之前看到的登录导语。

你可以使用 cowsaybannerfigletlolcat 等工具创建出色的引人注目的登录消息。此方法适用于几乎所有 Linux 发行版,如 RedHat、CentOs、Ubuntu、Fedora 等。


via: https://kerneltalks.com/tips-tricks/how-to-configure-login-banners-in-linux/

作者:kerneltalks 译者:geekpi 校对:wxy

本文由 LCTT 原创编译,Linux中国 荣誉推出

Learn xfs commands with examples

在我们另一篇文章中,我带您领略了一下什么是 xfs,xfs 的相关特性等内容。本文我们来看一些常用的 xfs 管理命令。我们将会通过几个例子来讲解如何创建 xfs 文件系统,如何对 xfs 文件系统进行扩容,如何检测并修复 xfs 文件系统。

创建 XFS 文件系统

mkfs.xfs 命令用来创建 xfs 文件系统。无需任何特别的参数,其输出如下:

root@kerneltalks # mkfs.xfs /dev/xvdf
meta-data=/dev/xvdf              isize=512    agcount=4, agsize=1310720 blks
         =                       sectsz=512   attr=2, projid32bit=1
         =                       crc=1        finobt=0, sparse=0
data     =                       bsize=4096   blocks=5242880, imaxpct=25
         =                       sunit=0      swidth=0 blks
naming   =version 2              bsize=4096   ascii-ci=0 ftype=1
log      =internal log           bsize=4096   blocks=2560, version=2
         =                       sectsz=512   sunit=0 blks, lazy-count=1
realtime =none                   extsz=4096   blocks=0, rtextents=0
注意:一旦 XFS 文件系统创建完毕就不能在缩容而只能进行扩容了。

调整 XFS 文件系统容量

你只能对 XFS 进行扩容而不能缩容。我们使用 xfs_growfs 来进行扩容。你需要使用 -D 参数指定挂载点的新容量。-D 接受一个数字的参数,指定文件系统块的数量。若你没有提供 -D 参数,则 xfs_growfs 会将文件系统扩到最大。

root@kerneltalks # xfs_growfs /dev/xvdf -D 256
meta-data=/dev/xvdf              isize=512    agcount=4, agsize=720896 blks
         =                       sectsz=512   attr=2, projid32bit=1
         =                       crc=1        finobt=0 spinodes=0
data     =                       bsize=4096   blocks=2883584, imaxpct=25
         =                       sunit=0      swidth=0 blks
naming   =version 2              bsize=4096   ascii-ci=0 ftype=1
log      =internal               bsize=4096   blocks=2560, version=2
         =                       sectsz=512   sunit=0 blks, lazy-count=1
realtime =none                   extsz=4096   blocks=0, rtextents=0
data size 256 too small, old size is 2883584

观察上面的输出中的最后一行。由于我分配的容量要小于现在的容量。它告诉你不能缩减 XFS 文件系统。你只能对它进行扩展。

root@kerneltalks #  xfs_growfs /dev/xvdf -D 2883840
meta-data=/dev/xvdf              isize=512    agcount=4, agsize=720896 blks
         =                       sectsz=512   attr=2, projid32bit=1
         =                       crc=1        finobt=0 spinodes=0
data     =                       bsize=4096   blocks=2883584, imaxpct=25
         =                       sunit=0      swidth=0 blks
naming   =version 2              bsize=4096   ascii-ci=0 ftype=1
log      =internal               bsize=4096   blocks=2560, version=2
         =                       sectsz=512   sunit=0 blks, lazy-count=1
realtime =none                   extsz=4096   blocks=0, rtextents=0
data blocks changed from 2883584 to 2883840

现在我多分配了 1GB 的空间,而且也成功地扩增了容量。

1GB 块的计算方式:

当前文件系统 bsize 为 4096,意思是块的大小为 4MB。我们需要 1GB,也就是 256 个块。因此在当前块数,2883584 上加上 256 得到 2883840。因此我为 -D 传递参数 2883840。

修复 XFS 文件系统

可以使用 xfs_repair 命令进行文件系统一致性检查和修复。使用 -n 参数则并不对文件系统做出什么实质性的修改。它只会搜索并报告要做哪些修改。若不带 -n 参数,则会修改文件系统以保证文件系统的纯净。

请注意,在检查之前,你需要先卸载 XFS 文件系统。否则会报错。

root@kerneltalks # xfs_repair -n /dev/xvdf
xfs_repair: /dev/xvdf contains a mounted filesystem
xfs_repair: /dev/xvdf contains a mounted and writable filesystem

fatal error -- couldn't initialize XFS library

卸载后运行检查命令。

root@kerneltalks # xfs_repair -n /dev/xvdf
Phase 1 - find and verify superblock...
Phase 2 - using internal log
        - zero log...
        - scan filesystem freespace and inode maps...
        - found root inode chunk
Phase 3 - for each AG...
        - scan (but don't clear) agi unlinked lists...
        - process known inodes and perform inode discovery...
        - agno = 0
        - agno = 1
        - agno = 2
        - agno = 3
        - agno = 4
        - process newly discovered inodes...
Phase 4 - check for duplicate blocks...
        - setting up duplicate extent list...
        - check for inodes claiming duplicate blocks...
        - agno = 0
        - agno = 1
        - agno = 2
        - agno = 3
        - agno = 4
No modify flag set, skipping phase 5
Phase 6 - check inode connectivity...
        - traversing filesystem ...
        - traversal finished ...
        - moving disconnected inodes to lost+found ...
Phase 7 - verify link counts...
No modify flag set, skipping filesystem flush and exiting.

你可以看到,命令在每个阶段都显示出了为了文件系统变得健康可能做出的修改。若你希望命令在扫描时实际应用这些修改,则不带任何参数运行命令即可。

root @ kerneltalks # xfs_repair /dev/xvdf

Phase 1 - find and verify superblock . . .
Phase 2 - using internal log
        - zero log . . .
        - scan filesystem freespace and inode maps . . .
        - found root inode chunk
Phase 3 - for each AG . . . 
        - scan and clear agi unlinked lists . . .
        - process known inodes and perform inode discovery . . .
        - agno = 0 
        - agno = 1
        - agno = 2
        - agno = 3
        - agno = 4
        - process newly discovered inodes . . . 
Phase 4 - check for duplicate blocks . . .
        - setting up duplicate extent list . . .
        - check for inodes claiming duplicate blocks . . .
        - agno = 0
        - agno = 1
        - agno = 2
        - agno = 3
        - agno = 4 
Phase 5 - rebuild AG headers and trees . . .
        - reset superblock . . .
Phase 6 - check inode connectivity . . .
        - resetting contents of realtime bitmap and summary inodes
        - traversing filesystem . . .
        - traversal finished . . .
        - moving disconnected inodes to lost + found . . .
Phase 7 - verify and correct link counts . . . 
done

你会发现 xfs_repair 命令对文件系统做出了修改让其变得健康。

查看 XFS 版本以及它的详细信息

查看 xfs 文件系统版本很简单。使用 -V 参数运行 xfs_info 再加上挂载点就行了。

root@kerneltalks # xfs_info -V /shrikant
xfs_info version 4.5.0

若要查看 XFS 文件系统的详细信息,比如想计算扩容 XFS 文件系统时要新增多少个块,需要了解块大小,块的个数等信息,则不带任何选项运行 xfs_info 加上挂载点。

root@kerneltalks # xfs_info /shrikant
meta-data=/dev/xvdf              isize=512    agcount=5, agsize=720896 blks
         =                       sectsz=512   attr=2, projid32bit=1
         =                       crc=1        finobt=0 spinodes=0
data     =                       bsize=4096   blocks=2883840, imaxpct=25
         =                       sunit=0      swidth=0 blks
naming   =version 2              bsize=4096   ascii-ci=0 ftype=1
log      =internal               bsize=4096   blocks=2560, version=2
         =                       sectsz=512   sunit=0 blks, lazy-count=1
realtime =none                   extsz=4096   blocks=0, rtextents=0

则会显示 XFS 文件系统的所有详细信息,就跟创建 XFS 文件系统时显示的信息一样。

此外还有一些 XFS 文件系统管理命令可以修改并管理 XFS 的元数据。我们将在另一篇文章中来讲解。


via: https://kerneltalks.com/commands/xfs-file-system-commands-with-examples/

作者:kerneltalks 译者:lujun9972 校对:wxy

本文由 LCTT 原创编译,Linux中国 荣誉推出

学习使用 8 种 Linux 原生命令或第三方实用程序来生成随机密码。

在这篇文章中,我们将引导你通过几种不同的方式在 Linux 终端中生成随机密码。其中几种利用原生 Linux 命令,另外几种则利用极易在 Linux 机器上安装的第三方工具或实用程序实现。在这里我们利用像 openssl, dd, md5sum, tr, urandom 这样的原生命令和 mkpasswd,randpw,pwgen,spw,gpg,xkcdpass,diceware,revelation,keepaasx,passwordmaker 这样的第三方工具。

其实这些方法就是生成一些能被用作密码的随机字母字符串。随机密码可以用于新用户的密码,不管用户基数有多大,这些密码都是独一无二的。话不多说,让我们来看看 8 种不同的在 Linux 上生成随机密码的方法吧。

使用 mkpasswd 实用程序生成密码

mkpasswd 在基于 RHEL 的系统上随 expect 软件包一起安装。在基于 Debian 的系统上 mkpasswd 则在软件包 whois 中。直接安装 mkpasswd 软件包将会导致错误:

  • RHEL 系统:软件包 mkpasswd 不可用。
  • Debian 系统:错误:无法定位软件包 mkpasswd。

所以按照上面所述安装他们的父软件包,就没问题了。

运行 mkpasswd 来获得密码

root@kerneltalks# mkpasswd << on RHEL
zt*hGW65c

root@kerneltalks# mkpasswd teststring << on Ubuntu
XnlrKxYOJ3vik

这个命令在不同的系统上表现得不一样,所以工作方式各异。你也可以通过参数来控制长度等选项,可以查阅 man 手册来探索。

使用 openssl 生成密码

几乎所有 Linux 发行版都包含 openssl。我们可以利用它的随机功能来生成可以用作密码的随机字母字符串。

root@kerneltalks # openssl rand -base64 10
nU9LlHO5nsuUvw==

这里我们使用 base64 编码随机函数,最后一个数字参数表示长度。

使用 urandom 生成密码

设备文件 /dev/urandom 是另一个获得随机字符串的方法。我们使用 tr 功能并裁剪输出来获得随机字符串,并把它作为密码。

root@kerneltalks # strings /dev/urandom |tr -dc A-Za-z0-9 | head -c20; echo
UiXtr0NAOSIkqtjK4c0X

使用 dd 命令生成密码

我们甚至可以使用 /dev/urandom 设备配合 dd 命令 来获取随机字符串。

root@kerneltalks# dd if=/dev/urandom bs=1 count=15|base64 -w 0
15+0 records in
15+0 records out
15 bytes (15 B) copied, 5.5484e-05 s, 270 kB/s
QMsbe2XbrqAc2NmXp8D0

我们需要将结果通过 base64 编码使它能被人类可读。你可以使用数值来获取想要的长度。想要获得更简洁的输出的话,可以将“标准错误输出”重定向到 /dev/null。简洁输出的命令是:

root@kerneltalks # dd if=/dev/urandom bs=1 count=15 2>/dev/null|base64 -w 0
F8c3a4joS+a3BdPN9C++

使用 md5sum 生成密码

另一种获取可用作密码的随机字符串的方法是计算 MD5 校验值!校验值看起来确实像是随机字符串组合在一起,我们可以用作密码。确保你的计算源是个变量,这样的话每次运行命令时生成的校验值都不一样。比如 datedate 命令 总会生成不同的输出。

root@kerneltalks # date |md5sum
4d8ce5c42073c7e9ca4aeffd3d157102  -

在这里我们将 date 命令的输出通过 md5sum 得到了校验和!你也可以用 cut 命令 裁剪你需要的长度。

使用 pwgen 生成密码

pwgen 软件包在类似 EPEL 软件仓库(LCTT 译注:企业版 Linux 附加软件包)中。pwgen 更专注于生成可发音的密码,但它们不在英语词典中,也不是纯英文的。标准发行版仓库中可能并不包含这个工具。安装这个软件包然后运行 pwgen 命令行。Boom !

root@kerneltalks # pwgen
thu8Iox7 ahDeeQu8 Eexoh0ai oD8oozie ooPaeD9t meeNeiW2 Eip6ieph Ooh1tiet
cootad7O Gohci0vo wah9Thoh Ohh3Ziur Ao1thoma ojoo6aeW Oochai4v ialaiLo5
aic2OaDa iexieQu8 Aesoh4Ie Eixou9ph ShiKoh0i uThohth7 taaN3fuu Iege0aeZ
cah3zaiW Eephei0m AhTh8guo xah1Shoo uh8Iengo aifeev4E zoo4ohHa fieDei6c
aorieP7k ahna9AKe uveeX7Hi Ohji5pho AigheV7u Akee9fae aeWeiW4a tiex8Oht

你的终端会呈现出一个密码列表!你还想要什么呢?好吧。你还想再仔细探索的话, pwgen 还有很多自定义选项,这些都可以在 man 手册里查阅到。

使用 gpg 工具生成密码

GPG 是一个遵循 OpenPGP 标准的加密及签名工具。大部分 gpg 工具都预先被安装好了(至少在我的 RHEL7 上是这样)。但如果没有的话你可以寻找 gpggpg2 软件包并安装它。

使用下面的命令以从 gpg 工具生成密码。

root@kerneltalks # gpg --gen-random --armor 1 12
mL8i+PKZ3IuN6a7a

这里我们传了生成随机字节序列选项(--gen-random),质量为 1(第一个参数),次数 12 (第二个参数)。选项 --armor 保证以 base64 编码输出。

使用 xkcdpass 生成密码

著名的极客幽默网站 xkcd,发表了一篇非常有趣的文章,是关于好记但又复杂的密码的。你可以在这里阅读。所以 xkcdpass 工具就受这篇文章启发,做了这样的工作!这是一个 Python 软件包,可以在这里的 Python 的官网上找到它。

所有的安装使用说明都在上面那个页面提及了。这里是安装步骤和我的测试 RHEL 服务器的输出,以供参考。

root@kerneltalks # wget https://pypi.python.org/packages/b4/d7/3253bd2964390e034cf0bba227db96d94de361454530dc056d8c1c096abc/xkcdpass-1.14.3.tar.gz#md5=5f15d52f1d36207b07391f7a25c7965f
--2018-01-23 19:09:17--  https://pypi.python.org/packages/b4/d7/3253bd2964390e034cf0bba227db96d94de361454530dc056d8c1c096abc/xkcdpass-1.14.3.tar.gz
Resolving pypi.python.org (pypi.python.org)... 151.101.32.223, 2a04:4e42:8::223
Connecting to pypi.python.org (pypi.python.org)|151.101.32.223|:443... connected.
HTTP request sent, awaiting response... 200 OK
Length: 871848 (851K) [binary/octet-stream]
Saving to: ‘xkcdpass-1.14.3.tar.gz’

100%[==============================================================================================================================>] 871,848     --.-K/s   in 0.01s

2018-01-23 19:09:17 (63.9 MB/s) - ‘xkcdpass-1.14.3.tar.gz’ saved [871848/871848]


root@kerneltalks # tar -xvf xkcdpass-1.14.3.tar.gz
xkcdpass-1.14.3/
xkcdpass-1.14.3/examples/
xkcdpass-1.14.3/examples/example_import.py
xkcdpass-1.14.3/examples/example_json.py
xkcdpass-1.14.3/examples/example_postprocess.py
xkcdpass-1.14.3/LICENSE.BSD
xkcdpass-1.14.3/MANIFEST.in
xkcdpass-1.14.3/PKG-INFO
xkcdpass-1.14.3/README.rst
xkcdpass-1.14.3/setup.cfg
xkcdpass-1.14.3/setup.py
xkcdpass-1.14.3/tests/
xkcdpass-1.14.3/tests/test_list.txt
xkcdpass-1.14.3/tests/test_xkcdpass.py
xkcdpass-1.14.3/tests/__init__.py
xkcdpass-1.14.3/xkcdpass/
xkcdpass-1.14.3/xkcdpass/static/
xkcdpass-1.14.3/xkcdpass/static/eff-long
xkcdpass-1.14.3/xkcdpass/static/eff-short
xkcdpass-1.14.3/xkcdpass/static/eff-special
xkcdpass-1.14.3/xkcdpass/static/fin-kotus
xkcdpass-1.14.3/xkcdpass/static/ita-wiki
xkcdpass-1.14.3/xkcdpass/static/legacy
xkcdpass-1.14.3/xkcdpass/static/spa-mich
xkcdpass-1.14.3/xkcdpass/xkcd_password.py
xkcdpass-1.14.3/xkcdpass/__init__.py
xkcdpass-1.14.3/xkcdpass.1
xkcdpass-1.14.3/xkcdpass.egg-info/
xkcdpass-1.14.3/xkcdpass.egg-info/dependency_links.txt
xkcdpass-1.14.3/xkcdpass.egg-info/entry_points.txt
xkcdpass-1.14.3/xkcdpass.egg-info/not-zip-safe
xkcdpass-1.14.3/xkcdpass.egg-info/PKG-INFO
xkcdpass-1.14.3/xkcdpass.egg-info/SOURCES.txt
xkcdpass-1.14.3/xkcdpass.egg-info/top_level.txt


root@kerneltalks # cd xkcdpass-1.14.3

root@kerneltalks # python setup.py install
running install
running bdist_egg
running egg_info
writing xkcdpass.egg-info/PKG-INFO
writing top-level names to xkcdpass.egg-info/top_level.txt
writing dependency_links to xkcdpass.egg-info/dependency_links.txt
writing entry points to xkcdpass.egg-info/entry_points.txt
reading manifest file 'xkcdpass.egg-info/SOURCES.txt'
reading manifest template 'MANIFEST.in'
writing manifest file 'xkcdpass.egg-info/SOURCES.txt'
installing library code to build/bdist.linux-x86_64/egg
running install_lib
running build_py
creating build
creating build/lib
creating build/lib/xkcdpass
copying xkcdpass/xkcd_password.py -> build/lib/xkcdpass
copying xkcdpass/__init__.py -> build/lib/xkcdpass
creating build/lib/xkcdpass/static
copying xkcdpass/static/eff-long -> build/lib/xkcdpass/static
copying xkcdpass/static/eff-short -> build/lib/xkcdpass/static
copying xkcdpass/static/eff-special -> build/lib/xkcdpass/static
copying xkcdpass/static/fin-kotus -> build/lib/xkcdpass/static
copying xkcdpass/static/ita-wiki -> build/lib/xkcdpass/static
copying xkcdpass/static/legacy -> build/lib/xkcdpass/static
copying xkcdpass/static/spa-mich -> build/lib/xkcdpass/static
creating build/bdist.linux-x86_64
creating build/bdist.linux-x86_64/egg
creating build/bdist.linux-x86_64/egg/xkcdpass
copying build/lib/xkcdpass/xkcd_password.py -> build/bdist.linux-x86_64/egg/xkcdpass
copying build/lib/xkcdpass/__init__.py -> build/bdist.linux-x86_64/egg/xkcdpass
creating build/bdist.linux-x86_64/egg/xkcdpass/static
copying build/lib/xkcdpass/static/eff-long -> build/bdist.linux-x86_64/egg/xkcdpass/static
copying build/lib/xkcdpass/static/eff-short -> build/bdist.linux-x86_64/egg/xkcdpass/static
copying build/lib/xkcdpass/static/eff-special -> build/bdist.linux-x86_64/egg/xkcdpass/static
copying build/lib/xkcdpass/static/fin-kotus -> build/bdist.linux-x86_64/egg/xkcdpass/static
copying build/lib/xkcdpass/static/ita-wiki -> build/bdist.linux-x86_64/egg/xkcdpass/static
copying build/lib/xkcdpass/static/legacy -> build/bdist.linux-x86_64/egg/xkcdpass/static
copying build/lib/xkcdpass/static/spa-mich -> build/bdist.linux-x86_64/egg/xkcdpass/static
byte-compiling build/bdist.linux-x86_64/egg/xkcdpass/xkcd_password.py to xkcd_password.pyc
byte-compiling build/bdist.linux-x86_64/egg/xkcdpass/__init__.py to __init__.pyc
creating build/bdist.linux-x86_64/egg/EGG-INFO
copying xkcdpass.egg-info/PKG-INFO -> build/bdist.linux-x86_64/egg/EGG-INFO
copying xkcdpass.egg-info/SOURCES.txt -> build/bdist.linux-x86_64/egg/EGG-INFO
copying xkcdpass.egg-info/dependency_links.txt -> build/bdist.linux-x86_64/egg/EGG-INFO
copying xkcdpass.egg-info/entry_points.txt -> build/bdist.linux-x86_64/egg/EGG-INFO
copying xkcdpass.egg-info/not-zip-safe -> build/bdist.linux-x86_64/egg/EGG-INFO
copying xkcdpass.egg-info/top_level.txt -> build/bdist.linux-x86_64/egg/EGG-INFO
creating dist
creating 'dist/xkcdpass-1.14.3-py2.7.egg' and adding 'build/bdist.linux-x86_64/egg' to it
removing 'build/bdist.linux-x86_64/egg' (and everything under it)
Processing xkcdpass-1.14.3-py2.7.egg
creating /usr/lib/python2.7/site-packages/xkcdpass-1.14.3-py2.7.egg
Extracting xkcdpass-1.14.3-py2.7.egg to /usr/lib/python2.7/site-packages
Adding xkcdpass 1.14.3 to easy-install.pth file
Installing xkcdpass script to /usr/bin

Installed /usr/lib/python2.7/site-packages/xkcdpass-1.14.3-py2.7.egg
Processing dependencies for xkcdpass==1.14.3
Finished processing dependencies for xkcdpass==1.14.3

现在运行 xkcdpass 命令,将会随机给出你几个像下面这样的字典单词:

root@kerneltalks # xkcdpass
broadside unpadded osmosis statistic cosmetics lugged

你可以用这些单词作为其他命令,比如 md5sum 的输入,来获取随机密码(就像下面这样),甚至你也可以用每个单词的第 N 个字母来生成你的密码!

root@kerneltalks # xkcdpass |md5sum
45f2ec9b3ca980c7afbd100268c74819  -

root@kerneltalks # xkcdpass |md5sum
ad79546e8350744845c001d8836f2ff2  -

或者你甚至可以把所有单词串在一起作为一个超长的密码,不仅非常好记,也不容易被电脑程序攻破。

Linux 上还有像 DicewareKeePassXRevelationPasswordMaker 这样的工具,也可以考虑用来生成强随机密码。


via: https://kerneltalks.com/tips-tricks/8-ways-to-generate-random-password-in-linux/

作者:kerneltalks 译者:heart4lor 校对:Locez

本文由 LCTT 原创编译,Linux中国 荣誉推出

本文解释了 “ERROR Cannot fetch deployment URL via curl:Couldn't resolve host。The given remote host was not resolved。” 的原因及其解决方案。

ERROR Cannot fetch deployment URL via curl:Couldn't resolve host。The given remote host was not resolved。

check_mk 是一个帮你配置 nagios 监控服务器的工具。然后在配置其中一台机器时,我遇到了下面的错误:

ERROR Cannot fetch deployment URL via curl:Couldn't resolve host。The given remote host was not resolved。

该错误是在我使用下面命令尝试将该机器注册到监控服务器时发生的:

root@kerneltalks# /usr/bin/cmk-update-agent register -s monitor.kerneltalks.com -i master -H `hostname` -p http -U omdadmin -S ASFKWEFUNSHEFKG -v 

其中:

  • -s 指明监控服务器
  • -i 指定服务器上 Check\_MK 站点的名称
  • -H 指定 agent 所在的主机名
  • -p 为协议,可以是 http 或 https (默认为 https)
  • -U 允许下载 agent 的用户 ID
  • -S 为密码。用户的自动操作密码(当是自动用户时)

从错误中可以看出,命令无法解析监控服务器的 DNS 名称 monitor.kerneltalks.com

解决方案:

超级简单。检查 /etc/resolv.conf,确保你的 DNS 配置正确。如果还解决不了这个问题那么你可以直接在 /etc/hosts 中指明它的 IP。

root@kerneltalks# cat /etc/hosts
10.0.10.9 monitor.kerneltalks.com

这就搞定了。你现在可以成功注册了。

root@kerneltalks # /usr/bin/cmk-update-agent register -s monitor.kerneltalks.com -i master -H `hostname` -p http -U omdadmin -S ASFKWEFUNSHEFKG -v
Going to register agent at deployment server
Successfully registered agent for deployment.
You can now update your agent by running 'cmk-update-agent -v'
Saved your registration settings to /etc/cmk-update-agent.state.

另外,你也可以为 -s 直接指定 IP 地址,就没那么多事了!


via: https://kerneltalks.com/troubleshooting/check_mk-register-cannot-fetch-deployment-url-via-curl-error/

作者:kerneltalks 译者:lujun9972 校对:wxy

本文由 LCTT 原创编译,Linux中国 荣誉推出