MAGESH MARUTHAMUTHU 发布的文章

我们过去曾写过两篇关于这个主题的文章,每篇文章都是根据不同的要求发表的。如果你想在开始之前浏览这些文章。请通过以下链接:

这些文章与其他文章相互关联,因此,在深入研究之前,最好先阅读这些文章。

在本文中,我们将向你展示如何检查已安装的安全更新。我会介绍两种方法,你可以选择最适合你的。

此外,我还添加了一个小的 shell 脚本,它为你提供已安装的安全包计数。

运行以下命令获取系统上已安装的安全更新的列表。

# yum updateinfo list security installed

Loaded plugins: changelog, package_upload, product-id, search-disabled-repos,
              : subscription-manager, verify, versionlock
RHSA-2015:2315 Moderate/Sec.  ModemManager-glib-1.1.0-8.git20130913.el7.x86_64
RHSA-2015:2315 Moderate/Sec.  NetworkManager-1:1.0.6-27.el7.x86_64
RHSA-2016:2581 Low/Sec.       NetworkManager-1:1.4.0-12.el7.x86_64
RHSA-2017:2299 Moderate/Sec.  NetworkManager-1:1.8.0-9.el7.x86_64
RHSA-2015:2315 Moderate/Sec.  NetworkManager-adsl-1:1.0.6-27.el7.x86_64
RHSA-2016:2581 Low/Sec.       NetworkManager-adsl-1:1.4.0-12.el7.x86_64
RHSA-2017:2299 Moderate/Sec.  NetworkManager-adsl-1:1.8.0-9.el7.x86_64
RHSA-2015:2315 Moderate/Sec.  NetworkManager-bluetooth-1:1.0.6-27.el7.x86_64

要计算已安装的安全包的数量,请运行以下命令:

# yum updateinfo list security installed | wc -l
1046

仅打印安装包列表:

# yum updateinfo list security all | grep -w "i"

i RHSA-2015:2315 Moderate/Sec.  ModemManager-glib-1.1.0-8.git20130913.el7.x86_64
i RHSA-2015:2315 Moderate/Sec.  NetworkManager-1:1.0.6-27.el7.x86_64
i RHSA-2016:2581 Low/Sec.       NetworkManager-1:1.4.0-12.el7.x86_64
i RHSA-2017:2299 Moderate/Sec.  NetworkManager-1:1.8.0-9.el7.x86_64
i RHSA-2015:2315 Moderate/Sec.  NetworkManager-adsl-1:1.0.6-27.el7.x86_64
i RHSA-2016:2581 Low/Sec.       NetworkManager-adsl-1:1.4.0-12.el7.x86_64
i RHSA-2017:2299 Moderate/Sec.  NetworkManager-adsl-1:1.8.0-9.el7.x86_64
i RHSA-2015:2315 Moderate/Sec.  NetworkManager-bluetooth-1:1.0.6-27.el7.x86_64
i RHSA-2016:2581 Low/Sec.       NetworkManager-bluetooth-1:1.4.0-12.el7.x86_64
i RHSA-2017:2299 Moderate/Sec.  NetworkManager-bluetooth-1:1.8.0-9.el7.x86_64
i RHSA-2015:2315 Moderate/Sec.  NetworkManager-config-server-1:1.0.6-27.el7.x86_64
i RHSA-2016:2581 Low/Sec.       NetworkManager-config-server-1:1.4.0-12.el7.x86_64
i RHSA-2017:2299 Moderate/Sec.  NetworkManager-config-server-1:1.8.0-9.el7.noarch

要计算已安装的安全包的数量,请运行以下命令:

# yum updateinfo list security all | grep -w "i" | wc -l
1043

或者,你可以检查指定包修复的漏洞列表。

在此例中,我们将检查 “openssh” 包中已修复的漏洞列表:

# rpm -q --changelog openssh | grep -i CVE

- Fix for CVE-2017-15906 (#1517226)
- CVE-2015-8325: privilege escalation via user's PAM environment and UseLogin=yes (#1329191)
- CVE-2016-1908: possible fallback from untrusted to trusted X11 forwarding (#1298741)
- CVE-2016-3115: missing sanitisation of input for X11 forwarding (#1317819)
- prevents CVE-2016-0777 and CVE-2016-0778
- Security fixes released with openssh-6.9 (CVE-2015-5352) (#1247864)
- only query each keyboard-interactive device once (CVE-2015-5600) (#1245971)
- add new option GSSAPIEnablek5users and disable using ~/.k5users by default CVE-2014-9278
- prevent a server from skipping SSHFP lookup - CVE-2014-2653 (#1081338)
- change default value of MaxStartups - CVE-2010-5107 (#908707)
- CVE-2010-4755
- merged cve-2007_3102 to audit patch
- fixed audit log injection problem (CVE-2007-3102)
- CVE-2006-5794 - properly detect failed key verify in monitor (#214641)
- CVE-2006-4924 - prevent DoS on deattack detector (#207957)
- CVE-2006-5051 - don't call cleanups from signal handler (#208459)
- use fork+exec instead of system in scp - CVE-2006-0225 (#168167)

同样,你可以通过运行以下命令来检查相应的包中是否修复了指定的漏洞:

# rpm -q --changelog openssh | grep -i CVE-2016-3115

- CVE-2016-3115: missing sanitisation of input for X11 forwarding (#1317819)

如何使用 Shell 脚本计算安装的安全包?

我添加了一个小的 shell 脚本,它可以帮助你计算已安装的安全包列表。

# vi /opt/scripts/security-check.sh

#!/bin/bash
echo "+-------------------------+"
echo "|Security Advisories Count|"
echo "+-------------------------+"
for i in Important Moderate Low
do
    sec=$(yum updateinfo list security installed | grep $i | wc -l)
    echo "$i: $sec"
done | column -t
echo "+-------------------------+"

security-check.sh 文件执行权限。

$ chmod +x security-check.sh

最后执行脚本统计。

# sh /opt/scripts/security-check.sh

+-------------------------+
|Security Advisories Count|
+-------------------------+
Important:  480
Moderate:   410
Low:        111
+-------------------------+

via: https://www.2daygeek.com/check-installed-security-updates-on-redhat-rhel-and-centos-system/

作者:Magesh Maruthamuthu 选题:lujun9972 译者:geekpi 校对:wxy

本文由 LCTT 原创编译,Linux中国 荣誉推出

NTP 意即 网络时间协议 Network Time Protocol ,它通过网络同步计算机系统之间的时钟。NTP 服务器可以使组织中的所有服务器保持同步,以准确时间执行基于时间的作业。NTP 客户端会将其时钟与 NTP 服务器同步。

我们已经写了一篇关于 NTP 服务器和客户端安装和配置的文章。如果你想查看这些文章,请导航至以下链接。

我假设你已经使用上述链接设置了 NTP 服务器和 NTP 客户端。现在,如何验证 NTP 设置是否正常工作?

Linux 中有三个命令可用于验证 NTP 同步情况。详情如下。在本文中,我们将告诉您如何使用所有这些命令验证 NTP 同步。

  • ntpq:ntpq 是一个标准的 NTP 查询程序。
  • ntpstat:显示网络世界同步状态。
  • timedatectl:它控制 systemd 系统中的系统时间和日期。

方法 1:如何使用 ntpq 命令检查 NTP 状态?

ntpq 实用程序用于监视 NTP 守护程序 ntpd 的操作并确定性能。

该程序可以以交互模式运行,也可以使用命令行参数进行控制。它通过向服务器发送多个查询来打印出连接的对等项列表。如果 NTP 正常工作,你将获得类似于下面的输出。

# ntpq -p

     remote           refid      st t when poll reach   delay   offset  jitter
==============================================================================
*CentOS7.2daygee 133.243.238.163  2 u   14   64   37    0.686    0.151  16.432

细节:

  • -p:打印服务器已知的对等项列表以及其状态摘要。

方法 2:如何使用 ntpstat 命令检查 NTP 状态?

ntpstat 将报告在本地计算机上运行的 NTP 守护程序(ntpd)的同步状态。如果发现本地系统与参考时间源保持同步,则 ntpstat 将报告大致的时间精度。

ntpstat 命令根据 NTP 同步状态返回三种状态码。详情如下。

  • 0:如果时钟同步则返回 0。
  • 1:如果时钟不同步则返回 1。
  • 2:如果时钟状态不确定,则返回 2,例如 ntpd 不可联系时。
# ntpstat

synchronised to NTP server (192.168.1.8) at stratum 3
   time correct to within 508 ms
   polling server every 64 s

方法 3:如何使用 timedatectl 命令检查 NTP 状态?

timedatectl 命令用于查询和更改系统时钟及其在 systmed 系统中的设置。

# timedatectl
或
# timedatectl status

      Local time: Thu 2019-05-30 05:01:05 CDT
  Universal time: Thu 2019-05-30 10:01:05 UTC
        RTC time: Thu 2019-05-30 10:01:05
       Time zone: America/Chicago (CDT, -0500)
     NTP enabled: yes
NTP synchronized: yes
 RTC in local TZ: no
      DST active: yes
 Last DST change: DST began at
                  Sun 2019-03-10 01:59:59 CST
                  Sun 2019-03-10 03:00:00 CDT
 Next DST change: DST ends (the clock jumps one hour backwards) at
                  Sun 2019-11-03 01:59:59 CDT
                  Sun 2019-11-03 01:00:00 CST

更多技巧

Chrony 是一个 NTP 客户端的替代品。它可以更快地同步系统时钟,时间精度更高,对于一直不在线的系统尤其有用。

chronyd 较小,它使用较少的内存,只在必要时才唤醒 CPU,这样可以更好地节省电能。即使网络拥塞较长时间,它也能很好地运行。

你可以使用以下任何命令来检查 Chrony 状态。

检查 Chrony 跟踪状态。

# chronyc tracking

Reference ID    : C0A80105 (CentOS7.2daygeek.com)
Stratum         : 3
Ref time (UTC)  : Thu Mar 28 05:57:27 2019
System time     : 0.000002545 seconds slow of NTP time
Last offset     : +0.001194361 seconds
RMS offset      : 0.001194361 seconds
Frequency       : 1.650 ppm fast
Residual freq   : +184.101 ppm
Skew            : 2.962 ppm
Root delay      : 0.107966967 seconds
Root dispersion : 1.060455322 seconds
Update interval : 2.0 seconds
Leap status     : Normal

运行 sources 命令以显示有关当前时间源的信息。

# chronyc sources

210 Number of sources = 1
MS Name/IP address         Stratum Poll Reach LastRx Last sample
===============================================================================
^* CentOS7.2daygeek.com          2   6    17    62    +36us[+1230us] +/- 1111ms

via: https://www.2daygeek.com/check-verify-ntp-sync-is-working-or-not-in-linux-using-ntpq-ntpstat-timedatectl/

作者:Magesh Maruthamuthu 选题:lujun9972 译者:wxy 校对:校对者ID

本文由 LCTT 原创编译,Linux中国 荣誉推出

当你更新系统时,根据你所在公司的安全策略,有时候可能只需要打上与安全相关的补丁。大多数情况下,这应该是出于程序兼容性方面的考量。那该怎样实践呢?有没有办法让 yum 只安装安全补丁呢?

答案是肯定的,可以用 yum 包管理器轻松实现。

在这篇文章中,我们不但会提供所需的信息。而且,我们会介绍一些额外的命令,可以帮你获取指定安全更新的详实信息。

希望这样可以启发你去了解并修复你列表上的那些漏洞。一旦有安全漏洞被公布,就必须更新受影响的软件,这样可以降低系统中的安全风险。

对于 RHEL 或 CentOS 6 系统,运行下面的 Yum 命令 来安装 yum 安全插件。

# yum -y install yum-plugin-security

在 RHEL 7&8 或是 CentOS 7&8 上面,这个插件已经是 yum 的一部分了,不用单独安装。

要列出全部可用的补丁(包括安全、Bug 修复以及产品改进),但不安装它们:

# yum updateinfo list available
Loaded plugins: changelog, package_upload, product-id, search-disabled-repos,
              : subscription-manager, verify, versionlock
RHSA-2014:1031 Important/Sec. 389-ds-base-1.3.1.6-26.el7_0.x86_64
RHSA-2015:0416 Important/Sec. 389-ds-base-1.3.3.1-13.el7.x86_64
RHBA-2015:0626 bugfix         389-ds-base-1.3.3.1-15.el7_1.x86_64
RHSA-2015:0895 Important/Sec. 389-ds-base-1.3.3.1-16.el7_1.x86_64
RHBA-2015:1554 bugfix         389-ds-base-1.3.3.1-20.el7_1.x86_64
RHBA-2015:1960 bugfix         389-ds-base-1.3.3.1-23.el7_1.x86_64
RHBA-2015:2351 bugfix         389-ds-base-1.3.4.0-19.el7.x86_64
RHBA-2015:2572 bugfix         389-ds-base-1.3.4.0-21.el7_2.x86_64
RHSA-2016:0204 Important/Sec. 389-ds-base-1.3.4.0-26.el7_2.x86_64
RHBA-2016:0550 bugfix         389-ds-base-1.3.4.0-29.el7_2.x86_64
RHBA-2016:1048 bugfix         389-ds-base-1.3.4.0-30.el7_2.x86_64
RHBA-2016:1298 bugfix         389-ds-base-1.3.4.0-32.el7_2.x86_64

要统计补丁的大约数量,运行下面的命令:

# yum updateinfo list available | wc -l
11269

想列出全部可用的安全补丁但不安装,以下命令用来展示你系统里已安装和待安装的推荐补丁:

# yum updateinfo list security all
Loaded plugins: changelog, package_upload, product-id, search-disabled-repos,
              : subscription-manager, verify, versionlock
  RHSA-2014:1031 Important/Sec. 389-ds-base-1.3.1.6-26.el7_0.x86_64
  RHSA-2015:0416 Important/Sec. 389-ds-base-1.3.3.1-13.el7.x86_64
  RHSA-2015:0895 Important/Sec. 389-ds-base-1.3.3.1-16.el7_1.x86_64
  RHSA-2016:0204 Important/Sec. 389-ds-base-1.3.4.0-26.el7_2.x86_64
  RHSA-2016:2594 Moderate/Sec.  389-ds-base-1.3.5.10-11.el7.x86_64
  RHSA-2017:0920 Important/Sec. 389-ds-base-1.3.5.10-20.el7_3.x86_64
  RHSA-2017:2569 Moderate/Sec.  389-ds-base-1.3.6.1-19.el7_4.x86_64
  RHSA-2018:0163 Important/Sec. 389-ds-base-1.3.6.1-26.el7_4.x86_64
  RHSA-2018:0414 Important/Sec. 389-ds-base-1.3.6.1-28.el7_4.x86_64
  RHSA-2018:1380 Important/Sec. 389-ds-base-1.3.7.5-21.el7_5.x86_64
  RHSA-2018:2757 Moderate/Sec.  389-ds-base-1.3.7.5-28.el7_5.x86_64
  RHSA-2018:3127 Moderate/Sec.  389-ds-base-1.3.8.4-15.el7.x86_64
  RHSA-2014:1031 Important/Sec. 389-ds-base-libs-1.3.1.6-26.el7_0.x86_64

要显示所有待安装的安全补丁:

# yum updateinfo list security all | grep -v "i"

  RHSA-2014:1031 Important/Sec. 389-ds-base-1.3.1.6-26.el7_0.x86_64
  RHSA-2015:0416 Important/Sec. 389-ds-base-1.3.3.1-13.el7.x86_64
  RHSA-2015:0895 Important/Sec. 389-ds-base-1.3.3.1-16.el7_1.x86_64
  RHSA-2016:0204 Important/Sec. 389-ds-base-1.3.4.0-26.el7_2.x86_64
  RHSA-2016:2594 Moderate/Sec.  389-ds-base-1.3.5.10-11.el7.x86_64
  RHSA-2017:0920 Important/Sec. 389-ds-base-1.3.5.10-20.el7_3.x86_64
  RHSA-2017:2569 Moderate/Sec.  389-ds-base-1.3.6.1-19.el7_4.x86_64
  RHSA-2018:0163 Important/Sec. 389-ds-base-1.3.6.1-26.el7_4.x86_64
  RHSA-2018:0414 Important/Sec. 389-ds-base-1.3.6.1-28.el7_4.x86_64
  RHSA-2018:1380 Important/Sec. 389-ds-base-1.3.7.5-21.el7_5.x86_64
  RHSA-2018:2757 Moderate/Sec.  389-ds-base-1.3.7.5-28.el7_5.x86_64

要统计全部安全补丁的大致数量,运行下面的命令:

# yum updateinfo list security all | wc -l
3522

下面根据已装软件列出可更新的安全补丁。这包括 bugzilla(bug 修复)、CVE(知名漏洞数据库)、安全更新等:

# yum updateinfo list security

或者

# yum updateinfo list sec

Loaded plugins: changelog, package_upload, product-id, search-disabled-repos,
              : subscription-manager, verify, versionlock

RHSA-2018:3665 Important/Sec. NetworkManager-1:1.12.0-8.el7_6.x86_64
RHSA-2018:3665 Important/Sec. NetworkManager-adsl-1:1.12.0-8.el7_6.x86_64
RHSA-2018:3665 Important/Sec. NetworkManager-bluetooth-1:1.12.0-8.el7_6.x86_64
RHSA-2018:3665 Important/Sec. NetworkManager-config-server-1:1.12.0-8.el7_6.noarch
RHSA-2018:3665 Important/Sec. NetworkManager-glib-1:1.12.0-8.el7_6.x86_64
RHSA-2018:3665 Important/Sec. NetworkManager-libnm-1:1.12.0-8.el7_6.x86_64
RHSA-2018:3665 Important/Sec. NetworkManager-ppp-1:1.12.0-8.el7_6.x86_64
RHSA-2018:3665 Important/Sec. NetworkManager-team-1:1.12.0-8.el7_6.x86_64
RHSA-2018:3665 Important/Sec. NetworkManager-tui-1:1.12.0-8.el7_6.x86_64
RHSA-2018:3665 Important/Sec. NetworkManager-wifi-1:1.12.0-8.el7_6.x86_64
RHSA-2018:3665 Important/Sec. NetworkManager-wwan-1:1.12.0-8.el7_6.x86_64

显示所有与安全相关的更新,并且返回一个结果来告诉你是否有可用的补丁:

# yum --security check-update
Loaded plugins: changelog, package_upload, product-id, search-disabled-repos, subscription-manager, verify, versionlock
rhel-7-server-rpms                                                                                                                            | 2.0 kB  00:00:00
--> policycoreutils-devel-2.2.5-20.el7.x86_64 from rhel-7-server-rpms excluded (updateinfo)
--> smc-raghumalayalam-fonts-6.0-7.el7.noarch from rhel-7-server-rpms excluded (updateinfo)
--> amanda-server-3.3.3-17.el7.x86_64 from rhel-7-server-rpms excluded (updateinfo)
--> 389-ds-base-libs-1.3.4.0-26.el7_2.x86_64 from rhel-7-server-rpms excluded (updateinfo)
--> 1:cups-devel-1.6.3-26.el7.i686 from rhel-7-server-rpms excluded (updateinfo)
--> openwsman-client-2.6.3-3.git4391e5c.el7.i686 from rhel-7-server-rpms excluded (updateinfo)
--> 1:emacs-24.3-18.el7.x86_64 from rhel-7-server-rpms excluded (updateinfo)
--> augeas-libs-1.4.0-2.el7_4.2.i686 from rhel-7-server-rpms excluded (updateinfo)
--> samba-winbind-modules-4.2.3-10.el7.i686 from rhel-7-server-rpms excluded (updateinfo)
--> tftp-5.2-11.el7.x86_64 from rhel-7-server-rpms excluded (updateinfo)
.
.
35 package(s) needed for security, out of 115 available
NetworkManager.x86_64                        1:1.12.0-10.el7_6            rhel-7-server-rpms
NetworkManager-adsl.x86_64                   1:1.12.0-10.el7_6            rhel-7-server-rpms
NetworkManager-bluetooth.x86_64              1:1.12.0-10.el7_6            rhel-7-server-rpms
NetworkManager-config-server.noarch          1:1.12.0-10.el7_6            rhel-7-server-rpms
NetworkManager-glib.x86_64                   1:1.12.0-10.el7_6            rhel-7-server-rpms
NetworkManager-libnm.x86_64                  1:1.12.0-10.el7_6            rhel-7-server-rpms
NetworkManager-ppp.x86_64                    1:1.12.0-10.el7_6            rhel-7-server-rpms

列出所有可用的安全补丁,并且显示其详细信息:

# yum info-sec
.
.
===============================================================================
  tzdata bug fix and enhancement update
===============================================================================
  Update ID : RHBA-2019:0689
    Release : 0
       Type : bugfix
     Status : final
     Issued : 2019-03-28 19:27:44 UTC
Description : The tzdata packages contain data files with rules for various
            : time zones.
            :
            : The tzdata packages have been updated to version
            : 2019a, which addresses recent time zone changes.
            : Notably:
            :
            : * The Asia/Hebron and Asia/Gaza zones will start
            :   DST on 2019-03-30, rather than 2019-03-23 as
            :   previously predicted.
            : * Metlakatla rejoined Alaska time on 2019-01-20,
            :   ending its observances of Pacific standard time.
            :
            : (BZ#1692616, BZ#1692615, BZ#1692816)
            :
            : Users of tzdata are advised to upgrade to these
            : updated packages.
   Severity : None

如果你想要知道某个更新的具体内容,可以运行下面这个命令:

# yum updateinfo RHSA-2019:0163

Loaded plugins: changelog, package_upload, product-id, search-disabled-repos, subscription-manager, verify, versionlock
rhel-7-server-rpms                                                                                                                            | 2.0 kB  00:00:00
===============================================================================
  Important: kernel security, bug fix, and enhancement update
===============================================================================
  Update ID : RHSA-2019:0163
    Release : 0
       Type : security
     Status : final
     Issued : 2019-01-29 15:21:23 UTC
    Updated : 2019-01-29 15:23:47 UTC       Bugs : 1641548 - CVE-2018-18397 kernel: userfaultfd bypasses tmpfs file permissions
            : 1641878 - CVE-2018-18559 kernel: Use-after-free due to race condition in AF_PACKET implementation
       CVEs : CVE-2018-18397
            : CVE-2018-18559
Description : The kernel packages contain the Linux kernel, the core of any
            : Linux operating system.
            :
            : Security Fix(es):
            :
            : * kernel: Use-after-free due to race condition in
            :   AF_PACKET implementation (CVE-2018-18559)
            :
            : * kernel: userfaultfd bypasses tmpfs file
            :   permissions (CVE-2018-18397)
            :
            : For more details about the security issue(s),
            : including the impact, a CVSS score, and other
            : related information, refer to the CVE page(s)
            : listed in the References section.
            :
            : Bug Fix(es):
            :
            : These updated kernel packages include also
            : numerous bug fixes and enhancements. Space
            : precludes documenting all of the bug fixes in this
            : advisory. See the descriptions in the related
            : Knowledge Article:
            : https://access.redhat.com/articles/3827321
   Severity : Important
updateinfo info done

跟之前类似,你可以只查询那些通过 CVE 释出的系统漏洞:

# yum updateinfo list cves

Loaded plugins: changelog, package_upload, product-id, search-disabled-repos,
              : subscription-manager, verify, versionlock
CVE-2018-15688 Important/Sec. NetworkManager-1:1.12.0-8.el7_6.x86_64
CVE-2018-15688 Important/Sec. NetworkManager-adsl-1:1.12.0-8.el7_6.x86_64
CVE-2018-15688 Important/Sec. NetworkManager-bluetooth-1:1.12.0-8.el7_6.x86_64
CVE-2018-15688 Important/Sec. NetworkManager-config-server-1:1.12.0-8.el7_6.noarch
CVE-2018-15688 Important/Sec. NetworkManager-glib-1:1.12.0-8.el7_6.x86_64
CVE-2018-15688 Important/Sec. NetworkManager-libnm-1:1.12.0-8.el7_6.x86_64
CVE-2018-15688 Important/Sec. NetworkManager-ppp-1:1.12.0-8.el7_6.x86_64
CVE-2018-15688 Important/Sec. NetworkManager-team-1:1.12.0-8.el7_6.x86_64

你也可以查看那些跟 bug 修复相关的更新,运行下面的命令:

# yum updateinfo list bugfix | less

Loaded plugins: changelog, package_upload, product-id, search-disabled-repos,
              : subscription-manager, verify, versionlock
RHBA-2018:3349 bugfix NetworkManager-1:1.12.0-7.el7_6.x86_64
RHBA-2019:0519 bugfix NetworkManager-1:1.12.0-10.el7_6.x86_64
RHBA-2018:3349 bugfix NetworkManager-adsl-1:1.12.0-7.el7_6.x86_64
RHBA-2019:0519 bugfix NetworkManager-adsl-1:1.12.0-10.el7_6.x86_64
RHBA-2018:3349 bugfix NetworkManager-bluetooth-1:1.12.0-7.el7_6.x86_64
RHBA-2019:0519 bugfix NetworkManager-bluetooth-1:1.12.0-10.el7_6.x86_64
RHBA-2018:3349 bugfix NetworkManager-config-server-1:1.12.0-7.el7_6.noarch
RHBA-2019:0519 bugfix NetworkManager-config-server-1:1.12.0-10.el7_6.noarch

要想得到待安装更新的摘要信息,运行这个:

# yum updateinfo summary
Loaded plugins: changelog, package_upload, product-id, search-disabled-repos, subscription-manager, verify, versionlock
rhel-7-server-rpms                                                                                                                            | 2.0 kB  00:00:00
Updates Information Summary: updates
    13 Security notice(s)
         9 Important Security notice(s)
         3 Moderate Security notice(s)
         1 Low Security notice(s)
    35 Bugfix notice(s)
     1 Enhancement notice(s)
updateinfo summary done

如果只想打印出低级别的安全更新,运行下面这个命令。类似的,你也可以只查询重要级别和中等级别的安全更新。

# yum updateinfo list sec | grep -i "Low"

RHSA-2019:0201 Low/Sec.       libgudev1-219-62.el7_6.3.x86_64
RHSA-2019:0201 Low/Sec.       systemd-219-62.el7_6.3.x86_64
RHSA-2019:0201 Low/Sec.       systemd-libs-219-62.el7_6.3.x86_64
RHSA-2019:0201 Low/Sec.       systemd-sysv-219-62.el7_6.3.x86_64

via: https://www.2daygeek.com/check-list-view-find-available-security-updates-on-redhat-rhel-centos-system/

作者:Magesh Maruthamuthu 选题:lujun9972 译者:jdh8383 校对:wxy

本文由 LCTT 原创编译,Linux中国 荣誉推出

在某些情况下,你可能想要将一个服务器上的软件包列表安装到另一个服务器上。例如,你已经在服务器 A 上安装了 15 个软件包并且这些软件包也需要被安装到服务器 B、服务器 C 上等等。

我们可以手动去安装这些软件但是这将花费大量的时间。你可以手动安装一俩个服务器,但是试想如果你有大概十个服务器呢。在这种情况下你无法手动完成工作,那么怎样才能解决问题呢?

不要担心我们可以帮你摆脱这样的情况和场景。我们在这篇文章中增加了四种方法来克服困难。

我希望这可以帮你解决问题。我已经在 Centos7 和 Ubuntu 18.04 上测试了这些命令。

我也希望这可以在其他发行版上工作。这仅仅需要使用该发行版的官方包管理器命令替代本文中的包管理器命令就行了。

如果想要 检查 Linux 系统上已安装的软件包列表,请点击链接。

例如,如果你想要在基于 RHEL 系统上创建软件包列表请使用以下步骤。其他发行版也一样。

# rpm -qa --last | head -15 | awk '{print $1}' > /tmp/pack1.txt

# cat /tmp/pack1.txt
mariadb-server-5.5.60-1.el7_5.x86_64
perl-DBI-1.627-4.el7.x86_64
perl-DBD-MySQL-4.023-6.el7.x86_64
perl-PlRPC-0.2020-14.el7.noarch
perl-Net-Daemon-0.48-5.el7.noarch
perl-IO-Compress-2.061-2.el7.noarch
perl-Compress-Raw-Zlib-2.061-4.el7.x86_64
mariadb-5.5.60-1.el7_5.x86_64
perl-Data-Dumper-2.145-3.el7.x86_64
perl-Compress-Raw-Bzip2-2.061-3.el7.x86_64
httpd-2.4.6-88.el7.centos.x86_64
mailcap-2.1.41-2.el7.noarch
httpd-tools-2.4.6-88.el7.centos.x86_64
apr-util-1.5.2-6.el7.x86_64
apr-1.4.8-3.el7_4.1.x86_64

方法一:如何在 Linux 上使用 cat 命令安装文件中列出的包?

为实现这个目标,我将使用简单明了的第一种方法。为此,创建一个文件并添加上你想要安装的包列表。

出于测试的目的,我们将只添加以下的三个软件包名到文件中。

# cat /tmp/pack1.txt

apache2
mariadb-server
nano

只要简单的运行 apt 命令 就能在 Ubuntu/Debian 系统上一次性安装所有的软件包。

# apt -y install $(cat /tmp/pack1.txt)

Reading package lists... Done
Building dependency tree
Reading state information... Done
The following packages were automatically installed and are no longer required:
  libopts25 sntp
Use 'sudo apt autoremove' to remove them.
Suggested packages:
  apache2-doc apache2-suexec-pristine | apache2-suexec-custom spell
The following NEW packages will be installed:
  apache2 mariadb-server nano
0 upgraded, 3 newly installed, 0 to remove and 24 not upgraded.
Need to get 339 kB of archives.
After this operation, 1,377 kB of additional disk space will be used.
Get:1 http://in.archive.ubuntu.com/ubuntu bionic-updates/main amd64 apache2 amd64 2.4.29-1ubuntu4.6 [95.1 kB]
Get:2 http://in.archive.ubuntu.com/ubuntu bionic/main amd64 nano amd64 2.9.3-2 [231 kB]
Get:3 http://in.archive.ubuntu.com/ubuntu bionic-updates/universe amd64 mariadb-server all 1:10.1.38-0ubuntu0.18.04.1 [12.9 kB]
Fetched 339 kB in 19s (18.0 kB/s)
Selecting previously unselected package apache2.
(Reading database ... 290926 files and directories currently installed.)
Preparing to unpack .../apache2_2.4.29-1ubuntu4.6_amd64.deb ...
Unpacking apache2 (2.4.29-1ubuntu4.6) ...
Selecting previously unselected package nano.
Preparing to unpack .../nano_2.9.3-2_amd64.deb ...
Unpacking nano (2.9.3-2) ...
Selecting previously unselected package mariadb-server.
Preparing to unpack .../mariadb-server_1%3a10.1.38-0ubuntu0.18.04.1_all.deb ...
Unpacking mariadb-server (1:10.1.38-0ubuntu0.18.04.1) ...
Processing triggers for ufw (0.36-0ubuntu0.18.04.1) ...
Setting up apache2 (2.4.29-1ubuntu4.6) ...
Processing triggers for ureadahead (0.100.0-20) ...
Processing triggers for install-info (6.5.0.dfsg.1-2) ...
Setting up nano (2.9.3-2) ...
update-alternatives: using /bin/nano to provide /usr/bin/editor (editor) in auto mode
update-alternatives: using /bin/nano to provide /usr/bin/pico (pico) in auto mode
Processing triggers for systemd (237-3ubuntu10.20) ...
Processing triggers for man-db (2.8.3-2ubuntu0.1) ...
Setting up mariadb-server (1:10.1.38-0ubuntu0.18.04.1) ...

至于删除,需要使用相同的命令格式和适当的选项。

# apt -y remove $(cat /tmp/pack1.txt)
Reading package lists... Done
Building dependency tree
Reading state information... Done
The following packages were automatically installed and are no longer required:
  apache2-bin apache2-data apache2-utils galera-3 libaio1 libapr1 libaprutil1 libaprutil1-dbd-sqlite3 libaprutil1-ldap libconfig-inifiles-perl libdbd-mysql-perl libdbi-perl libjemalloc1 liblua5.2-0
  libmysqlclient20 libopts25 libterm-readkey-perl mariadb-client-10.1 mariadb-client-core-10.1 mariadb-common mariadb-server-10.1 mariadb-server-core-10.1 mysql-common sntp socat
Use 'apt autoremove' to remove them.
The following packages will be REMOVED:
  apache2 mariadb-server nano
0 upgraded, 0 newly installed, 3 to remove and 24 not upgraded.
After this operation, 1,377 kB disk space will be freed.
(Reading database ... 291046 files and directories currently installed.)
Removing apache2 (2.4.29-1ubuntu4.6) ...
Removing mariadb-server (1:10.1.38-0ubuntu0.18.04.1) ...
Removing nano (2.9.3-2) ...
update-alternatives: using /usr/bin/vim.tiny to provide /usr/bin/editor (editor) in auto mode
Processing triggers for ufw (0.36-0ubuntu0.18.04.1) ...
Processing triggers for install-info (6.5.0.dfsg.1-2) ...
Processing triggers for man-db (2.8.3-2ubuntu0.1) ...

使用 yum 命令 在基于 RHEL (如 Centos、RHEL (Redhat) 和 OEL (Oracle Enterprise Linux)) 的系统上安装文件中列出的软件包。

# yum -y install $(cat /tmp/pack1.txt)

使用以命令在基于 RHEL (如 Centos、RHEL (Redhat) 和 OEL (Oracle Enterprise Linux)) 的系统上卸载文件中列出的软件包。

# yum -y remove $(cat /tmp/pack1.txt)

使用以下 dnf 命令 在 Fedora 系统上安装文件中列出的软件包。

# dnf -y install $(cat /tmp/pack1.txt)

使用以下命令在 Fedora 系统上卸载文件中列出的软件包。

# dnf -y remove $(cat /tmp/pack1.txt)

使用以下 zypper 命令 在 openSUSE 系统上安装文件中列出的软件包。

# zypper -y install $(cat /tmp/pack1.txt)

使用以下命令从 openSUSE 系统上卸载文件中列出的软件包。

# zypper -y remove $(cat /tmp/pack1.txt)

使用以下 pacman 命令 在基于 Arch Linux (如 Manjaro 和 Antergos) 的系统上安装文件中列出的软件包。

# pacman -S $(cat /tmp/pack1.txt)

使用以下命令从基于 Arch Linux (如 Manjaro 和 Antergos) 的系统中卸载文件中列出的软件包。

# pacman -Rs $(cat /tmp/pack1.txt)

方法二:如何使用 cat 和 xargs 命令在 Linux 中安装文件中列出的软件包。

甚至,我更喜欢使用这种方法,因为这是一种非常简单直接的方法。

使用以下 apt 命令在基于 Debian 的系统 (如 Debian、Ubuntu 和 Linux Mint) 上安装文件中列出的软件包。

# cat /tmp/pack1.txt | xargs apt -y install

使用以下 apt 命令 从基于 Debian 的系统 (如 Debian、Ubuntu 和 Linux Mint) 上卸载文件中列出的软件包。

# cat /tmp/pack1.txt | xargs apt -y remove

使用以下 yum 命令在基于 RHEL (如 Centos,RHEL (Redhat) 和 OEL (Oracle Enterprise Linux)) 的系统上安装文件中列出的软件包。

# cat /tmp/pack1.txt | xargs yum -y install

使用以命令从基于 RHEL (如 Centos、RHEL (Redhat) 和 OEL (Oracle Enterprise Linux)) 的系统上卸载文件中列出的软件包。

# cat /tmp/pack1.txt | xargs yum -y remove

使用以下 dnf 命令在 Fedora 系统上安装文件中列出的软件包。

# cat /tmp/pack1.txt | xargs dnf -y install

使用以下命令从 Fedora 系统上卸载文件中列出的软件包。

# cat /tmp/pack1.txt | xargs dnf -y remove

使用以下 zypper 命令在 openSUSE 系统上安装文件中列出的软件包。

# cat /tmp/pack1.txt | xargs zypper -y install

使用以下命令从 openSUSE 系统上卸载文件中列出的软件包。

# cat /tmp/pack1.txt | xargs zypper -y remove

使用以下 pacman 命令在基于 Arch Linux (如 Manjaro 和 Antergos) 的系统上安装文件中列出的软件包。

# cat /tmp/pack1.txt | xargs pacman -S

使用下以命令从基于 Arch Linux (如 Manjaro 和 Antergos) 的系统上卸载文件中列出的软件包。

# cat /tmp/pack1.txt | xargs pacman -Rs

方法三 : 如何使用 For 循环在 Linux 上安装文件中列出的软件包

我们也可以使用 for 循环命令来实现此目的。

安装批量包可以使用以下一条 for 循环的命令。

# for pack in `cat /tmp/pack1.txt` ; do apt -y install $i; done

要使用 shell 脚本安装批量包,请使用以下 for 循环。

# vi /opt/scripts/bulk-package-install.sh

#!/bin/bash
for pack in `cat /tmp/pack1.txt`
do apt -y remove $pack
done

bulk-package-install.sh 设置可执行权限。

# chmod + bulk-package-install.sh

最后运行这个脚本。

# sh bulk-package-install.sh

方法四:如何使用 While 循环在 Linux 上安装文件中列出的软件包

我们也可以使用 while 循环命令来实现目的。

安装批量包可以使用以下一条 while 循环的命令。

# file="/tmp/pack1.txt"; while read -r pack; do apt -y install $pack; done < "$file"

要使用 shell 脚本安装批量包,请使用以下 while 循环。

# vi /opt/scripts/bulk-package-install.sh

#!/bin/bash
file="/tmp/pack1.txt"
while read -r pack
do apt -y remove $pack
done < "$file"

bulk-package-install.sh 设置可执行权限。

# chmod + bulk-package-install.sh

最后运行这个脚本。

# sh bulk-package-install.sh

via: https://www.2daygeek.com/how-to-install-uninstall-listed-packages-from-a-file-in-linux/

作者:Magesh Maruthamuthu 选题:lujun9972 译者:way-ww 校对:wxy

本文由 LCTT 原创编译,Linux中国 荣誉推出

在 Linux 中,Bash 技巧非常棒,它使 Linux 中的一切成为可能。

对于开发人员或系统管理员来说,它真的很管用,因为他们大部分时间都在使用终端。你知道他们为什么喜欢这种技巧吗?

因为这些技巧可以提高他们的工作效率,也能使他们工作更快。

什么是 ddgr

ddgr 是一个命令行实用程序,用于从终端搜索 DuckDuckGo。如果设置了 BROWSER 环境变量,ddgr 可以在几个基于文本的浏览器中开箱即用。

确保你的系统安装了任何一个基于文本的浏览器。你可能知道 googler,它允许用户从 Linux 命令行进行 Google 搜索。

它在命令行用户中非常受欢迎,他们期望对隐私敏感的 DuckDuckGo 也有类似的实用程序,这就是 ddgr 出现的原因。

与 Web 界面不同,你可以指定每页要查看的搜索结果数。

建议阅读:

什么是 DuckDuckGo

DDG 即 DuckDuckGo。DuckDuckGo(DDG)是一个真正保护用户搜索和隐私的互联网搜索引擎。它没有过滤用户的个性化搜索结果,对于给定的搜索词,它会向所有用户显示相同的搜索结果。

大多数用户更喜欢谷歌搜索引擎,但是如果你真的担心隐私,那么你可以放心地使用 DuckDuckGo。

ddgr 特性

  • 快速且干净(没有广告、多余的 URL 或杂物参数),自定义颜色
  • 旨在以最小的空间提供最高的可读性
  • 指定每页显示的搜索结果数
  • 可以在 omniprompt 中导航结果,在浏览器中打开 URL
  • 用于 Bash、Zsh 和 Fish 的搜索和选项补完脚本
  • 支持 DuckDuckGo Bang(带有自动补完)
  • 直接在浏览器中打开第一个结果(如同 “I’m Feeling Ducky”)
  • 不间断搜索:无需退出即可在 omniprompt 中触发新搜索
  • 关键字支持(例如:filetype:mime、site:somesite.com)
  • 按时间、指定区域搜索,禁用安全搜索
  • 支持 HTTPS 代理,支持 Do Not Track,可选择禁用用户代理字符串
  • 支持自定义 URL 处理程序脚本或命令行实用程序
  • 全面的文档,man 页面有方便的使用示例
  • 最小的依赖关系

需要条件

ddgr 需要 Python 3.4 或更高版本。因此,确保你的系统应具有 Python 3.4 或更高版本。

$ python3 --version
Python 3.6.3

如何在 Linux 中安装 ddgr

我们可以根据发行版使用以下命令轻松安装 ddgr

对于 Fedora ,使用 DNF 命令来安装 ddgr

# dnf install ddgr

或者我们可以使用 SNAP 命令来安装 ddgr

# snap install ddgr

对于 LinuxMint/Ubuntu,使用 APT-GET 命令APT 命令来安装 ddgr

$ sudo add-apt-repository ppa:twodopeshaggy/jarun
$ sudo apt-get update
$ sudo apt-get install ddgr

对于基于 Arch Linux 的系统,使用 Yaourt 命令Packer 命令从 AUR 仓库安装 ddgr

$ yaourt -S ddgr
或
$ packer -S ddgr

对于 Debian,使用 DPKG 命令 安装 ddgr

# wget https://github.com/jarun/ddgr/releases/download/v1.2/ddgr_1.2-1_debian9.amd64.deb
# dpkg -i ddgr_1.2-1_debian9.amd64.deb

对于 CentOS 7,使用 YUM 命令来安装 ddgr

# yum install https://github.com/jarun/ddgr/releases/download/v1.2/ddgr-1.2-1.el7.3.centos.x86_64.rpm

对于 opensuse,使用 zypper 命令来安装 ddgr

# zypper install https://github.com/jarun/ddgr/releases/download/v1.2/ddgr-1.2-1.opensuse42.3.x86_64.rpm

如何启动 ddgr

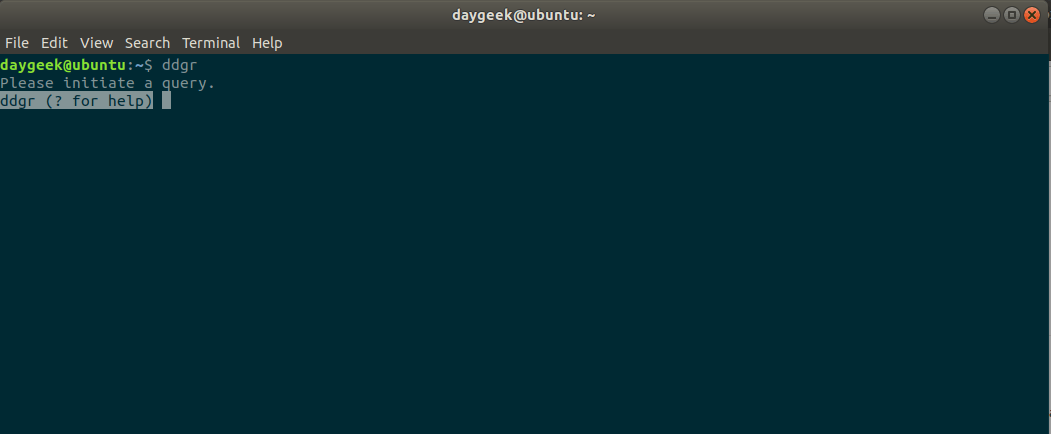
在终端上输入 ddgr 命令,不带任何选项来进行 DuckDuckGo 搜索。你将获得类似于下面的输出。

$ ddgr

如何使用 ddgr 进行搜索

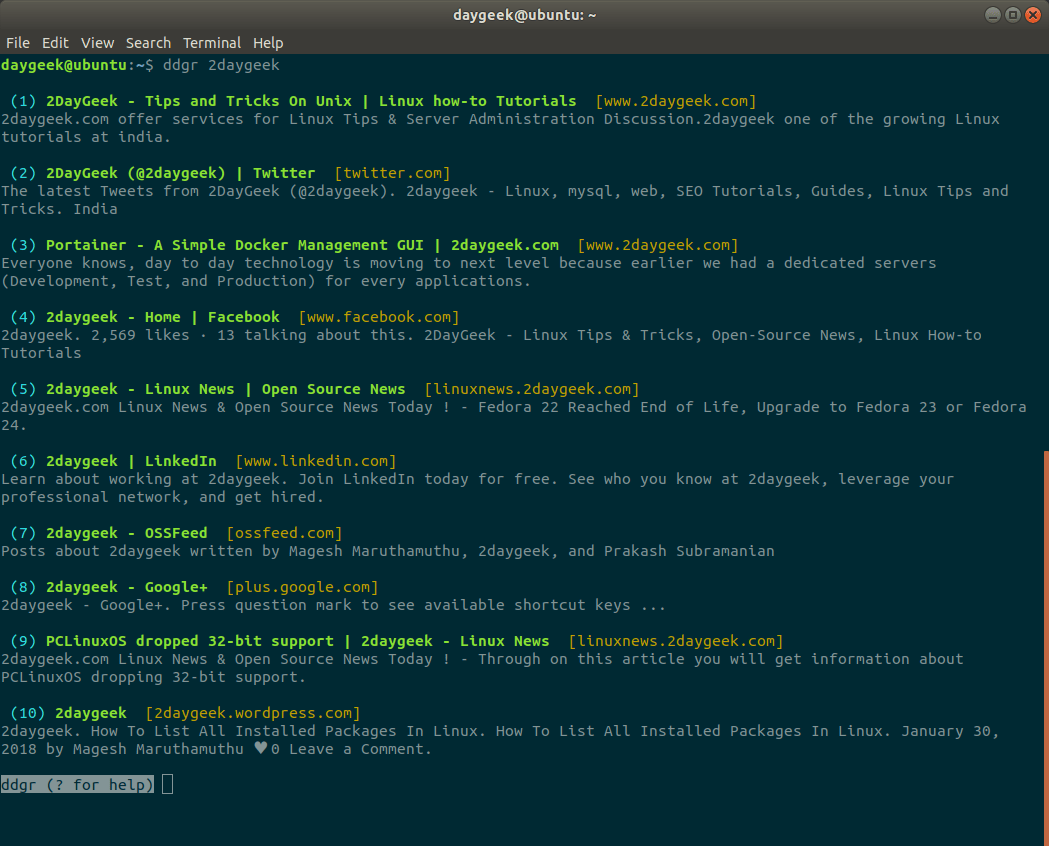
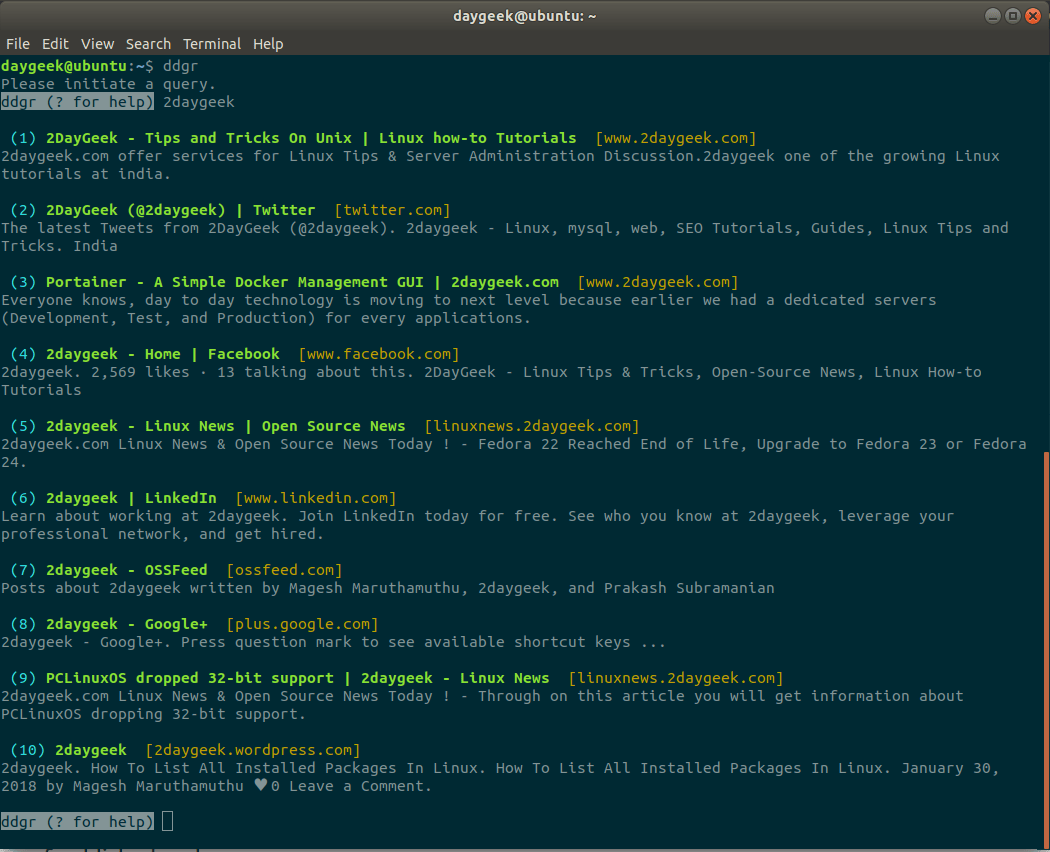
我们可以通过两种方式启动搜索。从 omniprompt 或者直接从终端开始。你可以搜索任何你想要的短语。

直接从终端:

$ ddgr 2daygeek

从 omniprompt:

Omniprompt 快捷方式

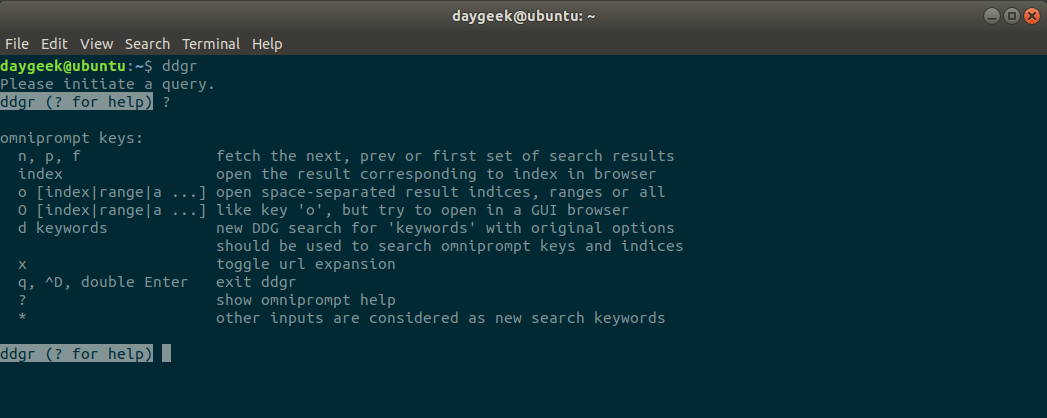
输入 ? 以获得 omniprompt,它将显示关键字列表和进一步使用 ddgr 的快捷方式。

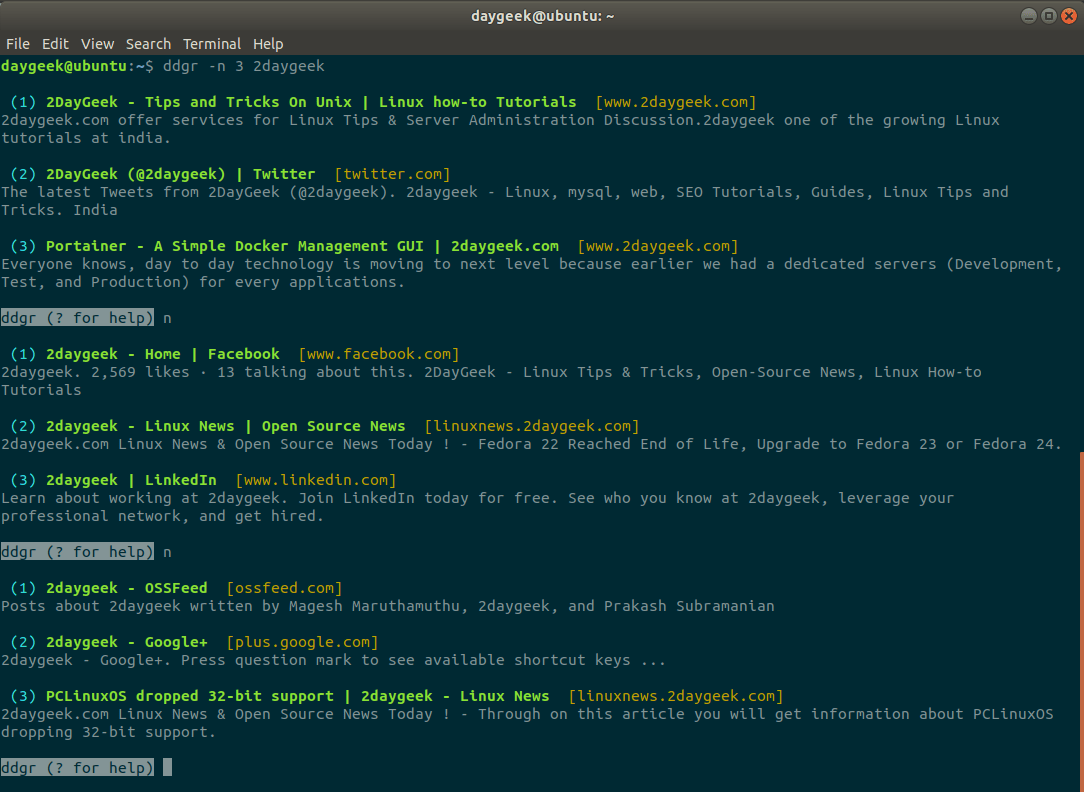
如何移动下一页、上一页和第一页

它允许用户移动下一页、上一页或第一页。

  • n: 移动到下一组搜索结果
  • p: 移动到上一组搜索结果
  • f: 跳转到第一页

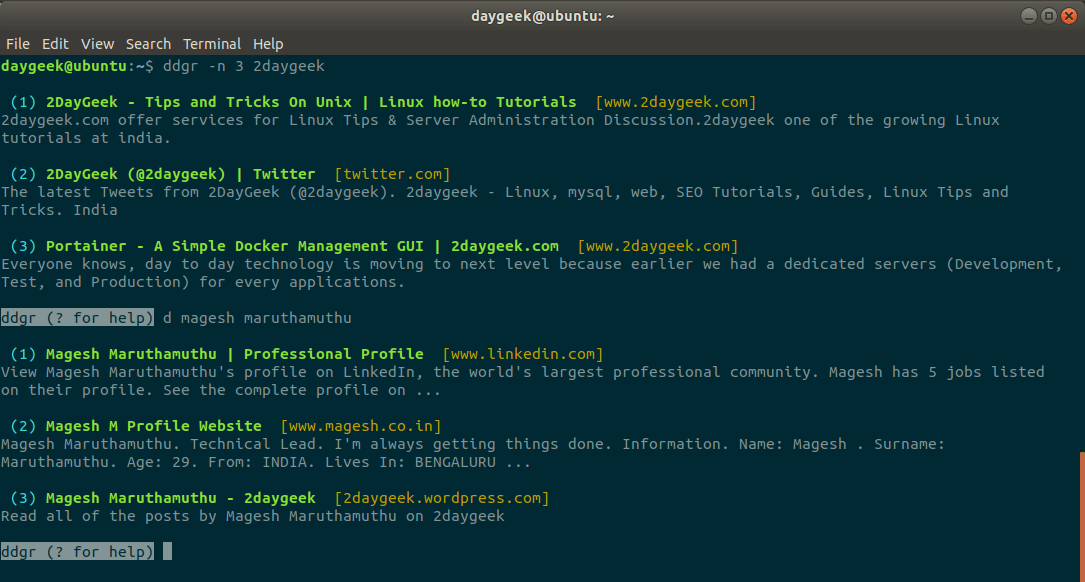
如何启动新搜索

d 选项允许用户从 omniprompt 发起新的搜索。例如,我搜索了 “2daygeek website”,现在我将搜索 “Magesh Maruthamuthu” 这个新短语。

从 omniprompt:

ddgr (? for help) d magesh maruthmuthu

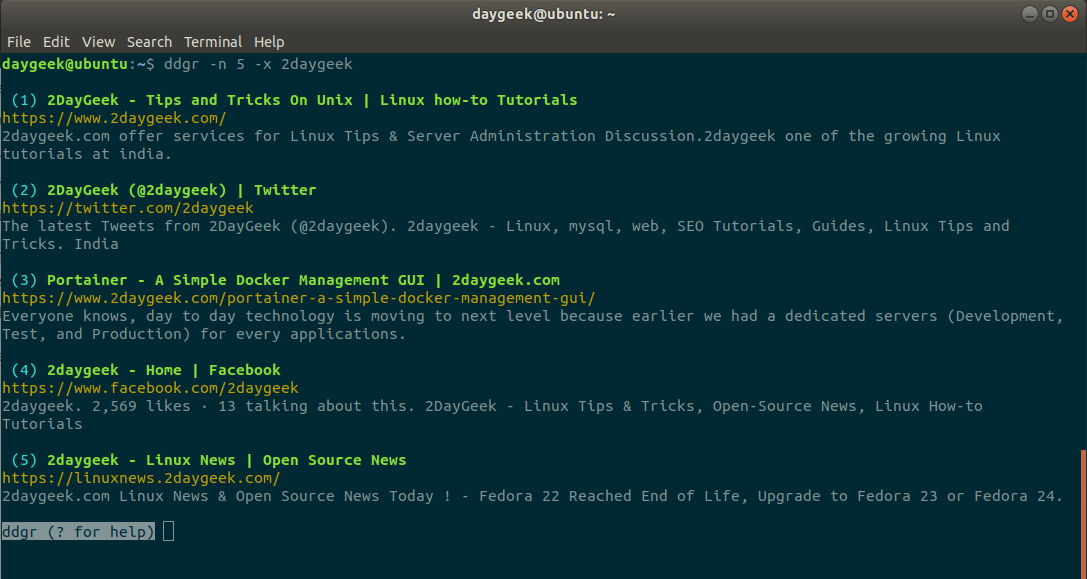
在搜索结果中显示完整的 URL

默认情况下,它仅显示文章标题,在搜索中添加 x 选项以在搜索结果中显示完整的文章网址。

$ ddgr -n 5 -x 2daygeek

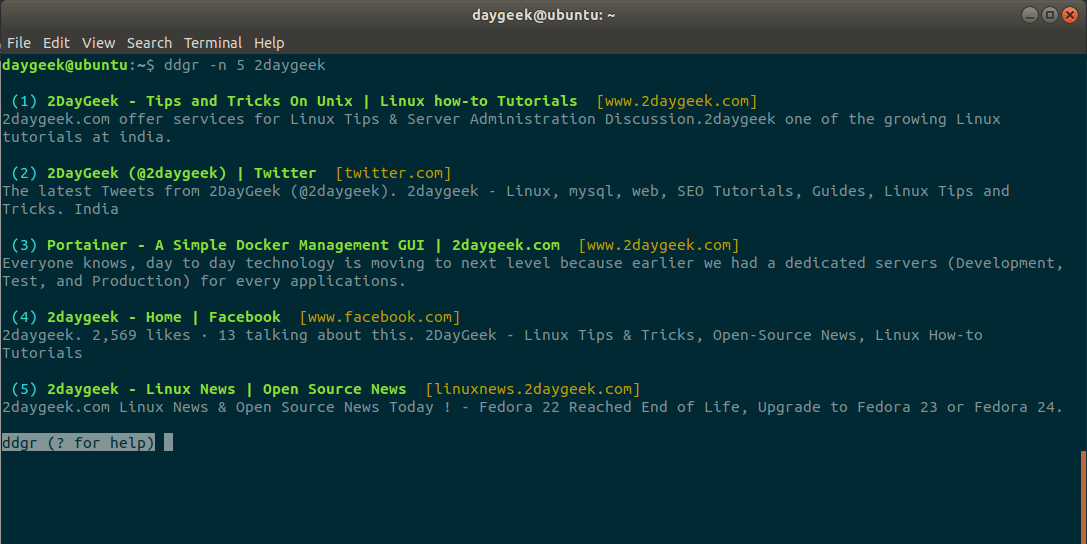
限制搜索结果

默认情况下,搜索结果每页显示 10 个结果。如果你想为方便起见限制页面结果,可以使用 ddgr 带有 --num-n 参数。

$ ddgr -n 5 2daygeek

网站特定搜索

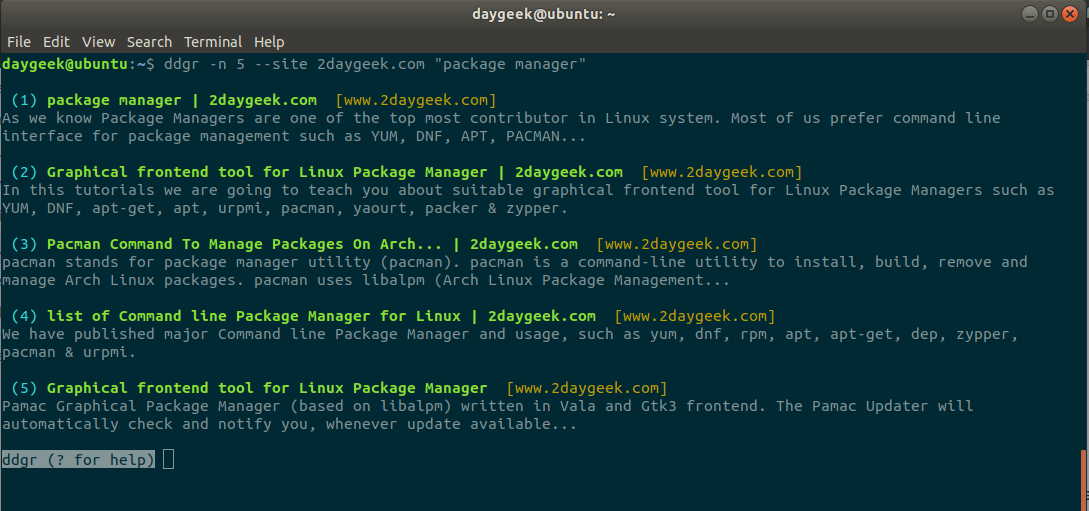
要搜索特定网站的特定页面,使用以下格式。这将从网站获取给定关键字的结果。例如,我们在 2daygeek 网站下搜索 “Package Manager”,查看结果。

$ ddgr -n 5 --site 2daygeek "package manager"


via: https://www.2daygeek.com/ddgr-duckduckgo-search-from-the-command-line-in-linux/

作者:Magesh Maruthamuthu 译者:MjSeven 校对:wxy 选题:lujun9972

本文由 LCTT 原创编译,Linux中国 荣誉推出

我们都已经知道 SOSReport。它用来收集可用于诊断的系统信息。Redhat 的支持服务建议我们在提交案例时提供 SOSReport 来分析当前的系统状态。

它会收集全部类型的报告,以帮助用户找出问题的根本原因。我们可以轻松地提取和阅读 SOSReport,但它很难阅读。因为它的每个部分都是一个单独的文件。

那么,在 Linux 中使用语法高亮显示阅读所有这些内容的最佳方法是什么。是的,这可以通过 xsos 工具做到。

sosreport

sosreport 命令是一个从运行中的系统(尤其是 RHEL 和 OEL 系统)收集大量配置细节、系统信息和诊断信息的工具。它可以帮助技术支持工程师在很多方面分析系统。

此报告包含有关系统的大量信息,例如引导信息、文件系统、内存、主机名、已安装的 RPM、系统 IP、网络详细信息、操作系统版本、已安装的内核、已加载的内核模块、打开的文件列表、PCI 设备列表、挂载点及其细节、运行中的进程信息、进程树输出、系统路由、位于 /etc 文件夹中的所有配置文件,以及位于 /var 文件夹中的所有日志文件。

这将需要一段时间来生成报告,这取决于你的系统安装和配置。

完成后,sosreport 将在 /tmp 目录下生成一个压缩的归档文件。

xsos

xsos 是一个帮助用户轻松读取 Linux 系统上的 sosreport 的工具。另一方面,我们可以说它是 sosreport 考官。

它可以立即从 sosreport 或正在运行的系统中汇总系统信息。

xsos 将尝试简化、解析、计算并格式化来自数十个文件(和命令)的数据,以便为你提供有关系统的详细概述。

你可以通过运行以下命令立即汇总系统信息。

# curl -Lo ./xsos bit.ly/xsos-direct; chmod +x ./xsos; ./xsos -ya

如何在 Linux 上安装 xsos

我们可以使用以下两种方法轻松安装 xsos

如果你正在寻找最新的前沿版本。使用以下步骤:

# curl -Lo /usr/local/bin/xsos bit.ly/xsos-direct
# chmod +x /usr/local/bin/xsos

下面是安装 xsos 的推荐方法。它将从 rpm 文件安装 xsos

# yum install http://people.redhat.com/rsawhill/rpms/latest-rsawaroha-release.rpm
# yum install xsos

如何在 Linux 上使用 xsos

一旦通过上述方法之一安装了 xsos。只需运行 xsos 命令,不带任何选项,它们会显示有关系统的基本信息。

# xsos

OS
  Hostname: CentOS7.2daygeek.com
  Distro:   [redhat-release] CentOS Linux release 7.6.1810 (Core)
            [centos-release] CentOS Linux release 7.6.1810 (Core)
            [os-release] CentOS Linux 7 (Core) 7 (Core)
  RHN:      (missing)
  RHSM:     (missing)
  YUM:      2 enabled plugins: fastestmirror, langpacks
  Runlevel: N 5  (default graphical)
  SELinux:  enforcing  (default enforcing)
  Arch:     mach=x86_64  cpu=x86_64  platform=x86_64
  Kernel:
    Booted kernel:  3.10.0-957.el7.x86_64
    GRUB default:   3.10.0-957.el7.x86_64
    Build version:
      Linux version 3.10.0-957.el7.x86_64 ([email protected]) (gcc version 4.8.5 20150623 (Red
      Hat 4.8.5-36) (GCC) ) #1 SMP Thu Nov 8 23:39:32 UTC 2018
    Booted kernel cmdline:
      root=/dev/mapper/centos-root ro crashkernel=auto rd.lvm.lv=centos/root rd.lvm.lv=centos/swap rhgb quiet
      LANG=en_US.UTF-8
    GRUB default kernel cmdline:
      root=/dev/mapper/centos-root ro crashkernel=auto rd.lvm.lv=centos/root rd.lvm.lv=centos/swap rhgb quiet
      LANG=en_US.UTF-8
    Taint-check: 0  (kernel untainted)
    - - - - - - - - - - - - - - - - - - -
  Sys time:  Sun May 12 10:05:21 CDT 2019
  Boot time: Sun May 12 09:50:20 CDT 2019  (epoch: 1557672620)
  Time Zone: America/Chicago
  Uptime:    15 min,  1 user
  LoadAvg:   [1 CPU] 0.00 (0%), 0.04 (4%), 0.09 (9%)
  /proc/stat:
    procs_running: 2   procs_blocked: 0    processes [Since boot]: 6423
    cpu [Utilization since boot]:
      us 1%, ni 0%, sys 1%, idle 99%, iowait 0%, irq 0%, sftirq 0%, steal 0%

如何使用 xsos 命令在 Linux 中查看生成的 SOSReport 输出?

我们需要份 SOSReport 以使用 xsos 命令进一步阅读。

是的,我已经生成了一个 SOSReport,文件如下。

# ls -lls -lh /var/tmp/sosreport-CentOS7-01-1005-2019-05-12-pomeqsa.tar.xz
9.8M -rw-------. 1 root root 9.8M May 12 10:13 /var/tmp/sosreport-CentOS7-01-1005-2019-05-12-pomeqsa.tar.xz

运行如下命令解开它。

# tar xf sosreport-CentOS7-01-1005-2019-05-12-pomeqsa.tar.xz

要查看全部信息,带上 -a--all 开关运行 xsos

# xsos --all /var/tmp/sosreport-CentOS7-01-1005-2019-05-12-pomeqsa

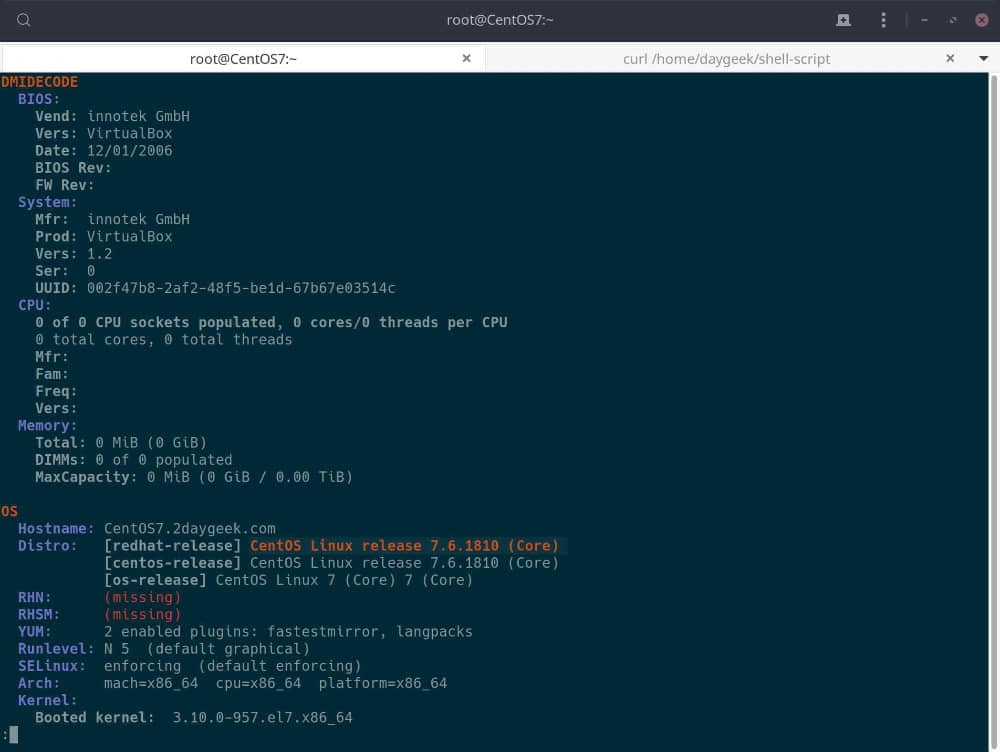
要查看 BIOS 信息,带上 -b--bios 开关运行 xsos

# xsos --bios /var/tmp/sosreport-CentOS7-01-1005-2019-05-12-pomeqsa
DMIDECODE
  BIOS:
    Vend: innotek GmbH
    Vers: VirtualBox
    Date: 12/01/2006
    BIOS Rev:
    FW Rev:
  System:
    Mfr:  innotek GmbH
    Prod: VirtualBox
    Vers: 1.2
    Ser:  0
    UUID: 002f47b8-2af2-48f5-be1d-67b67e03514c
  CPU:
    0 of 0 CPU sockets populated, 0 cores/0 threads per CPU
    0 total cores, 0 total threads
    Mfr:
    Fam:
    Freq:
    Vers:
  Memory:
    Total: 0 MiB (0 GiB)
    DIMMs: 0 of 0 populated
    MaxCapacity: 0 MiB (0 GiB / 0.00 TiB)

要查看系统基本信息,如主机名、发行版、SELinux、内核信息、正常运行时间等,请使用 -o--os 开关运行 xsos

# xsos --os /var/tmp/sosreport-CentOS7-01-1005-2019-05-12-pomeqsa
OS
  Hostname: CentOS7.2daygeek.com
  Distro:   [redhat-release] CentOS Linux release 7.6.1810 (Core)
            [centos-release] CentOS Linux release 7.6.1810 (Core)
            [os-release] CentOS Linux 7 (Core) 7 (Core)
  RHN:      (missing)
  RHSM:     (missing)
  YUM:      2 enabled plugins: fastestmirror, langpacks
  SELinux:  enforcing  (default enforcing)
  Arch:     mach=x86_64  cpu=x86_64  platform=x86_64
  Kernel:
    Booted kernel:  3.10.0-957.el7.x86_64
    GRUB default:   3.10.0-957.el7.x86_64
    Build version:
      Linux version 3.10.0-957.el7.x86_64 ([email protected]) (gcc version 4.8.5 20150623 (Red
      Hat 4.8.5-36) (GCC) ) #1 SMP Thu Nov 8 23:39:32 UTC 2018
    Booted kernel cmdline:
      root=/dev/mapper/centos-root ro crashkernel=auto rd.lvm.lv=centos/root rd.lvm.lv=centos/swap rhgb quiet
      LANG=en_US.UTF-8
    GRUB default kernel cmdline:
      root=/dev/mapper/centos-root ro crashkernel=auto rd.lvm.lv=centos/root rd.lvm.lv=centos/swap rhgb quiet
      LANG=en_US.UTF-8
    Taint-check: 536870912  (see https://access.redhat.com/solutions/40594)
      29  TECH_PREVIEW: Technology Preview code is loaded
    - - - - - - - - - - - - - - - - - - -
  Sys time:  Sun May 12 10:12:22 CDT 2019
  Boot time: Sun May 12 09:50:20 CDT 2019  (epoch: 1557672620)
  Time Zone: America/Chicago
  Uptime:    22 min,  1 user
  LoadAvg:   [1 CPU] 1.19 (119%), 0.27 (27%), 0.14 (14%)
  /proc/stat:
    procs_running: 8   procs_blocked: 2    processes [Since boot]: 9005
    cpu [Utilization since boot]:
      us 1%, ni 0%, sys 1%, idle 99%, iowait 0%, irq 0%, sftirq 0%, steal 0%

要查看 kdump 配置,请使用 -k--kdump 开关运行 xsos

# xsos --kdump /var/tmp/sosreport-CentOS7-01-1005-2019-05-12-pomeqsa
KDUMP CONFIG
  kexec-tools rpm version:
    kexec-tools-2.0.15-21.el7.x86_64
  Service enablement:
    UNIT           STATE
    kdump.service  enabled
  kdump initrd/initramfs:
    13585734 Feb 19 05:51 initramfs-3.10.0-957.el7.x86_64kdump.img
  Memory reservation config:
    /proc/cmdline { crashkernel=auto }
    GRUB default  { crashkernel=auto }
  Actual memory reservation per /proc/iomem:
      2a000000-340fffff : Crash kernel
  kdump.conf:
    path /var/crash
    core_collector makedumpfile -l --message-level 1 -d 31
  kdump.conf "path" available space:
    System MemTotal (uncompressed core size) { 1.80 GiB }
    Available free space on target path's fs { 22.68 GiB }  (fs=/)
  Panic sysctls:
    kernel.sysrq [bitmask] =  "16"  (see proc man page)
    kernel.panic [secs] =  0  (no autoreboot on panic)
    kernel.hung_task_panic =  0
    kernel.panic_on_oops =  1
    kernel.panic_on_io_nmi =  0
    kernel.panic_on_unrecovered_nmi =  0
    kernel.panic_on_stackoverflow =  0
    kernel.softlockup_panic =  0
    kernel.unknown_nmi_panic =  0
    kernel.nmi_watchdog =  1
    vm.panic_on_oom [0-2] =  0  (no panic)

要查看有关 CPU 的信息,请使用 -c--cpu 开关运行 xsos

# xsos --cpu /var/tmp/sosreport-CentOS7-01-1005-2019-05-12-pomeqsa
CPU
  1 logical processors
  1 Intel Core i7-6700HQ CPU @ 2.60GHz (flags: aes,constant_tsc,ht,lm,nx,pae,rdrand)

要查看内存利用情况,请使用 -m--mem 开关运行 xsos

# xsos --mem /var/tmp/sosreport-CentOS7-01-1005-2019-05-12-pomeqsa
MEMORY
  Stats graphed as percent of MemTotal:
    MemUsed    ▊▊▊▊▊▊▊▊▊▊▊▊▊▊▊▊▊▊▊▊▊▊▊▊▊▊▊▊▊.....................  58.8%
    Buffers    ..................................................   0.6%
    Cached     ▊▊▊▊▊▊▊▊▊▊▊▊▊▊▊...................................  29.9%
    HugePages  ..................................................   0.0%
    Dirty      ..................................................   0.7%
  RAM:
    1.8 GiB total ram
    1.1 GiB (59%) used
    0.5 GiB (28%) used excluding Buffers/Cached
    0.01 GiB (1%) dirty
  HugePages:
    No ram pre-allocated to HugePages
  LowMem/Slab/PageTables/Shmem:
    0.09 GiB (5%) of total ram used for Slab
    0.02 GiB (1%) of total ram used for PageTables
    0.01 GiB (1%) of total ram used for Shmem
  Swap:
    0 GiB (0%) used of 2 GiB total

要查看添加的磁盘信息,请使用 -d-disks 开关运行 xsos

# xsos --disks /var/tmp/sosreport-CentOS7-01-1005-2019-05-12-pomeqsa
STORAGE
  Whole Disks from /proc/partitions:
    2 disks, totaling 40 GiB (0.04 TiB)
    - - - - - - - - - - - - - - - - - - - - -
    Disk    Size in GiB
    ----    -----------
    sda     30
    sdb     10

要查看网络接口配置,请使用 -e--ethtool 开关运行 xsos

# xsos --ethtool /var/tmp/sosreport-CentOS7-01-1005-2019-05-12-pomeqsa
ETHTOOL
  Interface Status:
    enp0s10     0000:00:0a.0  link=up 1000Mb/s full (autoneg=Y)  rx ring 256/4096  drv e1000 v7.3.21-k8-NAPI / fw UNKNOWN
    enp0s9      0000:00:09.0  link=up 1000Mb/s full (autoneg=Y)  rx ring 256/4096  drv e1000 v7.3.21-k8-NAPI / fw UNKNOWN
    virbr0      N/A           link=DOWN                          rx ring UNKNOWN   drv bridge v2.3 / fw N/A
    virbr0-nic  tap           link=DOWN                          rx ring UNKNOWN   drv tun v1.6 / fw UNKNOWN

要查看有关 IP 地址的信息,请使用 -i--ip 开关运行 xsos

# xsos --ip /var/tmp/sosreport-CentOS7-01-1005-2019-05-12-pomeqsa
IP4
  Interface   Master IF  MAC Address        MTU     State  IPv4 Address
  =========   =========  =================  ======  =====  ==================
  lo          -          -                  65536   up     127.0.0.1/8
  enp0s9      -          08:00:27:0b:bc:e9  1500    up     192.168.1.8/24
  enp0s10     -          08:00:27:b2:08:91  1500    up     192.168.1.9/24
  virbr0      -          52:54:00:ae:01:94  1500    up     192.168.122.1/24
  virbr0-nic  virbr0     52:54:00:ae:01:94  1500    DOWN   -

IP6
  Interface   Master IF  MAC Address        MTU     State  IPv6 Address                                 Scope
  =========   =========  =================  ======  =====  ===========================================  =====
  lo          -          -                  65536   up     ::1/128                                      host
  enp0s9      -          08:00:27:0b:bc:e9  1500    up     fe80::945b:8333:f4bc:9723/64                 link
  enp0s10     -          08:00:27:b2:08:91  1500    up     fe80::7ed4:1fab:23c3:3790/64                 link
  virbr0      -          52:54:00:ae:01:94  1500    up     -                                            -
  virbr0-nic  virbr0     52:54:00:ae:01:94  1500    DOWN   -                                            -

要通过 ps 查看正在运行的进程,请使用 -p--ps 开关运行 xsos

# xsos --ps /var/tmp/sosreport-CentOS7-01-1005-2019-05-12-pomeqsa
PS CHECK
  Total number of threads/processes:
    501 / 171
  Top users of CPU & MEM:
    USER     %CPU   %MEM   RSS
    root     20.6%  14.1%  0.30 GiB
    gdm      0.3%   16.8%  0.33 GiB
    postfix  0.0%   0.6%   0.01 GiB
    polkitd  0.0%   0.6%   0.01 GiB
    daygeek  0.0%   0.2%   0.00 GiB
    colord   0.0%   0.4%   0.01 GiB
  Uninteruptible sleep threads/processes (0/0):
    [None]
  Defunct zombie threads/processes (0/0):
    [None]
  Top CPU-using processes:
    USER      PID   %CPU  %MEM  VSZ-MiB  RSS-MiB  TTY    STAT  START  TIME  COMMAND
    root      6542  15.6  4.2   875      78       pts/0  Sl+   10:11  0:07  /usr/bin/python /sbin/sosreport
    root      7582  3.0   0.1   10       2        pts/0  S     10:12  0:00  /bin/bash /usr/sbin/dracut --print-cmdline
    root      7969  0.7   0.1   95       4        ?      Ss    10:12  0:00  /usr/sbin/certmonger -S -p
    root      7889  0.4   0.2   24       4        ?      Ss    10:12  0:00  /usr/lib/systemd/systemd-hostnamed
    gdm       3866  0.3   7.1   2856     131      ?      Sl    09:50  0:04  /usr/bin/gnome-shell
    root      8553  0.2   0.1   47       3        ?      S     10:12  0:00  /usr/lib/systemd/systemd-udevd
    root      6971  0.2   0.4   342      9        ?      Sl    10:12  0:00  /usr/sbin/abrt-dbus -t133
    root      3200  0.2   0.9   982      18       ?      Ssl   09:50  0:02  /usr/sbin/libvirtd
    root      2855  0.1   0.1   88       3        ?      Ss    09:50  0:01  /sbin/rngd -f
    rtkit     2826  0.0   0.0   194      2        ?      SNsl  09:50  0:00  /usr/libexec/rtkit-daemon
  Top MEM-using processes:
    USER      PID   %CPU  %MEM  VSZ-MiB  RSS-MiB  TTY    STAT  START  TIME  COMMAND
    gdm       3866  0.3   7.1   2856     131      ?      Sl    09:50  0:04  /usr/bin/gnome-shell
    root      6542  15.6  4.2   875      78       pts/0  Sl+   10:11  0:07  /usr/bin/python /sbin/sosreport
    root      3264  0.0   1.2   271      23       tty1   Ssl+  09:50  0:00  /usr/bin/X :0 -background
    root      3200  0.2   0.9   982      18       ?      Ssl   09:50  0:02  /usr/sbin/libvirtd
    root      3189  0.0   0.9   560      17       ?      Ssl   09:50  0:00  /usr/bin/python2 -Es /usr/sbin/tuned
    gdm       4072  0.0   0.9   988      17       ?      Sl    09:50  0:00  /usr/libexec/gsd-media-keys
    gdm       4076  0.0   0.8   625      16       ?      Sl    09:50  0:00  /usr/libexec/gsd-power
    gdm       4056  0.0   0.8   697      16       ?      Sl    09:50  0:00  /usr/libexec/gsd-color
    root      2853  0.0   0.7   622      14       ?      Ssl   09:50  0:00  /usr/sbin/NetworkManager --no-daemon
    gdm       4110  0.0   0.7   544      14       ?      Sl    09:50  0:00  /usr/libexec/gsd-wacom
  Top thread-spawning processes:
    #   USER      PID   %CPU  %MEM  VSZ-MiB  RSS-MiB  TTY    STAT  START  TIME  COMMAND
    17  root      3200  0.2   0.9   982      18       ?      -     09:50  0:02  /usr/sbin/libvirtd
    12  root      6542  16.1  4.5   876      83       pts/0  -     10:11  0:07  /usr/bin/python /sbin/sosreport
    10  gdm       3866  0.3   7.1   2856     131      ?      -     09:50  0:04  /usr/bin/gnome-shell
    7   polkitd   2864  0.0   0.6   602      13       ?      -     09:50  0:01  /usr/lib/polkit-1/polkitd --no-debug
    6   root      2865  0.0   0.0   203      1        ?      -     09:50  0:00  /usr/sbin/gssproxy -D
    5   root      3189  0.0   0.9   560      17       ?      -     09:50  0:00  /usr/bin/python2 -Es /usr/sbin/tuned
    5   root      2823  0.0   0.3   443      6        ?      -     09:50  0:00  /usr/libexec/udisks2/udisksd
    5   gdm       4102  0.0   0.2   461      5        ?      -     09:50  0:00  /usr/libexec/gsd-smartcard
    4   root      3215  0.0   0.2   470      4        ?      -     09:50  0:00  /usr/sbin/gdm
    4   gdm       4106  0.0   0.2   444      5        ?      -     09:50  0:00  /usr/libexec/gsd-sound

via: https://www.2daygeek.com/xsos-a-tool-to-read-sosreport-in-linux/

作者:Magesh Maruthamuthu 选题:lujun9972 译者:wxy 校对:wxy

本文由 LCTT 原创编译,Linux中国 荣誉推出