SK 发布的文章

你使用的是基于 Debian 的系统吗?如果是,太好了!我今天在这里给你带来了一个好消息。先向 “Debian-goodies” 打个招呼,这是一组基于 Debian 系统(比如:Ubuntu、Linux Mint)的有用工具。这些实用工具提供了一些额外的有用的命令,这些命令在基于 Debian 的系统中默认不可用。通过使用这些工具,用户可以找到哪些程序占用更多磁盘空间,更新系统后需要重新启动哪些服务,在一个软件包中搜索与模式匹配的文件,根据搜索字符串列出已安装的包等等。在这个简短的指南中,我们将讨论一些有用的 Debian 的好东西。

Debian-goodies – 给 Debian 和 Ubuntu 用户的实用程序

debian-goodies 包可以在 Debian 和其衍生的 Ubuntu 以及其它 Ubuntu 变体(如 Linux Mint)的官方仓库中找到。要安装 debian-goodies,只需简单运行:

$ sudo apt-get install debian-goodies

debian-goodies 安装完成后,让我们继续看一看一些有用的实用程序。

1、 checkrestart

让我从我最喜欢的 checkrestart 实用程序开始。安装某些安全更新时,某些正在运行的应用程序可能仍然会使用旧库。要彻底应用安全更新,你需要查找并重新启动所有这些更新。这就是 checkrestart 派上用场的地方。该实用程序将查找哪些进程仍在使用旧版本的库,然后,你可以重新启动服务。

在进行库更新后,要检查哪些守护进程应该被重新启动,运行:

$ sudo checkrestart
[sudo] password for sk:
Found 0 processes using old versions of upgraded files

由于我最近没有执行任何安全更新,因此没有显示任何内容。

请注意,checkrestart 实用程序确实运行良好。但是,有一个名为 needrestart 的类似的新工具可用于最新的 Debian 系统。needrestart 的灵感来自 checkrestart 实用程序,它完成了同样的工作。 needrestart 得到了积极维护,并支持容器(LXC、 Docker)等新技术。

以下是 needrestart 的特点:

  • 支持(但不要求)systemd
  • 二进制程序的黑名单(例如:用于图形显示的显示管理器)
  • 尝试检测挂起的内核升级
  • 尝试检测基于解释器的守护进程所需的重启(支持 Perl、Python、Ruby)
  • 使用钩子完全集成到 apt/dpkg 中

它在默认仓库中也可以使用。所以,你可以使用如下命令安装它:

$ sudo apt-get install needrestart

现在,你可以使用以下命令检查更新系统后需要重新启动的守护程序列表:

$ sudo needrestart
Scanning processes...
Scanning linux images...

Running kernel seems to be up-to-date.

Failed to check for processor microcode upgrades.

No services need to be restarted.

No containers need to be restarted.

No user sessions are running outdated binaries.

好消息是 Needrestart 同样也适用于其它 Linux 发行版。例如,你可以从 Arch Linux 及其衍生版的 AUR 或者其它任何 AUR 帮助程序来安装,就像下面这样:

$ yaourt -S needrestart

在 Fedora:

$ sudo dnf install needrestart

2、 check-enhancements

check-enhancements 实用程序用于查找那些用于增强已安装的包的软件包。此实用程序将列出增强其它包但不是必须运行它的包。你可以通过 -ip–installed-packages 选项来查找增强单个包或所有已安装包的软件包。

例如,我将列出增强 gimp 包功能的包:

$ check-enhancements gimp
gimp => gimp-data: Installed: (none) Candidate: 2.8.22-1
gimp => gimp-gmic: Installed: (none) Candidate: 1.7.9+zart-4build3
gimp => gimp-gutenprint: Installed: (none) Candidate: 5.2.13-2
gimp => gimp-help-ca: Installed: (none) Candidate: 2.8.2-0.1
gimp => gimp-help-de: Installed: (none) Candidate: 2.8.2-0.1
gimp => gimp-help-el: Installed: (none) Candidate: 2.8.2-0.1
gimp => gimp-help-en: Installed: (none) Candidate: 2.8.2-0.1
gimp => gimp-help-es: Installed: (none) Candidate: 2.8.2-0.1
gimp => gimp-help-fr: Installed: (none) Candidate: 2.8.2-0.1
gimp => gimp-help-it: Installed: (none) Candidate: 2.8.2-0.1
gimp => gimp-help-ja: Installed: (none) Candidate: 2.8.2-0.1
gimp => gimp-help-ko: Installed: (none) Candidate: 2.8.2-0.1
gimp => gimp-help-nl: Installed: (none) Candidate: 2.8.2-0.1
gimp => gimp-help-nn: Installed: (none) Candidate: 2.8.2-0.1
gimp => gimp-help-pt: Installed: (none) Candidate: 2.8.2-0.1
gimp => gimp-help-ru: Installed: (none) Candidate: 2.8.2-0.1
gimp => gimp-help-sl: Installed: (none) Candidate: 2.8.2-0.1
gimp => gimp-help-sv: Installed: (none) Candidate: 2.8.2-0.1
gimp => gimp-plugin-registry: Installed: (none) Candidate: 7.20140602ubuntu3
gimp => xcftools: Installed: (none) Candidate: 1.0.7-6

要列出增强所有已安装包的,请运行:

$ check-enhancements -ip
autoconf => autoconf-archive: Installed: (none) Candidate: 20170928-2
btrfs-progs => snapper: Installed: (none) Candidate: 0.5.4-3
ca-certificates => ca-cacert: Installed: (none) Candidate: 2011.0523-2
cryptsetup => mandos-client: Installed: (none) Candidate: 1.7.19-1
dpkg => debsig-verify: Installed: (none) Candidate: 0.18
[...]

3、 dgrep

顾名思义,dgrep 用于根据给定的正则表达式搜索制指定包的所有文件。例如,我将在 Vim 包中搜索包含正则表达式 “text” 的文件。

$ sudo dgrep "text" vim
Binary file /usr/bin/vim.tiny matches
/usr/share/doc/vim-tiny/copyright: that they must include this license text. You can also distribute
/usr/share/doc/vim-tiny/copyright: include this license text. You are also allowed to include executables
/usr/share/doc/vim-tiny/copyright: 1) This license text must be included unmodified.
/usr/share/doc/vim-tiny/copyright: text under a) applies to those changes.
/usr/share/doc/vim-tiny/copyright: context diff. You can choose what license to use for new code you
/usr/share/doc/vim-tiny/copyright: context diff will do. The e-mail address to be used is
/usr/share/doc/vim-tiny/copyright: On Debian systems, the complete text of the GPL version 2 license can be
[...]

dgrep 支持大多数 grep 的选项。参阅以下指南以了解 grep 命令。

4、 dglob

dglob 实用程序生成与给定模式匹配的包名称列表。例如,找到与字符串 “vim” 匹配的包列表。

$ sudo dglob vim
vim-tiny:amd64
vim:amd64
vim-common:all
vim-runtime:all

默认情况下,dglob 将仅显示已安装的软件包。如果要列出所有包(包括已安装的和未安装的),使用 -a 标志。

$ sudo dglob vim -a

5、 debget

debget 实用程序将在 APT 的数据库中下载一个包的 .deb 文件。请注意,它只会下载给定的包,不包括依赖项。

$ debget nano
Get:1 http://in.archive.ubuntu.com/ubuntu bionic/main amd64 nano amd64 2.9.3-2 [231 kB]
Fetched 231 kB in 2s (113 kB/s)

6、 dpigs

这是此次集合中另一个有用的实用程序。dpigs 实用程序将查找并显示那些占用磁盘空间最多的已安装包。

$ dpigs
260644 linux-firmware
167195 linux-modules-extra-4.15.0-20-generic
75186 linux-headers-4.15.0-20
64217 linux-modules-4.15.0-20-generic
55620 snapd
31376 git
31070 libicu60
28420 vim-runtime
25971 gcc-7
24349 g++-7

如你所见,linux-firmware 包占用的磁盘空间最多。默认情况下,它将显示占用磁盘空间的 前 10 个包。如果要显示更多包,例如 20 个,运行以下命令:

$ dpigs -n 20

7. debman

debman 实用程序允许你轻松查看二进制文件 .deb 中的手册页而不提取它。你甚至不需要安装 .deb 包。以下命令显示 nano 包的手册页。

$ debman -f nano_2.9.3-2_amd64.deb nano

如果你没有 .deb 软件包的本地副本,使用 -p 标志下载并查看包的手册页。

$ debman -p nano nano

建议阅读:

8、 debmany

安装的 Debian 包不仅包含手册页,还包括其它文件,如确认、版权和自述文件等。debmany 实用程序允许你查看和读取那些文件。

$ debmany vim
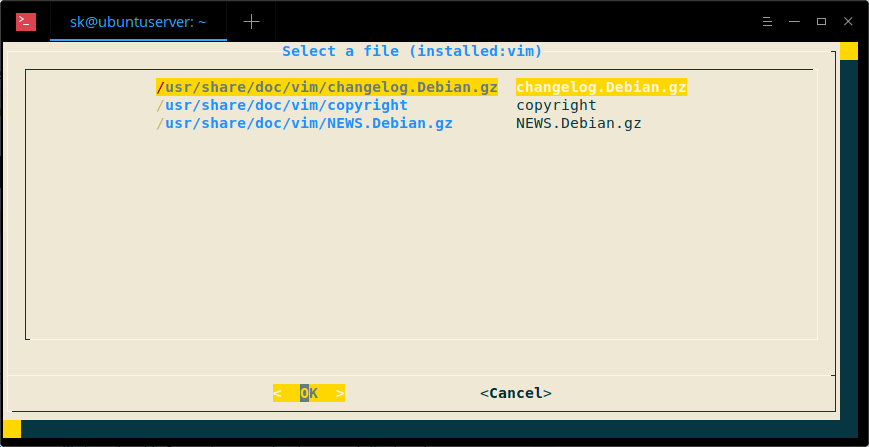
使用方向键选择要查看的文件,然后按回车键查看所选文件。按 q 返回主菜单。

如果未安装指定的软件包,debmany 将从 APT 数据库下载并显示手册页。应安装 dialog 包来阅读手册页。

9、 popbugs

如果你是开发人员,popbugs 实用程序将非常有用。它将根据你使用的包显示一个定制的发布关键 bug 列表(使用 popularity-contest 数据)。对于那些不关心的人,popularity-contest 包设置了一个 cron (定时)任务,它将定期匿名向 Debian 开发人员提交有关该系统上最常用的 Debian 软件包的统计信息。这些信息有助于 Debian 做出决定,例如哪些软件包应该放在第一张 CD 上。它还允许 Debian 改进未来的发行版本,以便为新用户自动安装最流行的软件包。

要生成严重 bug 列表并在默认 Web 浏览器中显示结果,运行:

$ popbugs

此外,你可以将结果保存在文件中,如下所示。

$ popbugs --output=bugs.txt

10、 which-pkg-broke

此命令将显示给定包的所有依赖项以及安装每个依赖项的时间。通过使用此信息,你可以在升级系统或软件包之后轻松找到哪个包可能会在什么时间损坏了另一个包。

$ which-pkg-broke vim
Package <debconf-2.0> has no install time info
debconf Wed Apr 25 08:08:40 2018
gcc-8-base:amd64 Wed Apr 25 08:08:41 2018
libacl1:amd64 Wed Apr 25 08:08:41 2018
libattr1:amd64 Wed Apr 25 08:08:41 2018
dpkg Wed Apr 25 08:08:41 2018
libbz2-1.0:amd64 Wed Apr 25 08:08:41 2018
libc6:amd64 Wed Apr 25 08:08:42 2018
libgcc1:amd64 Wed Apr 25 08:08:42 2018
liblzma5:amd64 Wed Apr 25 08:08:42 2018
libdb5.3:amd64 Wed Apr 25 08:08:42 2018
[...]

11、 dhomepage

dhomepage 实用程序将在默认 Web 浏览器中显示给定包的官方网站。例如,以下命令将打开 Vim 编辑器的主页。

$ dhomepage vim

这就是全部了。Debian-goodies 是你武器库中必备的工具。即使我们不经常使用所有这些实用程序,但它们值得学习,我相信它们有时会非常有用。

我希望这很有用。更多好东西要来了。敬请关注!

干杯!


via: https://www.ostechnix.com/debian-goodies-a-set-of-useful-utilities-for-debian-and-ubuntu-users/

作者:SK 选题:lujun9972 译者:MjSeven 校对:wxy

本文由 LCTT 原创编译,Linux中国 荣誉推出

众所周知,让我们的 Linux 系统保持最新状态会用到多种包管理器。比如说,在 Ubuntu 中,你无法使用 sudo apt updatesudo apt upgrade 命令升级所有软件。此命令仅升级使用 APT 包管理器安装的应用程序。你有可能使用 cargopipnpmsnapflatpakLinuxbrew 包管理器安装了其他软件。你需要使用相应的包管理器才能使它们全部更新。

再也不用这样了!跟 topgrade 打个招呼,这是一个可以一次性升级系统中所有软件的工具。

你无需运行每个包管理器来更新包。这个 topgrade 工具通过检测已安装的软件包、工具、插件并运行相应的软件包管理器来更新 Linux 中的所有软件,用一条命令解决了这个问题。它是自由而开源的,使用 rust 语言编写。它支持 GNU/Linux 和 Mac OS X.

在 Linux 中使用一个命令升级所有软件

topgrade 存在于 AUR 中。因此,你可以在任何基于 Arch 的系统中使用 Yay 助手程序安装它。

$ yay -S topgrade

在其他 Linux 发行版上,你可以使用 cargo 包管理器安装 topgrade。要安装 cargo 包管理器,请参阅以下链接:

然后,运行以下命令来安装 topgrade

$ cargo install topgrade

安装完成后,运行 topgrade 以升级 Linux 系统中的所有软件。

$ topgrade

一旦调用了 topgrade,它将逐个执行以下任务。如有必要,系统会要求输入 root/sudo 用户密码。

1、 运行系统的包管理器:

  • Arch:运行 yay 或者回退到 pacman
  • CentOS/RHEL:运行 yum upgrade
  • Fedora :运行 dnf upgrade
  • Debian/Ubuntu:运行 apt updateapt dist-upgrade
  • Linux/macOS:运行 brew updatebrew upgrade

2、 检查 Git 是否跟踪了以下路径。如果有,则拉取它们:

  • ~/.emacs.d (无论你使用 Spacemacs 还是自定义配置都应该可用)
  • ~/.zshrc
  • ~/.oh-my-zsh
  • ~/.tmux
  • ~/.config/fish/config.fish
  • 自定义路径

3、 Unix:运行 zplug 更新

4、 Unix:使用 TPM 升级 tmux 插件

5、 运行 cargo install-update

6、 升级 Emacs 包

7、 升级 Vim 包。对以下插件框架均可用:

8、 升级 npm 全局安装的包

9、 升级 Atom 包

10、 升级 Flatpak

11、 升级 snap

12、 Linux:运行 fwupdmgr 显示固件升级。 (仅查看​​。实际不会执行升级)

13、 运行自定义命令。

最后,topgrade 将运行 needrestart 以重新启动所有服务。在 Mac OS X 中,它会升级 App Store 程序。

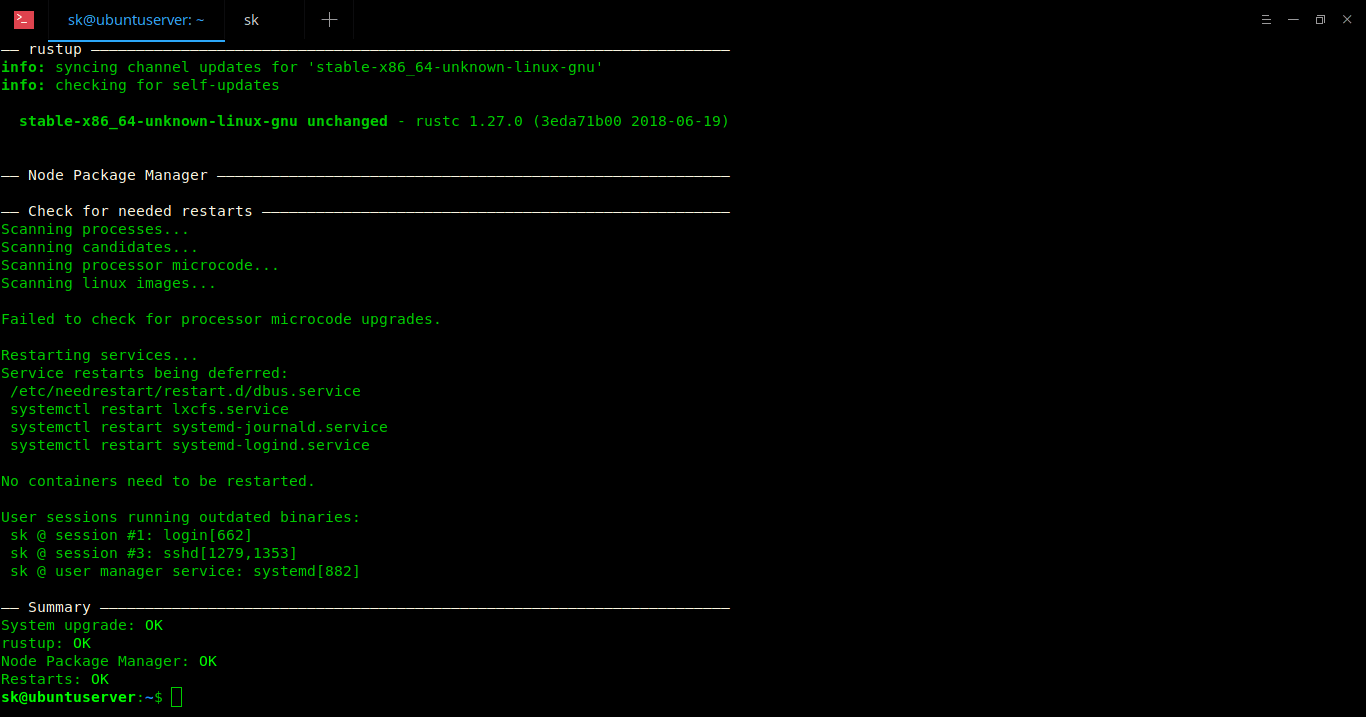
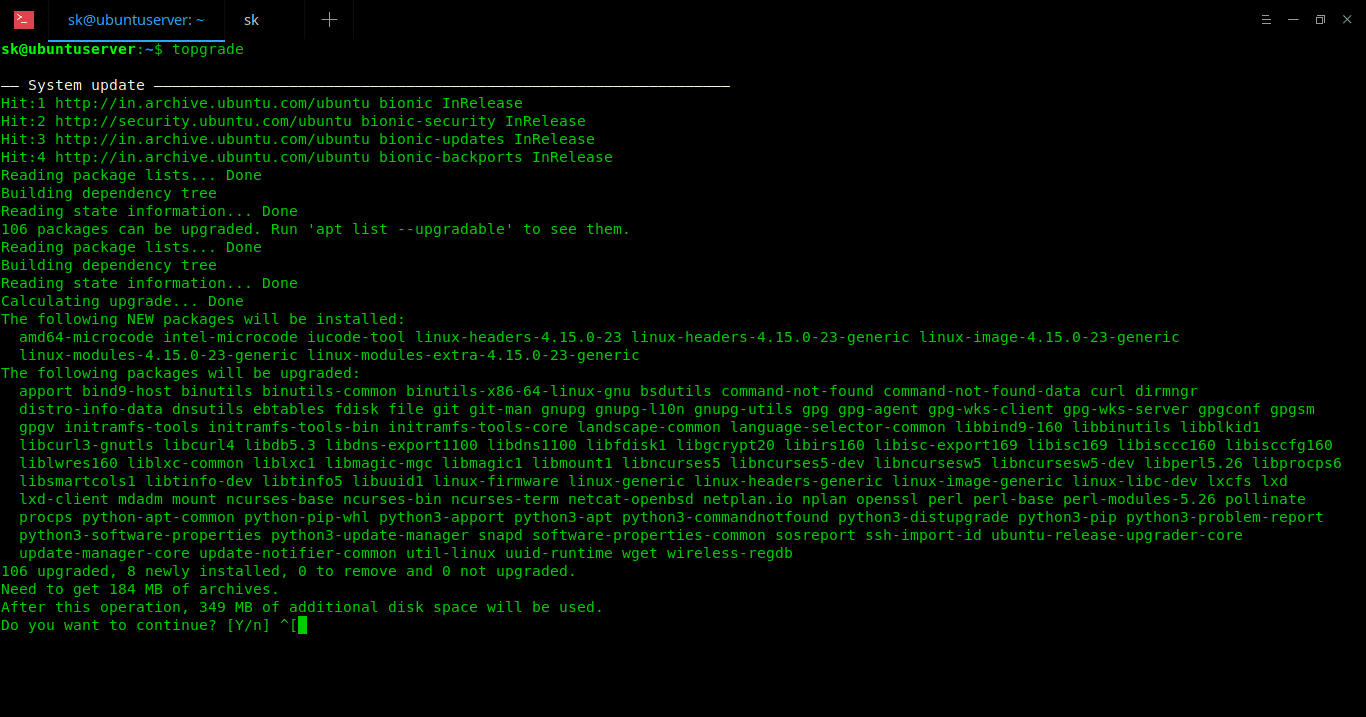
我的 Ubuntu 18.04 LTS 测试环境的示例输出:

好处是如果一个任务失败,它将自动运行下一个任务并完成所有其他后续任务。最后,它将显示摘要,其中包含运行的任务数量,成功的数量和失败的数量等详细信息。

建议阅读:

就个人而言,我喜欢创建一个像 topgrade 程序的想法,并使用一个命令升级使用各种包管理器安装的所有软件。我希望你也觉得它有用。还有更多的好东西。敬请关注!

干杯!


via: https://www.ostechnix.com/how-to-upgrade-everything-using-a-single-command-in-linux/

作者:SK 选题:lujun9972 译者:geekpi 校对:wxy

本文由 LCTT 原创编译,Linux中国 荣誉推出

大多数教育机构仍在使用 Microsoft 字体, 我不清楚其他国家是什么情况。但在泰米尔纳德邦(印度的一个州), Times New RomanArial 字体主要被用于大学和学校的几乎所有文档工作、项目和作业。不仅是教育机构,而且一些小型组织、办公室和商店仍在使用 MS Windows 字体。以防万一,如果你需要在 Ubuntu 桌面版上使用 Microsoft 字体,请按照以下步骤安装。

免责声明: Microsoft 已免费发布其核心字体。 但请注意 Microsoft 字体是禁止使用在其他操作系统中。在任何 Linux 操作系统中安装 MS 字体之前请仔细阅读 EULA 。我们不负责这种任何种类的盗版行为。

(LCTT 译注:本文只做技术探讨,并不代表作者、译者和本站鼓励任何行为。)

在 Ubuntu 18.04 LTS 桌面版上安装 MS 字体

如下所示安装 MS TrueType 字体:

$ sudo apt update
$ sudo apt install ttf-mscorefonts-installer

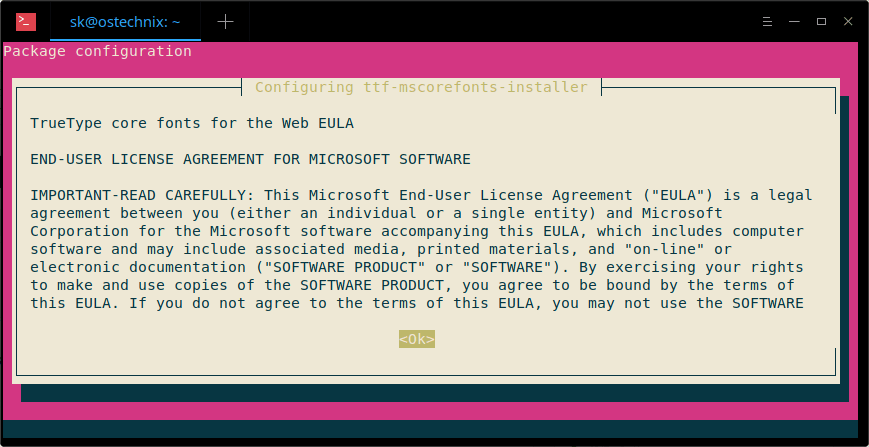
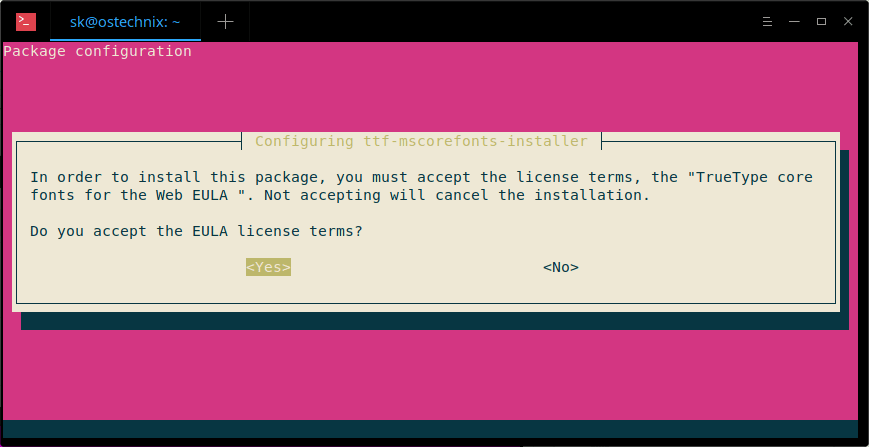
然后将会出现 Microsoft 的最终用户协议向导,点击 OK 以继续。

点击 Yes 已接受 Microsoft 的协议:

安装字体之后, 我们需要使用命令行来更新字体缓存:

$ sudo fc-cache -f -v

示例输出:

/usr/share/fonts: caching, new cache contents: 0 fonts, 6 dirs
/usr/share/fonts/X11: caching, new cache contents: 0 fonts, 4 dirs
/usr/share/fonts/X11/Type1: caching, new cache contents: 8 fonts, 0 dirs
/usr/share/fonts/X11/encodings: caching, new cache contents: 0 fonts, 1 dirs
/usr/share/fonts/X11/encodings/large: caching, new cache contents: 0 fonts, 0 dirs
/usr/share/fonts/X11/misc: caching, new cache contents: 89 fonts, 0 dirs
/usr/share/fonts/X11/util: caching, new cache contents: 0 fonts, 0 dirs
/usr/share/fonts/cMap: caching, new cache contents: 0 fonts, 0 dirs
/usr/share/fonts/cmap: caching, new cache contents: 0 fonts, 5 dirs
/usr/share/fonts/cmap/adobe-cns1: caching, new cache contents: 0 fonts, 0 dirs
/usr/share/fonts/cmap/adobe-gb1: caching, new cache contents: 0 fonts, 0 dirs
/usr/share/fonts/cmap/adobe-japan1: caching, new cache contents: 0 fonts, 0 dirs
/usr/share/fonts/cmap/adobe-japan2: caching, new cache contents: 0 fonts, 0 dirs
/usr/share/fonts/cmap/adobe-korea1: caching, new cache contents: 0 fonts, 0 dirs
/usr/share/fonts/opentype: caching, new cache contents: 0 fonts, 2 dirs
/usr/share/fonts/opentype/malayalam: caching, new cache contents: 3 fonts, 0 dirs
/usr/share/fonts/opentype/noto: caching, new cache contents: 24 fonts, 0 dirs
/usr/share/fonts/truetype: caching, new cache contents: 0 fonts, 46 dirs
/usr/share/fonts/truetype/Gargi: caching, new cache contents: 1 fonts, 0 dirs
/usr/share/fonts/truetype/Gubbi: caching, new cache contents: 1 fonts, 0 dirs
/usr/share/fonts/truetype/Nakula: caching, new cache contents: 1 fonts, 0 dirs
/usr/share/fonts/truetype/Navilu: caching, new cache contents: 1 fonts, 0 dirs
/usr/share/fonts/truetype/Sahadeva: caching, new cache contents: 1 fonts, 0 dirs
/usr/share/fonts/truetype/Sarai: caching, new cache contents: 1 fonts, 0 dirs
/usr/share/fonts/truetype/abyssinica: caching, new cache contents: 1 fonts, 0 dirs
/usr/share/fonts/truetype/dejavu: caching, new cache contents: 6 fonts, 0 dirs
/usr/share/fonts/truetype/droid: caching, new cache contents: 1 fonts, 0 dirs
/usr/share/fonts/truetype/fonts-beng-extra: caching, new cache contents: 6 fonts, 0 dirs
/usr/share/fonts/truetype/fonts-deva-extra: caching, new cache contents: 3 fonts, 0 dirs
/usr/share/fonts/truetype/fonts-gujr-extra: caching, new cache contents: 5 fonts, 0 dirs
/usr/share/fonts/truetype/fonts-guru-extra: caching, new cache contents: 1 fonts, 0 dirs
/usr/share/fonts/truetype/fonts-kalapi: caching, new cache contents: 1 fonts, 0 dirs
/usr/share/fonts/truetype/fonts-orya-extra: caching, new cache contents: 1 fonts, 0 dirs
/usr/share/fonts/truetype/fonts-telu-extra: caching, new cache contents: 2 fonts, 0 dirs
/usr/share/fonts/truetype/freefont: caching, new cache contents: 12 fonts, 0 dirs
/usr/share/fonts/truetype/kacst: caching, new cache contents: 15 fonts, 0 dirs
/usr/share/fonts/truetype/kacst-one: caching, new cache contents: 2 fonts, 0 dirs
/usr/share/fonts/truetype/lao: caching, new cache contents: 1 fonts, 0 dirs
/usr/share/fonts/truetype/liberation: caching, new cache contents: 16 fonts, 0 dirs
/usr/share/fonts/truetype/liberation2: caching, new cache contents: 12 fonts, 0 dirs
/usr/share/fonts/truetype/lohit-assamese: caching, new cache contents: 1 fonts, 0 dirs
/usr/share/fonts/truetype/lohit-bengali: caching, new cache contents: 1 fonts, 0 dirs
/usr/share/fonts/truetype/lohit-devanagari: caching, new cache contents: 1 fonts, 0 dirs
/usr/share/fonts/truetype/lohit-gujarati: caching, new cache contents: 1 fonts, 0 dirs
/usr/share/fonts/truetype/lohit-kannada: caching, new cache contents: 1 fonts, 0 dirs
/usr/share/fonts/truetype/lohit-malayalam: caching, new cache contents: 1 fonts, 0 dirs
/usr/share/fonts/truetype/lohit-oriya: caching, new cache contents: 1 fonts, 0 dirs
/usr/share/fonts/truetype/lohit-punjabi: caching, new cache contents: 1 fonts, 0 dirs
/usr/share/fonts/truetype/lohit-tamil: caching, new cache contents: 1 fonts, 0 dirs
/usr/share/fonts/truetype/lohit-tamil-classical: caching, new cache contents: 1 fonts, 0 dirs
/usr/share/fonts/truetype/lohit-telugu: caching, new cache contents: 1 fonts, 0 dirs
/usr/share/fonts/truetype/malayalam: caching, new cache contents: 11 fonts, 0 dirs
/usr/share/fonts/truetype/msttcorefonts: caching, new cache contents: 60 fonts, 0 dirs
/usr/share/fonts/truetype/noto: caching, new cache contents: 2 fonts, 0 dirs
/usr/share/fonts/truetype/openoffice: caching, new cache contents: 1 fonts, 0 dirs
/usr/share/fonts/truetype/padauk: caching, new cache contents: 4 fonts, 0 dirs
/usr/share/fonts/truetype/pagul: caching, new cache contents: 1 fonts, 0 dirs
/usr/share/fonts/truetype/samyak: caching, new cache contents: 1 fonts, 0 dirs
/usr/share/fonts/truetype/samyak-fonts: caching, new cache contents: 3 fonts, 0 dirs
/usr/share/fonts/truetype/sinhala: caching, new cache contents: 1 fonts, 0 dirs
/usr/share/fonts/truetype/tibetan-machine: caching, new cache contents: 1 fonts, 0 dirs
/usr/share/fonts/truetype/tlwg: caching, new cache contents: 58 fonts, 0 dirs
/usr/share/fonts/truetype/ttf-khmeros-core: caching, new cache contents: 2 fonts, 0 dirs
/usr/share/fonts/truetype/ubuntu: caching, new cache contents: 13 fonts, 0 dirs
/usr/share/fonts/type1: caching, new cache contents: 0 fonts, 1 dirs
/usr/share/fonts/type1/gsfonts: caching, new cache contents: 35 fonts, 0 dirs
/usr/local/share/fonts: caching, new cache contents: 0 fonts, 0 dirs
/home/sk/.local/share/fonts: skipping, no such directory
/home/sk/.fonts: skipping, no such directory
/var/cache/fontconfig: cleaning cache directory
/home/sk/.cache/fontconfig: cleaning cache directory
/home/sk/.fontconfig: not cleaning non-existent cache directory
fc-cache: succeeded

在 Linux 和 Windows 双启动的机器上安装 MS 字体

如果你有 Linux 和 Windows 的双启动系统,你可以轻松地从 Windows C 驱动器上安装 MS 字体。 你所要做的就是挂载 Windows 分区(C:/windows)。

我假设你已经在 Linux 中将 C:\Windows 分区挂载在了 /Windowsdrive 目录下。

现在,将字体位置链接到你的 Linux 系统的字体文件夹,如下所示:

ln -s /Windowsdrive/Windows/Fonts /usr/share/fonts/WindowsFonts

链接字体文件之后,使用命令行重新生成 fontconfig 缓存:

fc-cache

或者,将所有的 Windows 字体复制到 /usr/share/fonts 目录下并使用一下命令安装字体:

mkdir /usr/share/fonts/WindowsFonts
cp /Windowsdrive/Windows/Fonts/* /usr/share/fonts/WindowsFonts
chmod 755 /usr/share/fonts/WindowsFonts/*

最后,使用命令行重新生成 fontconfig 缓存:

fc-cache

测试 Windows 字体

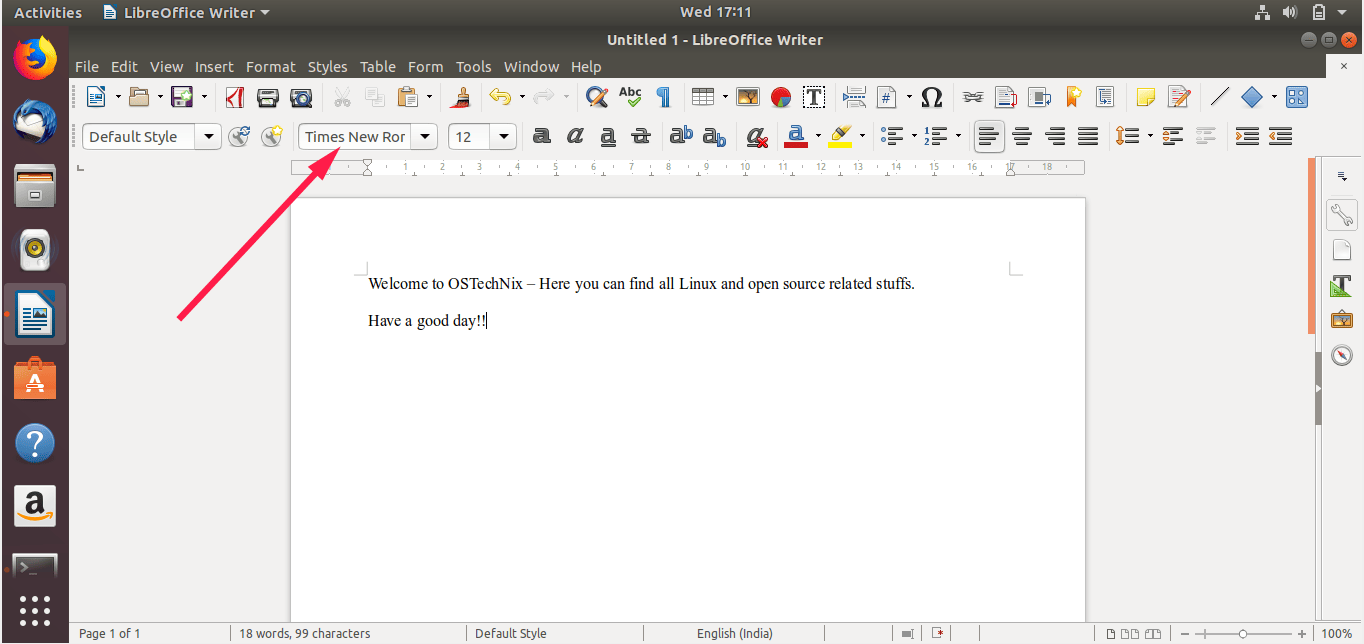
安装 MS 字体后打开 LibreOffice 或 GIMP。 现在,你将会看到 Microsoft coretype 字体。

就是这样, 希望这本指南有用。我再次警告你,在其他操作系统中使用 MS 字体是被禁止的。在安装 MS 字体之前请先阅读 Microsoft 许可协议。

如果你觉得我们的指南有用,请在你的社区、专业网络上分享并支持我们。还有更多好东西在等着我们。持续访问!

庆祝吧!!


via: https://www.ostechnix.com/install-microsoft-windows-fonts-ubuntu-16-04/

作者:SK 选题:lujun9972 译者:Auk7F7 校对:wxy

本文由 LCTT 原创编译,Linux中国 荣誉推出

Ubunsys 是一个面向 Ubuntu 及其衍生版的基于 Qt 的高级系统工具。高级用户可以使用命令行轻松完成大多数配置。不过为了以防万一某天,你突然不想用命令行了,就可以用 Ubnusys 这个程序来配置你的系统或其衍生系统,如 Linux Mint、Elementary OS 等。Ubunsys 可用来修改系统配置,安装、删除、更新包和旧内核,启用或禁用 sudo 权限,安装主线内核,更新软件安装源,清理垃圾文件,将你的 Ubuntu 系统升级到最新版本等等。以上提到的所有功能都可以通过鼠标点击完成。你不需要再依赖于命令行模式,下面是你能用 Ubunsys 做到的事:

  • 安装、删除、更新包
  • 更新和升级软件源
  • 安装主线内核
  • 删除旧的和不再使用的内核
  • 系统整体更新
  • 将系统升级到下一个可用的版本
  • 将系统升级到最新的开发版本
  • 清理系统垃圾文件
  • 在不输入密码的情况下启用或者禁用 sudo 权限
  • 当你在终端输入密码时使 sudo 密码可见
  • 启用或禁用系统休眠
  • 启用或禁用防火墙
  • 打开、备份和导入 sources.list.dsudoers 文件
  • 显示或者隐藏启动项
  • 启用或禁用登录音效
  • 配置双启动
  • 启用或禁用锁屏
  • 智能系统更新
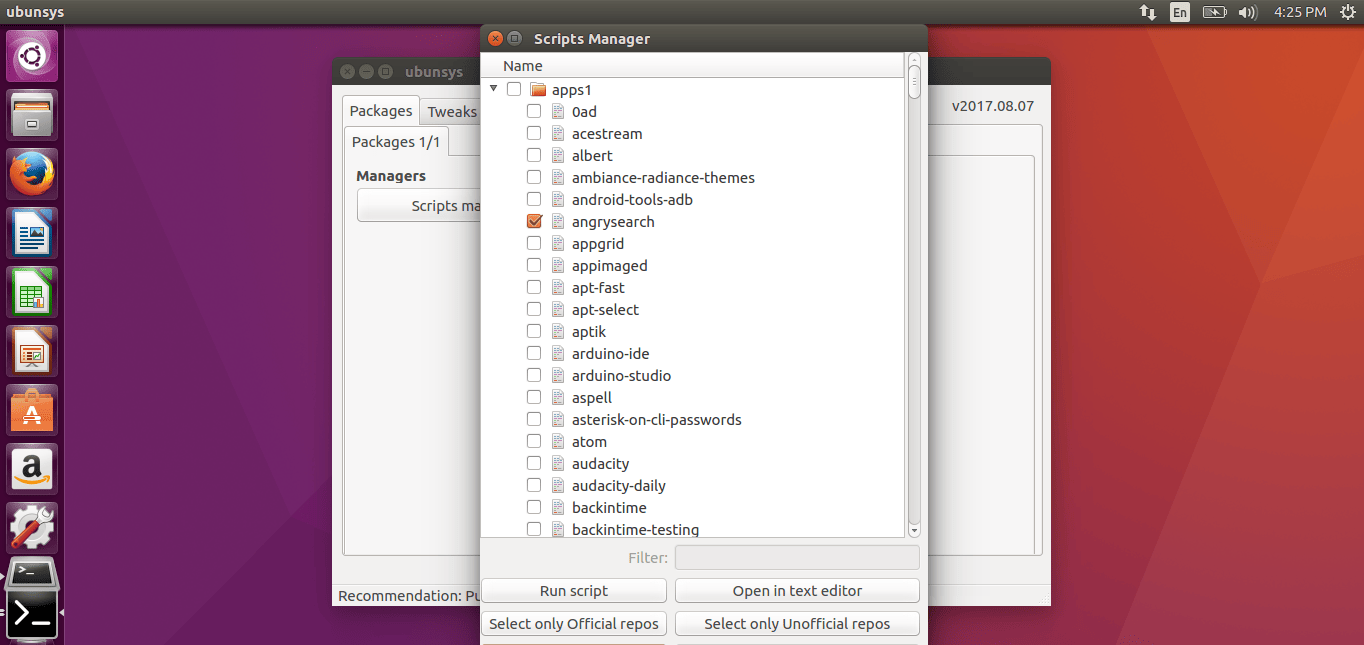
  • 使用脚本管理器更新/一次性执行脚本
  • git 执行常规用户安装脚本
  • 检查系统完整性和缺失的 GPG 密钥
  • 修复网络
  • 修复已破损的包
  • 还有更多功能在开发中

重要提示: Ubunsys 不适用于 Ubuntu 新手。它很危险并且仍然不是稳定版。它可能会使你的系统崩溃。如果你刚接触 Ubuntu 不久,不要使用。但如果你真的很好奇这个应用能做什么,仔细浏览每一个选项,并确定自己能承担风险。在使用这一应用之前记着备份你自己的重要数据。

安装 Ubunsys

Ubunsys 开发者制作了一个 PPA 来简化安装过程,Ubunsys 现在可以在 Ubuntu 16.04 LTS、 Ubuntu 17.04 64 位版本上使用。

逐条执行下面的命令,将 Ubunsys 的 PPA 添加进去,并安装它。

sudo add-apt-repository ppa:adgellida/ubunsys
sudo apt-get update
sudo apt-get install ubunsys

如果 PPA 无法使用,你可以在发布页面根据你自己当前系统,选择正确的安装包,直接下载并安装 Ubunsys。

用途

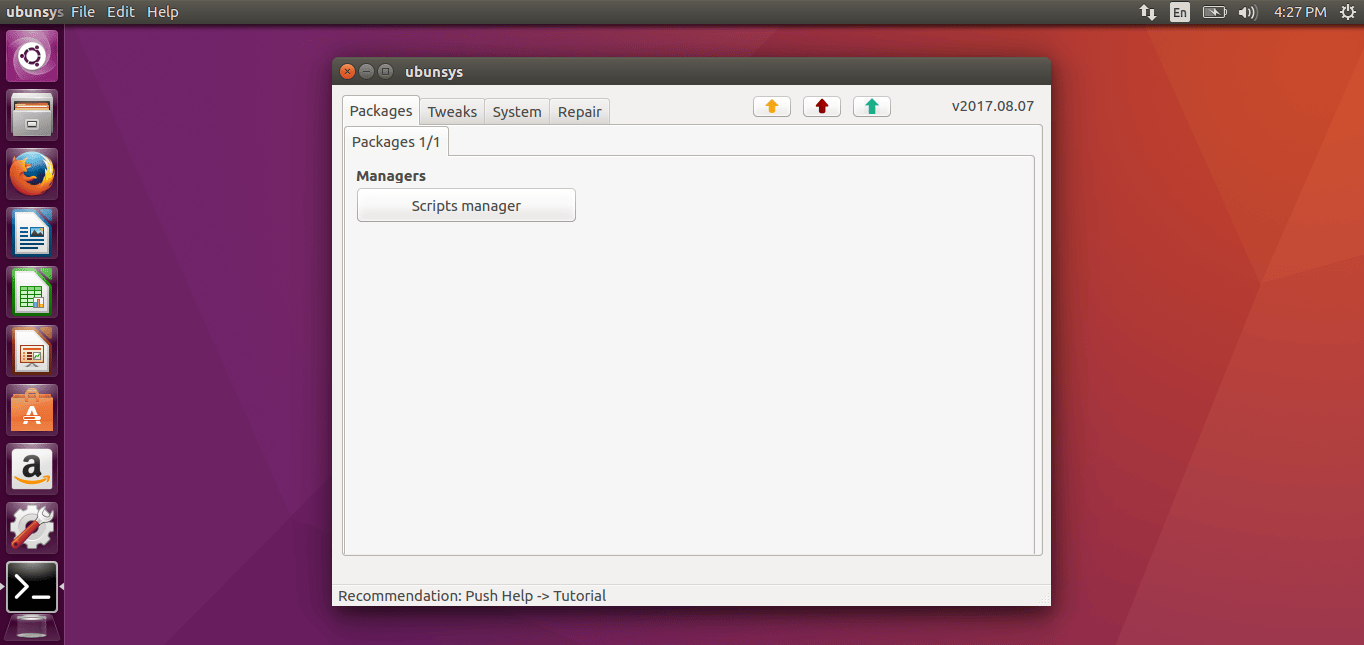
一旦安装完成,从菜单栏启动 Ubunsys。下图是 Ubunsys 主界面。

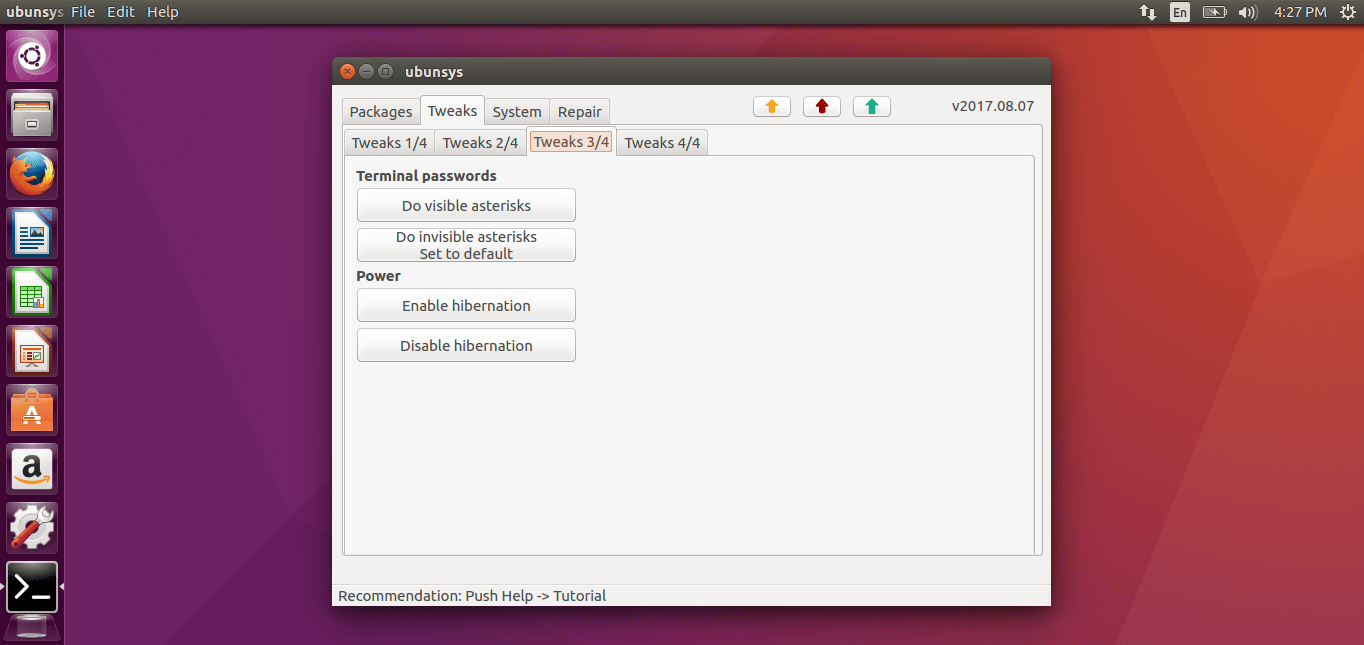
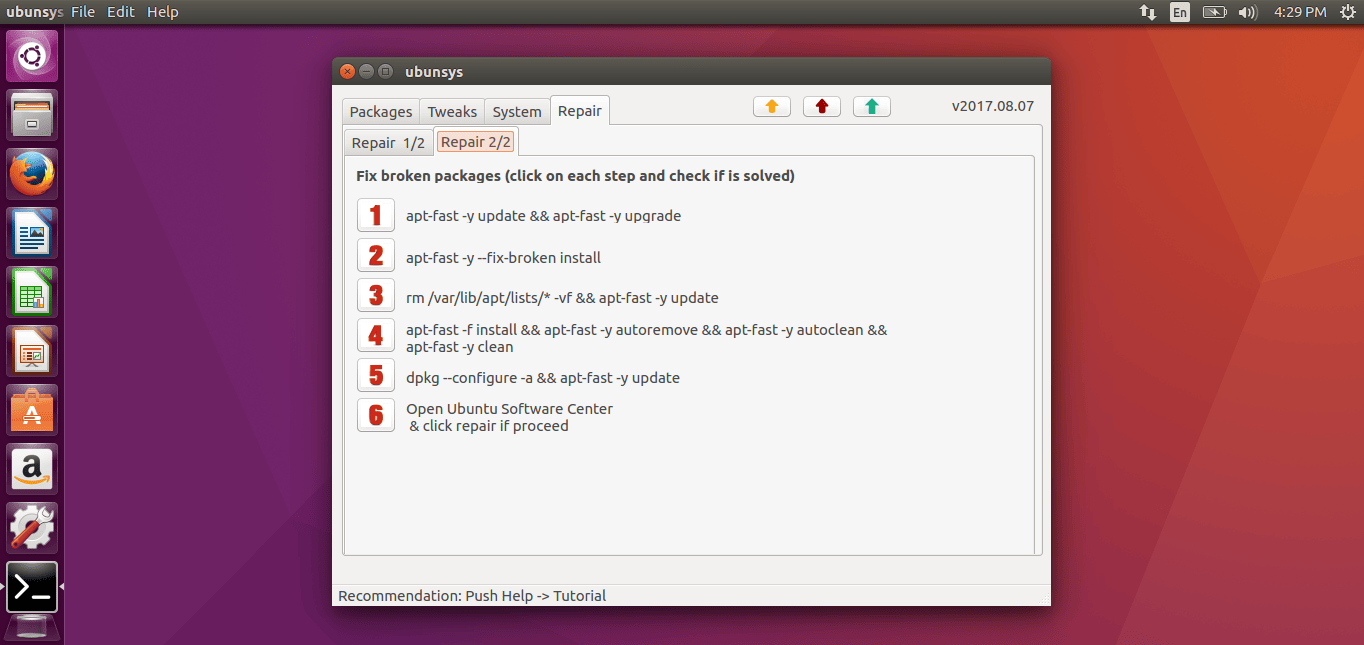
你可以看到,Ubunsys 有四个主要部分,分别是 Packages、Tweaks、System 和 Repair。在每一个标签项下面都有一个或多个子标签项以对应不同的操作。

Packages

这一部分允许你安装、删除和更新包。

Tweaks

在这一部分,我们可以对系统进行多种调整,例如:

  • 打开、备份和导入 sources.list.dsudoers 文件;
  • 配置双启动;
  • 启用或禁用登录音效、防火墙、锁屏、系统休眠、sudo 权限(在不需要密码的情况下)同时你还可以针对某一用户启用或禁用 sudo 权限(在不需要密码的情况下);
  • 在终端中输入密码时可见(禁用星号)。

System

这一部分被进一步分成 3 个部分,每个都是针对某一特定用户类型。

Normal user 这一标签下的选项可以:

  • 更新、升级包和软件源
  • 清理系统
  • 执行常规用户安装脚本

Advanced user 这一标签下的选项可以:

  • 清理旧的/无用的内核
  • 安装主线内核
  • 智能包更新
  • 升级系统

Developer 这一部分可以将系统升级到最新的开发版本。

Repair

这是 Ubunsys 的第四个也是最后一个部分。正如名字所示,这一部分能让我们修复我们的系统、网络、缺失的 GPG 密钥,和已经缺失的包。

正如你所见,Ubunsys 可以在几次点击下就能完成诸如系统配置、系统维护和软件维护之类的任务。你不需要一直依赖于终端。Ubunsys 能帮你完成任何高级任务。再次声明,我警告你,这个应用不适合新手,而且它并不稳定。所以当你使用的时候,能会出现 bug 或者系统崩溃。在仔细研究过每一个选项的影响之后再使用它。

谢谢阅读!

参考资源


via: https://www.ostechnix.com/ubunsys-advanced-system-configuration-utility-ubuntu-power-users/

作者:SK 选题:lujun9972 译者:wenwensnow 校对:wxy

本文由 LCTT 原创编译,Linux中国 荣誉推出

你是狂热的自由软件支持者吗?你目前在使用任何基于 Arch 的 Linux 发行版吗?我有一个小小的提示送给你!现在,你可以轻松地在 Arch Linux 及其变体(如 Antergos、Manjaro Linux 等)中找到已安装的专有软件包。你无需在已安装软件包的网站中参考其许可细节,也无需使用任何其它外部工具来查明软件包是自由的还是专有的。(LCTT 译注:其实下面还是借助了一个外部程序)

在 Arch Linux 中查找已安装的专有软件包

一位开发人员开发了一个名为 “Absolutely Proprietary” 的实用程序,它是一种用于基于 Arch 发行版的专有软件包检测器。它将基于 Arch 系统中的所有安装包与 Parabola 的软件包 blacklistaur-blacklist 进行比较,然后显示出你的 斯托曼自由指数 Stallman Freedom Index (“自由/总计”比分)。此外,你可以将该列表保存到文件中,并与其他系统/用户共享或比较。

在安装之前,确保你安装了 Python 和 Git。

然后,git clone 仓库:

git clone https://github.com/vmavromatis/absolutely-proprietary.git

这条命令将会下载所有内容到你当前工作目录中的 absolutely-proprietary 目录。

进入此目录:

cd absolutely-proprietary

接着,使用以下命令查找已安装的专有软件:

python main.py

这条命令将会下载 blacklist.txtaur-blacklist.txt,并将本地已安装的软件包与远程软件包进行比较并显示其指数。

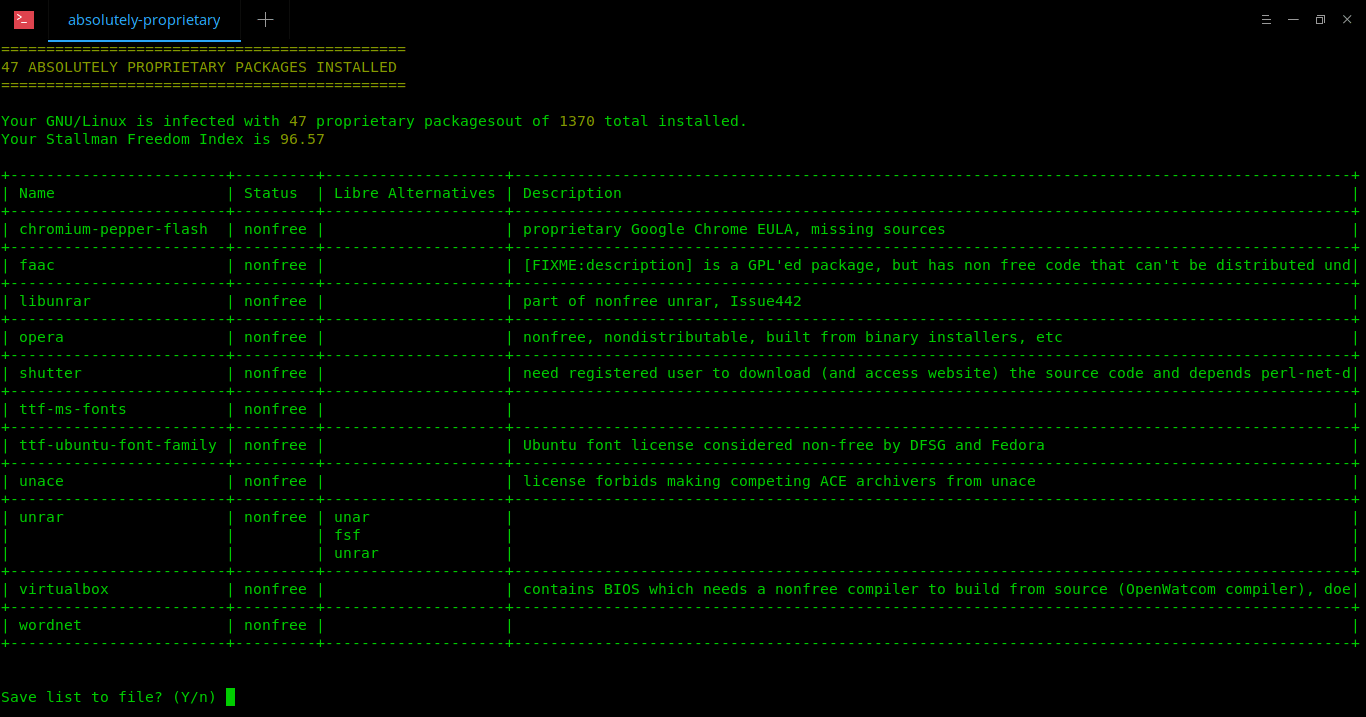
以下是在我的 Arch Linux 桌面的示例输出:

Retrieving local packages (including AUR)...
Downloading https://git.parabola.nu/blacklist.git/plain/blacklist.txt
Downloading https://git.parabola.nu/blacklist.git/plain/aur-blacklist.txt
Comparing local packages to remote...
=============================================
47 ABSOLUTELY PROPRIETARY PACKAGES INSTALLED
=============================================

Your GNU/Linux is infected with 47 proprietary packages out of 1370 total installed.
Your Stallman Freedom Index is 96.57

+------------------------|---------|--------------------|---------------------------------------------------------------------------------------------+
| Name | Status | Libre Alternatives | Description |
+------------------------|---------|--------------------|---------------------------------------------------------------------------------------------+
| chromium-pepper-flash | nonfree | | proprietary Google Chrome EULA, missing sources |
+------------------------|---------|--------------------|---------------------------------------------------------------------------------------------+
| faac | nonfree | | [FIXME:description] is a GPL'ed package, but has non free code that can't be distributed und|
+------------------------|---------|--------------------|---------------------------------------------------------------------------------------------+
| libunrar | nonfree | | part of nonfree unrar, Issue442 |
+------------------------|---------|--------------------|---------------------------------------------------------------------------------------------+
| opera | nonfree | | nonfree, nondistributable, built from binary installers, etc |
+------------------------|---------|--------------------|---------------------------------------------------------------------------------------------+
| shutter | nonfree | | need registered user to download (and access website) the source code and depends perl-net-d|
+------------------------|---------|--------------------|---------------------------------------------------------------------------------------------+
| ttf-ms-fonts | nonfree | | |
+------------------------|---------|--------------------|---------------------------------------------------------------------------------------------+
| ttf-ubuntu-font-family | nonfree | | Ubuntu font license considered non-free by DFSG and Fedora |
+------------------------|---------|--------------------|---------------------------------------------------------------------------------------------+
| unace | nonfree | | license forbids making competing ACE archivers from unace |
+------------------------|---------|--------------------|---------------------------------------------------------------------------------------------+
| unrar | nonfree | unar | |
| | | fsf | |
| | | unrar | |
+------------------------|---------|--------------------|---------------------------------------------------------------------------------------------+
| virtualbox | nonfree | | contains BIOS which needs a nonfree compiler to build from source (OpenWatcom compiler), doe|
+------------------------|---------|--------------------|---------------------------------------------------------------------------------------------+
| wordnet | nonfree | | |
+------------------------|---------|--------------------|---------------------------------------------------------------------------------------------+


Save list to file? (Y/n)

如你所见,我的系统中有 47 个专有软件包。就像我说的那样,我们可以将它保存到文件中稍后查看。为此,当提示你将列表保存在文件时,请按 y。然后按 y 接受默认值,或按 n 以你喜欢的格式和位置来保存它。

Save list to file? (Y/n) y
Save as markdown table? (Y/n) y
Save it to (/tmp/tmpkuky_082.md): y
The list is saved at /home/sk/absolutely-proprietary/y.md

You can review it from the command line
using the "less -S /home/sk/absolutely-proprietary/y.md"
or, if installed, the "most /home/sk/absolutely-proprietary/y.md" commands

你可能已经注意到,我只有 nonfree 包。它还会显示另外两种类型的软件包,例如 semifree、 uses-nonfree。

  • nonfree:这个软件包是公然的非自由软件。
  • semifree:这个软件包大部分是自由的,但包含一些非自由软件。
  • uses-nonfree:这个软件包依赖、推荐或不恰当地与其他自由软件或服务集成。

该使用程序的另一个显著特点是它不仅显示了专有软件包,而且还显示这些包的替代品。

希望这有些帮助。我很快就会在这里提供另一份有用的指南。敬请关注!

干杯!

资源:


via: https://www.ostechnix.com/find-installed-proprietary-packages-arch-linux/

作者:SK 译者:MjSeven 校对:wxy

本文由 LCTT 原创编译,Linux中国 荣誉推出

如果你是 RHEL 管理员,你可能肯定听说过 Sosreport :一个可扩展、可移植的支持数据收集工具。它是一个从类 Unix 操作系统中收集系统配置详细信息和诊断信息的工具。当用户提出支持服务单时,他/她必须运行此工具并将由 Sosreport 工具生成的结果报告发送给 Red Hat 支持人员。然后,执行人员将根据报告进行初步分析,并尝试找出系统中的问题。不仅在 RHEL 系统上,你可以在任何类 Unix 操作系统上使用它来收集系统日志和其他调试信息。

安装 Sosreport

Sosreport 在 Red Hat 官方系统仓库中,因此你可以使用 Yum 或 DNF 包管理器安装它,如下所示。

$ sudo yum install sos

要么,

$ sudo dnf install sos

在 Debian、Ubuntu 和 Linux Mint 上运行:

$ sudo apt install sosreport

用法

安装后,运行以下命令以收集系统配置详细信息和其他诊断信息。

$ sudo sosreport

系统将要求你输入系统的一些详细信息,例如系统名称、案例 ID 等。相应地输入详细信息,然后按回车键生成报告。如果你不想更改任何内容并使用默认值,只需按回车键即可。

我的 CentOS 7 服务器的示例输出:

sosreport (version 3.5)

This command will collect diagnostic and configuration information from
this CentOS Linux system and installed applications.

An archive containing the collected information will be generated in
/var/tmp/sos.DiJXi7 and may be provided to a CentOS support
representative.

Any information provided to CentOS will be treated in accordance with
the published support policies at:

https://wiki.centos.org/

The generated archive may contain data considered sensitive and its
content should be reviewed by the originating organization before being
passed to any third party.

No changes will be made to system configuration.

Press ENTER to continue, or CTRL-C to quit.

Please enter your first initial and last name [server.ostechnix.local]:
Please enter the case id that you are generating this report for []:

Setting up archive ...
Setting up plugins ...
Running plugins. Please wait ...

Running 73/73: yum...
Creating compressed archive...

Your sosreport has been generated and saved in:
/var/tmp/sosreport-server.ostechnix.local-20180628171844.tar.xz

The checksum is: 8f08f99a1702184ec13a497eff5ce334

Please send this file to your support representative.

如果你不希望系统提示你输入此类详细信息,请如下使用批处理模式。

$ sudo sosreport --batch

正如你在上面的输出中所看到的,生成了一个归档报告并保存在 /var/tmp/sos.DiJXi7 中。在 RHEL 6/CentOS 6 中,报告将在 /tmp 中生成。你现在可以将此报告发送给你的支持人员,以便他可以进行初步分析并找出问题所在。

你可能会担心或想知道报告中的内容。如果是这样,你可以通过运行以下命令来查看它:

$ sudo tar -tf /var/tmp/sosreport-server.ostechnix.local-20180628171844.tar.xz

要么,

$ sudo vim /var/tmp/sosreport-server.ostechnix.local-20180628171844.tar.xz

请注意,上述命令不会解压存档,而只显示存档中的文件和文件夹列表。如果要查看存档中文件的实际内容,请首先使用以下命令解压存档:

$ sudo tar -xf /var/tmp/sosreport-server.ostechnix.local-20180628171844.tar.xz

存档的所有内容都将解压当前工作目录中 ssosreport-server.ostechnix.local-20180628171844/ 目录中。进入目录并使用 cat 命令或任何其他文本浏览器查看文件内容:

$ cd sosreport-server.ostechnix.local-20180628171844/

$ cat uptime
17:19:02 up 1:03, 2 users, load average: 0.50, 0.17, 0.10

有关 Sosreport 的更多详细信息,请参阅手册页。

$ man sosreport

就是这些了。希望这些有用。还有更多好东西。敬请关注!

干杯!


via: https://www.ostechnix.com/sosreport-a-tool-to-collect-system-logs-and-diagnostic-information/

作者:SK 选题:lujun9972 译者:geekpi 校对:wxy

本文由 LCTT 原创编译,Linux中国 荣誉推出