2018年8月

如果我告诉你有这样一种软件架构,一个应用程序的组件通过基于网络的通讯协议为其它组件提供服务,我估计你可能会说它是 …

是的,它和你编程的年限有关。如果你从上世纪九十年代就开始了你的编程生涯,那么你肯定会说它是 面向服务的架构 Service-Oriented Architecture (SOA)。但是,如果你是个年青人,并且在云上获得初步的经验,那么,你将会说:“哦,你说的是 微服务 Microservices 。”

你们都没错。如果想真正地了解它们的差别,你需要深入地研究这两种架构。

在 SOA 中,服务是一个功能,它是定义好的、自包含的、并且是不依赖上下文和其它服务的状态的功能。总共有两种服务。一种是消费者服务,它从另外类型的服务 —— 提供者服务 —— 中请求一个服务。一个 SOA 服务可以同时扮演这两种角色。

SOA 服务可以与其它服务交换数据。两个或多个服务也可以彼此之间相互协调。这些服务执行基本的任务,比如创建一个用户帐户、提供登录功能、或验证支付。

与其说 SOA 是模块化一个应用程序,还不如说它是把分布式的、独立维护和部署的组件,组合成一个应用程序。然后在服务器上运行这些组件。

早期版本的 SOA 使用面向对象的协议进行组件间通讯。例如,微软的 分布式组件对象模型 Distributed Component Object Model (DCOM) 和使用 通用对象请求代理架构 Common Object Request Broker Architecture (CORBA) 规范的 对象请求代理 Object Request Broker (ORB)。

用于消息服务的最新的版本,有 Java 消息服务 Java Message Service (JMS)或者 高级消息队列协议 Advanced Message Queuing Protocol (AMQP)。这些服务通过 企业服务总线 Enterprise Service Bus (ESB) 进行连接。基于这些总线,来传递和接收可扩展标记语言(XML)格式的数据。

微服务 是一个架构样式,其中的应用程序以松散耦合的服务或模块组成。它适用于开发大型的、复杂的应用程序的 持续集成 Continuous Integration / 持续部署 Continuous Deployment (CI/CD)模型。一个应用程序就是一堆模块的汇总。

每个微服务提供一个应用程序编程接口(API)端点。它们通过轻量级协议连接,比如, 表述性状态转移 REpresentational State Transfer (REST),或 gRPC。数据倾向于使用 JavaScript 对象标记 JavaScript Object Notation (JSON)或 Protobuf 来表示。

这两种架构都可以用于去替代以前老的整体式架构,整体式架构的应用程序被构建为单个的、自治的单元。例如,在一个客户机 —— 服务器模式中,一个典型的 Linux、Apache、MySQL、PHP/Python/Perl (LAMP) 服务器端应用程序将去处理 HTTP 请求、运行子程序、以及从底层的 MySQL 数据库中检索/更新数据。所有这些应用程序“绑”在一起提供服务。当你改变了任何一个东西,你都必须去构建和部署一个新版本。

使用 SOA,你可以只改变需要的几个组件,而不是整个应用程序。使用微服务,你可以做到一次只改变一个服务。使用微服务,你才能真正做到一个解耦架构。

微服务也比 SOA 更轻量级。不过 SOA 服务是部署到服务器和虚拟机上,而微服务是部署在容器中。协议也更轻量级。这使得微服务比 SOA 更灵活。因此,它更适合于要求敏捷性的电商网站。

说了这么多,到底意味着什么呢?微服务就是 SOA 在容器和云计算上的变种。

老式的 SOA 并没有离我们远去,而因为我们不断地将应用程序搬迁到容器中,所以微服务架构将越来越流行。


via: https://blogs.dxc.technology/2018/05/08/everything-old-is-new-again-microservices/

作者:Cloudy Weather 选题:lujun9972 译者:qhwdw 校对:wxy

本文由 LCTT 原创编译,Linux中国 荣誉推出

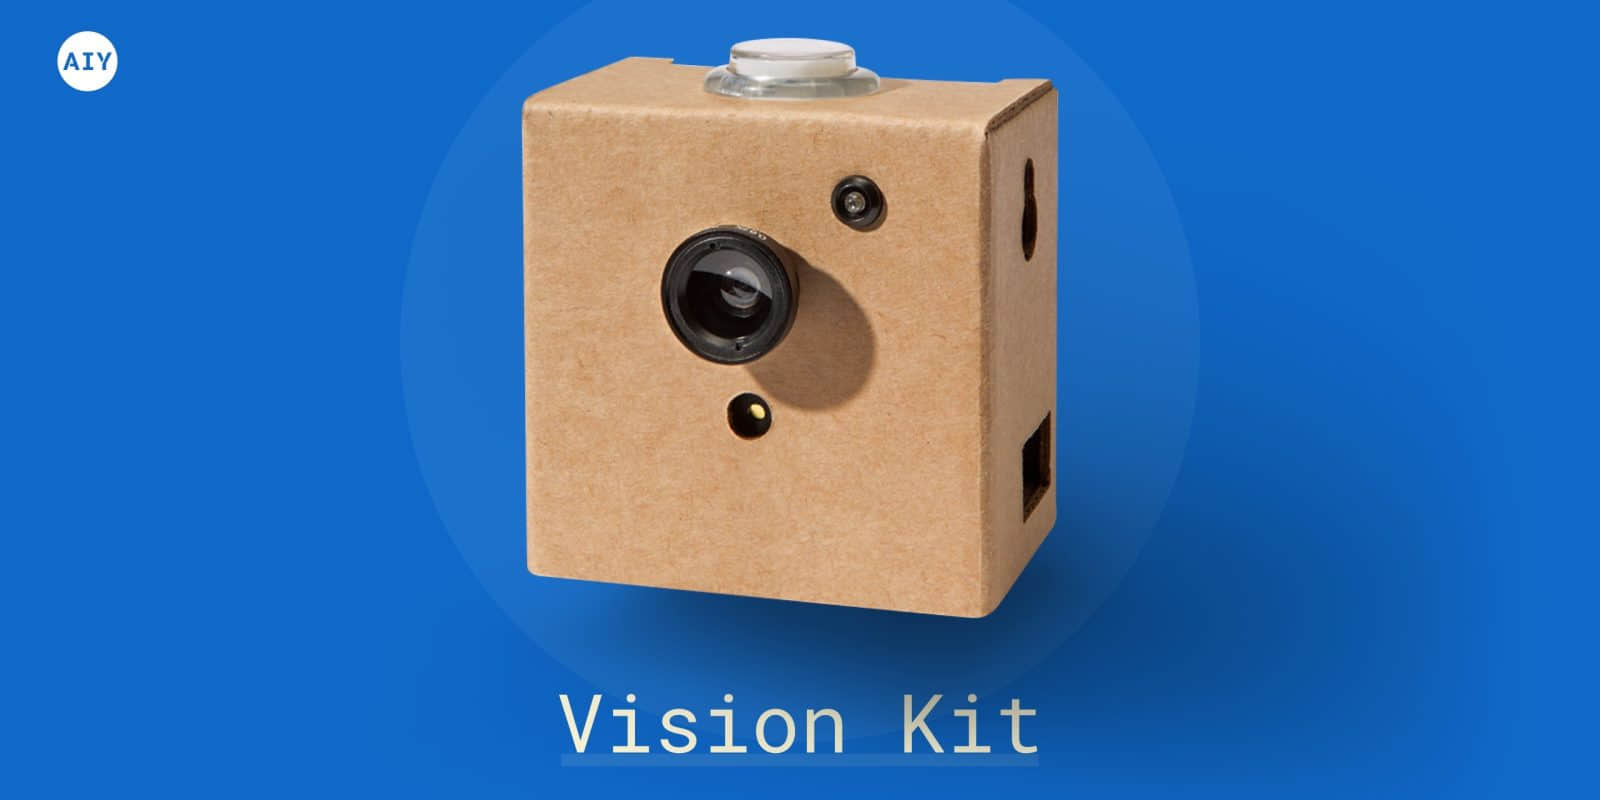
Google 发布了一个 45 美元的 “AIY Vision Kit”,它是运行在树莓派 Zero W 上的基于 TensorFlow 的视觉识别开发套件,它使用了一个带 Movidius 芯片的 “VisionBonnet” 板。

为加速该设备上的神经网络,Google 的 AIY 视频套件继承了早期树莓派上运行的 AIY 项目 的语音/AI 套件,这个型号的树莓派随五月份的 MagPi 杂志一起赠送。与语音套件和老的 Google 硬纸板 VR 查看器一样,这个新的 AIY 视觉套件也使用一个硬纸板包装。这个套件和 Cloud Vision API 是不一样的,它使用了一个在 2015 年演示过的基于树莓派的 GoPiGo 机器人,它完全在本地的处理能力上运行,而不需要使用一个云端连接。这个 AIY 视觉套件现在可以 45 美元的价格去预订,将在 12 月份发货。

AIY 视觉套件,完整包装(左)和树莓派 Zero W

这个套件的主要处理部分除了所需要的 树莓派 Zero W 单片机之外 —— 一个基于 ARM11 的 1 GHz 的 Broadcom BCM2836 片上系统,另外的就是 Google 最新的 VisionBonnet RPi 附件板。这个 VisionBonnet pHAT 附件板使用了一个 Movidius MA2450,它是 Movidius Myriad 2 VPU 版的处理器。在 VisionBonnet 上,处理器为神经网络运行了 Google 的开源机器学习库 TensorFlow。因为这个芯片,使得视觉处理的速度最高达每秒 30 帧。

这个 AIY 视觉套件要求用户提供一个树莓派 Zero W、一个 树莓派摄像机 v2、以及一个 16GB 的 micro SD 卡,它用来下载基于 Linux 的 OS 镜像。这个套件包含了 VisionBonnet、一个 RGB 街机风格的按钮、一个压电扬声器、一个广角镜头套件、以及一个包裹它们的硬纸板。还有一些就是线缆、支架、安装螺母,以及连接部件。

AIY 视觉套件组件(左)和 VisonBonnet 附件板

有三个可用的神经网络模型。一个是通用的模型,它可以识别常见的 1000 个东西,一个是面部检测模型,它可以对 “快乐程度” 进行评分,从 “悲伤” 到 “大笑”,还有一个模型可以用来辨别图像内容是狗、猫、还是人。这个 1000 个图片模型源自 Google 的开源 MobileNets,它是基于 TensorFlow 家族的计算机视觉模型,它设计用于资源受限的移动或者嵌入式设备。

MobileNet 模型是低延时、低功耗,和参数化的,以满足资源受限的不同使用情景。Google 说,这个模型可以用于构建分类、检测、嵌入、以及分隔。在本月的早些时候,Google 发布了一个开发者预览版,它是一个对 Android 和 iOS 移动设备友好的 TensorFlow Lite 库,它与 MobileNets 和 Android 神经网络 API 是兼容的。

AIY 视觉套件包装图

除了提供这三个模型之外,AIY 视觉套件还提供了基本的 TensorFlow 代码和一个编译器,因此用户可以去开发自己的模型。另外,Python 开发者可以写一些新软件去定制 RGB 按钮颜色、压电元素声音、以及在 VisionBonnet 上的 4x GPIO 针脚,它可以添加另外的指示灯、按钮、或者伺服机构。Potential 模型包括识别食物、基于可视化输入来打开一个狗门、当你的汽车偏离车道时发出文本信息、或者根据识别到的人的面部表情来播放特定的音乐。

Myriad 2 VPU 结构图(左)和参考板

Movidius Myriad 2 处理器在一个标称 1W 的功耗下提供每秒万亿次浮点运算的性能。在被 Intel 收购之前,这个芯片最早出现在 Tango 项目的参考平台上,并内置在 2016 年 5 月由 Movidius 首次亮相的、Ubuntu 驱动的 USB 的 Fathom 神经网络处理棒中。根据 Movidius 的说法,Myriad 2 目前已经在 “市场上数百万的设备上使用”。

更多信息

AIY 视觉套件可以在 Micro Center 上预订,价格为 $44.99,预计在(2017 年) 12 月初发货。更多信息请参考 AIY 视觉套件的 公告Google 博客、以及 Micro Center 购物页面


via: http://linuxgizmos.com/google-launches-tensorflow-based-vision-recognition-kit-for-rpi-zero-w/

作者:Eric Brown 译者:qhwdw 校对:wxy

本文由 LCTT 原创编译,Linux中国 荣誉推出

你使用的是基于 Debian 的系统吗?如果是,太好了!我今天在这里给你带来了一个好消息。先向 “Debian-goodies” 打个招呼,这是一组基于 Debian 系统(比如:Ubuntu、Linux Mint)的有用工具。这些实用工具提供了一些额外的有用的命令,这些命令在基于 Debian 的系统中默认不可用。通过使用这些工具,用户可以找到哪些程序占用更多磁盘空间,更新系统后需要重新启动哪些服务,在一个软件包中搜索与模式匹配的文件,根据搜索字符串列出已安装的包等等。在这个简短的指南中,我们将讨论一些有用的 Debian 的好东西。

Debian-goodies – 给 Debian 和 Ubuntu 用户的实用程序

debian-goodies 包可以在 Debian 和其衍生的 Ubuntu 以及其它 Ubuntu 变体(如 Linux Mint)的官方仓库中找到。要安装 debian-goodies,只需简单运行:

$ sudo apt-get install debian-goodies

debian-goodies 安装完成后,让我们继续看一看一些有用的实用程序。

1、 checkrestart

让我从我最喜欢的 checkrestart 实用程序开始。安装某些安全更新时,某些正在运行的应用程序可能仍然会使用旧库。要彻底应用安全更新,你需要查找并重新启动所有这些更新。这就是 checkrestart 派上用场的地方。该实用程序将查找哪些进程仍在使用旧版本的库,然后,你可以重新启动服务。

在进行库更新后,要检查哪些守护进程应该被重新启动,运行:

$ sudo checkrestart
[sudo] password for sk:
Found 0 processes using old versions of upgraded files

由于我最近没有执行任何安全更新,因此没有显示任何内容。

请注意,checkrestart 实用程序确实运行良好。但是,有一个名为 needrestart 的类似的新工具可用于最新的 Debian 系统。needrestart 的灵感来自 checkrestart 实用程序,它完成了同样的工作。 needrestart 得到了积极维护,并支持容器(LXC、 Docker)等新技术。

以下是 needrestart 的特点:

  • 支持(但不要求)systemd
  • 二进制程序的黑名单(例如:用于图形显示的显示管理器)
  • 尝试检测挂起的内核升级
  • 尝试检测基于解释器的守护进程所需的重启(支持 Perl、Python、Ruby)
  • 使用钩子完全集成到 apt/dpkg 中

它在默认仓库中也可以使用。所以,你可以使用如下命令安装它:

$ sudo apt-get install needrestart

现在,你可以使用以下命令检查更新系统后需要重新启动的守护程序列表:

$ sudo needrestart
Scanning processes...
Scanning linux images...

Running kernel seems to be up-to-date.

Failed to check for processor microcode upgrades.

No services need to be restarted.

No containers need to be restarted.

No user sessions are running outdated binaries.

好消息是 Needrestart 同样也适用于其它 Linux 发行版。例如,你可以从 Arch Linux 及其衍生版的 AUR 或者其它任何 AUR 帮助程序来安装,就像下面这样:

$ yaourt -S needrestart

在 Fedora:

$ sudo dnf install needrestart

2、 check-enhancements

check-enhancements 实用程序用于查找那些用于增强已安装的包的软件包。此实用程序将列出增强其它包但不是必须运行它的包。你可以通过 -ip–installed-packages 选项来查找增强单个包或所有已安装包的软件包。

例如,我将列出增强 gimp 包功能的包:

$ check-enhancements gimp
gimp => gimp-data: Installed: (none) Candidate: 2.8.22-1
gimp => gimp-gmic: Installed: (none) Candidate: 1.7.9+zart-4build3
gimp => gimp-gutenprint: Installed: (none) Candidate: 5.2.13-2
gimp => gimp-help-ca: Installed: (none) Candidate: 2.8.2-0.1
gimp => gimp-help-de: Installed: (none) Candidate: 2.8.2-0.1
gimp => gimp-help-el: Installed: (none) Candidate: 2.8.2-0.1
gimp => gimp-help-en: Installed: (none) Candidate: 2.8.2-0.1
gimp => gimp-help-es: Installed: (none) Candidate: 2.8.2-0.1
gimp => gimp-help-fr: Installed: (none) Candidate: 2.8.2-0.1
gimp => gimp-help-it: Installed: (none) Candidate: 2.8.2-0.1
gimp => gimp-help-ja: Installed: (none) Candidate: 2.8.2-0.1
gimp => gimp-help-ko: Installed: (none) Candidate: 2.8.2-0.1
gimp => gimp-help-nl: Installed: (none) Candidate: 2.8.2-0.1
gimp => gimp-help-nn: Installed: (none) Candidate: 2.8.2-0.1
gimp => gimp-help-pt: Installed: (none) Candidate: 2.8.2-0.1
gimp => gimp-help-ru: Installed: (none) Candidate: 2.8.2-0.1
gimp => gimp-help-sl: Installed: (none) Candidate: 2.8.2-0.1
gimp => gimp-help-sv: Installed: (none) Candidate: 2.8.2-0.1
gimp => gimp-plugin-registry: Installed: (none) Candidate: 7.20140602ubuntu3
gimp => xcftools: Installed: (none) Candidate: 1.0.7-6

要列出增强所有已安装包的,请运行:

$ check-enhancements -ip
autoconf => autoconf-archive: Installed: (none) Candidate: 20170928-2
btrfs-progs => snapper: Installed: (none) Candidate: 0.5.4-3
ca-certificates => ca-cacert: Installed: (none) Candidate: 2011.0523-2
cryptsetup => mandos-client: Installed: (none) Candidate: 1.7.19-1
dpkg => debsig-verify: Installed: (none) Candidate: 0.18
[...]

3、 dgrep

顾名思义,dgrep 用于根据给定的正则表达式搜索制指定包的所有文件。例如,我将在 Vim 包中搜索包含正则表达式 “text” 的文件。

$ sudo dgrep "text" vim
Binary file /usr/bin/vim.tiny matches
/usr/share/doc/vim-tiny/copyright: that they must include this license text. You can also distribute
/usr/share/doc/vim-tiny/copyright: include this license text. You are also allowed to include executables
/usr/share/doc/vim-tiny/copyright: 1) This license text must be included unmodified.
/usr/share/doc/vim-tiny/copyright: text under a) applies to those changes.
/usr/share/doc/vim-tiny/copyright: context diff. You can choose what license to use for new code you
/usr/share/doc/vim-tiny/copyright: context diff will do. The e-mail address to be used is
/usr/share/doc/vim-tiny/copyright: On Debian systems, the complete text of the GPL version 2 license can be
[...]

dgrep 支持大多数 grep 的选项。参阅以下指南以了解 grep 命令。

4、 dglob

dglob 实用程序生成与给定模式匹配的包名称列表。例如,找到与字符串 “vim” 匹配的包列表。

$ sudo dglob vim
vim-tiny:amd64
vim:amd64
vim-common:all
vim-runtime:all

默认情况下,dglob 将仅显示已安装的软件包。如果要列出所有包(包括已安装的和未安装的),使用 -a 标志。

$ sudo dglob vim -a

5、 debget

debget 实用程序将在 APT 的数据库中下载一个包的 .deb 文件。请注意,它只会下载给定的包,不包括依赖项。

$ debget nano
Get:1 http://in.archive.ubuntu.com/ubuntu bionic/main amd64 nano amd64 2.9.3-2 [231 kB]
Fetched 231 kB in 2s (113 kB/s)

6、 dpigs

这是此次集合中另一个有用的实用程序。dpigs 实用程序将查找并显示那些占用磁盘空间最多的已安装包。

$ dpigs
260644 linux-firmware
167195 linux-modules-extra-4.15.0-20-generic
75186 linux-headers-4.15.0-20
64217 linux-modules-4.15.0-20-generic
55620 snapd
31376 git
31070 libicu60
28420 vim-runtime
25971 gcc-7
24349 g++-7

如你所见,linux-firmware 包占用的磁盘空间最多。默认情况下,它将显示占用磁盘空间的 前 10 个包。如果要显示更多包,例如 20 个,运行以下命令:

$ dpigs -n 20

7. debman

debman 实用程序允许你轻松查看二进制文件 .deb 中的手册页而不提取它。你甚至不需要安装 .deb 包。以下命令显示 nano 包的手册页。

$ debman -f nano_2.9.3-2_amd64.deb nano

如果你没有 .deb 软件包的本地副本,使用 -p 标志下载并查看包的手册页。

$ debman -p nano nano

建议阅读:

8、 debmany

安装的 Debian 包不仅包含手册页,还包括其它文件,如确认、版权和自述文件等。debmany 实用程序允许你查看和读取那些文件。

$ debmany vim
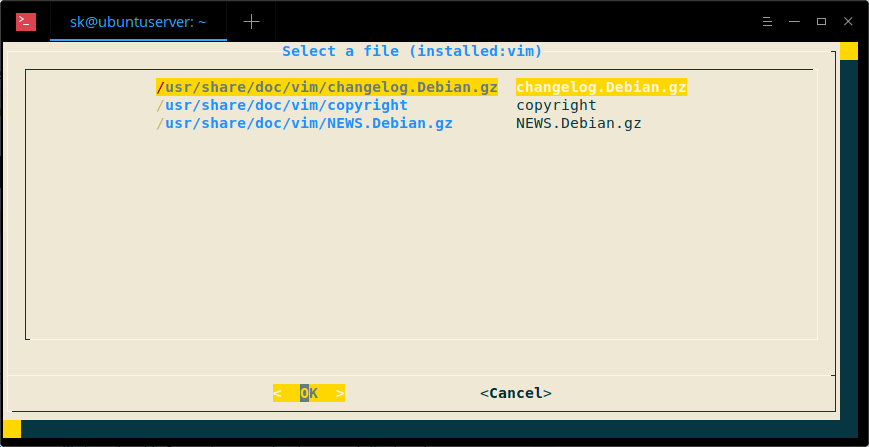
使用方向键选择要查看的文件,然后按回车键查看所选文件。按 q 返回主菜单。

如果未安装指定的软件包,debmany 将从 APT 数据库下载并显示手册页。应安装 dialog 包来阅读手册页。

9、 popbugs

如果你是开发人员,popbugs 实用程序将非常有用。它将根据你使用的包显示一个定制的发布关键 bug 列表(使用 popularity-contest 数据)。对于那些不关心的人,popularity-contest 包设置了一个 cron (定时)任务,它将定期匿名向 Debian 开发人员提交有关该系统上最常用的 Debian 软件包的统计信息。这些信息有助于 Debian 做出决定,例如哪些软件包应该放在第一张 CD 上。它还允许 Debian 改进未来的发行版本,以便为新用户自动安装最流行的软件包。

要生成严重 bug 列表并在默认 Web 浏览器中显示结果,运行:

$ popbugs

此外,你可以将结果保存在文件中,如下所示。

$ popbugs --output=bugs.txt

10、 which-pkg-broke

此命令将显示给定包的所有依赖项以及安装每个依赖项的时间。通过使用此信息,你可以在升级系统或软件包之后轻松找到哪个包可能会在什么时间损坏了另一个包。

$ which-pkg-broke vim
Package <debconf-2.0> has no install time info
debconf Wed Apr 25 08:08:40 2018
gcc-8-base:amd64 Wed Apr 25 08:08:41 2018
libacl1:amd64 Wed Apr 25 08:08:41 2018
libattr1:amd64 Wed Apr 25 08:08:41 2018
dpkg Wed Apr 25 08:08:41 2018
libbz2-1.0:amd64 Wed Apr 25 08:08:41 2018
libc6:amd64 Wed Apr 25 08:08:42 2018
libgcc1:amd64 Wed Apr 25 08:08:42 2018
liblzma5:amd64 Wed Apr 25 08:08:42 2018
libdb5.3:amd64 Wed Apr 25 08:08:42 2018
[...]

11、 dhomepage

dhomepage 实用程序将在默认 Web 浏览器中显示给定包的官方网站。例如,以下命令将打开 Vim 编辑器的主页。

$ dhomepage vim

这就是全部了。Debian-goodies 是你武器库中必备的工具。即使我们不经常使用所有这些实用程序,但它们值得学习,我相信它们有时会非常有用。

我希望这很有用。更多好东西要来了。敬请关注!

干杯!


via: https://www.ostechnix.com/debian-goodies-a-set-of-useful-utilities-for-debian-and-ubuntu-users/

作者:SK 选题:lujun9972 译者:MjSeven 校对:wxy

本文由 LCTT 原创编译,Linux中国 荣誉推出

对于 Linux 管理员来说,检查系统内存用量是一个重要的技能。Jack 给出了解决这个问题的五种不同方式。

Linux 操作系统包含大量工具,所有这些工具都可以帮助你管理系统。从简单的文件和目录工具到非常复杂的安全命令,在 Linux 中没有多少是你做不了的。而且,尽管普通桌面用户可能不需要在命令行熟悉这些工具,但对于 Linux 管理员来说,它们是必需的。为什么?首先,你在某些时候不得不使用没有 GUI 的 Linux 服务器。其次,命令行工具通常比 GUI 替代工具提供更多的功能和灵活性。

确定内存使用情况是你可能需要的技能,尤其是某个应用程序变得异常和占用系统内存时。当发生这种情况时,知道有多种工具可以帮助你进行故障排除十分方便的。或者,你可能需要收集有关 Linux 交换分区的信息,或者有关安装的内存的详细信息?对于这些也有相应的命令。让我们深入了解各种 Linux 命令行工具,以帮助你检查系统内存使用情况。这些工具并不是非常难以使用,在本文中,我将向你展示五种不同的方法来解决这个问题。

我将在 Ubuntu 18.04 服务器平台上进行演示,但是你应该在你选择的发行版中找到对应的所有命令。更妙的是,你不需要安装任何东西(因为大多数这些工具都包含 Linux 系统中)。

话虽如此,让我们开始工作吧。

top

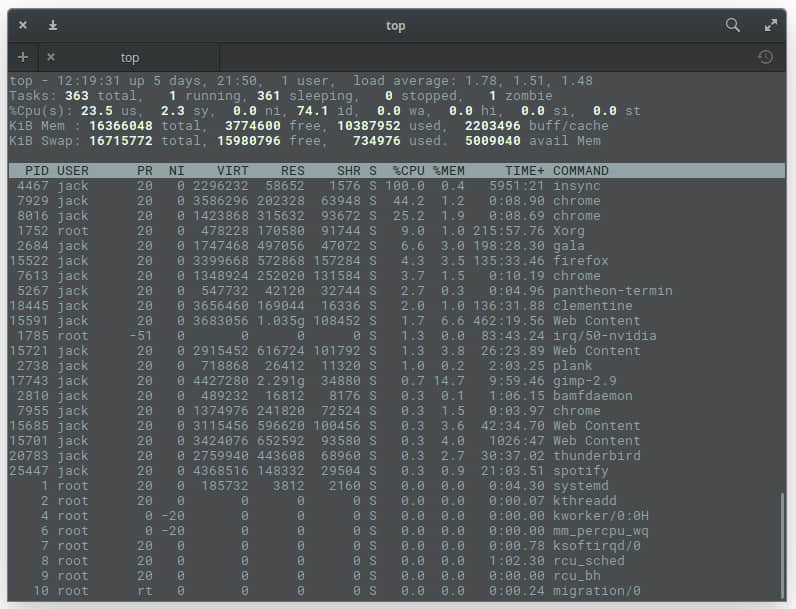
我想从最常用的工具开始。top 命令提供正在运行的系统的实时动态视图,它检查每个进程的内存使用情况。这非常重要,因为你可以轻松地看到同一命令的多个示例消耗不同的内存量。虽然你无法在没有显示器的服务器上看到这种情况,但是你已经注意到打开 Chrome 使你的系统速度变慢了。运行 top 命令以查看 Chrome 有多个进程在运行(每个选项卡一个 - 图 1)。

 title=

图1:top 命令中出现多个 Chrome 进程。

Chrome 并不是唯一显示多个进程的应用。你看到图 1 中的 Firefox 了吗?那是 Firefox 的主进程,而 Web Content 进程是其打开的选项卡。在输出的顶部,你将看到系统统计信息。在我的机器上(System76 Leopard Extreme),我总共有 16GB 可用 RAM,其中只有超过 10GB 的 RAM 正在使用中。然后,你可以整理该列表,查看每个进程使用的内存百分比。

top 最好的地方之一就是发现可能已经失控的服务的进程 ID 号(PID)。有了这些 PID,你可以对有问题的任务进行故障排除(或 kill)。

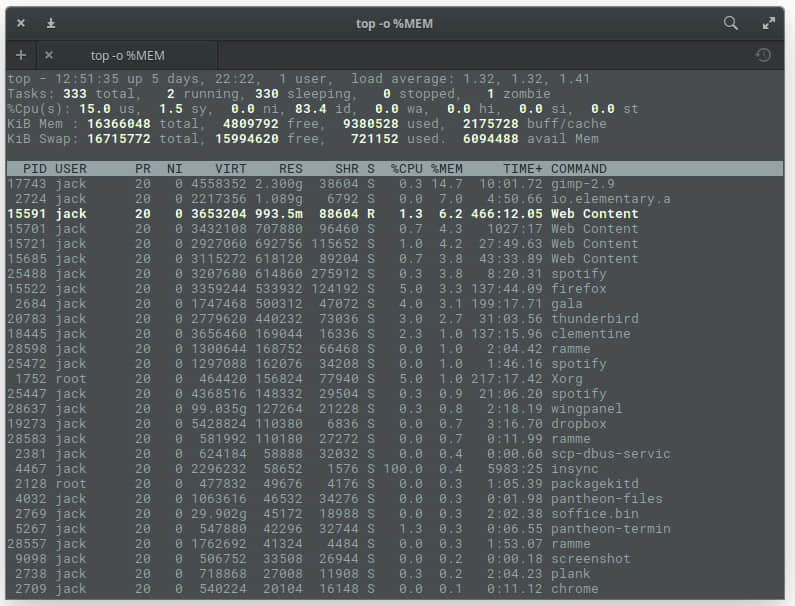
如果你想让 top 显示更友好的内存信息,使用命令 top -o %MEM,这会使 top 按进程所用内存对所有进程进行排序(图 2)。

 title=

图 2:在 top 命令中按使用内存对进程排序

top 命令还为你提供有关使用了多少交换空间的实时更新。

free

然而有时候,top 命令可能不能满足你的需求。你可能只需要查看系统的可用和已用内存。对此,Linux 还有 free 命令。free 命令显示:

  • 可用和已使用的物理内存总量
  • 系统中交换内存的总量
  • 内核使用的缓冲区和缓存

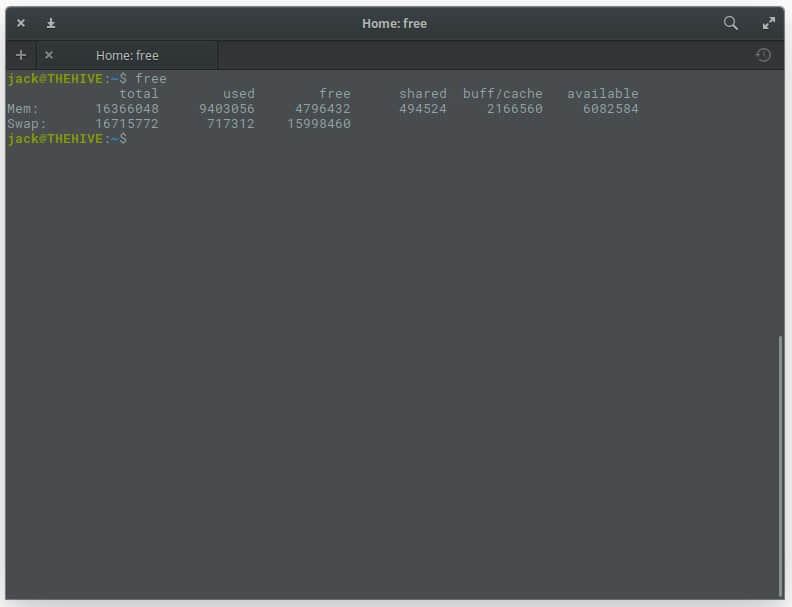
在终端窗口中,输入 free 命令。它的输出不是实时的,相反,你将获得的是当前空闲和已用内存的即时快照(图 3)。

 title=

图 3 :free 命令的输出简单明了。

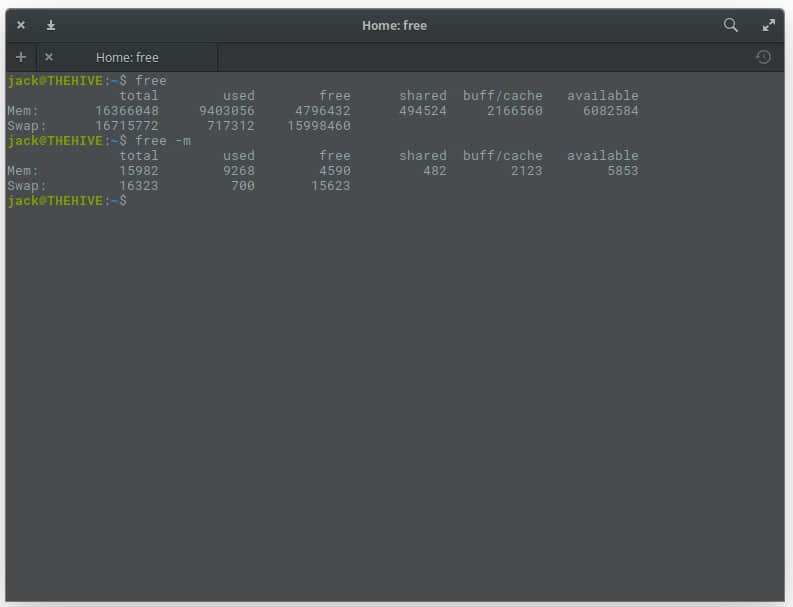
当然,你可以通过添加 -m 选项来让 free 显示得更友好一点,就像这样:free -m。这将显示内存的使用情况,以 MB 为单位(图 4)。

 title=

图 4:free 命令以一种更易于阅读的形式输出。

当然,如果你的系统是很新的,你将希望使用 -g 选项(以 GB 为单位),比如 free -g

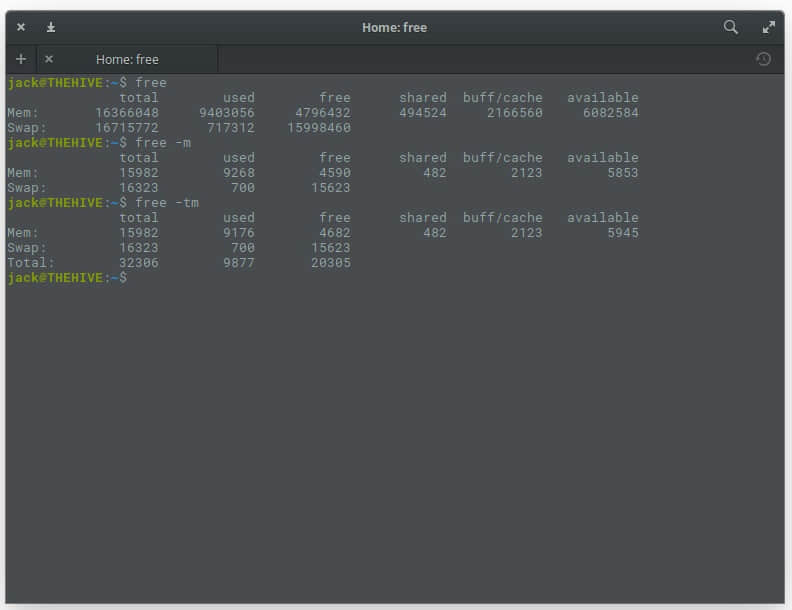
如果你需要知道内存总量,你可以添加 -t 选项,比如:free -mt。这将简单地计算每列中的内存总量(图 5)。

 title=

图 5:为你提供空闲的内存列。

vmstat

另一个非常方便的工具是 vmstat。这个特殊的命令是一个报告虚拟内存统计信息的小技巧。vmstat 命令将报告关于:

  • 进程
  • 内存
  • 分页
  • 阻塞 IO
  • 中断
  • 磁盘
  • CPU

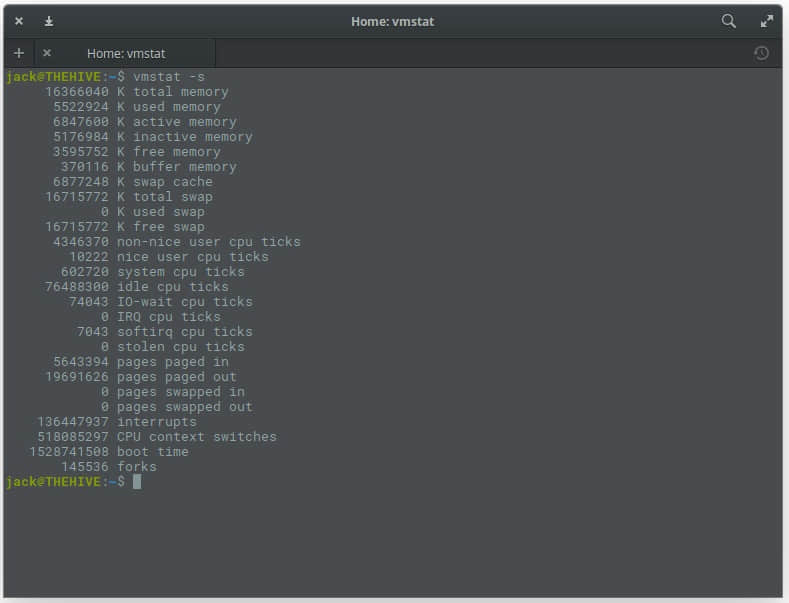
使用 vmstat 的最佳方法是使用 -s 选项,如 vmstat -s。这将在单列中报告统计信息(这比默认报告更容易阅读)。vmstat 命令将提供比你需要的更多的信息(图 6),但更多的总是更好的(在这种情况下)。

 title=

图 6:使用 vmstat 命令来检查内存使用情况。

dmidecode

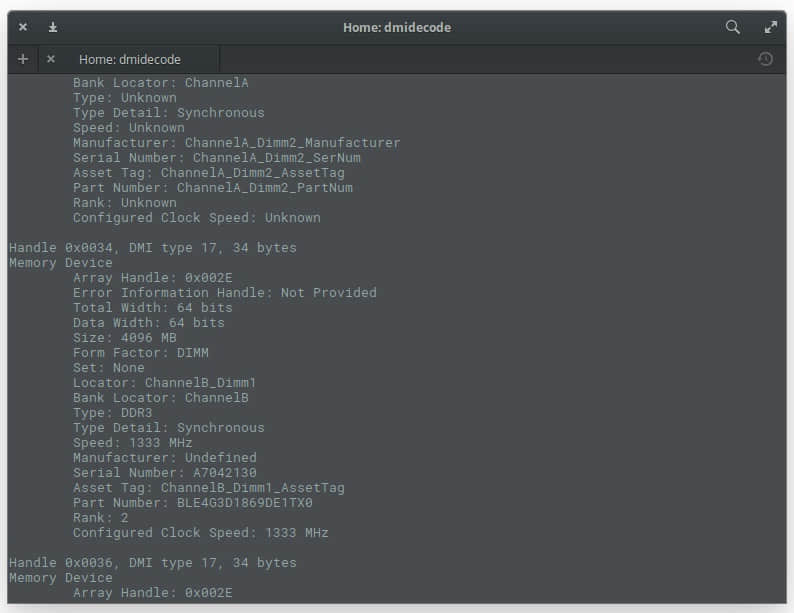
如果你想找到关于已安装的系统内存的详细信息,该怎么办?为此,你可以使用 dmidecode 命令。这个特殊的工具是 DMI 表解码器,它将系统的 DMI 表内容转储成人类可读的格式。如果你不清楚 DMI 表是什么,那么可以这样说,它可以用来描述系统的构成(以及系统的演变)。

要运行 dmidecode 命令,你需要 sudo 权限。因此输入命令 sudo dmidecode -t 17。该命令的输出(图 7)可能很长,因为它显示所有内存类型设备的信息。因此,如果你无法上下滚动,则可能需要将该命令的输出发送到一个文件中,比如:sudo dmidecode -t 17> dmi_infoI,或将其传递给 less 命令,如 sudo dmidecode | less

 title=

图 7:dmidecode 命令的输出。

/proc/meminfo

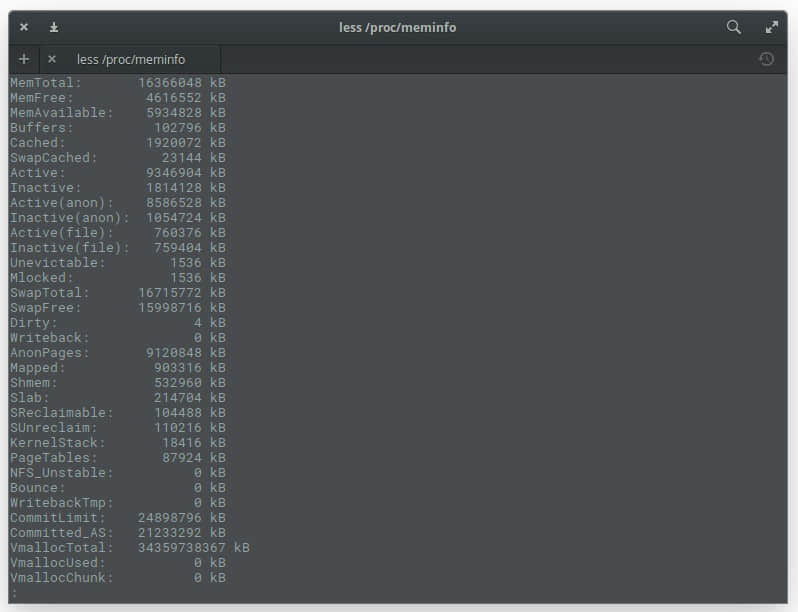
你可能会问自己:“这些命令从哪里获取这些信息?”在某些情况下,它们从 /proc/meminfo 文件中获取。猜到了吗?你可以使用命令 less /proc/meminfo 直接读取该文件。通过使用 less 命令,你可以在长长的输出中向上和向下滚动,以准确找到你需要的内容(图 8)。

 title=

图 8:less /proc/meminfo 命令的输出。

关于 /proc/meminfo 你应该知道:这不是一个真实的文件。相反 /proc/meminfo 是一个虚拟文件,包含有关系统的实时动态信息。特别是,你需要检查以下值:

  • 全部内存(MemTotal
  • 空闲内存(MemFree
  • 可用内存(MemAvailable
  • 缓冲区(Buffers
  • 文件缓存(Cached
  • 交换缓存(SwapCached
  • 全部交换区(SwapTotal
  • 空闲交换区(SwapFree

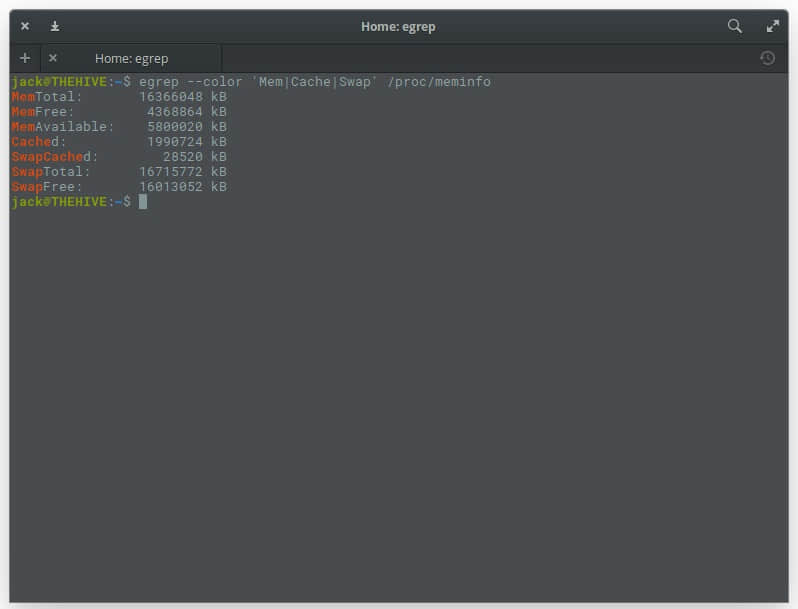
如果你想使用 /proc/meminfo,你可以连接 egrep 命令使用它:egrep --color'Mem | Cache | Swap'/proc/meminfo。这将生成一个易于阅读的列表,其中包含 MemCacheSwap 等内容的条目将是彩色的(图 9)。

 title=

图 9:让 /proc/meminfo 更容易阅读。

继续学习

你要做的第一件事就是阅读每个命令的手册页(例如 man topman freeman vmstatman dmidecode)。从命令的手册页开始,对于如何在 Linux 上使用一个工具,它总是一个很好的学习方法。

通过 Linux 基金会和 edX 的免费 “Linux 简介”课程了解有关 Linux 的更多知识。


via: https://www.linux.com/learn/5-commands-checking-memory-usage-linux

作者:Jack Wallen 选题:lujun9972 译者:MjSeven 校对:wxy

本文由 LCTT 原创编译,Linux中国 荣誉推出
获取有关生活、宇宙和除了有关 SELinux 的重要问题的答案

“一个重要而普遍的事实是,事情并不总是你看上去的那样 …” ―Douglas Adams,《银河系漫游指南》

安全、坚固、遵从性、策略是末世中系统管理员的四骑士。除了我们的日常任务之外 —— 监控、备份、实施、调优、更新等等 —— 我们还需要负责我们的系统安全。即使这些系统是第三方提供商告诉我们该禁用增强安全性的系统。这看起来像《碟中碟》中 Ethan Hunt 的工作一样。

面对这种窘境,一些系统管理员决定去服用蓝色小药丸,因为他们认为他们永远也不会知道如生命、宇宙、以及其它一些大问题的答案。而我们都知道,它的答案就是这个 42

按《银河系漫游指南》的精神,这里是关于在你的系统上管理和使用 SELinux 这个大问题的 42 个答案。

  1. SELinux 是一个标签系统,这意味着每个进程都有一个标签。每个文件、目录、以及系统对象都有一个标签。策略规则负责控制标签化的进程和标签化的对象之间的访问。由内核强制执行这些规则。
  2. 两个最重要的概念是:标签化(文件、进程、端口等等)和类型强制(基于不同的类型隔离不同的的进程)。
  3. 正确的标签格式是 user:role:type:level(可选)。
  4. 多级别安全 Multi-Level Security (MLS)强制的目的是基于它们所使用数据的安全级别,对进程(域)强制实施控制。比如,一个秘密级别的进程是不能读取极机密级别的数据。
  5. 多类别安全 Multi-Category Security (MCS)强制相互保护相似的进程(如虚拟机、OpenShift gears、SELinux 沙盒、容器等等)。
  6. 在启动时改变 SELinux 模式的内核参数有:

    • autorelabel=1 → 强制给系统重新标签化
    • selinux=0 → 内核不加载 SELinux 基础设施的任何部分
    • enforcing=0 → 以 许可 permissive 模式启动
  7. 如果给整个系统重新标签化:
# touch /.autorelabel 
# reboot

如果系统标签中有大量的错误,为了能够让 autorelabel 成功,你可以用许可模式引导系统。

  1. 检查 SELinux 是否启用:# getenforce
  2. 临时启用/禁用 SELinux:# setenforce [1|0]
  3. SELinux 状态工具:# sestatus
  4. 配置文件:/etc/selinux/config
  5. SELinux 是如何工作的?这是一个为 Apache Web Server 标签化的示例:
* 二进制文件:`/usr/sbin/httpd`→`httpd_exec_t`
* 配置文件目录:`/etc/httpd`→`httpd_config_t`
* 日志文件目录:`/var/log/httpd` → `httpd_log_t`
* 内容目录:`/var/www/html` → `httpd_sys_content_t`
* 启动脚本:`/usr/lib/systemd/system/httpd.service` → `httpd_unit_file_d`
* 进程:`/usr/sbin/httpd -DFOREGROUND` → `httpd_t`
* 端口:`80/tcp, 443/tcp` → `httpd_t, http_port_t`在 `httpd_t` 安全上下文中运行的一个进程可以与具有 `httpd_something_t` 标签的对象交互。
  1. 许多命令都可以接收一个 -Z 参数去查看、创建、和修改安全上下文:
* `ls -Z`
* `id -Z`
* `ps -Z`
* `netstat -Z`
* `cp -Z`
* `mkdir -Z`当文件被创建时,它们的安全上下文会根据它们父目录的安全上下文来创建(可能有某些例外)。RPM 可以在安装过程中设定安全上下文。
  1. 这里有导致 SELinux 出错的四个关键原因,它们将在下面的 15 - 21 条中展开描述:
* 标签化问题
* SELinux 需要知道一些东西
* SELinux 策略或者应用有 bug
* 你的信息可能被损坏
  1. 标签化问题:如果在 /srv/myweb 中你的文件没有被正确的标签化,访问可能会被拒绝。这里有一些修复这类问题的方法:
* 如果你知道标签:`# semanage fcontext -a -t httpd_sys_content_t '/srv/myweb(/.*)?'`
* 如果你知道和它有相同标签的文件:`# semanage fcontext -a -e /srv/myweb /var/www`
* 恢复安全上下文(对于以上两种情况):`# restorecon -vR /srv/myweb`
  1. 标签化问题:如果你是移动了一个文件,而不是去复制它,那么这个文件将保持原始的环境。修复这类问题:
* 使用标签来改变安全上下文:`# chcon -t httpd_system_content_t /var/www/html/index.html`
* 使用参考文件的标签来改变安全上下文:`# chcon --reference /var/www/html/ /var/www/html/index.html`
* 恢复安全上下文(对于以上两种情况):`# restorecon -vR /var/www/html/`
  1. 如果 SELinux 需要知道 HTTPD 在 8585 端口上监听,使用下列命令告诉 SELinux:# semanage port -a -t http_port_t -p tcp 8585
  2. SELinux 需要知道是否允许在运行时改变 SELinux 策略部分,而无需重写 SELinux 策略。例如,如果希望 httpd 去发送邮件,输入:# setsebool -P httpd_can_sendmail 1
  3. SELinux 需要知道 SELinux 设置的关闭或打开的一系列布尔值:
* 查看所有的布尔值:`# getsebool -a`
* 查看每个布尔值的描述:`# semanage boolean -l`
* 设置某个布尔值:`# setsebool [_boolean_] [1|0]`
* 将它配置为永久值,添加 `-P` 标志。例如:`# setsebool httpd_enable_ftp_server 1 -P`
  1. SELinux 策略/应用可能有 bug,包括:
* 不寻常的代码路径
* 配置
* 重定向 `stdout`
* 泄露的文件描述符
* 可执行内存
* 错误构建的库开一个工单(但不要提交 Bugzilla 报告;使用 Bugzilla 没有对应的服务)
  1. 你的信息可能被损坏了,假如你被限制在某个区域,尝试这样做:
* 加载内核模块
* 关闭 SELinux 的强制模式
* 写入 `etc_t/shadow_t`
* 修改 iptables 规则
  1. 用于开发策略模块的 SELinux 工具:# yum -y install setroubleshoot setroubleshoot-server。安装完成之后重引导机器或重启 auditd 服务。
  2. 使用 journalctl 去列出所有与 setroubleshoot 相关的日志:# journalctl -t setroubleshoot --since=14:20
  3. 使用 journalctl 去列出所有与特定 SELinux 标签相关的日志。例如:# journalctl _SELINUX_CONTEXT=system_u:system_r:policykit_t:s0
  4. 当 SELinux 错误发生时,使用setroubleshoot 的日志,并尝试找到某些可能的解决方法。例如:从 journalctl 中:
Jun 14 19:41:07 web1 setroubleshoot: SELinux is preventing httpd from getattr access on the file /var/www/html/index.html. For complete message run: sealert -l 12fd8b04-0119-4077-a710-2d0e0ee5755e

# sealert -l 12fd8b04-0119-4077-a710-2d0e0ee5755e
SELinux is preventing httpd from getattr access on the file /var/www/html/index.html.

***** Plugin restorecon (99.5 confidence) suggests ************************

If you want to fix the label,
/var/www/html/index.html default label should be httpd_syscontent_t.
Then you can restorecon.
Do
# /sbin/restorecon -v /var/www/html/index.html
  1. 日志:SELinux 记录的信息全在这些地方:
* `/var/log/messages`
* `/var/log/audit/audit.log`
* `/var/lib/setroubleshoot/setroubleshoot_database.xml`
  1. 日志:在审计日志中查找 SELinux 错误:# ausearch -m AVC,USER_AVC,SELINUX_ERR -ts today
  2. 针对特定的服务,搜索 SELinux 的 访问向量缓存 Access Vector Cache (AVC)信息:# ausearch -m avc -c httpd
  3. audit2allow 实用工具可以通过从日志中搜集有关被拒绝的操作,然后生成 SELinux 策略允许的规则,例如:
* 产生一个人类可读的关于为什么拒绝访问的描述:`# audit2allow -w -a`
* 查看允许被拒绝的类型强制规则:`# audit2allow -a`
* 创建一个自定义模块:`# audit2allow -a -M mypolicy`,其中 `-M` 选项将创建一个特定名称的强制类型文件(.te),并编译这个规则到一个策略包(.pp)中:`mypolicy.pp mypolicy.te`
* 安装自定义模块:`# semodule -i mypolicy.pp`
  1. 配置单个进程(域)运行在许可模式:# semanage permissive -a httpd_t
  2. 如果不再希望一个域在许可模式中:# semanage permissive -d httpd_t
  3. 禁用所有的许可域:# semodule -d permissivedomains
  4. 启用 SELinux MLS 策略:# yum install selinux-policy-mls。 在 /etc/selinux/config 中:
SELINUX=permissive
SELINUXTYPE=mls

确保 SELinux 运行在许可模式:# setenforce 0

使用 fixfiles 脚本来确保在下一次重启时文件将被重新标签化:# fixfiles -F onboot # reboot

  1. 创建一个带有特定 MLS 范围的用户:# useradd -Z staff_u john

使用 useradd 命令,映射新用户到一个已存在的 SELinux 用户(上面例子中是 staff_u)。

  1. 查看 SELinux 和 Linux 用户之间的映射:# semanage login -l
  2. 为用户定义一个指定的范围:# semanage login --modify --range s2:c100 john
  3. 调整用户家目录上的标签(如果需要的话):# chcon -R -l s2:c100 /home/john
  4. 列出当前类别:# chcat -L
  5. 修改类别或者创建你自己的分类,修改如下文件:/etc/selinux/_<selinuxtype>_/setrans.conf
  6. 以某个特定的文件、角色和用户安全上下文来运行一个命令或者脚本:# runcon -t initrc_t -r system_r -u user_u yourcommandhere
* `-t` 是文件安全上下文
* `-r` 是角色安全上下文
* `-u` 是用户安全上下文
  1. 在容器中禁用 SELinux:
* 使用 Podman:`# podman run --security-opt label=disable ...`
* 使用 Docker:`# docker run --security-opt label=disable ...`
  1. 如果需要给容器提供完全访问系统的权限:
* 使用 Podman:`# podman run --privileged ...`
* 使用 Docker:`# docker run --privileged ...`

就这些了,你已经知道了答案。因此请相信我:不用恐慌,去打开 SELinux 吧

作者简介

Alex Callejas 是位于墨西哥城的红帽公司拉丁美洲区的一名技术客服经理。作为一名系统管理员,他已有超过 10 年的经验。在基础设施强化方面具有很强的专业知识。对开源抱有热情,通过在不同的公共事件和大学中分享他的知识来支持社区。天生的极客,当然他一般选择使用 Fedora Linux 发行版。这里有更多关于他的信息。


via: https://opensource.com/article/18/7/sysadmin-guide-selinux

作者:Alex Callejas 选题:lujun9972 译者:qhwdw, FSSlc 校对:wxy

本文由 LCTT 原创编译,Linux中国 荣誉推出
Ubuntu 中有许多实用程序可以将 Linux 内核升级到最新的稳定版本。我们之前已经写过关于这些实用程序的文章,例如 Linux Kernel Utilities (LKU)、 Ubuntu Kernel Upgrade Utility (UKUU) 和 Ubunsys。

另外还有一些其它实用程序可供使用。我们计划在其它文章中包含这些,例如 ubuntu-mainline-kernel.sh 和从主线内核手动安装的方式。

今天我们还会教你类似的使用工具 —— UKTools。你可以尝试使用这些实用程序中的任何一个来将 Linux 内核升级至最新版本。

最新的内核版本附带了安全漏洞修复和一些改进,因此,最好保持最新的内核版本以获得可靠、安全和更好的硬件性能。

有时候最新的内核版本可能会有一些漏洞,并且会导致系统崩溃,这是你的风险。我建议你不要在生产环境中安装它。

建议阅读:

什么是 UKTools

UKTools 意思是 Ubuntu 内核工具,它包含两个 shell 脚本 ukupgradeukpurge

ukupgrade 意思是 “Ubuntu Kernel Upgrade”,它允许用户将 Linux 内核升级到 Ubuntu/Mint 的最新稳定版本以及基于 kernel.ubuntu.com 的衍生版本。

ukpurge 意思是 “Ubuntu Kernel Purge”,它允许用户在机器中删除旧的 Linux 内核镜像或头文件,用于 Ubuntu/Mint 和其衍生版本。它将只保留三个内核版本。

此实用程序没有 GUI,但它看起来非常简单直接,因此,新手可以在没有任何问题的情况下进行升级。

我正在运行 Ubuntu 17.10,目前的内核版本如下:

$ uname -a
Linux ubuntu 4.13.0-39-generic #44-Ubuntu SMP Thu Apr 5 14:25:01 UTC 2018 x86_64 x86_64 x86_64 GNU/Linux

运行以下命令来获取系统上已安装内核的列表(Ubuntu 及其衍生产品)。目前我持有 7 个内核。

$ dpkg --list | grep linux-image
ii linux-image-4.13.0-16-generic 4.13.0-16.19 amd64 Linux kernel image for version 4.13.0 on 64 bit x86 SMP
ii linux-image-4.13.0-17-generic 4.13.0-17.20 amd64 Linux kernel image for version 4.13.0 on 64 bit x86 SMP
ii linux-image-4.13.0-32-generic 4.13.0-32.35 amd64 Linux kernel image for version 4.13.0 on 64 bit x86 SMP
ii linux-image-4.13.0-36-generic 4.13.0-36.40 amd64 Linux kernel image for version 4.13.0 on 64 bit x86 SMP
ii linux-image-4.13.0-37-generic 4.13.0-37.42 amd64 Linux kernel image for version 4.13.0 on 64 bit x86 SMP
ii linux-image-4.13.0-38-generic 4.13.0-38.43 amd64 Linux kernel image for version 4.13.0 on 64 bit x86 SMP
ii linux-image-4.13.0-39-generic 4.13.0-39.44 amd64 Linux kernel image for version 4.13.0 on 64 bit x86 SMP
ii linux-image-extra-4.13.0-16-generic 4.13.0-16.19 amd64 Linux kernel extra modules for version 4.13.0 on 64 bit x86 SMP
ii linux-image-extra-4.13.0-17-generic 4.13.0-17.20 amd64 Linux kernel extra modules for version 4.13.0 on 64 bit x86 SMP
ii linux-image-extra-4.13.0-32-generic 4.13.0-32.35 amd64 Linux kernel extra modules for version 4.13.0 on 64 bit x86 SMP
ii linux-image-extra-4.13.0-36-generic 4.13.0-36.40 amd64 Linux kernel extra modules for version 4.13.0 on 64 bit x86 SMP
ii linux-image-extra-4.13.0-37-generic 4.13.0-37.42 amd64 Linux kernel extra modules for version 4.13.0 on 64 bit x86 SMP
ii linux-image-extra-4.13.0-38-generic 4.13.0-38.43 amd64 Linux kernel extra modules for version 4.13.0 on 64 bit x86 SMP
ii linux-image-extra-4.13.0-39-generic 4.13.0-39.44 amd64 Linux kernel extra modules for version 4.13.0 on 64 bit x86 SMP
ii linux-image-generic 4.13.0.39.42 amd64 Generic Linux kernel image

如何安装 UKTools

在 Ubuntu 及其衍生产品上,只需运行以下命令来安装 UKTools 即可。

在你的系统上运行以下命令来克隆 UKTools 仓库:

$ git clone https://github.com/usbkey9/uktools

进入 uktools 目录:

$ cd uktools

运行 Makefile 以生成必要的文件。此外,这将自动安装最新的可用内核。只需重新启动系统即可使用最新的内核。

$ sudo make
[sudo] password for daygeek:
Creating the directories if neccessary
Linking profile.d file for reboot message
Linking files to global sbin directory
Ubuntu Kernel Upgrade - by Mustafa Hasturk
------------------------------------------
This script is based on the work of Mustafa Hasturk and was reworked by
Caio Oliveira and modified and fixed by Christoph Kepler

Current Development and Maintenance by Christoph Kepler

Do you want the Stable Release (if not sure, press y)? (y/n): y
Do you want the Generic kernel? (y/n): y
Do you want to autoremove old kernel? (y/n): y
no crontab for root
Do you want to update the kernel automatically? (y/n): y
Setup complete. Update the kernel right now? (y/n): y
Reading package lists... Done
Building dependency tree
Reading state information... Done
The following packages were automatically installed and are no longer required:
 linux-headers-4.13.0-16 linux-headers-4.13.0-16-generic linux-headers-4.13.0-17 linux-headers-4.13.0-17-generic linux-headers-4.13.0-32 linux-headers-4.13.0-32-generic linux-headers-4.13.0-36
 linux-headers-4.13.0-36-generic linux-headers-4.13.0-37 linux-headers-4.13.0-37-generic linux-image-4.13.0-16-generic linux-image-4.13.0-17-generic linux-image-4.13.0-32-generic linux-image-4.13.0-36-generic
 linux-image-4.13.0-37-generic linux-image-extra-4.13.0-16-generic linux-image-extra-4.13.0-17-generic linux-image-extra-4.13.0-32-generic linux-image-extra-4.13.0-36-generic
 linux-image-extra-4.13.0-37-generic
Use 'sudo apt autoremove' to remove them.
The following additional packages will be installed:
 lynx-common
The following NEW packages will be installed:
 lynx lynx-common
0 upgraded, 2 newly installed, 0 to remove and 71 not upgraded.
Need to get 1,498 kB of archives.
After this operation, 5,418 kB of additional disk space will be used.
Get:1 http://in.archive.ubuntu.com/ubuntu artful/universe amd64 lynx-common all 2.8.9dev16-1 [873 kB]
Get:2 http://in.archive.ubuntu.com/ubuntu artful/universe amd64 lynx amd64 2.8.9dev16-1 [625 kB]
Fetched 1,498 kB in 12s (120 kB/s)
Selecting previously unselected package lynx-common.
(Reading database ... 441037 files and directories currently installed.)
Preparing to unpack .../lynx-common_2.8.9dev16-1_all.deb ...
Unpacking lynx-common (2.8.9dev16-1) ...
Selecting previously unselected package lynx.
Preparing to unpack .../lynx_2.8.9dev16-1_amd64.deb ...
Unpacking lynx (2.8.9dev16-1) ...
Processing triggers for mime-support (3.60ubuntu1) ...
Processing triggers for doc-base (0.10.7) ...
Processing 1 added doc-base file...
Processing triggers for man-db (2.7.6.1-2) ...
Setting up lynx-common (2.8.9dev16-1) ...
Setting up lynx (2.8.9dev16-1) ...
update-alternatives: using /usr/bin/lynx to provide /usr/bin/www-browser (www-browser) in auto mode

Cleaning old downloads in /tmp

Downloading the kernel's components...
Checksum for linux-headers-4.16.7-041607-generic_4.16.7-041607.201805021131_amd64.deb succeed
Checksum for linux-image-unsigned-4.16.7-041607-generic_4.16.7-041607.201805021131_amd64.deb succeed
Checksum for linux-modules-4.16.7-041607-generic_4.16.7-041607.201805021131_amd64.deb succeed

Downloading the shared kernel header...
Checksum for linux-headers-4.16.7-041607_4.16.7-041607.201805021131_all.deb succeed

Installing Kernel and Headers...
Selecting previously unselected package linux-headers-4.16.7-041607.
(Reading database ... 441141 files and directories currently installed.)
Preparing to unpack .../linux-headers-4.16.7-041607_4.16.7-041607.201805021131_all.deb ...
Unpacking linux-headers-4.16.7-041607 (4.16.7-041607.201805021131) ...
Selecting previously unselected package linux-headers-4.16.7-041607-generic.
Preparing to unpack .../linux-headers-4.16.7-041607-generic_4.16.7-041607.201805021131_amd64.deb ...
Unpacking linux-headers-4.16.7-041607-generic (4.16.7-041607.201805021131) ...
Selecting previously unselected package linux-image-unsigned-4.16.7-041607-generic.
Preparing to unpack .../linux-image-unsigned-4.16.7-041607-generic_4.16.7-041607.201805021131_amd64.deb ...
Unpacking linux-image-unsigned-4.16.7-041607-generic (4.16.7-041607.201805021131) ...
Selecting previously unselected package linux-modules-4.16.7-041607-generic.
Preparing to unpack .../linux-modules-4.16.7-041607-generic_4.16.7-041607.201805021131_amd64.deb ...
Unpacking linux-modules-4.16.7-041607-generic (4.16.7-041607.201805021131) ...
Setting up linux-headers-4.16.7-041607 (4.16.7-041607.201805021131) ...
dpkg: dependency problems prevent configuration of linux-headers-4.16.7-041607-generic:
 linux-headers-4.16.7-041607-generic depends on libssl1.1 (>= 1.1.0); however:
 Package libssl1.1 is not installed.

Setting up linux-modules-4.16.7-041607-generic (4.16.7-041607.201805021131) ...
Setting up linux-image-unsigned-4.16.7-041607-generic (4.16.7-041607.201805021131) ...
I: /vmlinuz.old is now a symlink to boot/vmlinuz-4.13.0-39-generic
I: /initrd.img.old is now a symlink to boot/initrd.img-4.13.0-39-generic
I: /vmlinuz is now a symlink to boot/vmlinuz-4.16.7-041607-generic
I: /initrd.img is now a symlink to boot/initrd.img-4.16.7-041607-generic
Processing triggers for linux-image-unsigned-4.16.7-041607-generic (4.16.7-041607.201805021131) ...
/etc/kernel/postinst.d/initramfs-tools:
update-initramfs: Generating /boot/initrd.img-4.16.7-041607-generic
/etc/kernel/postinst.d/zz-update-grub:
Generating grub configuration file ...
Warning: Setting GRUB_TIMEOUT to a non-zero value when GRUB_HIDDEN_TIMEOUT is set is no longer supported.
Found linux image: /boot/vmlinuz-4.16.7-041607-generic
Found initrd image: /boot/initrd.img-4.16.7-041607-generic
Found linux image: /boot/vmlinuz-4.13.0-39-generic
Found initrd image: /boot/initrd.img-4.13.0-39-generic
Found linux image: /boot/vmlinuz-4.13.0-38-generic
Found initrd image: /boot/initrd.img-4.13.0-38-generic
Found linux image: /boot/vmlinuz-4.13.0-37-generic
Found initrd image: /boot/initrd.img-4.13.0-37-generic
Found linux image: /boot/vmlinuz-4.13.0-36-generic
Found initrd image: /boot/initrd.img-4.13.0-36-generic
Found linux image: /boot/vmlinuz-4.13.0-32-generic
Found initrd image: /boot/initrd.img-4.13.0-32-generic
Found linux image: /boot/vmlinuz-4.13.0-17-generic
Found initrd image: /boot/initrd.img-4.13.0-17-generic
Found linux image: /boot/vmlinuz-4.13.0-16-generic
Found initrd image: /boot/initrd.img-4.13.0-16-generic
Found memtest86+ image: /boot/memtest86+.elf
Found memtest86+ image: /boot/memtest86+.bin
done

Thanks for using this script! Hope it helped.
Give it a star: https://github.com/MarauderXtreme/uktools

重新启动系统以激活最新的内核。

$ sudo shutdown -r now

一旦系统重新启动,重新检查内核版本。

$ uname -a
Linux ubuntu 4.16.7-041607-generic #201805021131 SMP Wed May 2 15:34:55 UTC 2018 x86_64 x86_64 x86_64 GNU/Linux

此 make 命令会将下面的文件放到 /usr/local/bin 目录中。

do-kernel-upgrade
do-kernel-purge

要移除旧内核,运行以下命令:

$ do-kernel-purge

Ubuntu Kernel Purge - by Caio Oliveira

This script will only keep three versions: the first and the last two, others will be purge

---Current version:
Linux Kernel 4.16.7-041607 Generic (linux-image-4.16.7-041607-generic)

---Versions to remove:
4.13.0-16
4.13.0-17
4.13.0-32
4.13.0-36
4.13.0-37

---Do you want to remove the old kernels/headers versions? (Y/n): y
Reading package lists... Done
Building dependency tree
Reading state information... Done
The following packages were automatically installed and are no longer required:
 linux-headers-4.13.0-17 linux-headers-4.13.0-17-generic linux-headers-4.13.0-32 linux-headers-4.13.0-32-generic linux-headers-4.13.0-36 linux-headers-4.13.0-36-generic linux-headers-4.13.0-37
 linux-headers-4.13.0-37-generic linux-image-4.13.0-17-generic linux-image-4.13.0-32-generic linux-image-4.13.0-36-generic linux-image-4.13.0-37-generic linux-image-extra-4.13.0-17-generic
 linux-image-extra-4.13.0-32-generic linux-image-extra-4.13.0-36-generic linux-image-extra-4.13.0-37-generic
Use 'sudo apt autoremove' to remove them.
The following packages will be REMOVED:
 linux-headers-4.13.0-16* linux-headers-4.13.0-16-generic* linux-image-4.13.0-16-generic* linux-image-extra-4.13.0-16-generic*
0 upgraded, 0 newly installed, 4 to remove and 71 not upgraded.
After this operation, 318 MB disk space will be freed.
(Reading database ... 465582 files and directories currently installed.)
Removing linux-headers-4.13.0-16-generic (4.13.0-16.19) ...
Removing linux-headers-4.13.0-16 (4.13.0-16.19) ...
Removing linux-image-extra-4.13.0-16-generic (4.13.0-16.19) ...
run-parts: executing /etc/kernel/postinst.d/apt-auto-removal 4.13.0-16-generic /boot/vmlinuz-4.13.0-16-generic
run-parts: executing /etc/kernel/postinst.d/initramfs-tools 4.13.0-16-generic /boot/vmlinuz-4.13.0-16-generic
update-initramfs: Generating /boot/initrd.img-4.13.0-16-generic
run-parts: executing /etc/kernel/postinst.d/unattended-upgrades 4.13.0-16-generic /boot/vmlinuz-4.13.0-16-generic
run-parts: executing /etc/kernel/postinst.d/update-notifier 4.13.0-16-generic /boot/vmlinuz-4.13.0-16-generic
run-parts: executing /etc/kernel/postinst.d/zz-update-grub 4.13.0-16-generic /boot/vmlinuz-4.13.0-16-generic
Generating grub configuration file ...
Warning: Setting GRUB_TIMEOUT to a non-zero value when GRUB_HIDDEN_TIMEOUT is set is no longer supported.
Found linux image: /boot/vmlinuz-4.16.7-041607-generic
Found initrd image: /boot/initrd.img-4.16.7-041607-generic
Found linux image: /boot/vmlinuz-4.13.0-39-generic
Found initrd image: /boot/initrd.img-4.13.0-39-generic
Found linux image: /boot/vmlinuz-4.13.0-38-generic
Found initrd image: /boot/initrd.img-4.13.0-38-generic
Found linux image: /boot/vmlinuz-4.13.0-37-generic
Found initrd image: /boot/initrd.img-4.13.0-37-generic
Found linux image: /boot/vmlinuz-4.13.0-36-generic
Found initrd image: /boot/initrd.img-4.13.0-36-generic
Found linux image: /boot/vmlinuz-4.13.0-32-generic
Found initrd image: /boot/initrd.img-4.13.0-32-generic
Found linux image: /boot/vmlinuz-4.13.0-17-generic
Found initrd image: /boot/initrd.img-4.13.0-17-generic
Found linux image: /boot/vmlinuz-4.13.0-16-generic
Found initrd image: /boot/initrd.img-4.13.0-16-generic
Found memtest86+ image: /boot/memtest86+.elf
Found memtest86+ image: /boot/memtest86+.bin
done
Removing linux-image-4.13.0-16-generic (4.13.0-16.19) ...
Examining /etc/kernel/postrm.d .
run-parts: executing /etc/kernel/postrm.d/initramfs-tools 4.13.0-16-generic /boot/vmlinuz-4.13.0-16-generic
update-initramfs: Deleting /boot/initrd.img-4.13.0-16-generic
run-parts: executing /etc/kernel/postrm.d/zz-update-grub 4.13.0-16-generic /boot/vmlinuz-4.13.0-16-generic
Generating grub configuration file ...
Warning: Setting GRUB_TIMEOUT to a non-zero value when GRUB_HIDDEN_TIMEOUT is set is no longer supported.
Found linux image: /boot/vmlinuz-4.16.7-041607-generic
Found initrd image: /boot/initrd.img-4.16.7-041607-generic
Found linux image: /boot/vmlinuz-4.13.0-39-generic
Found initrd image: /boot/initrd.img-4.13.0-39-generic
Found linux image: /boot/vmlinuz-4.13.0-38-generic
Found initrd image: /boot/initrd.img-4.13.0-38-generic
Found linux image: /boot/vmlinuz-4.13.0-37-generic
Found initrd image: /boot/initrd.img-4.13.0-37-generic
Found linux image: /boot/vmlinuz-4.13.0-36-generic
Found initrd image: /boot/initrd.img-4.13.0-36-generic
Found linux image: /boot/vmlinuz-4.13.0-32-generic
Found initrd image: /boot/initrd.img-4.13.0-32-generic
Found linux image: /boot/vmlinuz-4.13.0-17-generic
Found initrd image: /boot/initrd.img-4.13.0-17-generic
Found memtest86+ image: /boot/memtest86+.elf
Found memtest86+ image: /boot/memtest86+.bin
done
(Reading database ... 430635 files and directories currently installed.)
Purging configuration files for linux-image-extra-4.13.0-16-generic (4.13.0-16.19) ...
Purging configuration files for linux-image-4.13.0-16-generic (4.13.0-16.19) ...
Examining /etc/kernel/postrm.d .
run-parts: executing /etc/kernel/postrm.d/initramfs-tools 4.13.0-16-generic /boot/vmlinuz-4.13.0-16-generic
run-parts: executing /etc/kernel/postrm.d/zz-update-grub 4.13.0-16-generic /boot/vmlinuz-4.13.0-16-generic
Reading package lists... Done
Building dependency tree
Reading state information... Done
.
.
.
.
Reading package lists... Done
Building dependency tree
Reading state information... Done
The following packages will be REMOVED:
 linux-headers-4.13.0-37* linux-headers-4.13.0-37-generic* linux-image-4.13.0-37-generic* linux-image-extra-4.13.0-37-generic*
0 upgraded, 0 newly installed, 4 to remove and 71 not upgraded.
After this operation, 321 MB disk space will be freed.
(Reading database ... 325772 files and directories currently installed.)
Removing linux-headers-4.13.0-37-generic (4.13.0-37.42) ...
Removing linux-headers-4.13.0-37 (4.13.0-37.42) ...
Removing linux-image-extra-4.13.0-37-generic (4.13.0-37.42) ...
run-parts: executing /etc/kernel/postinst.d/apt-auto-removal 4.13.0-37-generic /boot/vmlinuz-4.13.0-37-generic
run-parts: executing /etc/kernel/postinst.d/initramfs-tools 4.13.0-37-generic /boot/vmlinuz-4.13.0-37-generic
update-initramfs: Generating /boot/initrd.img-4.13.0-37-generic
run-parts: executing /etc/kernel/postinst.d/unattended-upgrades 4.13.0-37-generic /boot/vmlinuz-4.13.0-37-generic
run-parts: executing /etc/kernel/postinst.d/update-notifier 4.13.0-37-generic /boot/vmlinuz-4.13.0-37-generic
run-parts: executing /etc/kernel/postinst.d/zz-update-grub 4.13.0-37-generic /boot/vmlinuz-4.13.0-37-generic
Generating grub configuration file ...
Warning: Setting GRUB_TIMEOUT to a non-zero value when GRUB_HIDDEN_TIMEOUT is set is no longer supported.
Found linux image: /boot/vmlinuz-4.16.7-041607-generic
Found initrd image: /boot/initrd.img-4.16.7-041607-generic
Found linux image: /boot/vmlinuz-4.13.0-39-generic
Found initrd image: /boot/initrd.img-4.13.0-39-generic
Found linux image: /boot/vmlinuz-4.13.0-38-generic
Found initrd image: /boot/initrd.img-4.13.0-38-generic
Found linux image: /boot/vmlinuz-4.13.0-37-generic
Found initrd image: /boot/initrd.img-4.13.0-37-generic
Found memtest86+ image: /boot/memtest86+.elf
Found memtest86+ image: /boot/memtest86+.bin
done
Removing linux-image-4.13.0-37-generic (4.13.0-37.42) ...
Examining /etc/kernel/postrm.d .
run-parts: executing /etc/kernel/postrm.d/initramfs-tools 4.13.0-37-generic /boot/vmlinuz-4.13.0-37-generic
update-initramfs: Deleting /boot/initrd.img-4.13.0-37-generic
run-parts: executing /etc/kernel/postrm.d/zz-update-grub 4.13.0-37-generic /boot/vmlinuz-4.13.0-37-generic
Generating grub configuration file ...
Warning: Setting GRUB_TIMEOUT to a non-zero value when GRUB_HIDDEN_TIMEOUT is set is no longer supported.
Found linux image: /boot/vmlinuz-4.16.7-041607-generic
Found initrd image: /boot/initrd.img-4.16.7-041607-generic
Found linux image: /boot/vmlinuz-4.13.0-39-generic
Found initrd image: /boot/initrd.img-4.13.0-39-generic
Found linux image: /boot/vmlinuz-4.13.0-38-generic
Found initrd image: /boot/initrd.img-4.13.0-38-generic
Found memtest86+ image: /boot/memtest86+.elf
Found memtest86+ image: /boot/memtest86+.bin
done
(Reading database ... 290810 files and directories currently installed.)
Purging configuration files for linux-image-extra-4.13.0-37-generic (4.13.0-37.42) ...
Purging configuration files for linux-image-4.13.0-37-generic (4.13.0-37.42) ...
Examining /etc/kernel/postrm.d .
run-parts: executing /etc/kernel/postrm.d/initramfs-tools 4.13.0-37-generic /boot/vmlinuz-4.13.0-37-generic
run-parts: executing /etc/kernel/postrm.d/zz-update-grub 4.13.0-37-generic /boot/vmlinuz-4.13.0-37-generic

Thanks for using this script!!!

使用以下命令重新检查已安装内核的列表。它将只保留三个旧的内核。

$ dpkg --list | grep linux-image
ii linux-image-4.13.0-38-generic 4.13.0-38.43 amd64 Linux kernel image for version 4.13.0 on 64 bit x86 SMP
ii linux-image-4.13.0-39-generic 4.13.0-39.44 amd64 Linux kernel image for version 4.13.0 on 64 bit x86 SMP
ii linux-image-extra-4.13.0-38-generic 4.13.0-38.43 amd64 Linux kernel extra modules for version 4.13.0 on 64 bit x86 SMP
ii linux-image-extra-4.13.0-39-generic 4.13.0-39.44 amd64 Linux kernel extra modules for version 4.13.0 on 64 bit x86 SMP
ii linux-image-generic 4.13.0.39.42 amd64 Generic Linux kernel image
ii linux-image-unsigned-4.16.7-041607-generic 4.16.7-041607.201805021131 amd64 Linux kernel image for version 4.16.7 on 64 bit x86 SMP

下次你可以调用 do-kernel-upgrade 实用程序来安装新的内核。如果有任何新内核可用,那么它将安装。如果没有,它将报告当前没有可用的内核更新。

$ do-kernel-upgrade
Kernel up to date. Finishing

再次运行 do-kernel-purge 命令以确认。如果发现超过三个内核,那么它将移除。如果不是,它将报告没有删除消息。

$ do-kernel-purge

Ubuntu Kernel Purge - by Caio Oliveira

This script will only keep three versions: the first and the last two, others will be purge

---Current version:
Linux Kernel 4.16.7-041607 Generic (linux-image-4.16.7-041607-generic)
Nothing to remove!

Thanks for using this script!!!

via: https://www.2daygeek.com/uktools-easy-way-to-install-latest-stable-linux-kernel-on-ubuntu-mint-and-derivatives/

作者:Prakash Subramanian 选题:lujun9972 译者:MjSeven 校对:wxy

本文由 LCTT 原创编译,Linux中国 荣誉推出